Introduction
Why HubSpot does not allow PII?
HubSpot's terms of conditions specify that it does not support storage of sensitive data. This includes files stored in the HubSpot file manager tool. Personally identifiable information (PII) which includes personal documents such as passport, government identifications etc… cannot be stored in HubSpot.
Still, as business professionals, we require collecting such important documents and store them in a cloud storage such as Google Drive or SharePoint. Here's where CloudFiles can help your business. Through the CloudFiles app you can collect this information through HubSpot and send it your backend storage which is compliant with all the laws.
How & Why CloudFiles can help?
CloudFiles is a GDPR-compliant and deeply integrated tool for HubSpot. It provides a feature called file requests which can be used with HubSpot workflows to collect & store sensitive files. These files can be then sent to folders in SharePoint, Google Drive, OneDrive, Box, Dropbox or even AWS S3 to be stored in a compliant way.
Thus, your business overcome HubSpot file manager limitations to store PII and PHI by using CloudFiles as a layer to collect and transfer the files from HubSpot to an external cloud storage.
How does the end result look like
Using the various CloudFiles workflow actions, we have created a process such that whenever a deal is created, a link would appear on the left side of the deal record. This link can be sent to customers manually or automatically. When the customer opens it, they would be able to upload files that will go into a folder on Google Drive. We would be able to see the uploaded files in Google Drive as well as from the deal record in HubSpot.
In the GIF below, we see this in action. The GIF is divided into 6 parts -
- Create a new deal
- Wait for the link to appear
- Open link in new tab
- Upload files
- See uploaded files in HubSpot
- See uploaded files in Google Drive
It's important to note that the same is possible with SharePoint, OneDrive, Box, Dropbox and AWS S3. Moreover, the same process can run with contacts, companies & tickets as well in HubSpot.
Read on to understand how to install the app and setup the workflow to achieve the same result.
Setup
Install CloudFiles in HubSpot
Before we delve into the tutorial, you need to install CloudFiles into a HubSpot account. You can install the app from the HubSpot marketplace using the steps below. These are also detailed here in the installation guide -
- Access the
- Click on the "connect button" on the top right of the page.
- Log in with your HubSpot Administrator account, and click "connect App" button.
- Once the app is installed, you should see the CloudFiles widget on the right sidebar of your deal, company, ticket and contact records. Check this
Now that you have the app installed, you can connect an automation user for your workflow executions.
Connect Automation User for Storage
In addition to installing CloudFiles in HubSpot, you also need to set an automation user for the workflow to work. This is the integration user that will be used by the workflow actions to pass files into the cloud storage.
To connect an automation user, simply head over to app.cloudfiles.io > Settings > Integrations > Google Drive and login through your google account. What is an 'Automation User' and how does it work? this article explains everything you need to know about the automation user, including what it is, why it's useful, and how it operates.
Design of the workflow
To summarize the process, we will create a deal workflow using HubSpot. This workflow will contain various CloudFiles related actions. It will first create a dataroom and add a file request block to it. It will then configure the file request block to store the documents in a specific folder in Google Drive. Finally it will create a sharing link for the dataroom and paste it in one of the deal properties.
The workflow consists of the following 6 elements -
- Trigger- Standard contact creation trigger that would fire this workflow when a new contact is created
- Create Dataroom- CloudFiles' Dataroom feature will be used to request files
- Create attachment- Associates the newly created dataroom to HubSpot record so we can see file uploads from the record itself
- Add to Dataroom- A file request block will be added to dataroom with the destination set as a Google Drive folder
- Share Attachment- Create a sharing link of the dataroom that can be sent to customers to upload files
- Copy Sharing Link- Copy the link in a property to be used manually and automatically
Here's how our final workflow looks like. We detail these elements in the sections below.
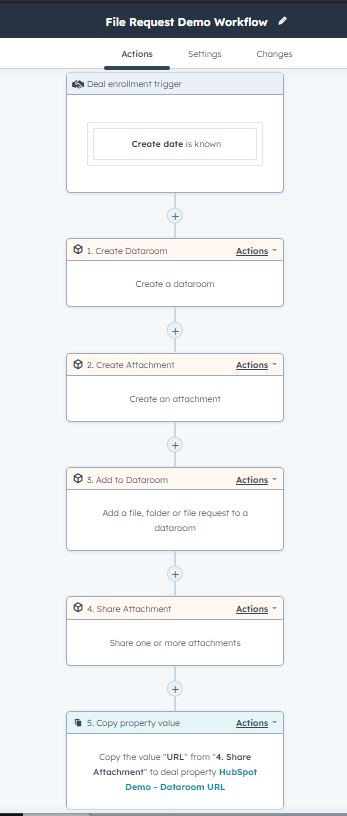
Trigger
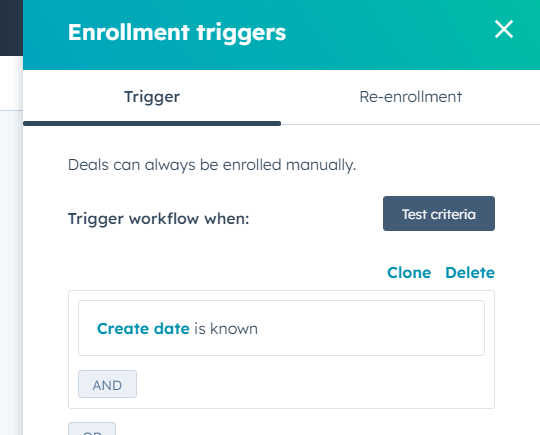
We would like to have a sharing link ready on our HubSpot property whenever a new deal is created. For this reason, we choose a simple Deal Create Date is Known trigger. The trigger is shown below.
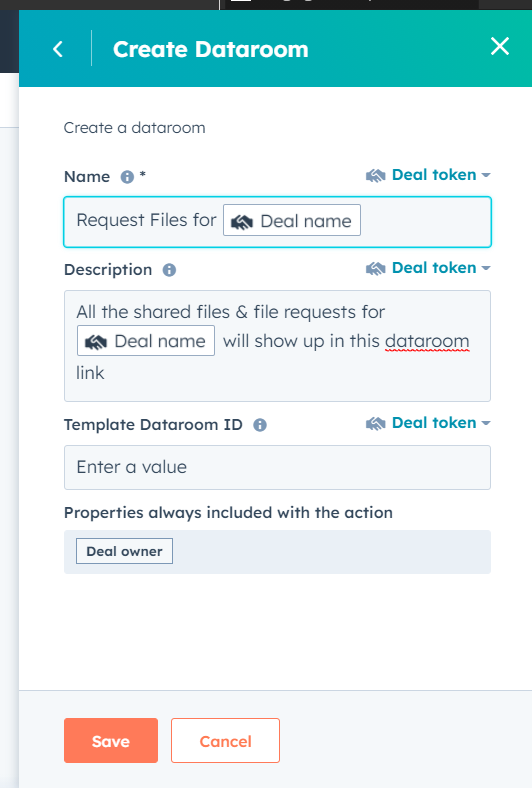
Action - Create Dataroom
CloudFiles datarooms are very much like file portals. They can be used to share multiple files and folders. They can also be used to request files from customers. We will discuss this file request feature later. In this section we detail the "Create Dataroom" workflow action which can auto-create datarooms.
The Create Dataroom action has 3 parameters that have been detailed in Create Dataroom Action article. Here is a summary -
- Name - Dataroom name that can be created using personalization tokens. This name appears on top of the dataroom.
- Description - Any description that can also be created using personalization tokens.
- Template ID (optional) -This is used if you want to clone an existing dataroom. This is left blank for this tutorial.
Here's how our final workflow action looks.
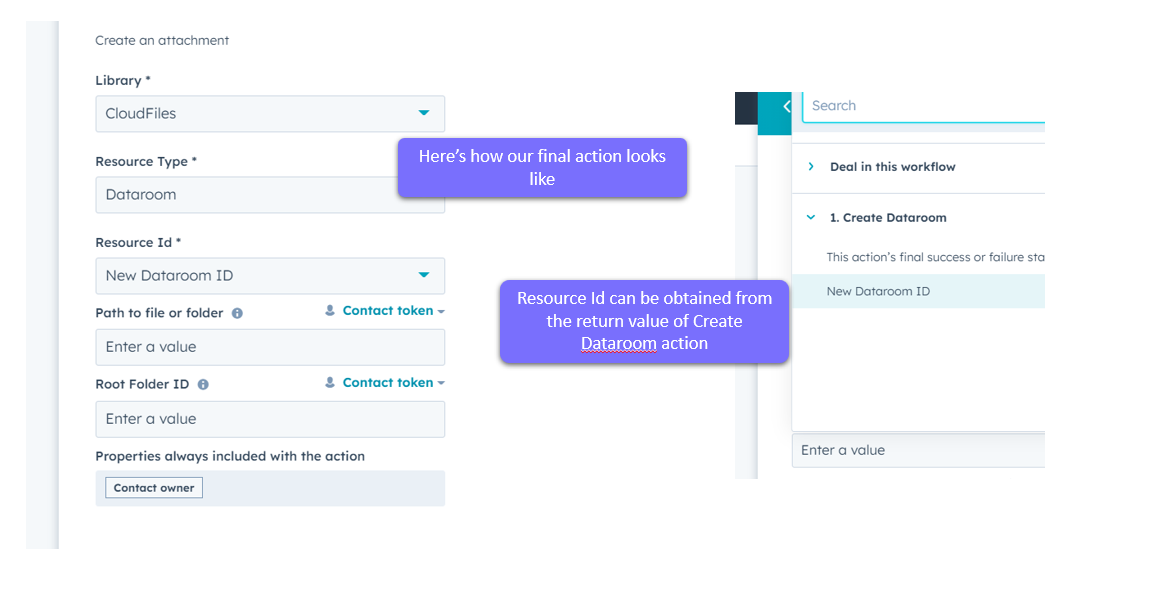
Action - Create Attachment
In order to access the uploaded files from the contact record itself, it is important to associate this dataroom to the contact. This way we can see it in the contact sidebar. CloudFiles provides an easy to use "Create Attachment" action that can create this association automatically with the previously created dataroom.
The "Create Attachment" action will need the following properties -
- Library - Since we are attaching a dataroom, set this to "CloudFiles"
- Resource Type - In this dropdown, select Dataroom option
- Resource ID- This can be selected using the dropdown. The New Dataroom ID is returned by our previous action where we created the dataroom. See the screenshot below.
- Other Properties - Since we are attaching a dataroom, other properties are not important and must be left blank.
You can learn more about this action in this help article. Here's how our final action looks like.
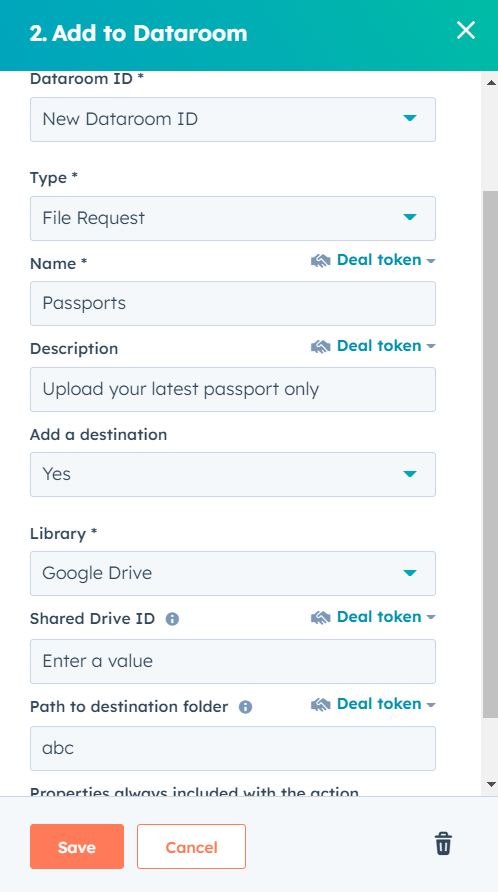
Action - Add to Dataroom
The Add to Dataroom action is where we add a file request block to our newly created dataroom and set the destination parameters such that the uploaded files go into a Google Drive Folder. There are a bunch of parameters available in this action. You can see all the details about this action in this help article.
For our use-case, we will use the following parameters of the actions -
- Dataroom ID - We want to add a file request block to the dataroom that we created above. So we will simply choose New Dataroom ID from the return values of Create Dataroom Action. This is exactly the same as getting the Resource Id in the last section.
- Type- We want to add a file request block, so we choose 'File Request' here.
- Name- This is the name you wish to give your file request block. Usually it's a good practice to use personalization tokens or names of specific documents that the customer needs to upload here.
- Description- This is an additional level of detail that you can give to your file request block. E.g. the specifications or count of files that need to be uploaded here.
- Add a destination- Since we want to store the file in Google Drive, we will select Yes here. Additional parameters will show up below.
- Library- Choose Google Drive here. This is the only change that needs to be made if SharePoint, OneDrive or some other cloud storage needs to be used.
- Shared Drive ID- Choose Google Drive here. This is the only change that needs to be made if SharePoint, OneDrive or some other cloud storage needs to be used.
- Path to destination folder- This specifies the final folder where the file must go to. You can enter a '/' separated path here. Check this article to see how to copy this easily from the CloudFiles interface.
Here's how our final action looks -
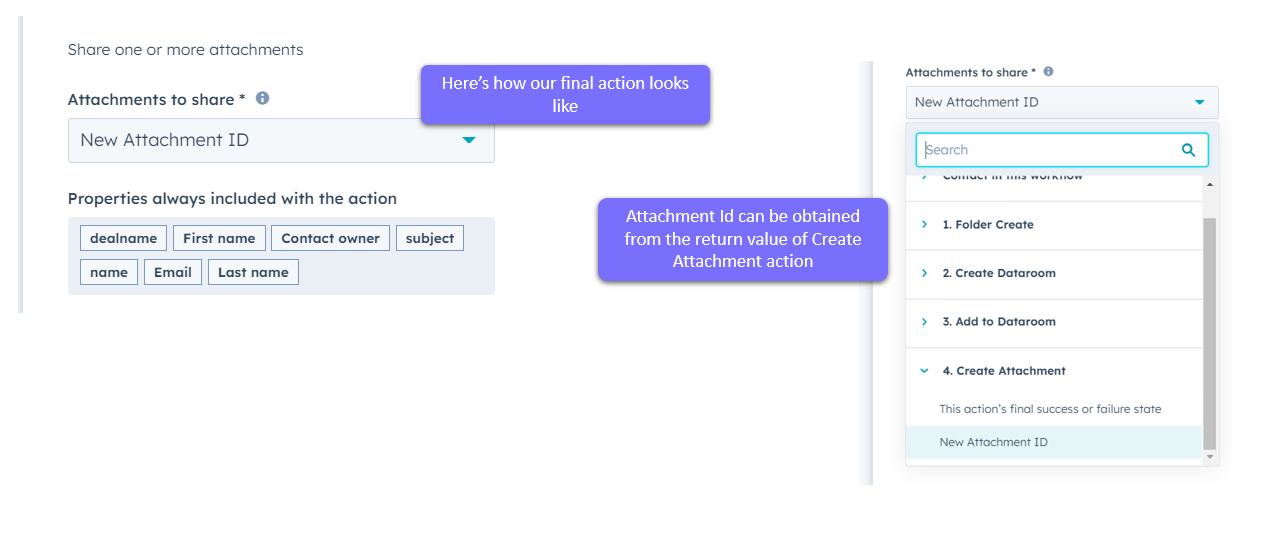
Action - Share Attachment
In order to share with customer, we need to create a personalized sharing link of the dataroom. Since we have already created a record attachment for the dataroom in one of the earlier steps, we will simply use the share attachment action to create a sharing link. We will later copy this link into a deal property.
This action only needs one parameter which is the ID of the attachment to share. We can grab this ID from our previous Create Attachment action. This is shown in the graphic below. You can check this help article to learn more about the Share Attachment action.
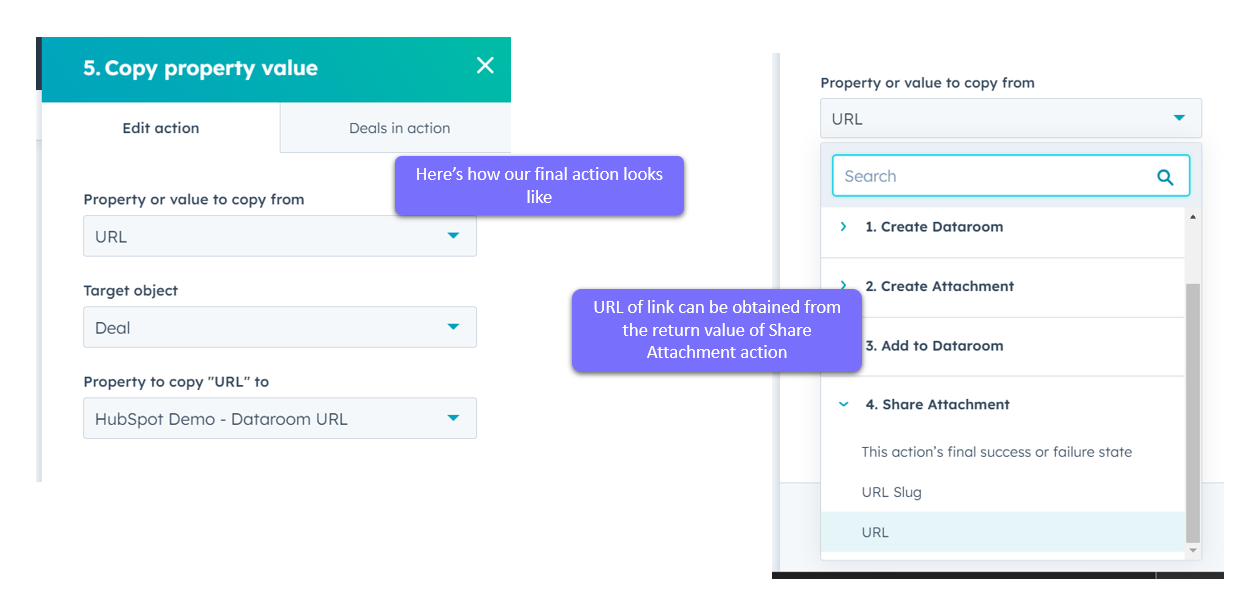
Action - Copy link to property
Finally we will use the Copy Property Value Action provided by HubSpot to copy the sharing link into one of the properties. For this tutorial, we created a contact property called 'HubSpot Demo - Dataroom URL' that we are using to copy the files into.
The sharing link can be grabbed from the return values of the Share Attachment that we used above. This is shown in the graphic below.
More Use-cases
CloudFiles provides a few other workflow actions as well which can be used creatively to create even more complex process automations. We have a detailed a few actions below which, in combination with the above tutorial, can enable some complex use-cases. You can also read about all the CloudFiles' workflow actions here.
- Create Folder Action - This action can help create a personalized folder for the contact (or any record) in an external drive. You can use this multiple times to create folder hierarchies & set one of the folders as the destination of upload. Thus your uploaded files would always stay segregated.
- Move HubSpot Files- This action can move the files uploaded through HubSpot Forms to an external storage. Thus, if you are already using a HubSpot form to request files, you can now move them to external folders. Moreover, when requesting more files, you can send the dataroom link instead so that the customer does not have to fill the whole form again.
- Create Attachment Action - In the tutorial above, we only created a dataroom attachment on the record. We can also attach the upload folder directly so that with a single click, the HubSpot user can go to the upload folder from the contact.
- Add to Dataroom Action - Along with file request blocks, you can also add files & folders into the dataroom using the automation. This enables you to not only show the customer all the files they have uploaded till date, you can also share other stuff with them to view when they are uploading those files.
- Update Link Settings Action - We created only a basic CloudFiles link above. You can add a lot of security and analytics settings on it automatically using the Update Link Settings Action. E.g. you can add email authentication such that only this contact's email is allowed to view the dataroom.
Error Debugging
In case you see some issues with the final execution, you can investigate the workflow execution error logs. You can also send us these logs and we can inform you of the issue or resolution quickly. Ping a screenshot of error logs as covered below on chat (bottom right) or on support@cloudfiles.io
To get the execution error logs in HubSpot workflows, go to the workflow edit screen. On top right click on Enroll > View Enrollments. A sidebar opens up on the right with all your record executions. Hover over the problematic one and click on Enrollment details. In the details you will see success / error against each of the action execution for this workflow run. You can expand and check the error logs here.
The most common issues include -
- Not connecting an automation user. See the setup step above.
- Mentioning incorrect drive / path in Add to Dataroom action. Take these parameters carefully from the CloudFiles app as mentioned above.
Pricing Info
This particular use-case is possible on all CloudFiles plans and works with any HubSpot licenses provided you have workflow access available. However, there are a few limits you need to be aware of.
The use-case would require 1 dataroom per client and consumes multiple workflow actions, thus the limits on datarooms and workflow actions on each plan become important. Here's relevant pricing & limits info about these -
- Pro Plan - If you are planning to purchase the PRO plan ($19 / user / month) on CloudFiles, this plan offers 10 datarooms / user / month and 100 workflow actions / user / month. You can purchase more PRO licenses or talk to us to relax some of the limits if your requirements are in this ballpark.
- Business Plan - This plan is much more suitable for this use-case at $100 / month for 3 seats. This gives you 150 datarooms / month and 750 workflow actions / month. Again you can talk to us to adjust the limits or get a discount if your requirements are in this ballpark.
- Enterprise Plan - The enterprise plan starts at $150 / month for 3 users and offers custom limits on datarooms and workflow actions. Additionally, you can also white-label the datarooms created to provide a more branded experience. This plan is perfect if you have volume requirements for this use-case and need branding on the shared datarooms.
Note that we offer progressive pricing, so if purchasing more seats, the per user per month costs reduces.
Summary
In this tutorial, we created workflow with actions from CloudFiles to create an automation that lets us request files from our customers through HubSpot deal objects and transfers them to Google Drive. It can be extended to other cloud storages and other HubSpot records as well.
We also saw a few other actions that make even more complex use-cases possible.
CloudFiles is a document automation and sharing platform that integrates very deeply with HubSpot. It is useful for any sales, marketing or service team who have file management and sharing requirements and are considering or already using HubSpot. To learn more about the app, visit their Hubspot integration page.
Need help? Book time with our team of experts.