Overview
In this tutorial, we will see how CloudFiles can be used with Salesforce flow automations to create a KYC upload checker. While this tutorial is similar in functionality to KYC Upload Checker, instead of performing multiple Query Document/Dataset calls, we will perform a single call for multiple actions using the Query Document/Dataset (Batch) action.
Each time a file is uploaded into Salesforce or external storage, the following actions will occur :
- The file will be processed using CloudFiles Document AI.
- Natural Language Queries will execute to classify the file and extract key details.
- Corresponsing fields will be updated in Salesforce.
Since we have multiple queries to run, we will use the Query Document/Dataset (Batch) action in this tutorial. To configure this tutorial using the Query Document/Dataset action instead, refer to the article on KYC Upload Checker.
In order to setup this automation, you first need to have some pre-requisites. After this you can start setting up some query automations and updates to achieve your use-case. Check the sections below for more information. In the image below, we have demonstrated this in action.

Pre-requisites
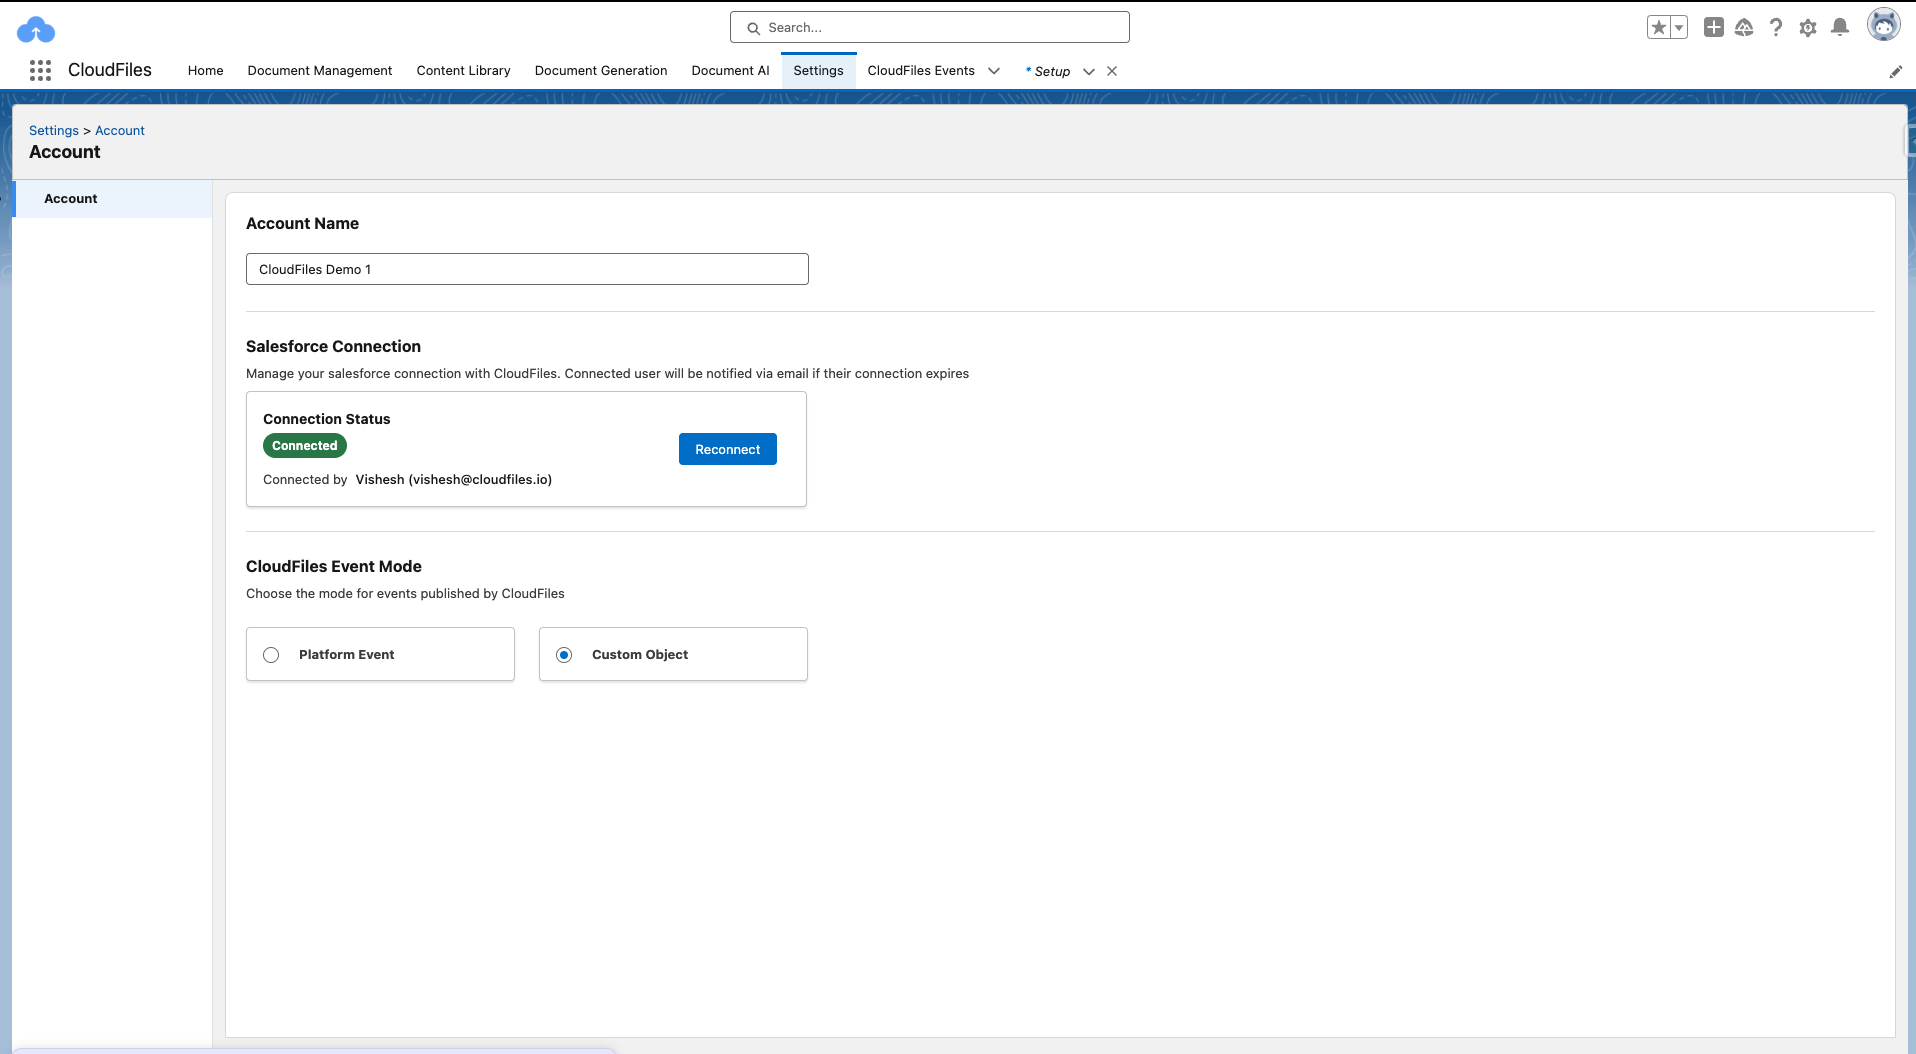
Before starting with this tutorial, you need to ensure that CloudFiles Document AI is properly installed & configured in your system. Additionally, you also need to create some initial automations to process the files before you can query them. Check the 2 sections below carefully -
Installation & Configuration
Ensure the following before starting:
- CloudFiles Document AI Installation and Configuration are complete.
- You have an Active Subscription or Trial of CloudFiles Document AI.
- The CloudFiles Event Mode setting is set to Custom Object
Initial Automation Setup
There are 2 flows you will need to setup to process the uploaded files. The first flow is triggered when the document is uploaded into Salesforce or external storage. This flow sends the file to AI for processing. This might take a few seconds. Once the AI is done with processing, the second flow will trigger which will contain the processed document. You can then run queries on this processed document.
- Flow 1: Send Document For Processing - Triggered when file is uploaded into Salesforce or external storage. Sends the file for processing which may take a few seconds to a minute.
- Flow 2: Document Processing Complete - Triggered when the file has been processed by AI. Performs queries on the file to extract the data.
Once your flow setup is complete, your flows should look like the following-
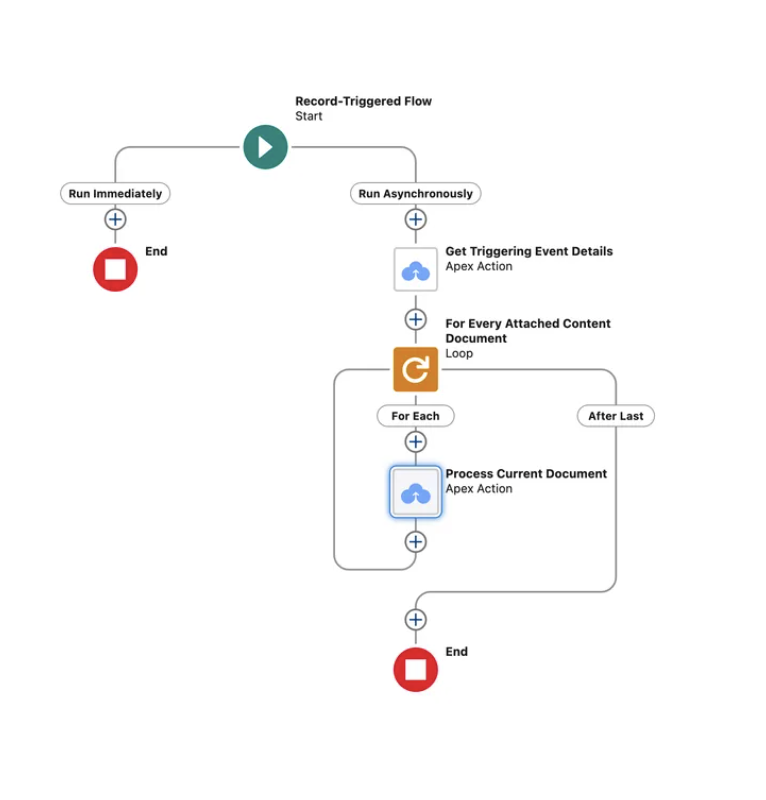
Read the article on AI Flows - Initial Setup Guide carefully to setup both the flows. Once your initial flows are setup as shown above, you are ready to move to the next step.
Query Automation Setup
Now that you have the initial automation setup, we can take the document processed flow and extend it to query the document and update the required fields. In this section, we show how to query the processed document, check the results and perform the necessary updates.
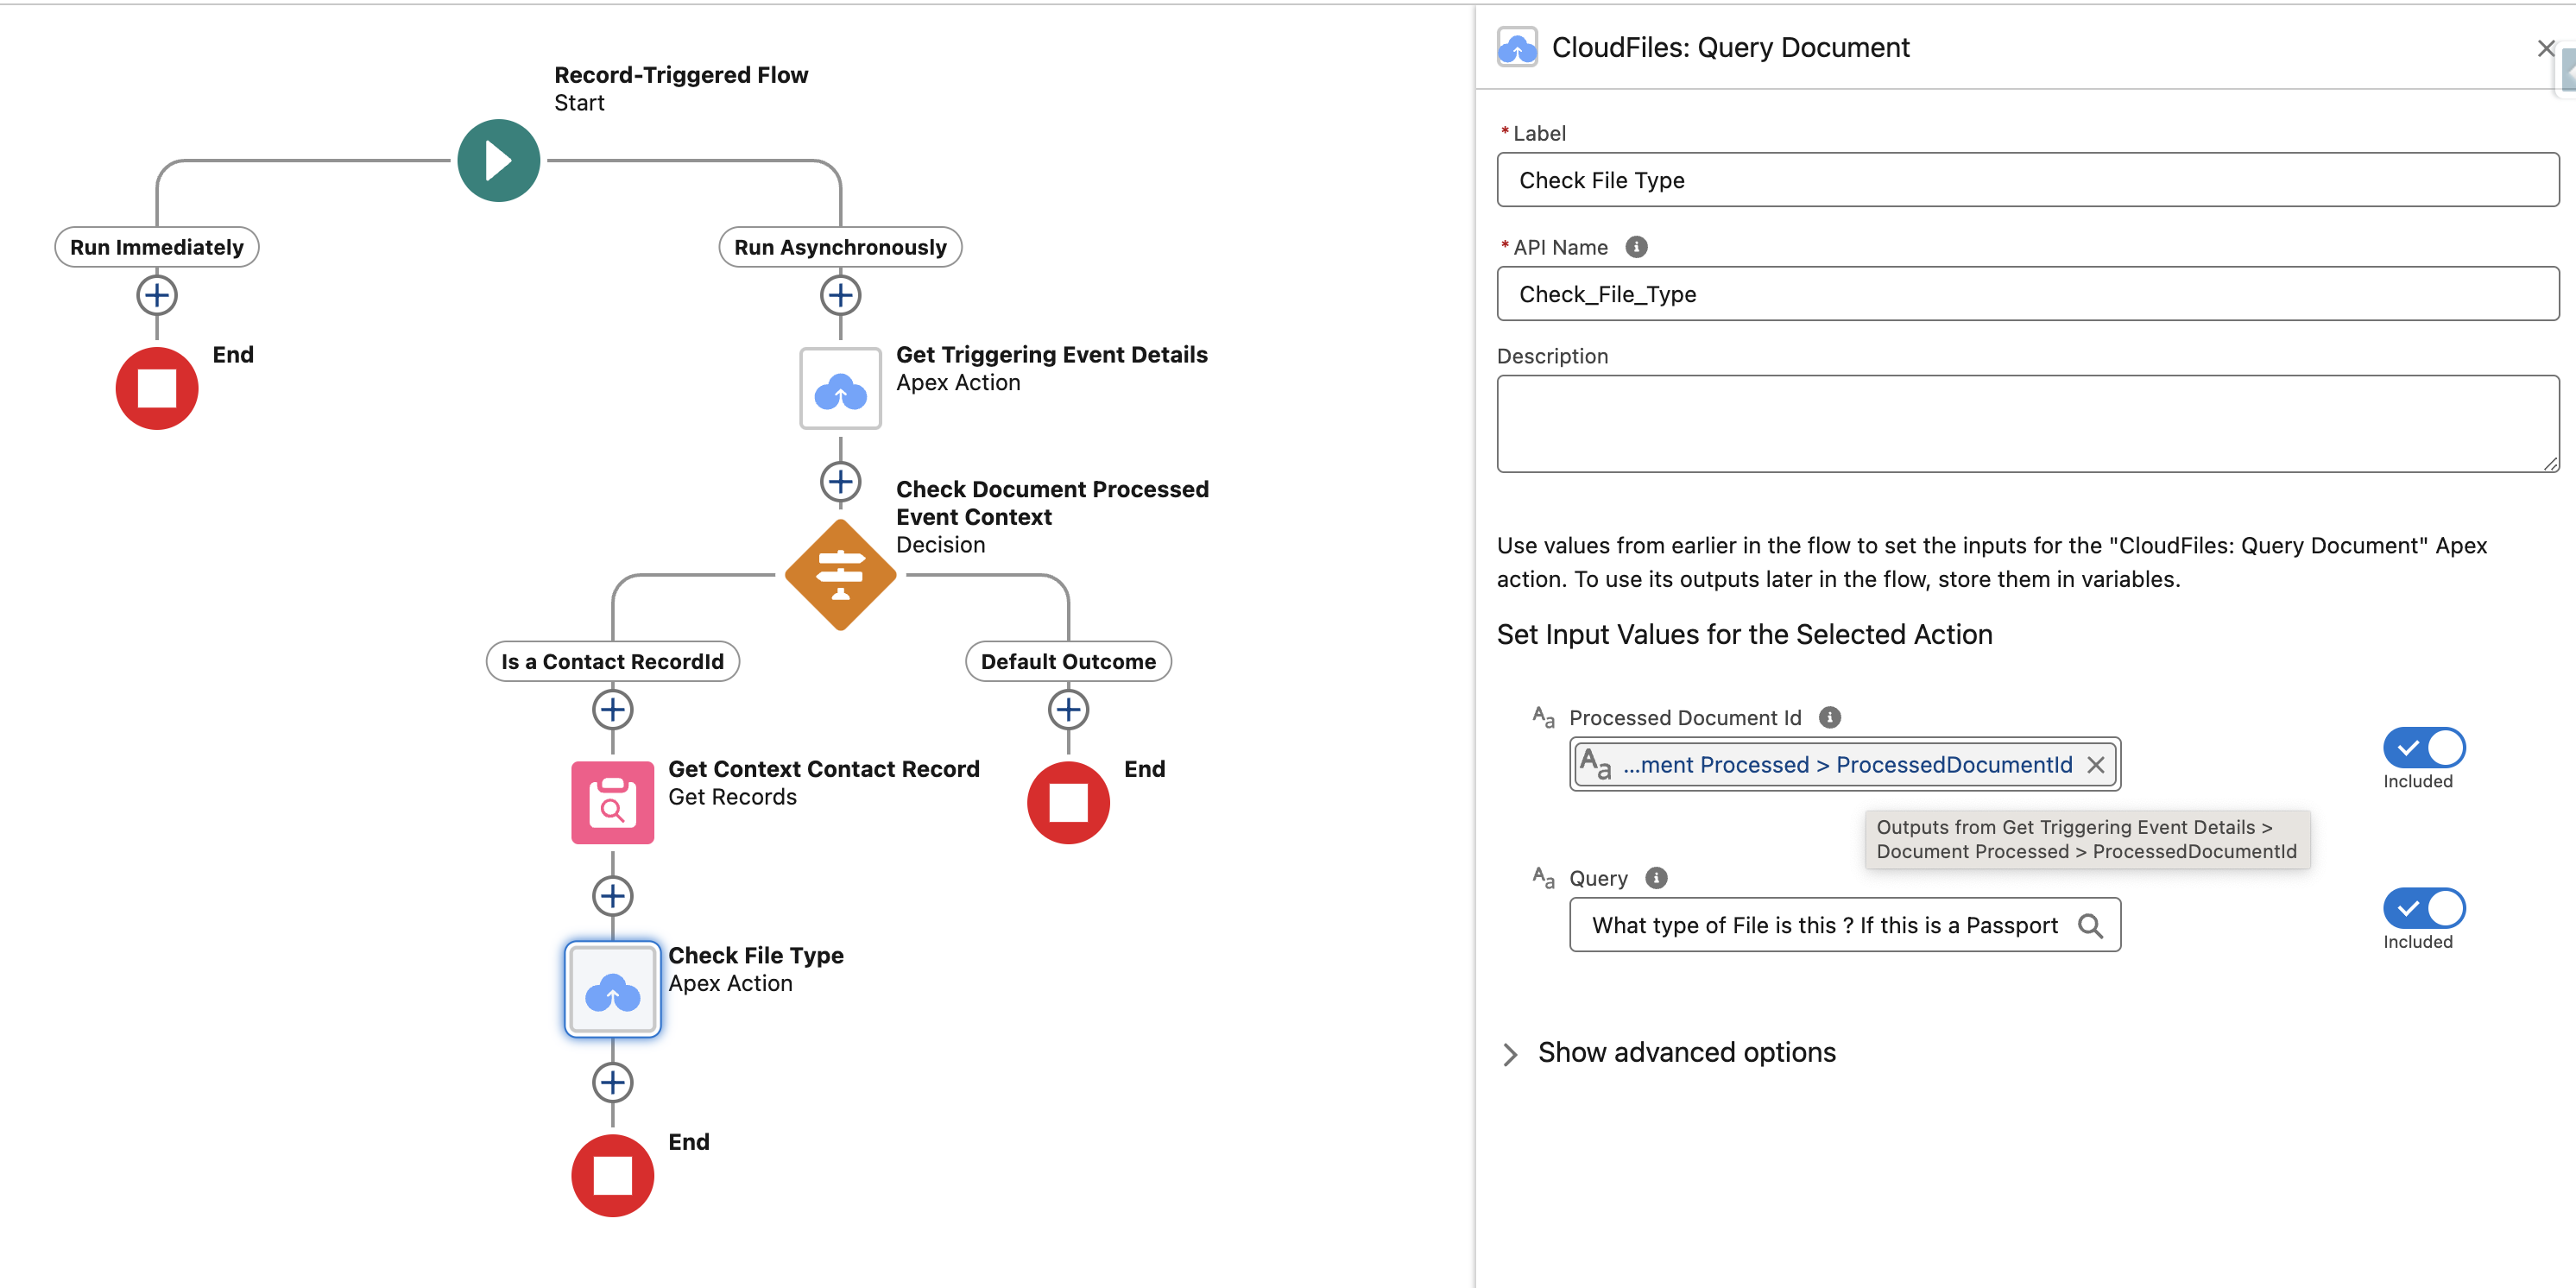
Classifying the document
In order to classify the document, we will simply use the Query Document/Dataset flow action along with a natural language prompt. This action taken in a processed document ID and a text query as input. The processed document ID is available as output of the Get Event Details action. Here are the full inputs used in the image below.
In this section we have used the Query Document action since we had a singular classification query to execute. In the next section, we will use the Query Document (Batch) action to perform multiple data extractions with a single call.
Processed Document Id = Outputs from Get Event Details : Get Processed Event Details > Document Processed > ProcessedDocumentId
Query = Classify the file as either a driving license or a passport. If the file does not match either of these types, classify it as other. Based on the classification, give the output as one of the following - Driving License, Passport, or Other.
Now that our documents are classified, we can use the output of the 'Query Document' action to create 2 branches in our flow. In each of the branches, we will ask document specific questions to extract relevant information. We will use the Query Document/Dataset (Batch) action to perform all queries in a single call.
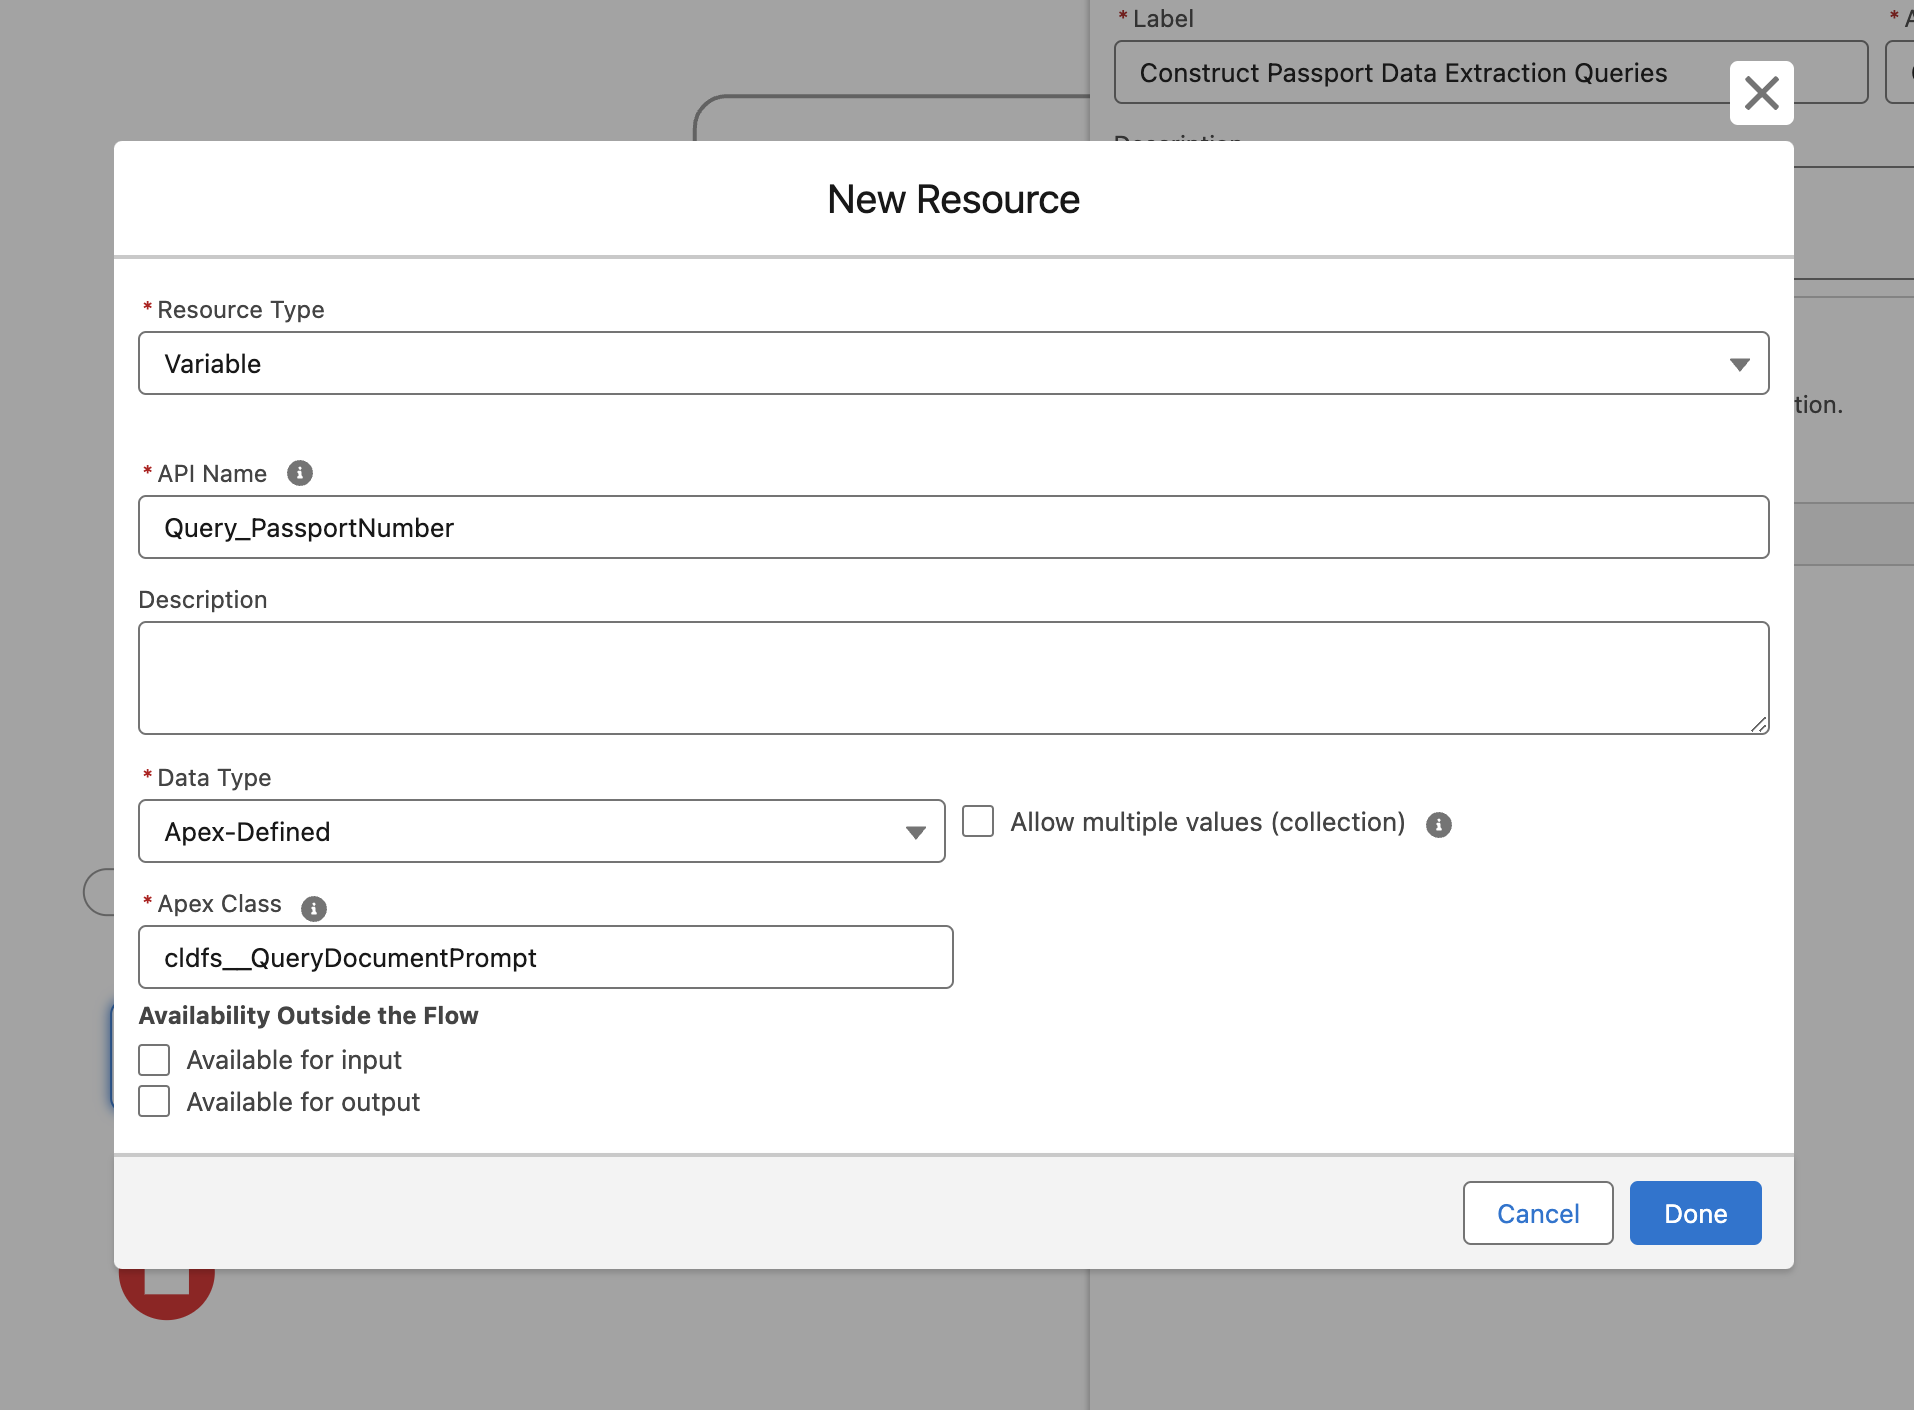
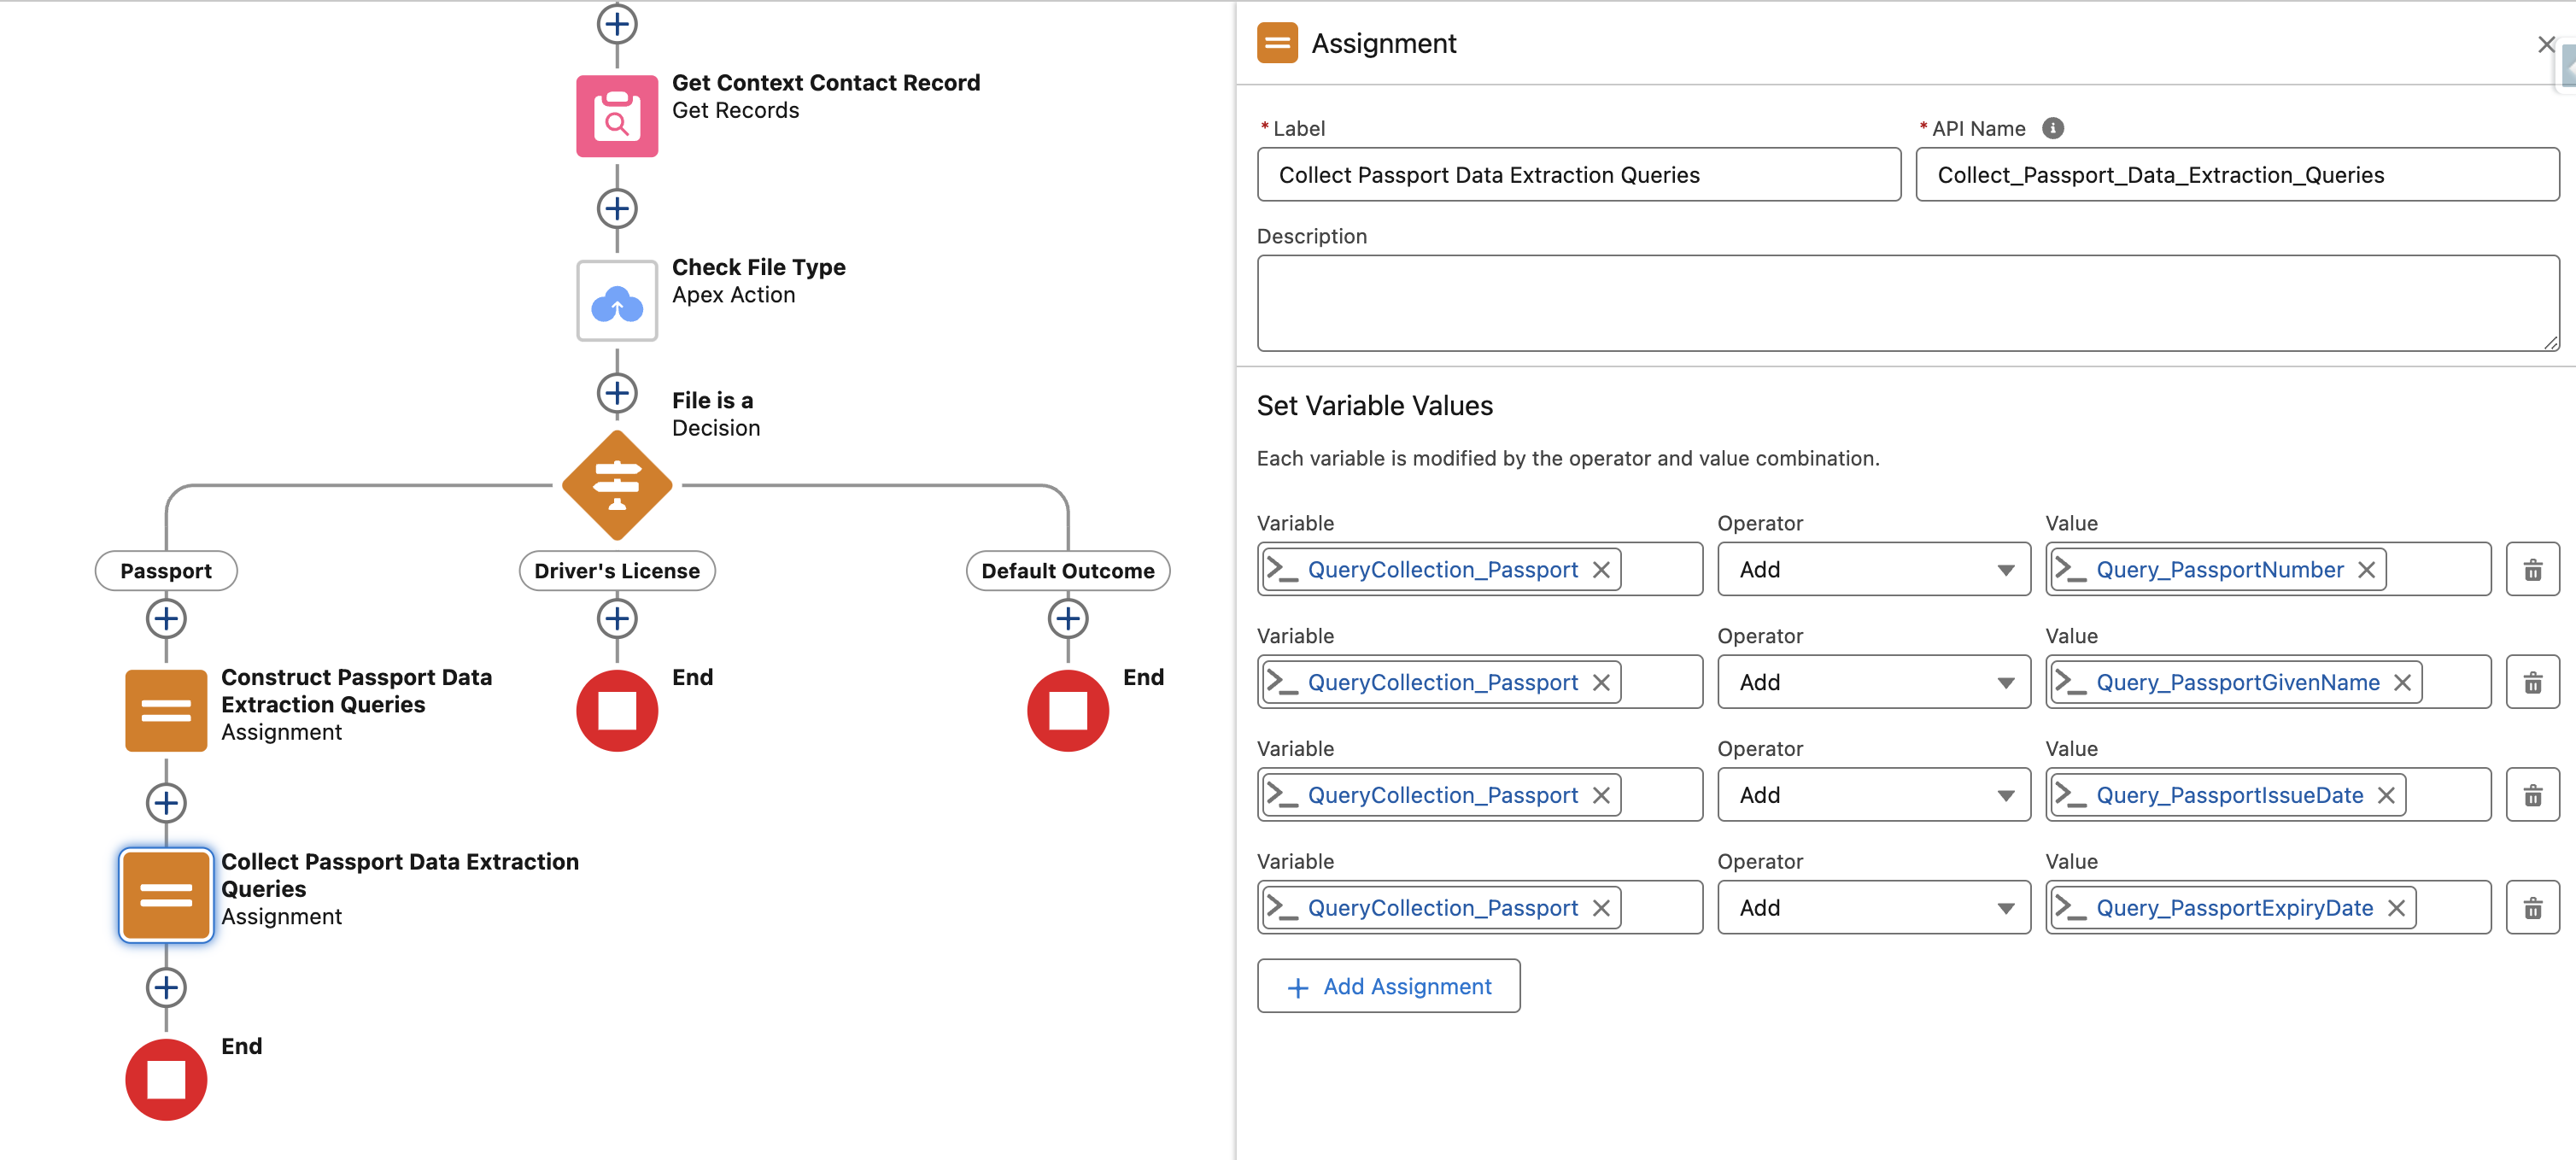
Create Query Variables
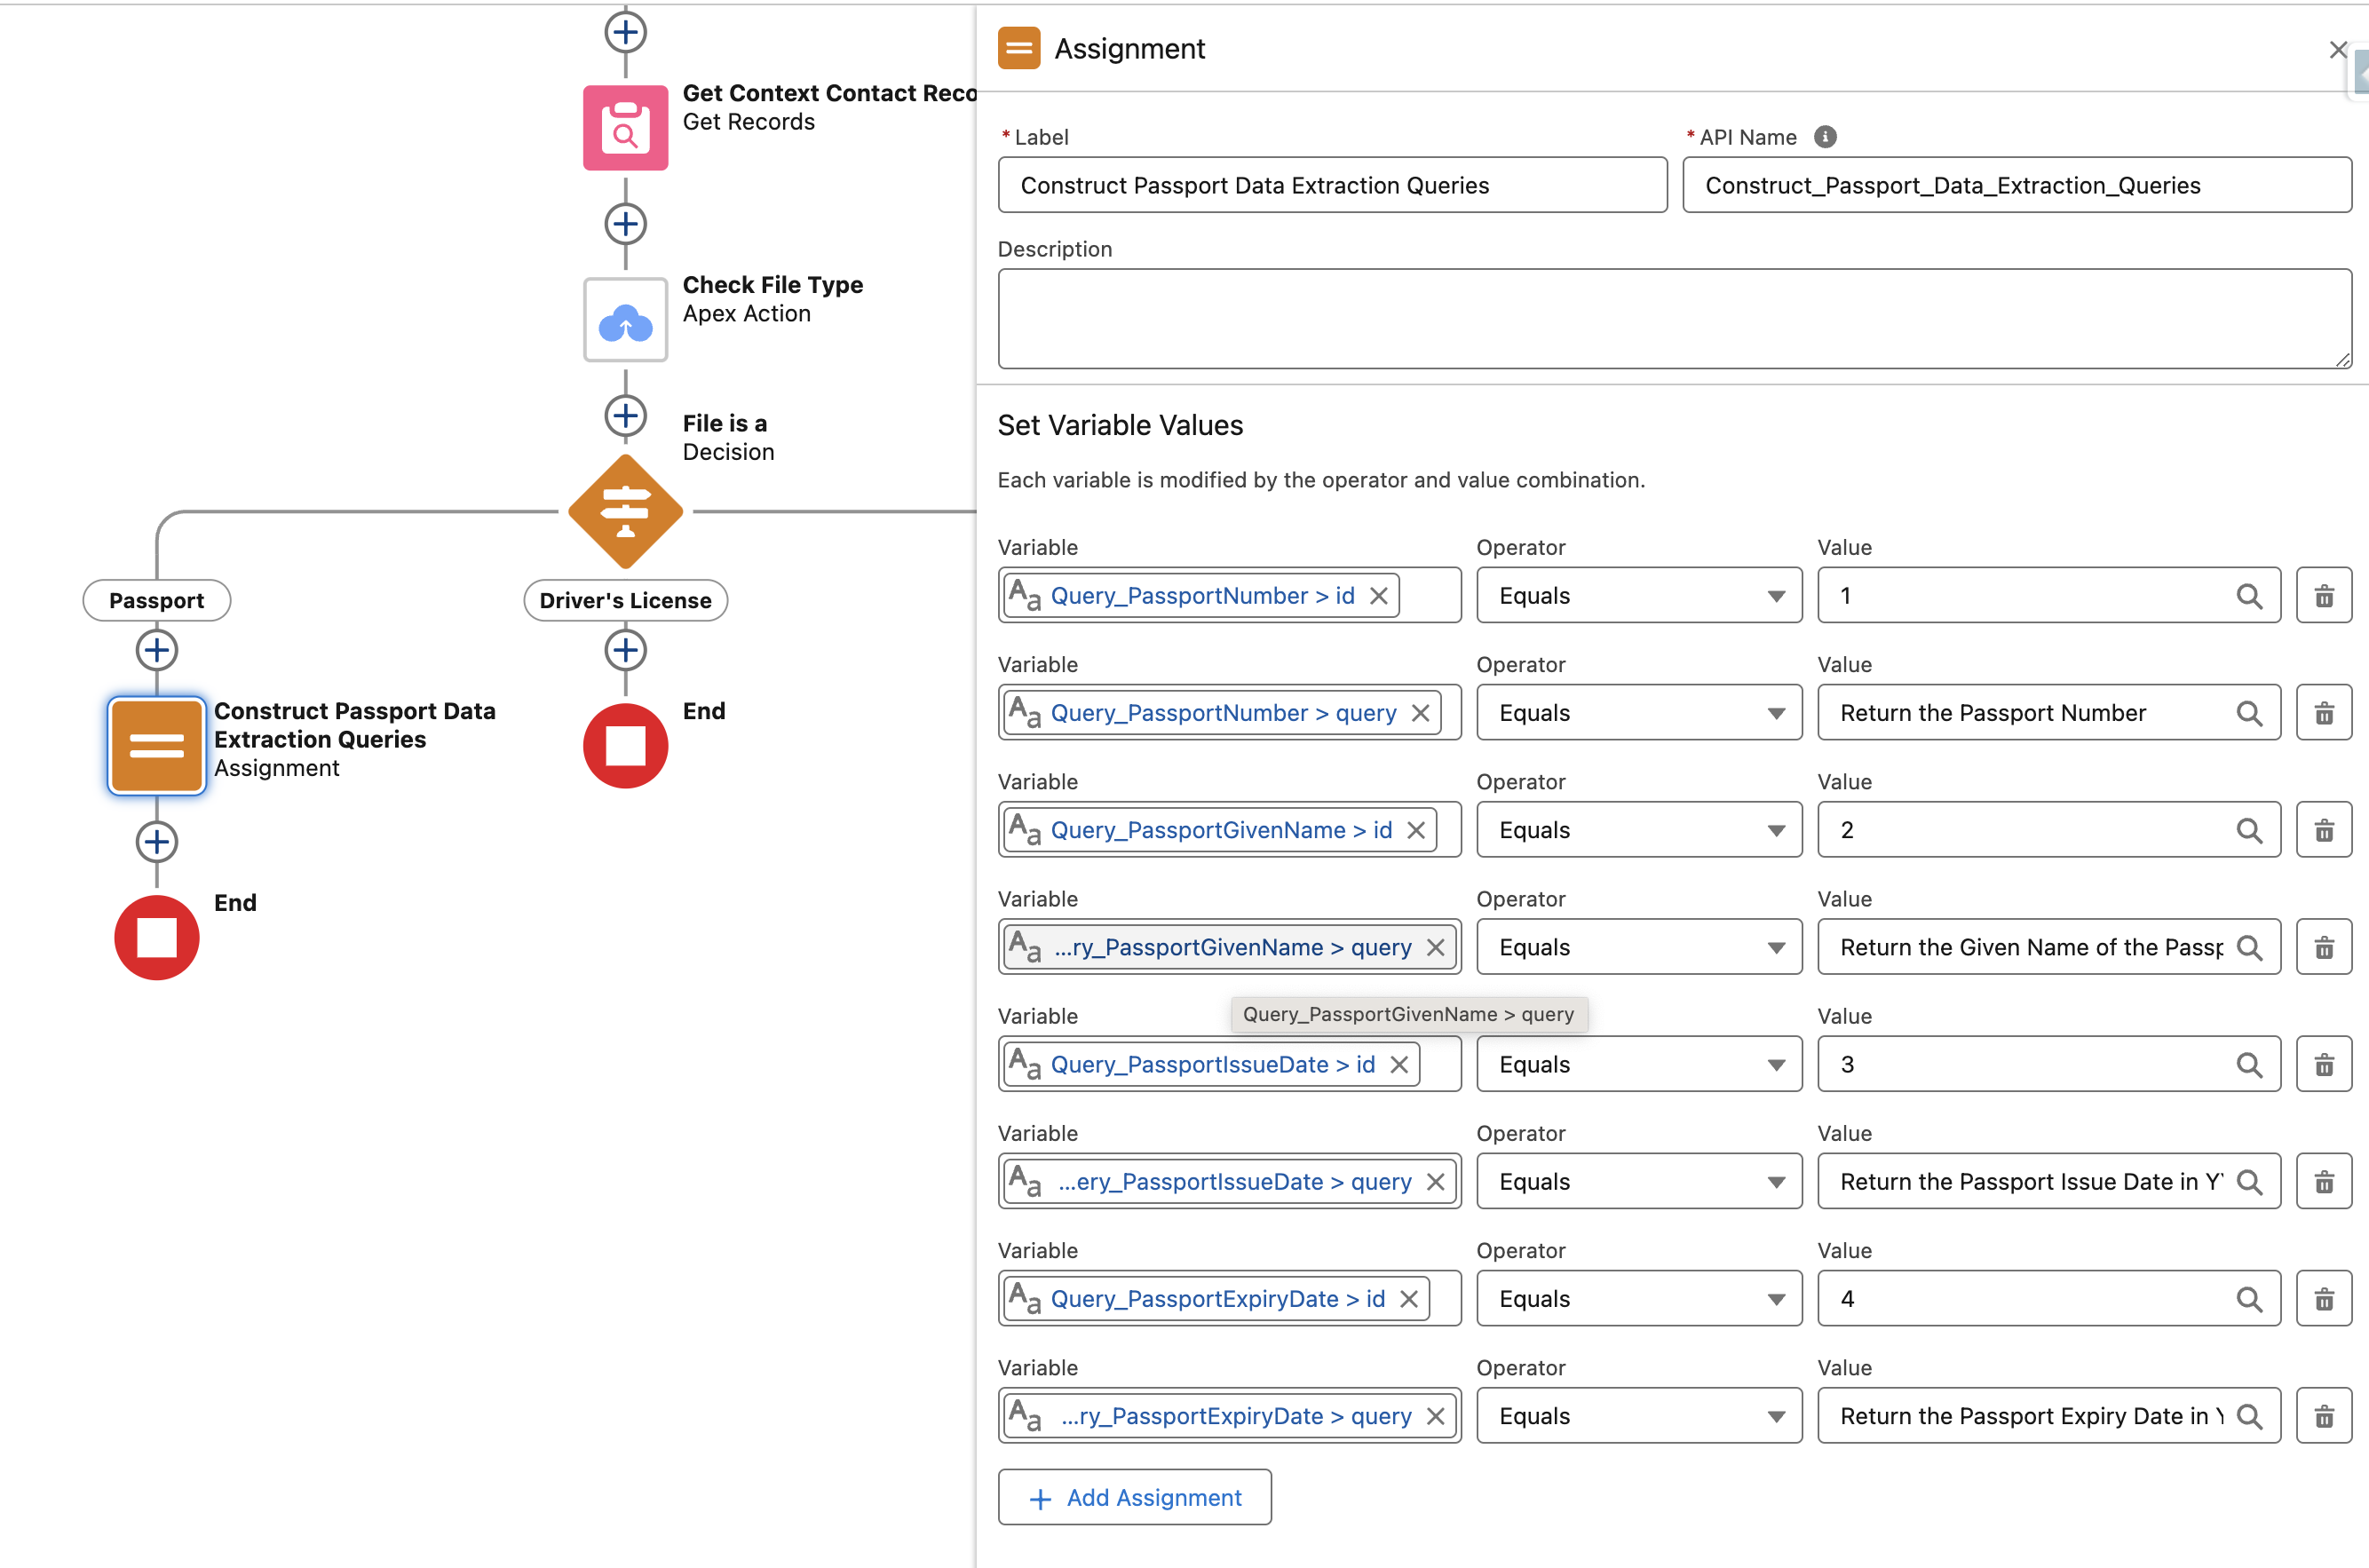
In order to batch queries, first create an apex-defined variable of class cldfs__QueryDocumentPrompt for each of the queries you need to run. This means you will need to create multiple such variables. Here is an example of one such variable.
Now using an assignment flow action, assign the 'id' & 'query' fields to your created variable as shown below. Here id is a text identifier that we will use later while looping over the batched results. Query is the natural language prompt you wish to ask AI.
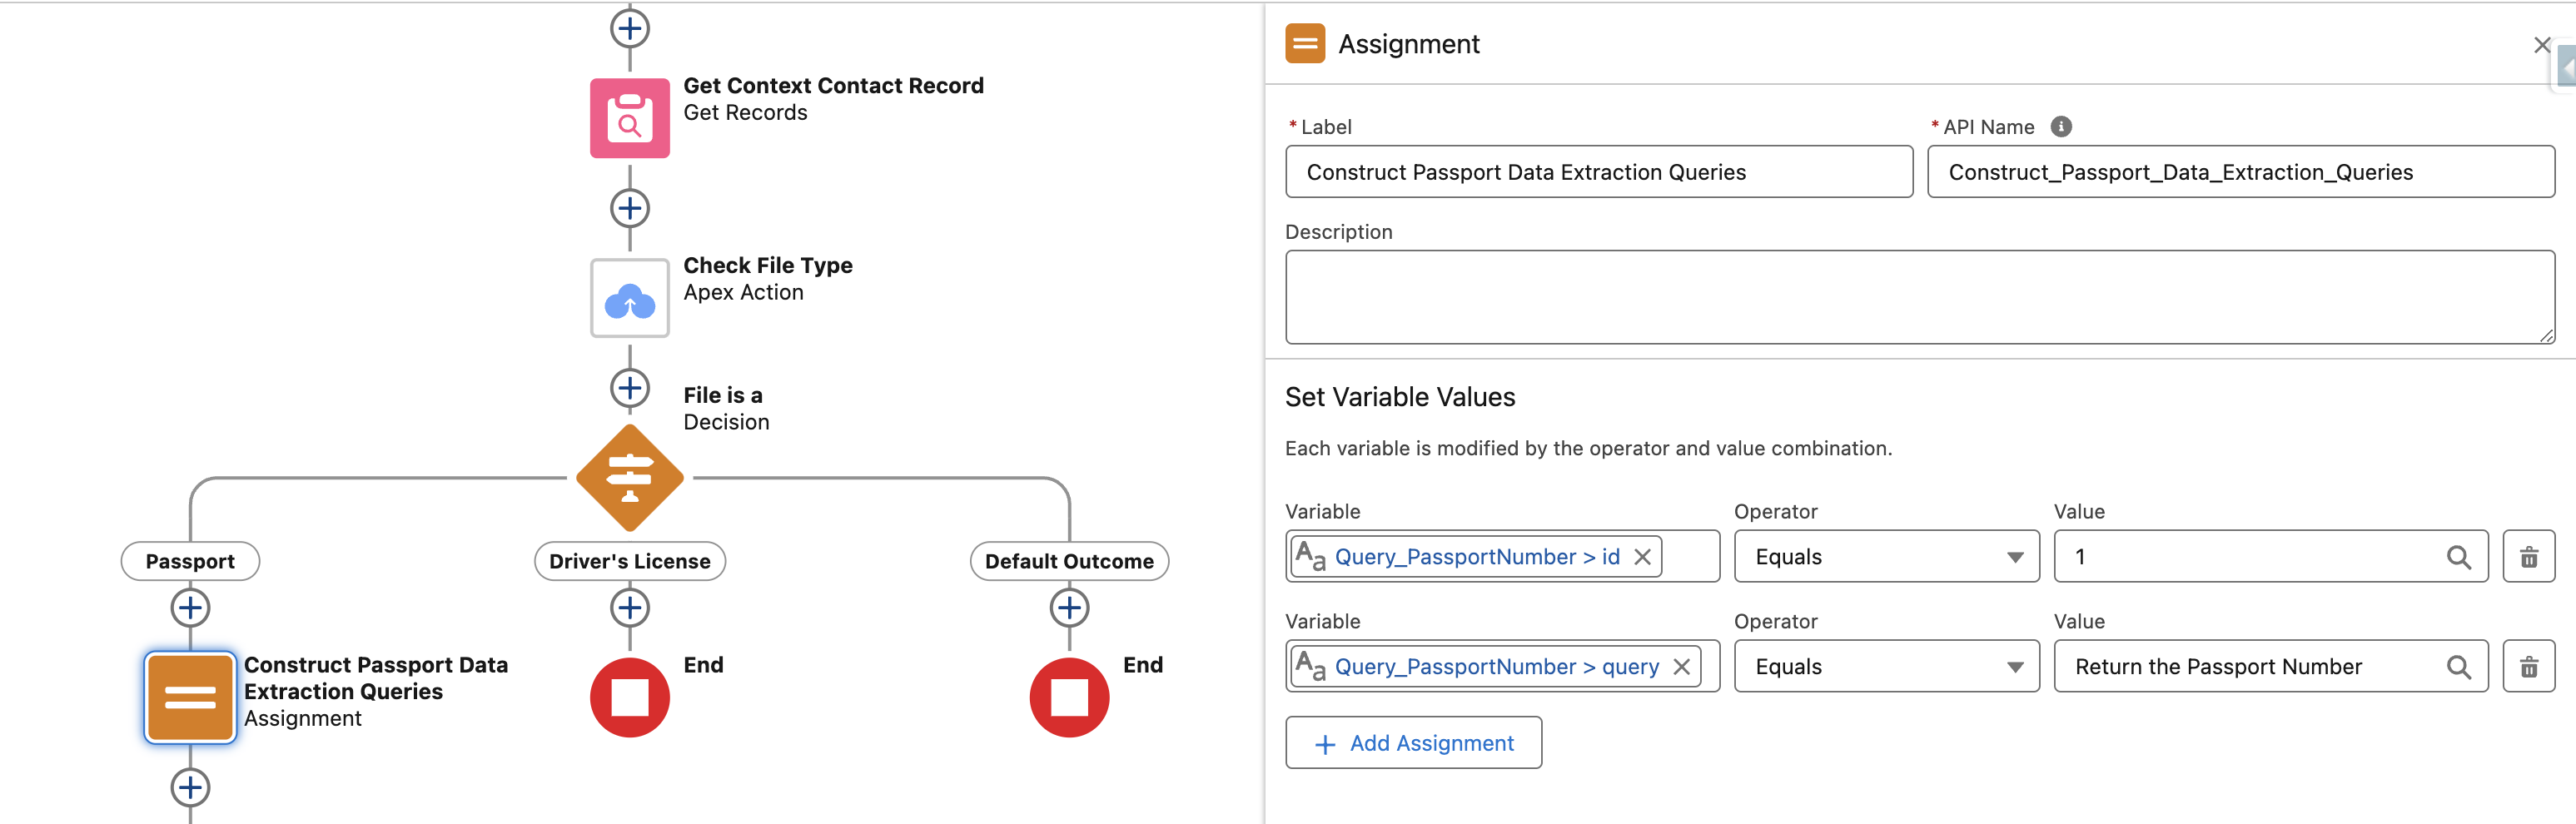
Repeat this for the queries you need to run. As you can see below, we have created and assigned multiple such variables, each with a different id & query. Here are some example queries we used :
- Return the Given Name of the Passport Holder
- Return the Passport Issue Date in YYYY-MM-DD Format
- Return the Passport Number
The effectiveness of the CloudFiles: Query Document action heavily depends on the quality of the query or input prompt.
Tips for crafting effective prompts:
- Be Specific: Avoid vague prompts like "Return Expiry Date of the Passport". Instead, use a more detailed query like: "Return the Expiry Date of the Passport in the format DD/MM/YYYY."
- Define a return format statement as well which should cover all the expected outcomes in order to avoid garbage values and unprecedented results.
- Test and Refine: You can test the quality of your queries and verify if they yield the desired results by using the Playground feature in the CloudFiles app.
Testing Queries in the Playground:
- Navigate to CloudFiles App > Document AI > Playground.
- Upload a sample file.
- Use the interactive Query side-component to experiment with different prompts against the file.
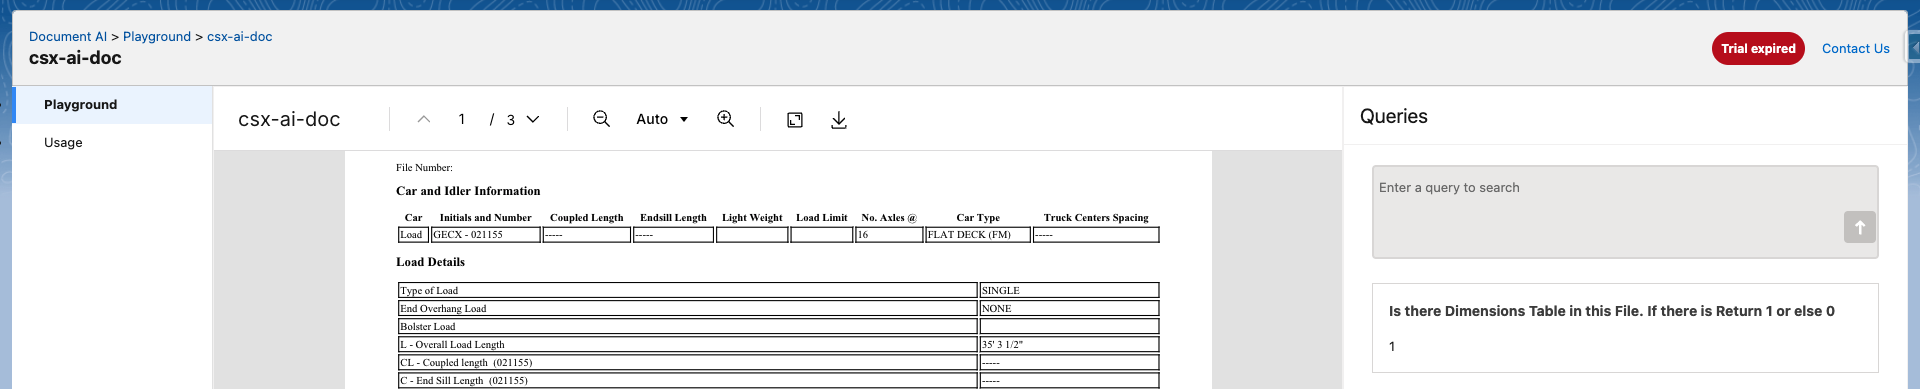
This iterative process helps you fine-tune your queries for optimal results before implementing them in your workflows.
This iterative process helps you fine-tune your queries for optimal results before implementing them in your workflows.
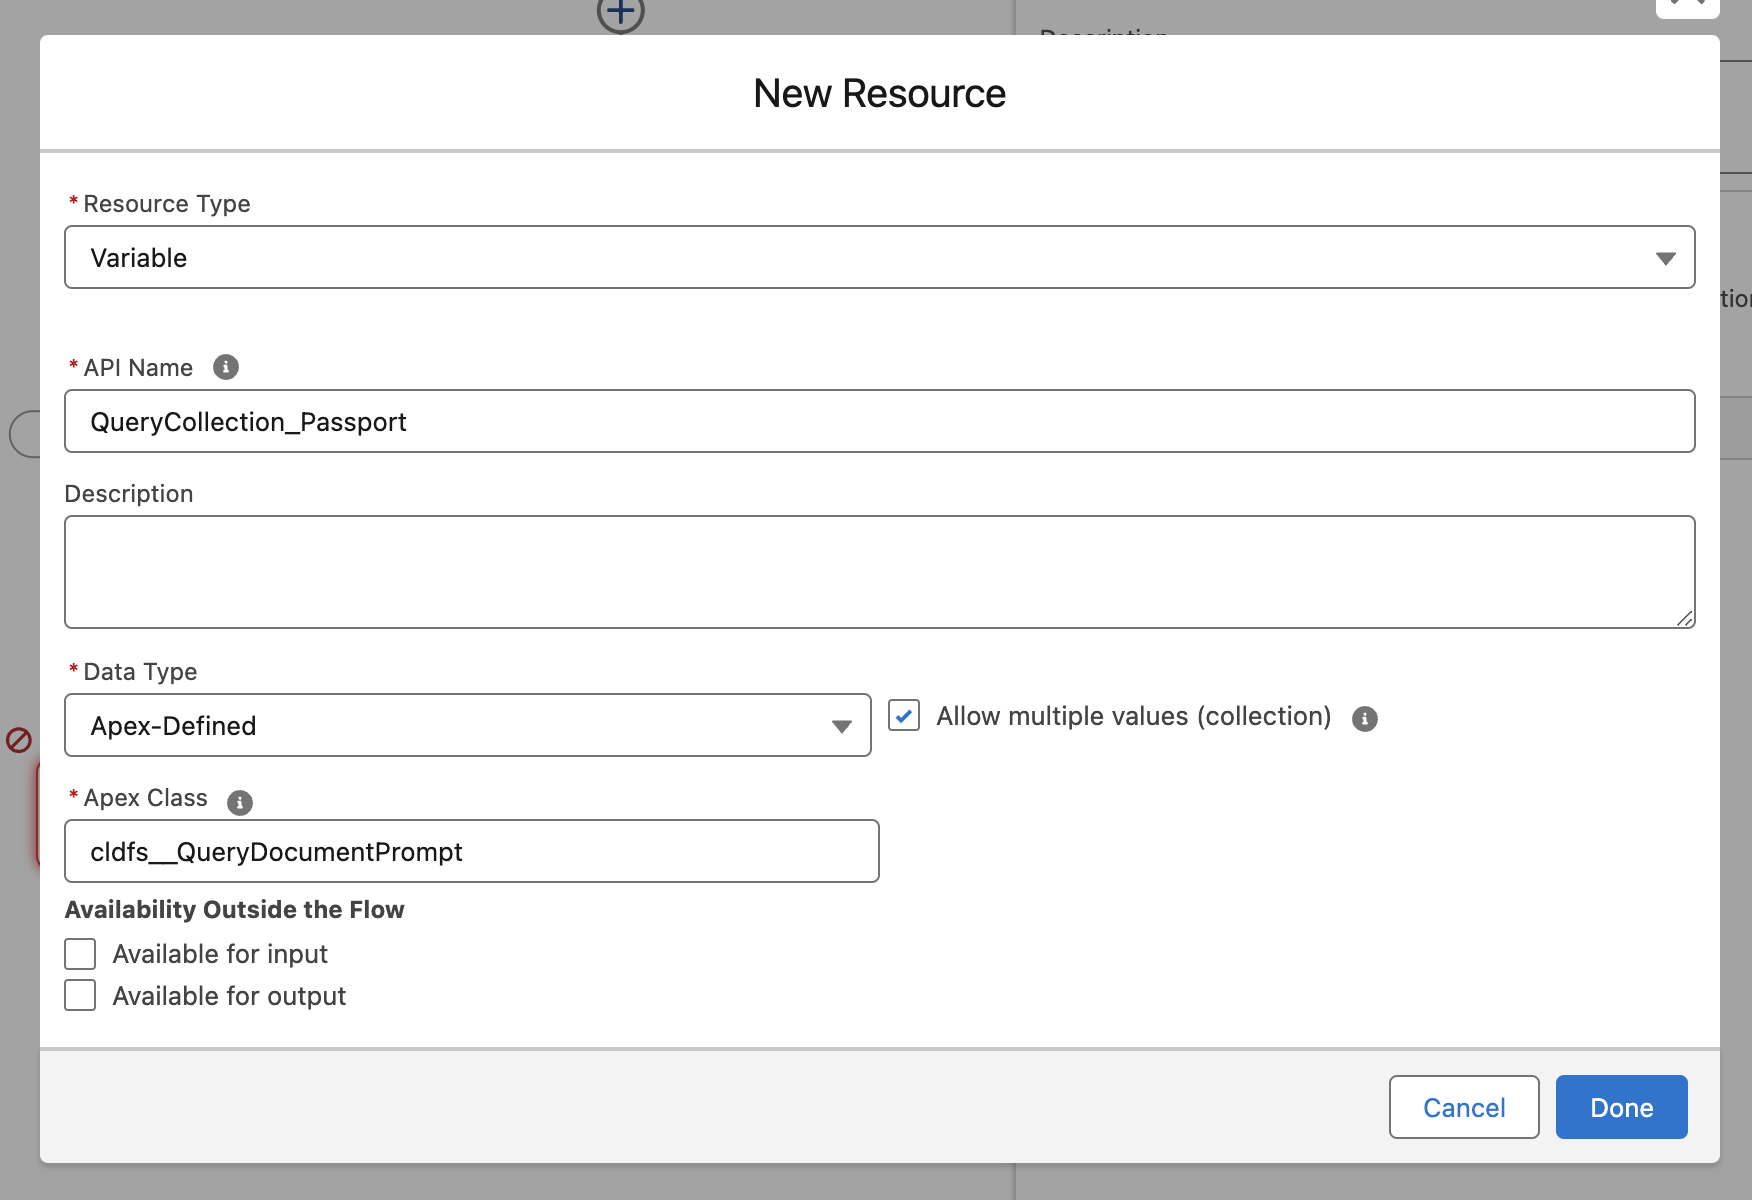
Create Query Collection
Now that you have constructed the variables, we will combine them into an apex-defined collection variable of class cldfs_QueryDocumentPrompt.
The creation of this collection variable has been shown in the image below-
Once created, you can simply use an assignment operator to add the above variables into this collection. This has been shown below-
Execute Queries in Batch
The previous consolidates all constructed queries into a single collection, preparing them for batch execution using Query Document/Dataset (Batch). In this step, we will actually use this action along with the collection variable from previous step to execute these queries. This action takes in 2 inputs -
- Processed Document Id: Select Triggering cldfs__CloudFilesEvent__c {!Get_Triggering_Event_Details.DocumentProcessed.ProcessedDocumentId}
- Prompts: Select QueryCollection_Passport (the previously created query collection)
The final action with the inputs is shown below -
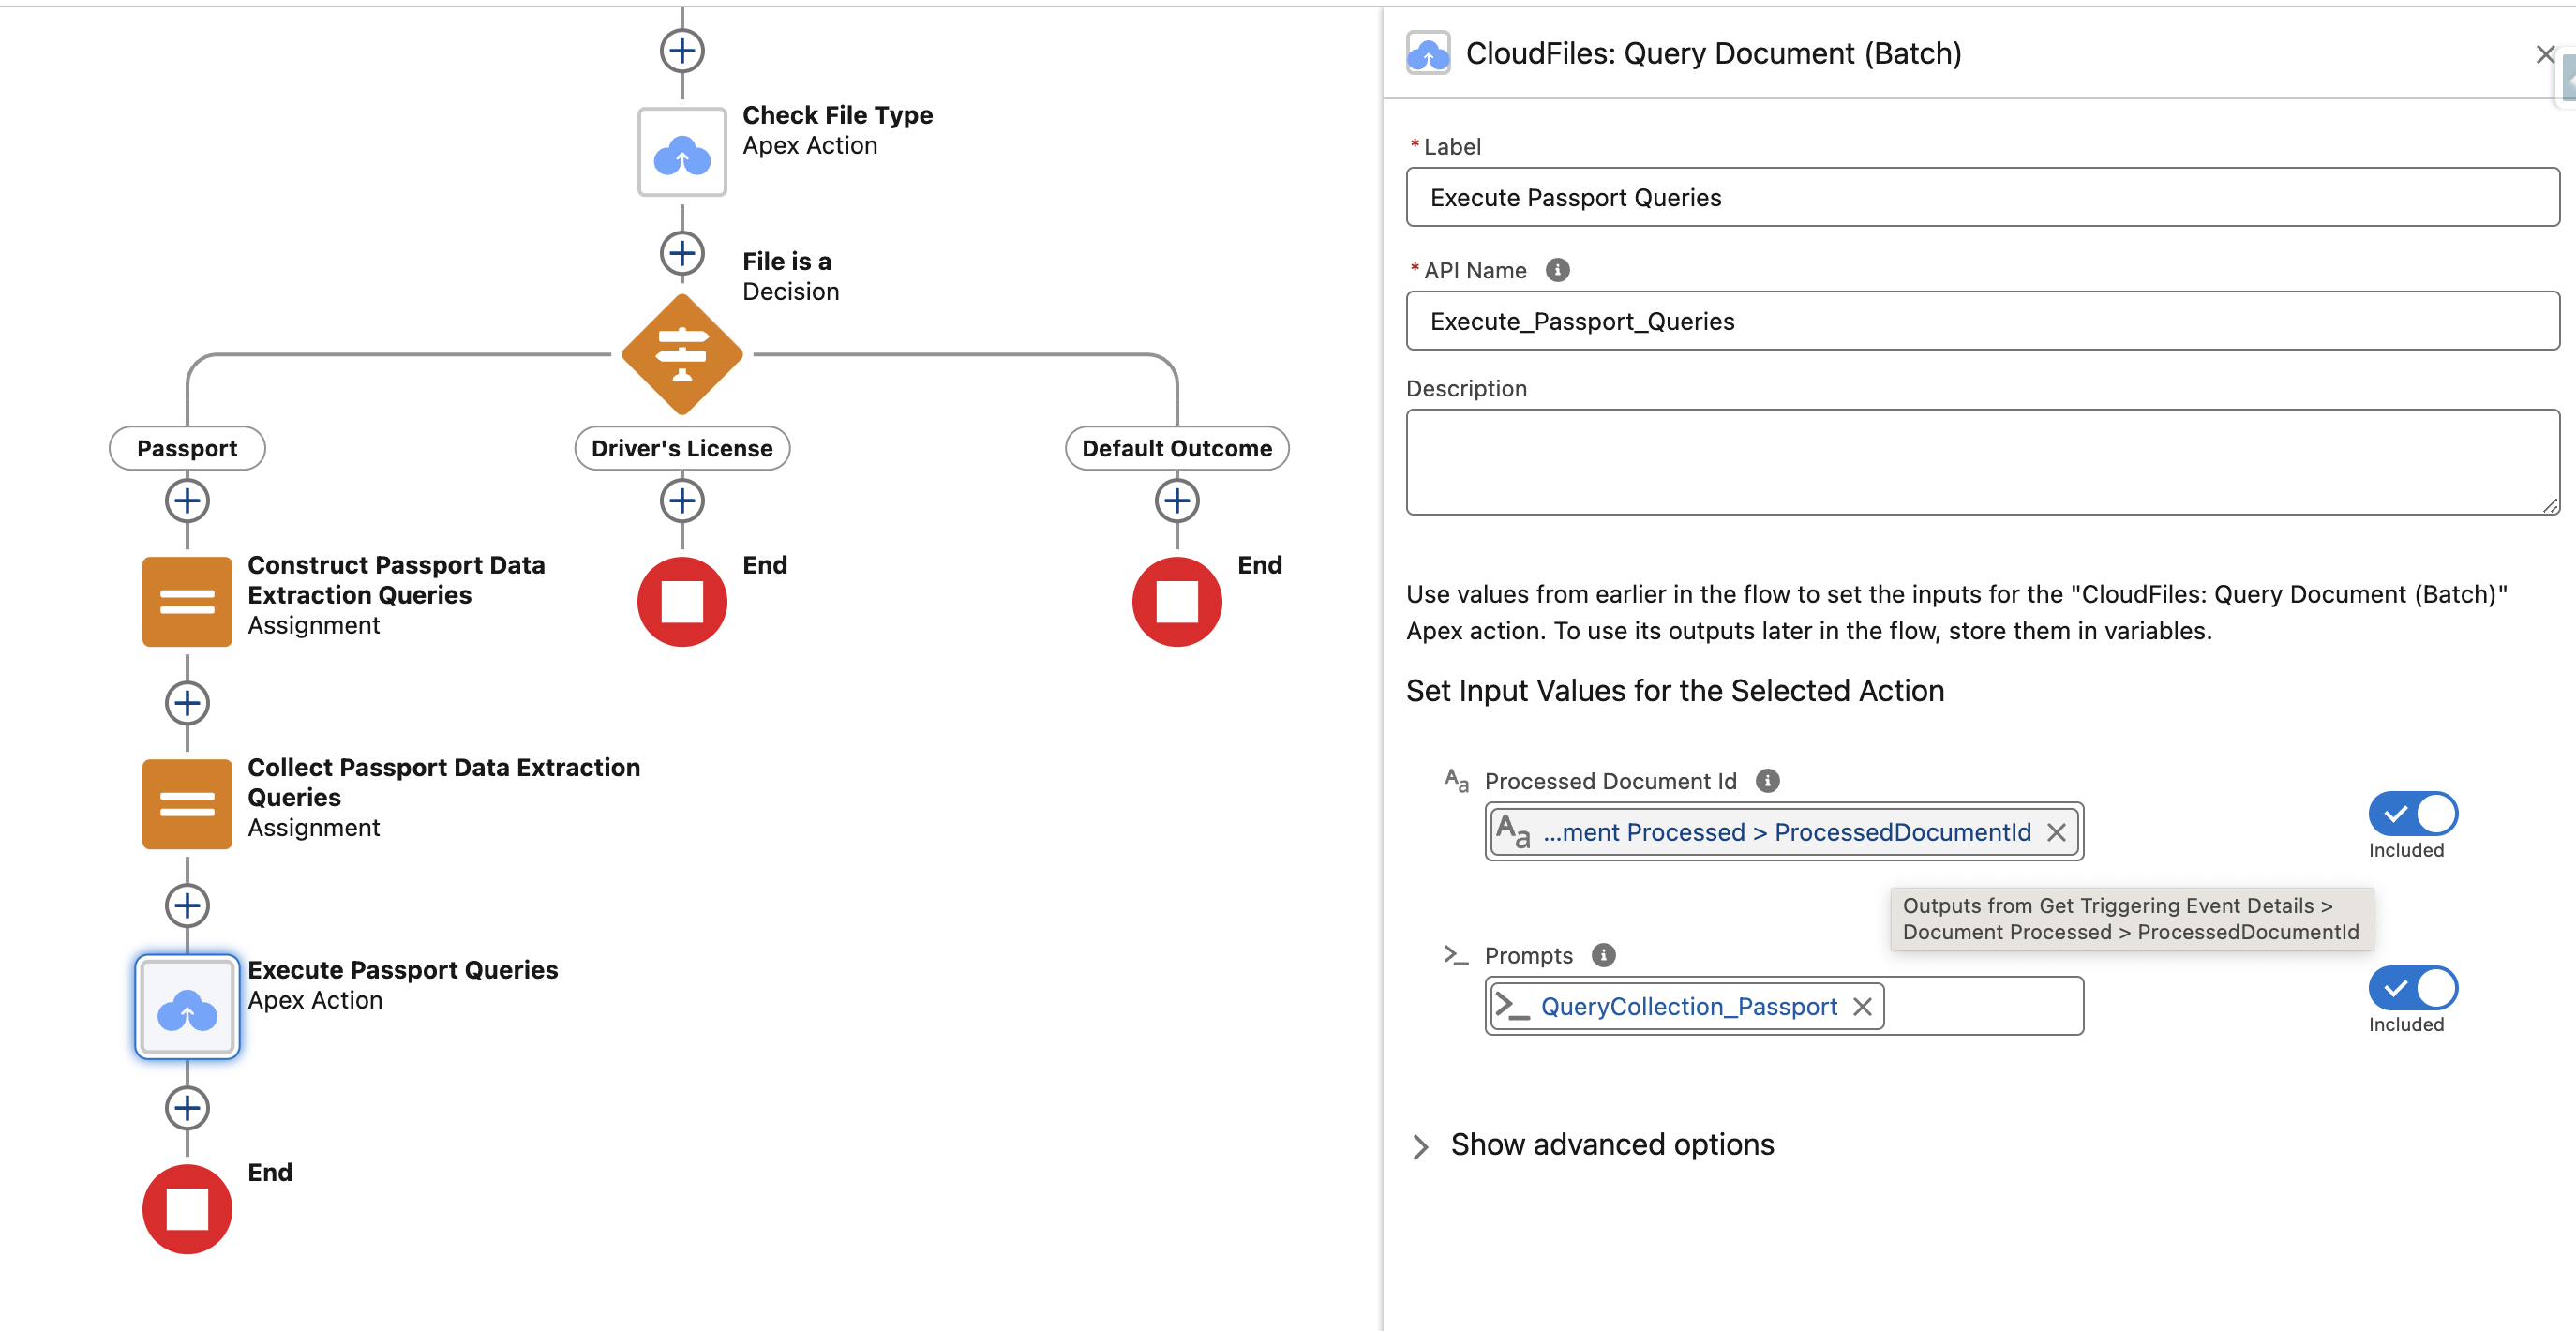
This step executes all data extraction queries simultaneously, optimizing performance and ensuring efficient processing.
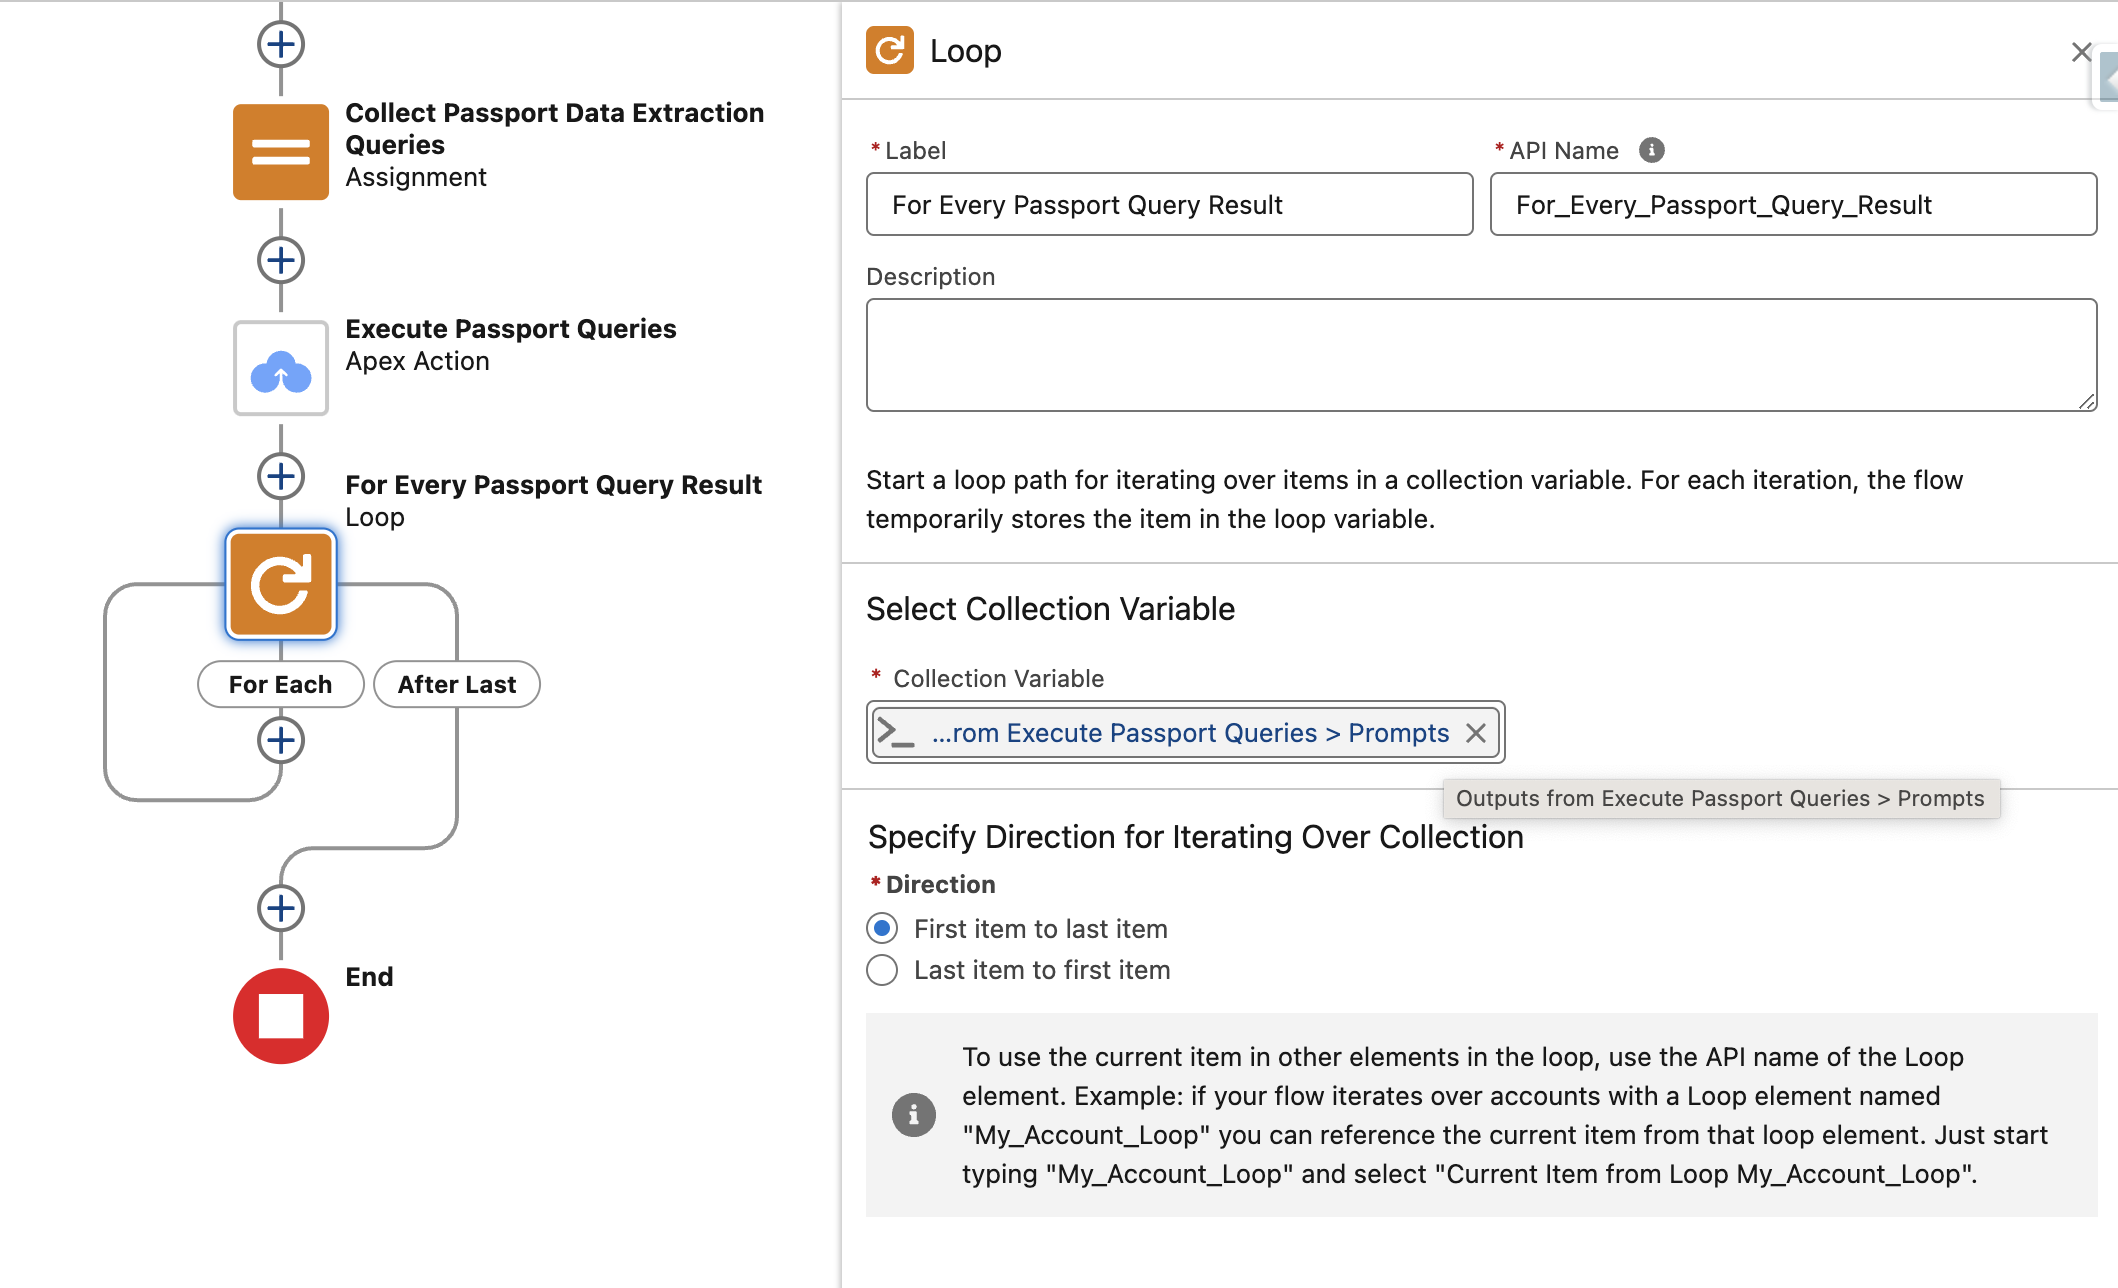
Loop & Filter the Results
The batch action above provides the results in a batched manner as well. We need to loop through these results in order to update them in our Salesforce record. We further need to filter the results into branches in order to update them in the correct salesforce properties. This step allows the flow to individually handle each query result, thus giving more control.
The image below shows how the loop has been setup. Set the Collection Variable to Outputs from Execute Passport Queries > Prompts.
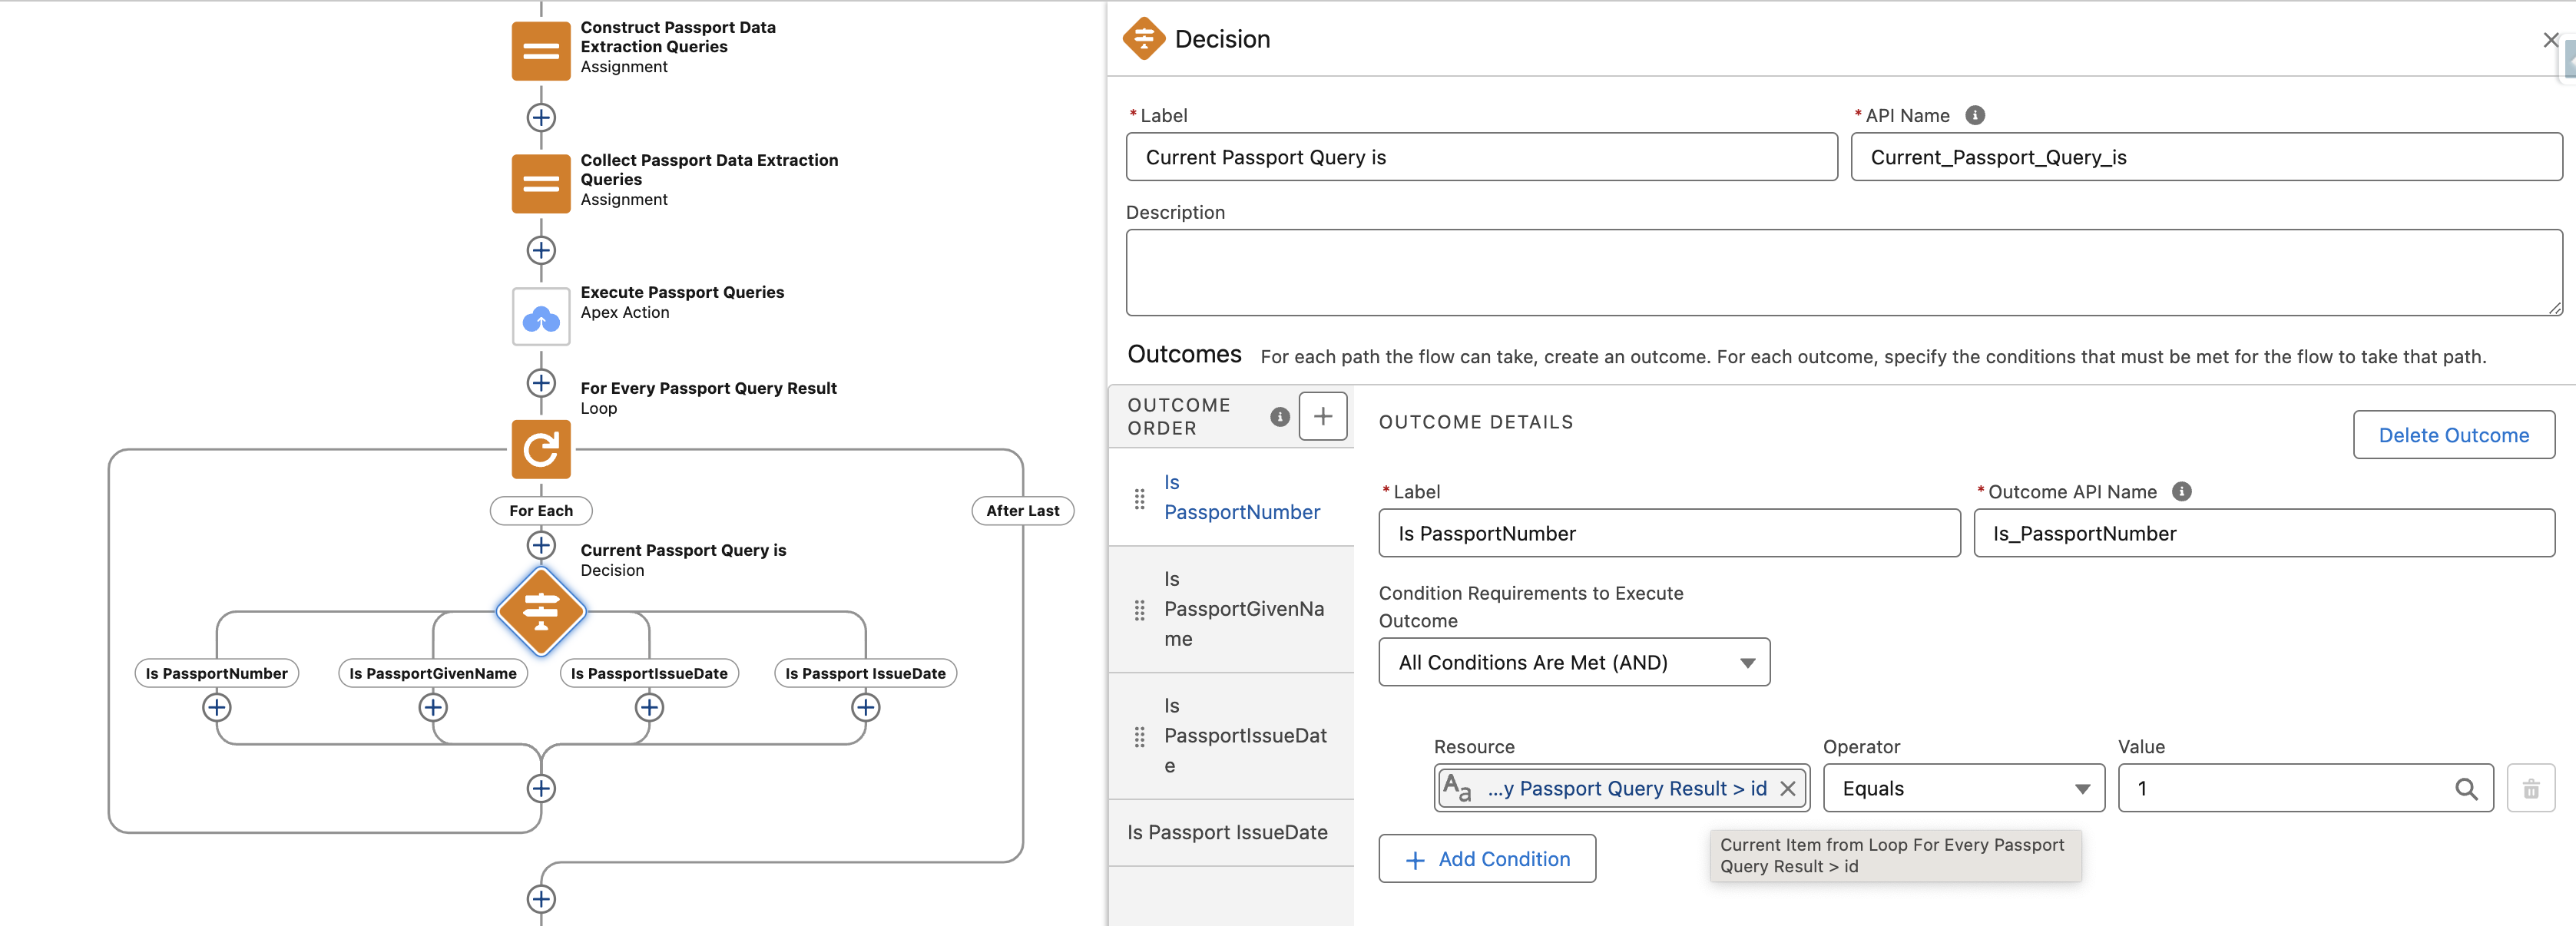
Once you have setup the loop, you can check the loop item's 'id' field in order to create the branches. These are the same IDs that we provided above while creating the Query variables. The image below shows an example branch-
Update Salesforce fields
Now that we have branches created to handle the response of each of the individual queries sent, we can easily update our record fields. While we can simply add the Update record action into these branches, this will trigger multiple record updates for the same record in a short time.
Since it is a good practice to perform less number of record update calls, we will use a simple trick. We will create some empty text variables for each of the responses, and store the result from the response array into these variables. You can simply create a text variable assign the looped item's 'result' as shown in the screenshot below-
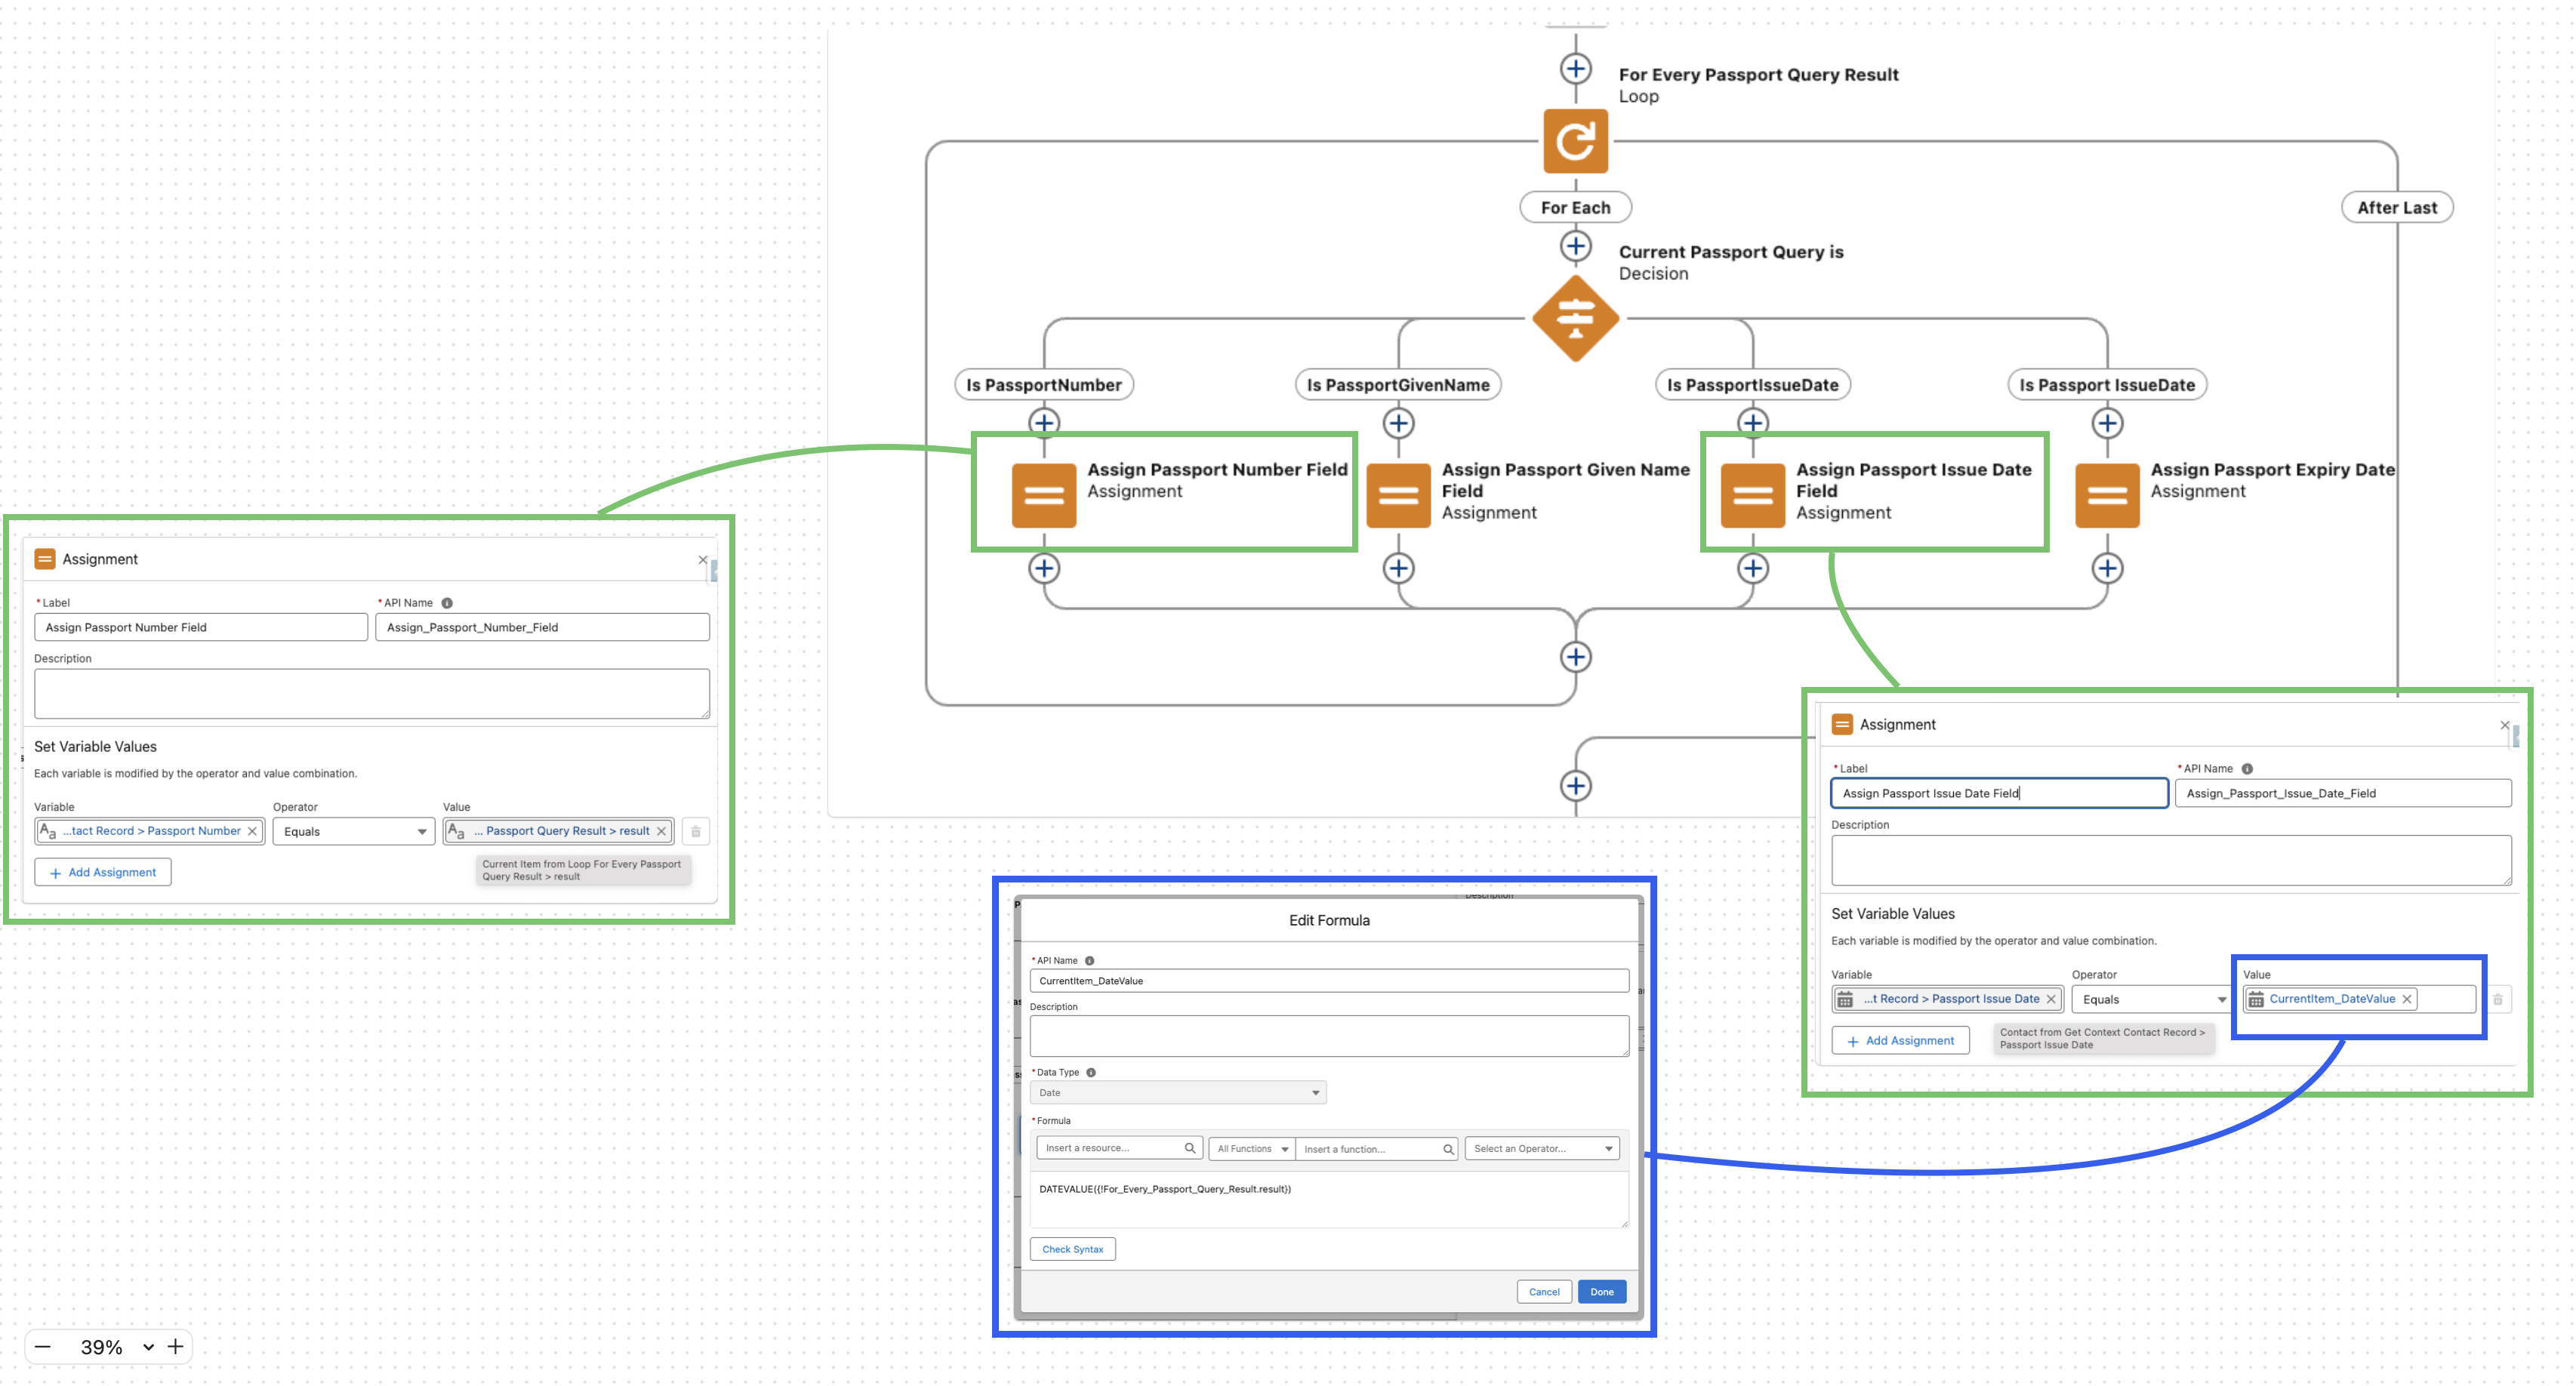
CloudFiles Document AI query results are always returned as plain text. To assign these text results to Salesforce fields of types other than Text, you must utilize Salesforce Flow’s native logic and formula elements to convert the values appropriately. For example, the DATEVALUE formula converts text into a Date type field, ensuring compatibility and correct field assignment.
Now that we have various variables for our responses, we can use a singular Update Record method to update the fields with these values. This has been shown below-
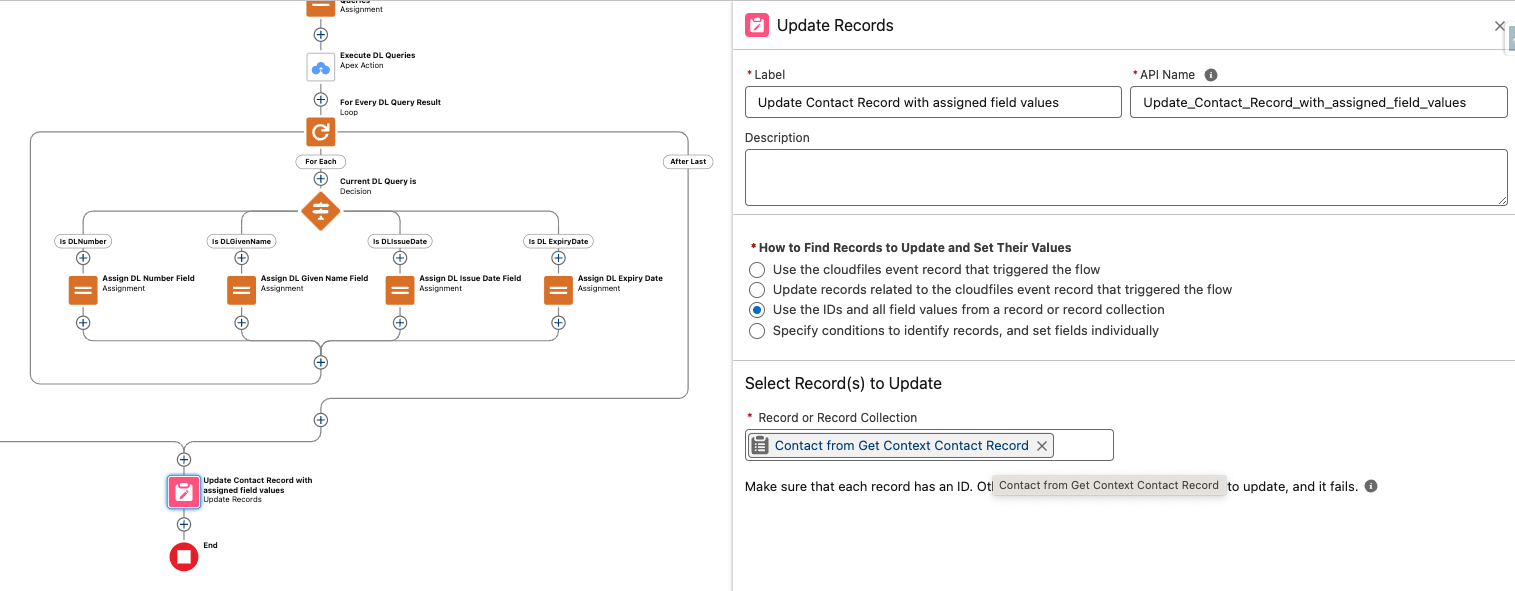
That's it. Your flow is now configured to run multiple queries in a batch and save the responses in record fields.
See it in Action
Now that everything is set up, you can test your flows. When a Passport or Driver's License is uploaded as Salesforce Files onto a Contact record, the mapped fields should be updated automatically.
Note: As Flow Automation executions and document processing via AI may take a short time, the field updates will not reflect immediately. To view the updates, wait briefly and refresh the page.

Congratulations! You've successfully created an AI-powered KYC Documents checker using CloudFiles AI & Salesforce flow.
Beyond this Tutorial
While this tutorial provides a simple and specific use case for processing Salesforce Files, the same logic can be extended to various scenarios such as:
- Order Management: Automatically extracting details from Purchase Orders uploaded to Order records and updating related fields or creating Order Line Items.
- Invoice Processing: Extracting invoice details uploaded on Opportunities and updating relevant fields or creating related payment records.
- HR Onboarding: Automatically extracting and populating data from employee documents uploaded to custom Employee records.
- Compliance Management: Processing compliance-related documentation (e.g., certifications) uploaded to Account records, updating compliance status automatically.
- Insurance Claims: Extracting data from insurance claim documents uploaded to Case records and automatically updating claim status and related details.
Explore these use cases to streamline your document management and Salesforce data updates, enhancing your organization's efficiency and accuracy.