What to Expect
By the end of this tutorial, you can expect to -
- Copy the files uploaded in Salesforce storage to Account’s parent folder in external storage automatically
- Automatically delete the original file stored in Salesforce storage.
The GIF below shows the expected output. If you have a basic grasp of these concepts, you can expect to finish the tutorial in under 10 minutes.
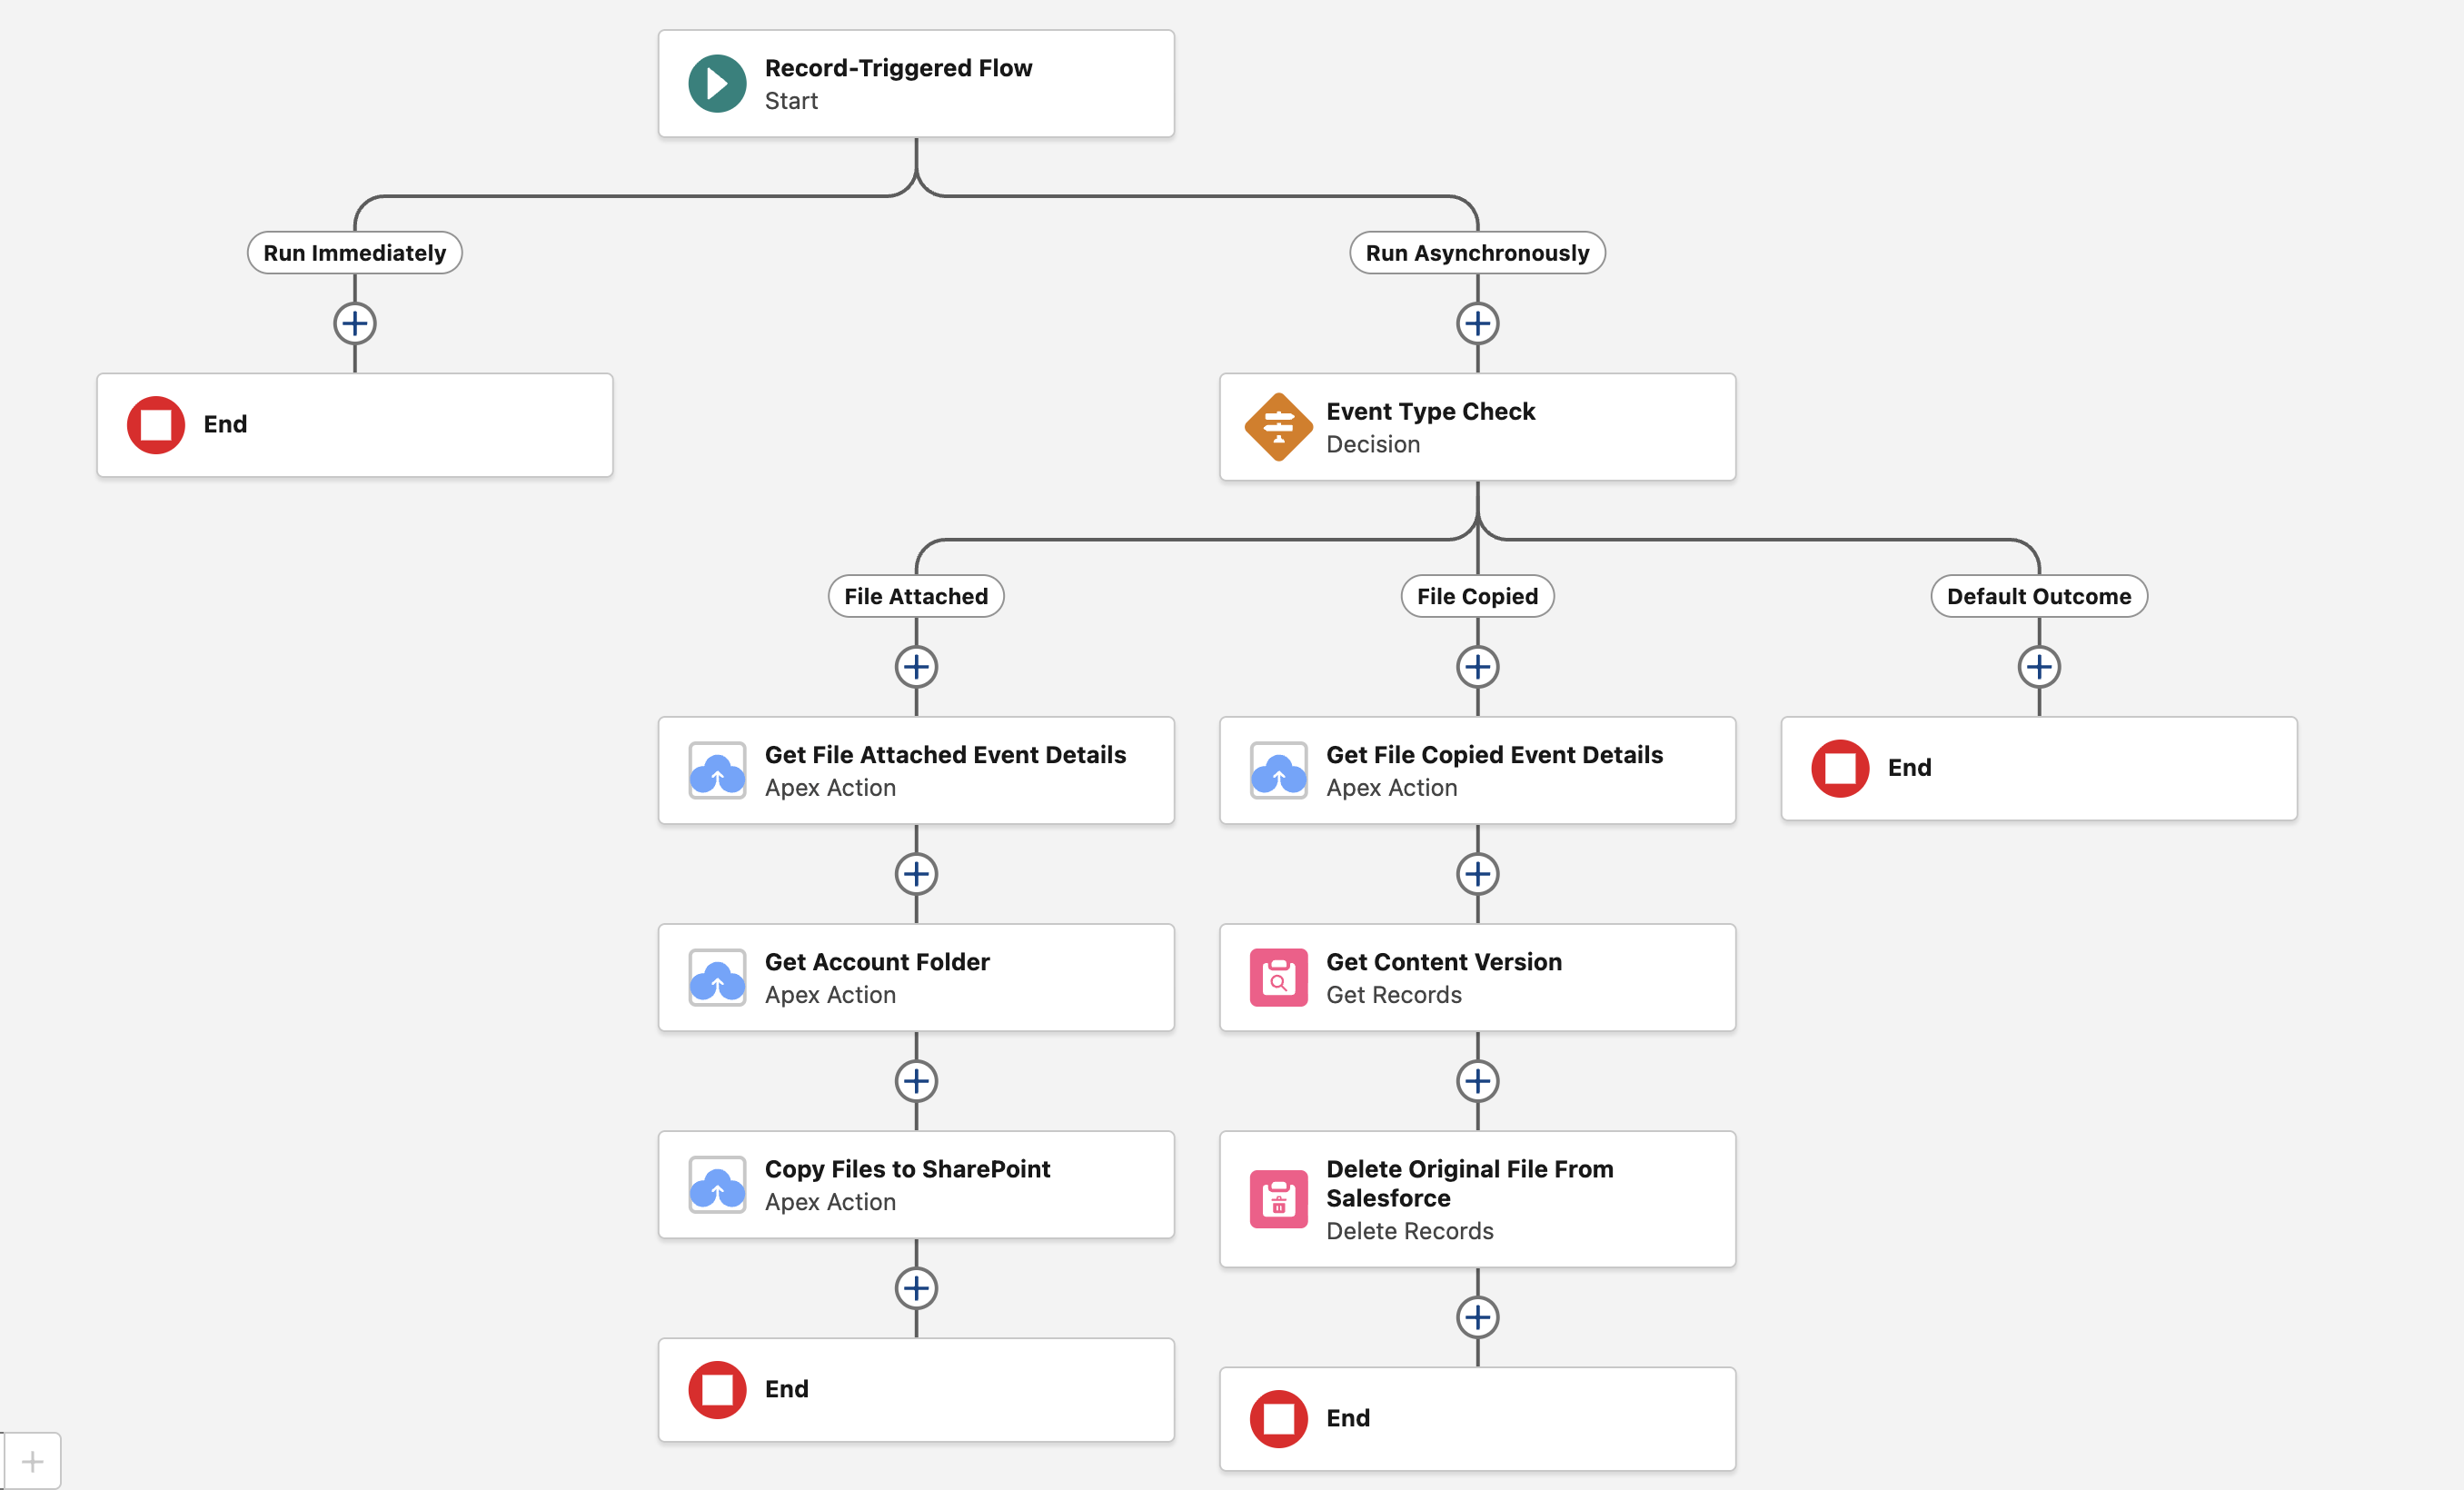
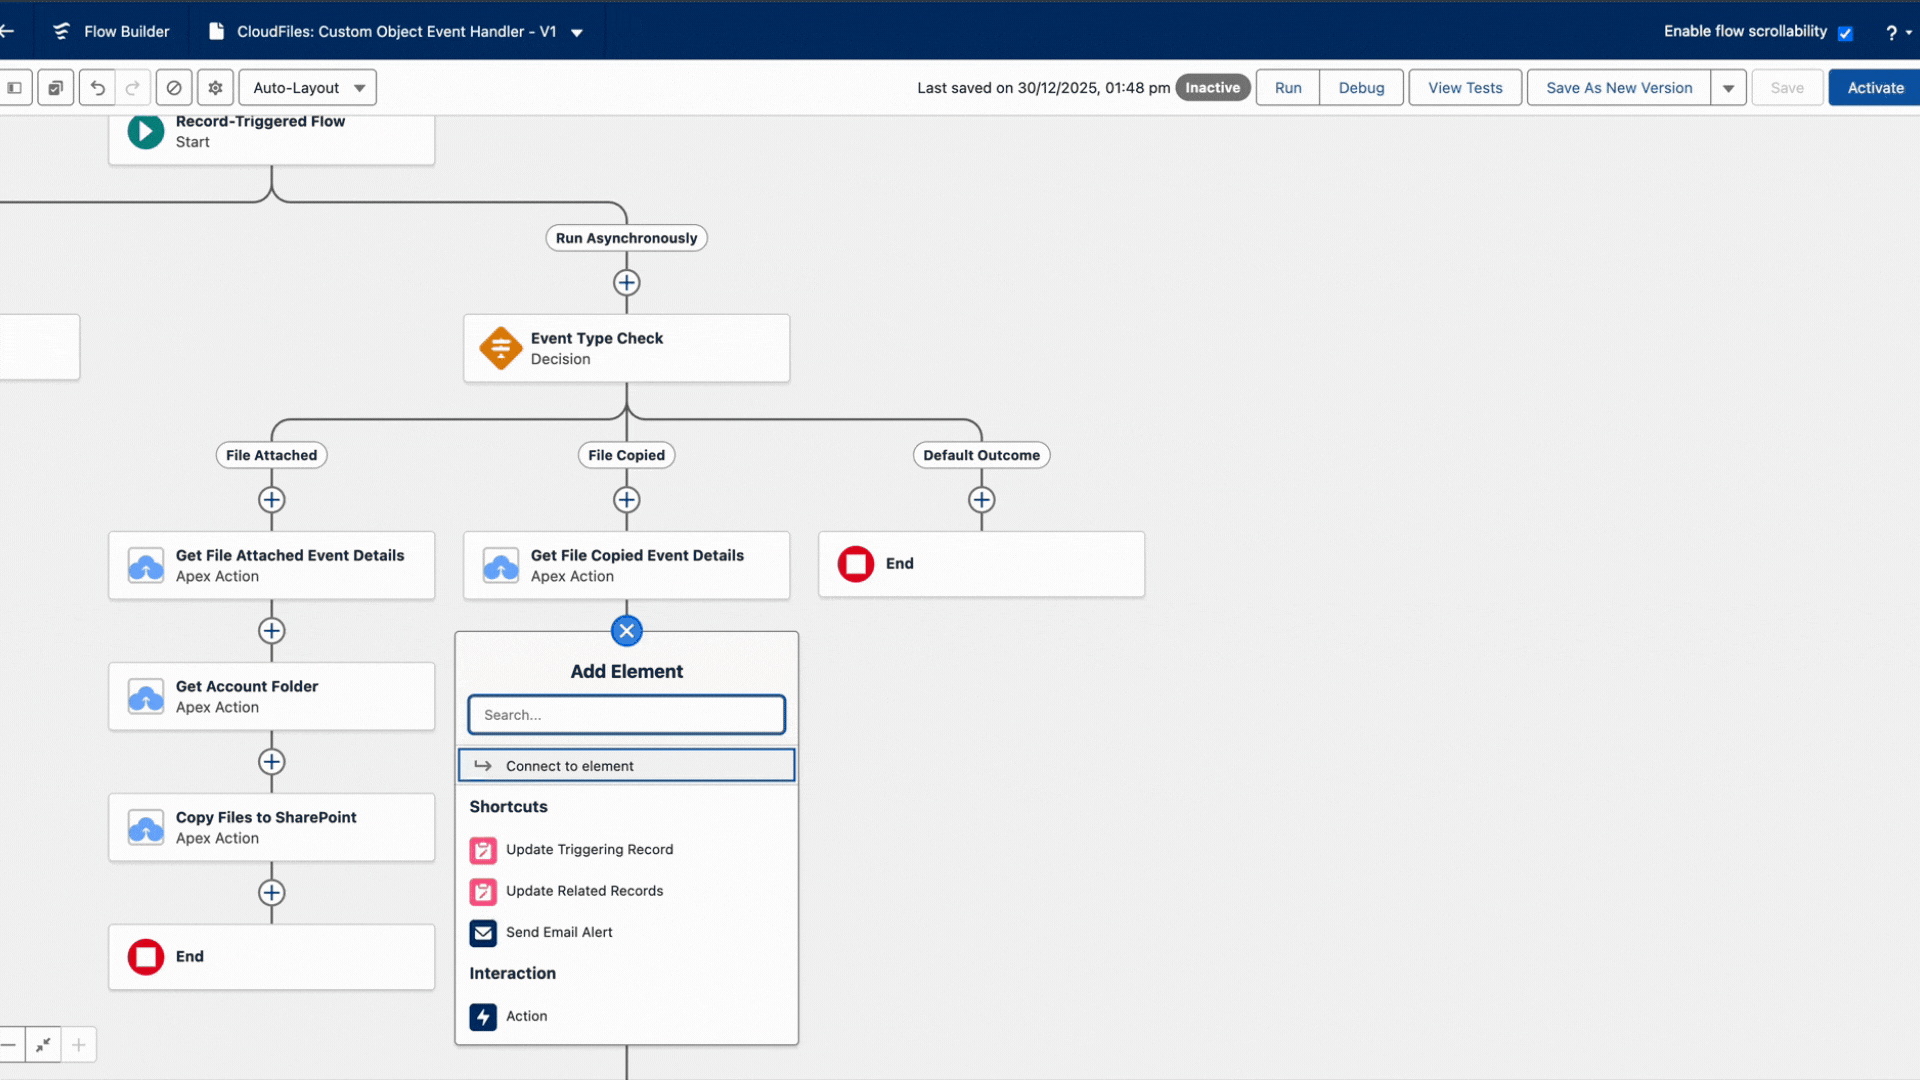
Our final setup involves a number of flow actions added to a Salesforce flow as shown below. In the sections below, we cover each of these actions and how to configure them.
1- Pre-requisites
Before you start with the set-up, please ensure these steps are completed.
Install CloudFiles in Salesforce
CloudFiles is available on the Salesforce AppExchange and can be installed using the standard app installation process. Check out Installation Guide to know more.
Connect your Cloud Storage to Salesforce using CloudFiles
All automations in CloudFiles are activated through Salesforce Flow Builder, utilizing account-wide authentication for external storage libraries through a service (admin) user. To connect your service user, access the setup, click on the external storage of choice and log into your account. For detailed steps, refer to the GIF below for a clearer understanding.
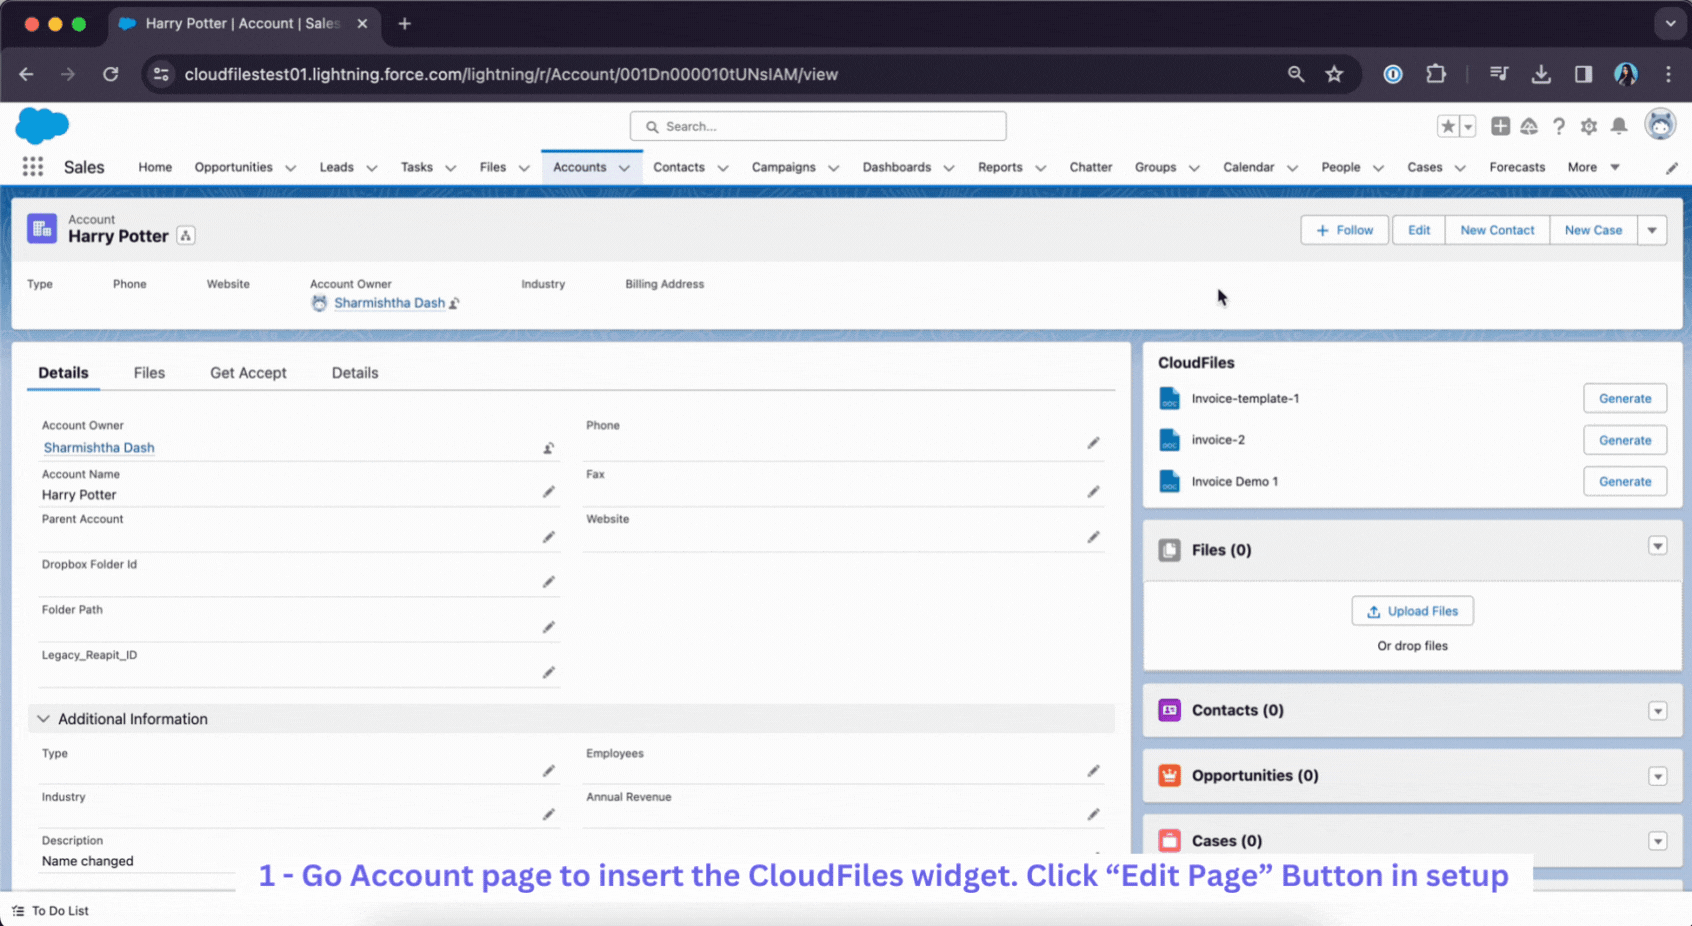
Add CloudFiles Widget to Account Record
To add the CloudFiles widget to the Account record in Salesforce, first, navigate to the Account page and click on the "Edit Page" button. Once in the Lightning Builder, insert a new tab and drag and drop the "CloudFiles" widget onto the page. Save the changes and exit the builder. Refresh the Salesforce record page, and the widget should now be visible, allowing easy access to view files and folders within Salesforce.
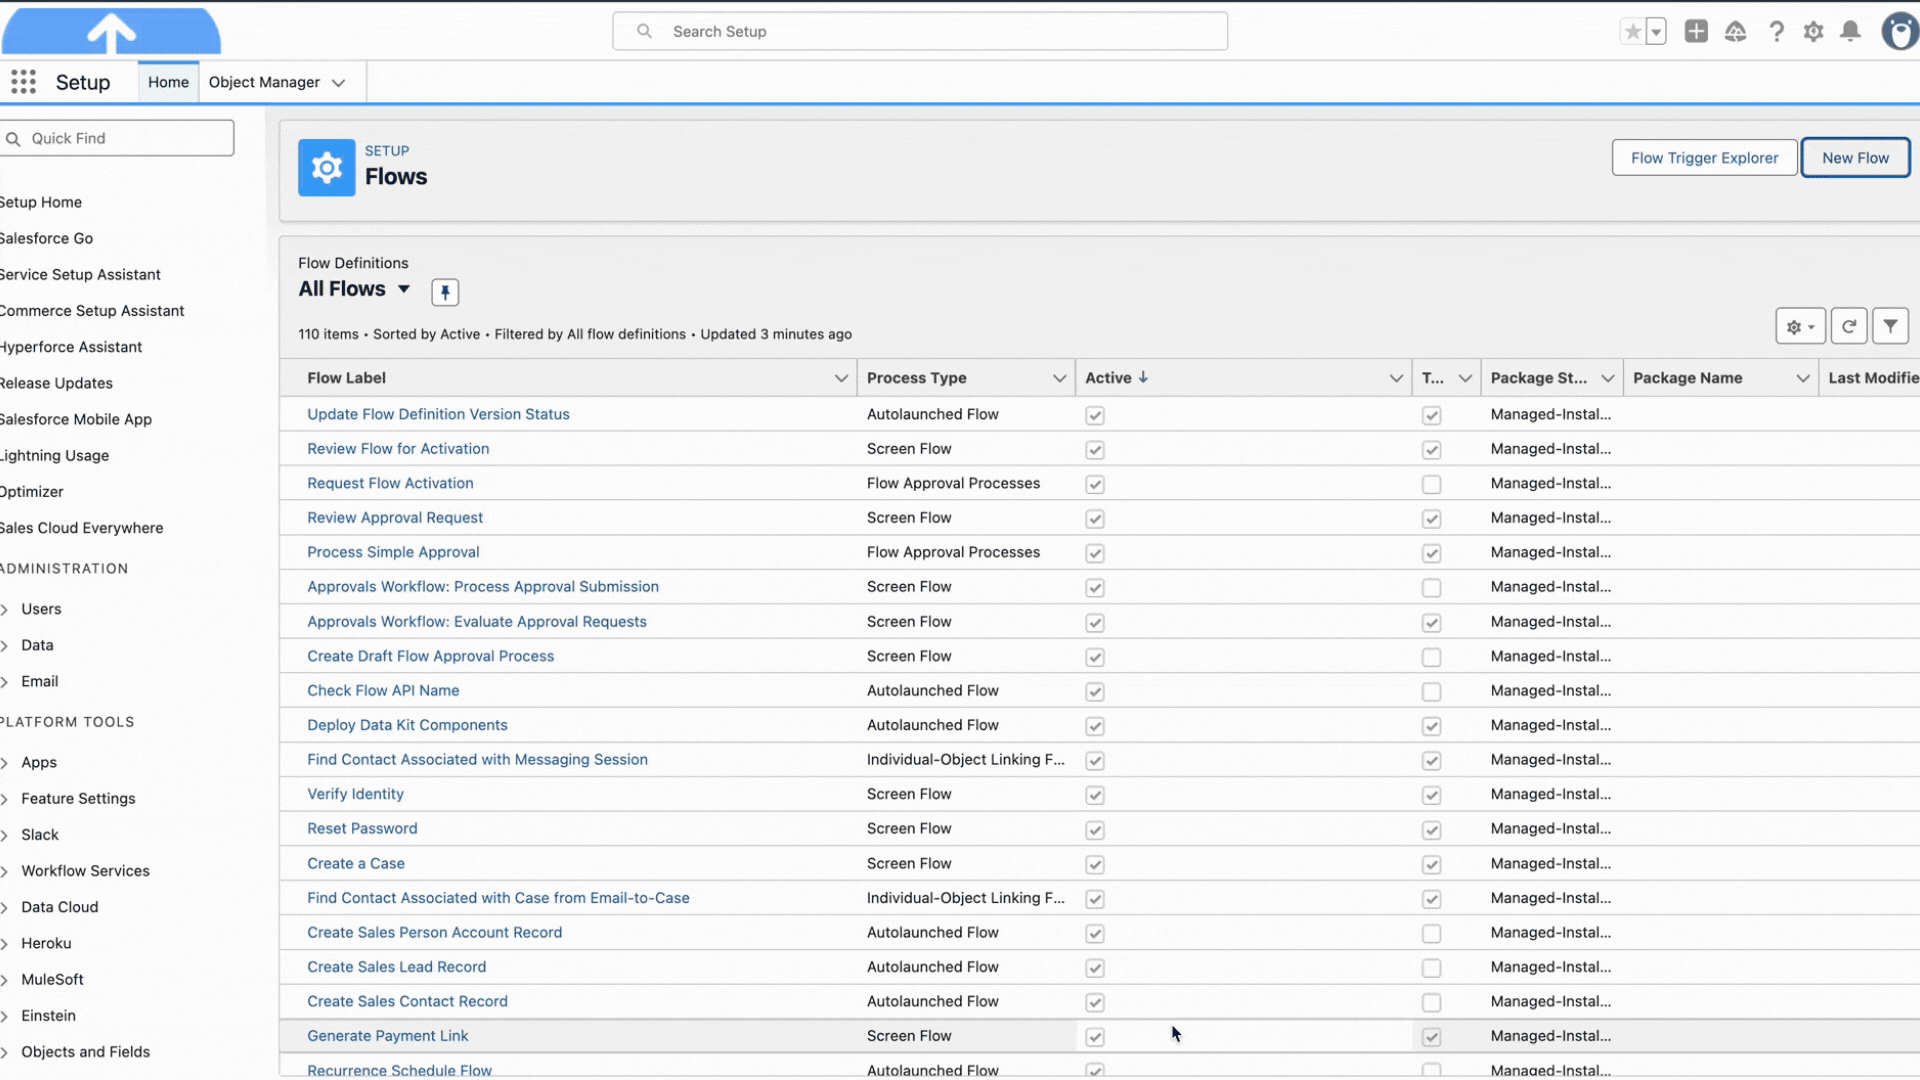
2- Create a Record-Triggered Flow
In this step, we will create a record-triggered flow on the CloudFiles Event custom object. This flow is triggered whenever a CloudFiles Event record is created and meets the defined entry conditions.
This flow will handle two key operations:
- Copying files from Salesforce storage to external storage
- Deleting the original files from Salesforce storage after a successful copy
Refer to the GIF below for a visual walkthrough of creating the record-triggered flow and configuring the start conditions.
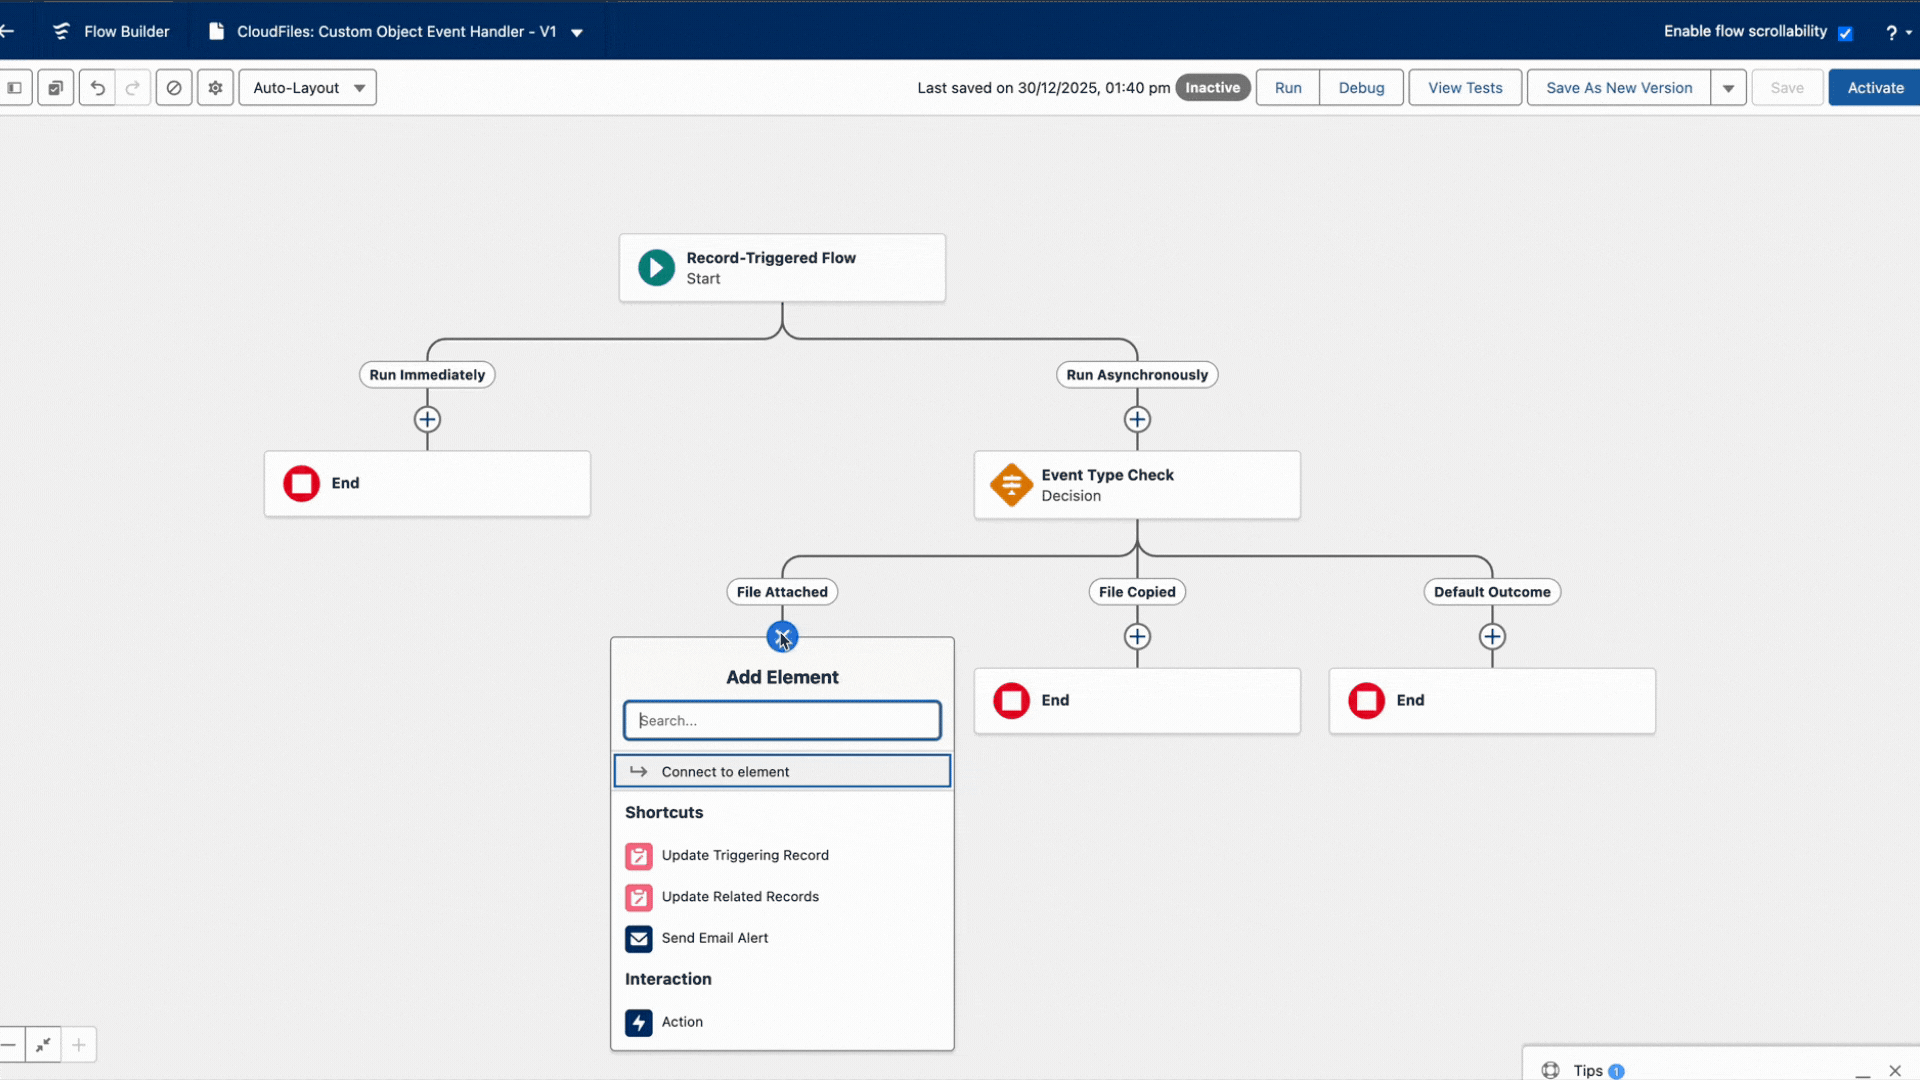
CloudFiles generates event records for multiple types of actions. To ensure the flow runs only for relevant scenarios, we will configure entry criteria so the flow is triggered only when a CloudFiles Event record is created.
The detailed handling of different event types—such as file uploads and file copy confirmations—is managed later in the flow using Decision elements. Each event type is processed in a separate branch, which we will configure step by step in the following sections.
Copy Uploaded files from Salesforce storage to External storage
CloudFiles event records can be generated for a variety of actions. In this section, we will focus on filtering events triggered when a file is attached to the Notes & Attachments section of an Account.
When such an event is detected, the flow will:
- Retrieve the Account’s connected folder in the external storage system, and
- Copy the uploaded file from Salesforce storage to the corresponding Account folder in external storage.
In addition to handling file uploads, the flow also includes a second condition to detect successful file copy events. This condition is used to initiate the cleanup process by deleting the original file from Salesforce storage, ensuring that files are retained only in the external storage system.
These conditions are implemented using Decision elements, with each outcome handled in a separate branch. The configuration of each branch is explained step by step in the sections that follow.
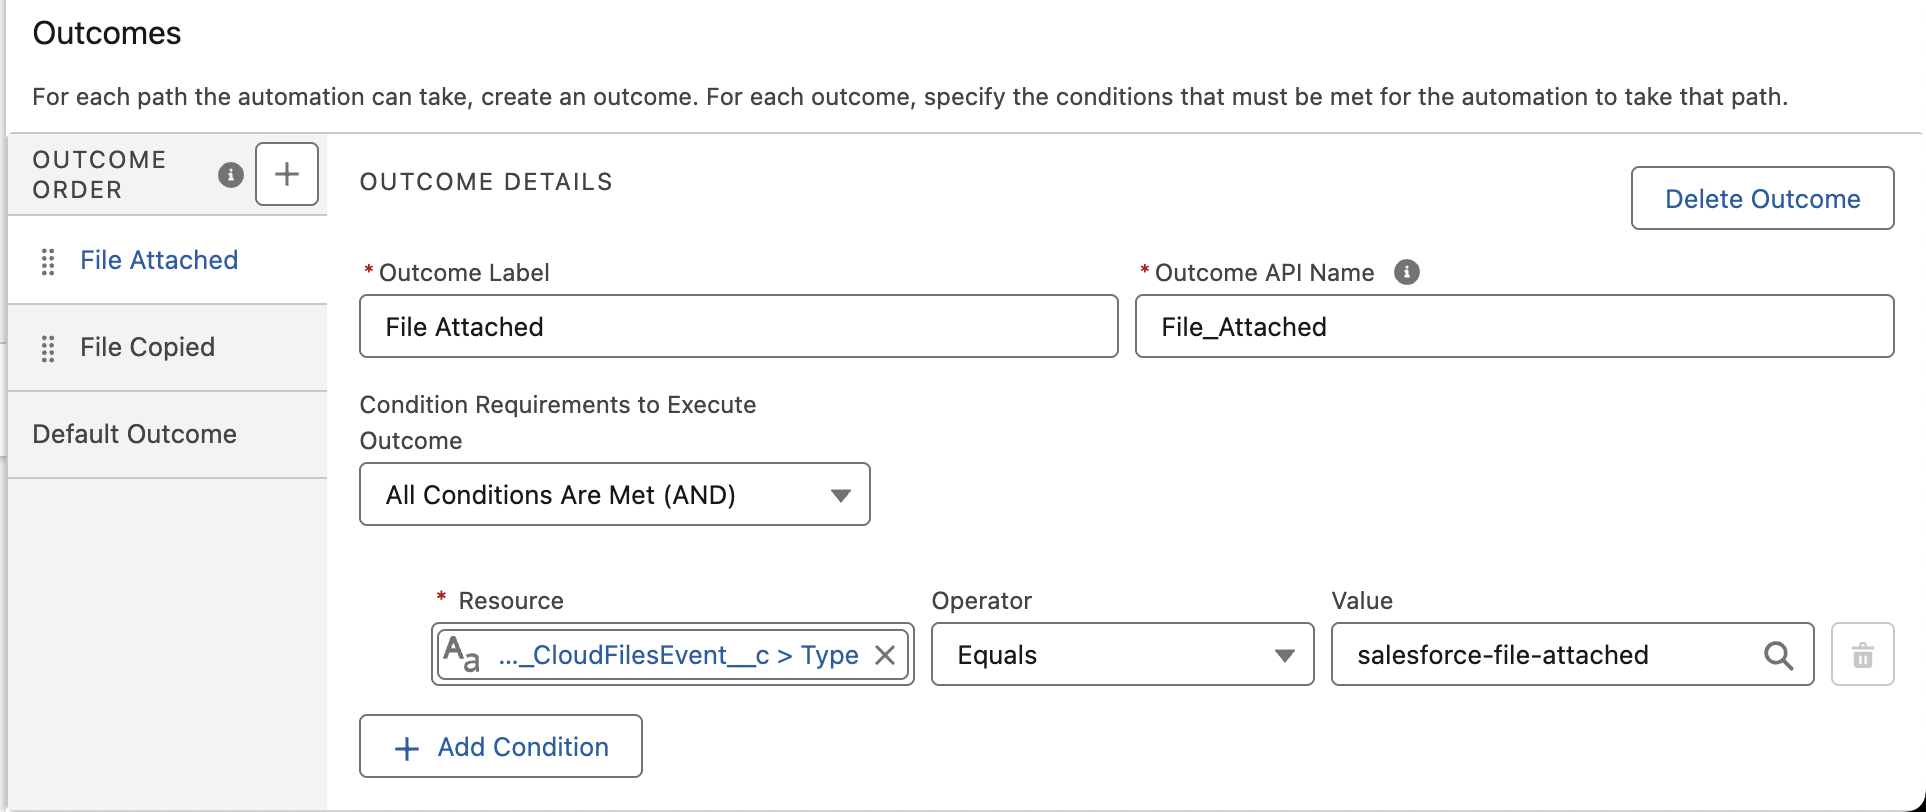
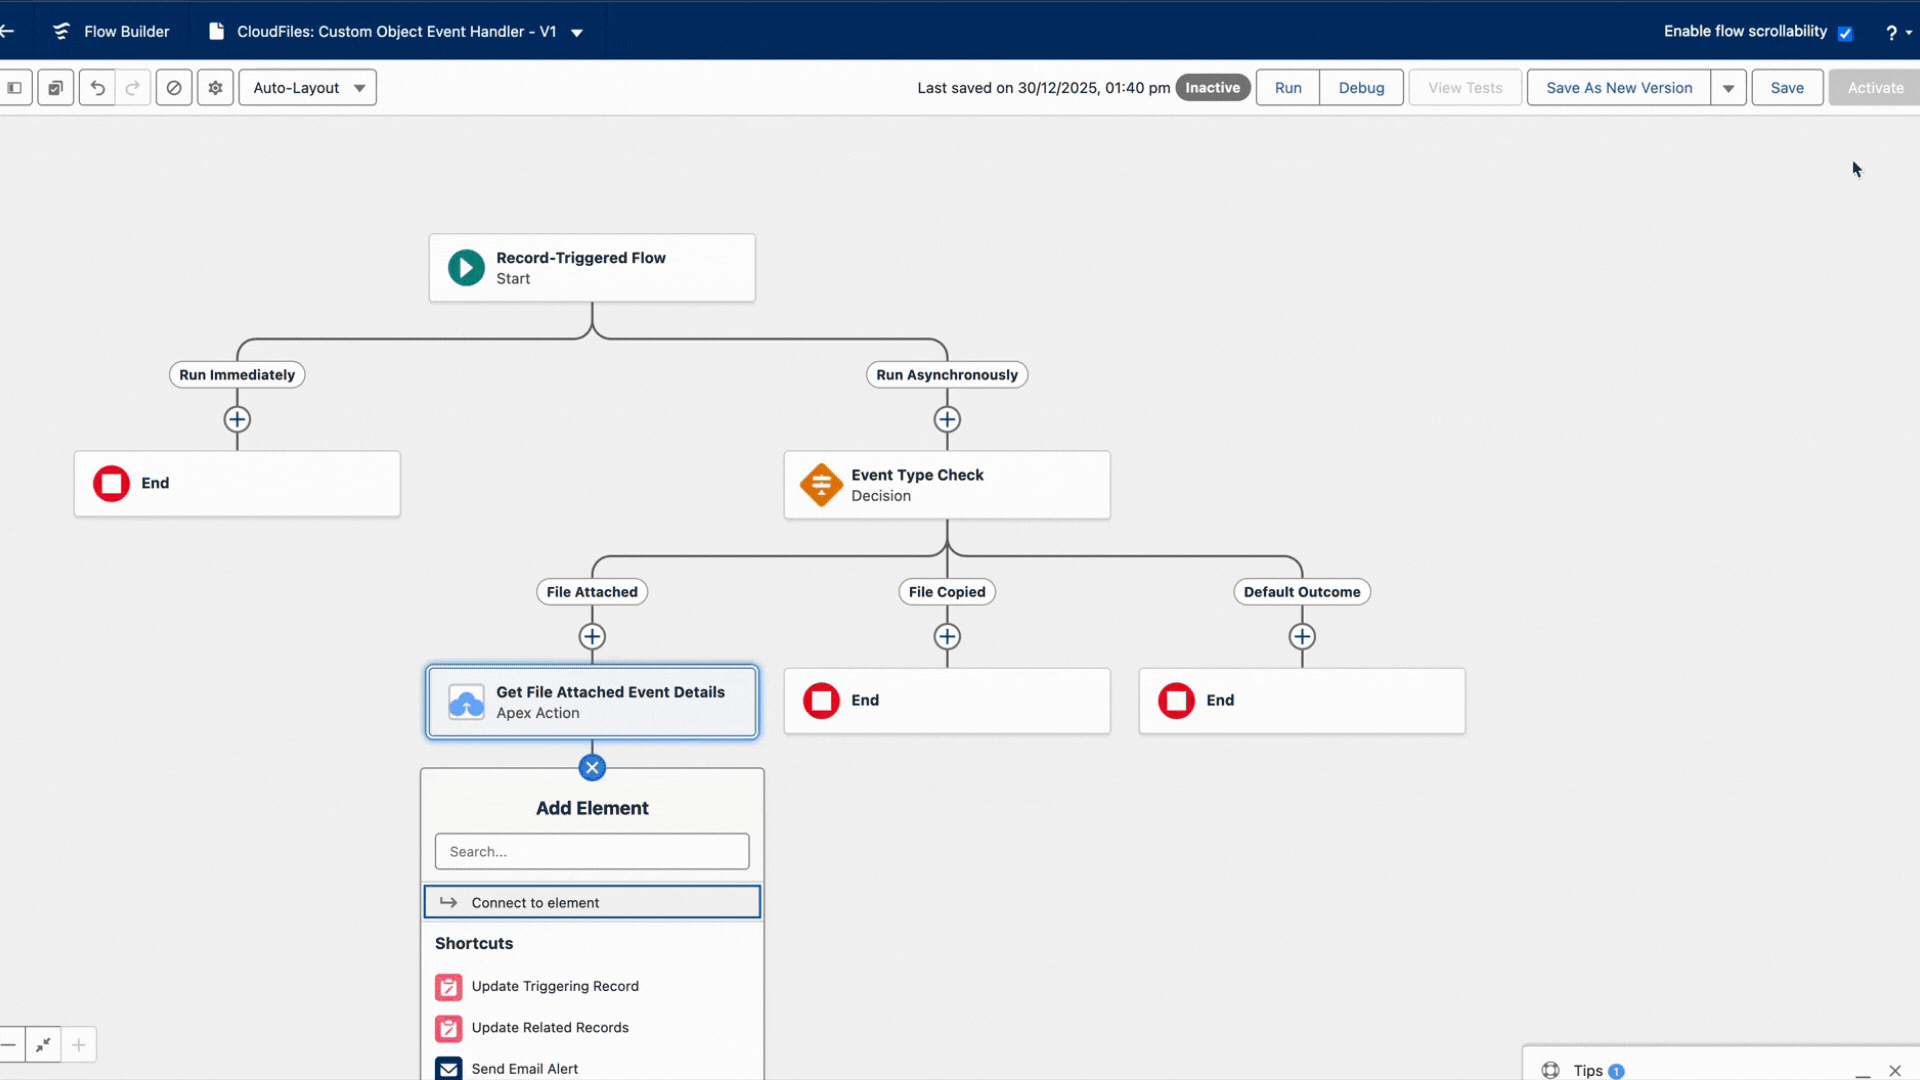
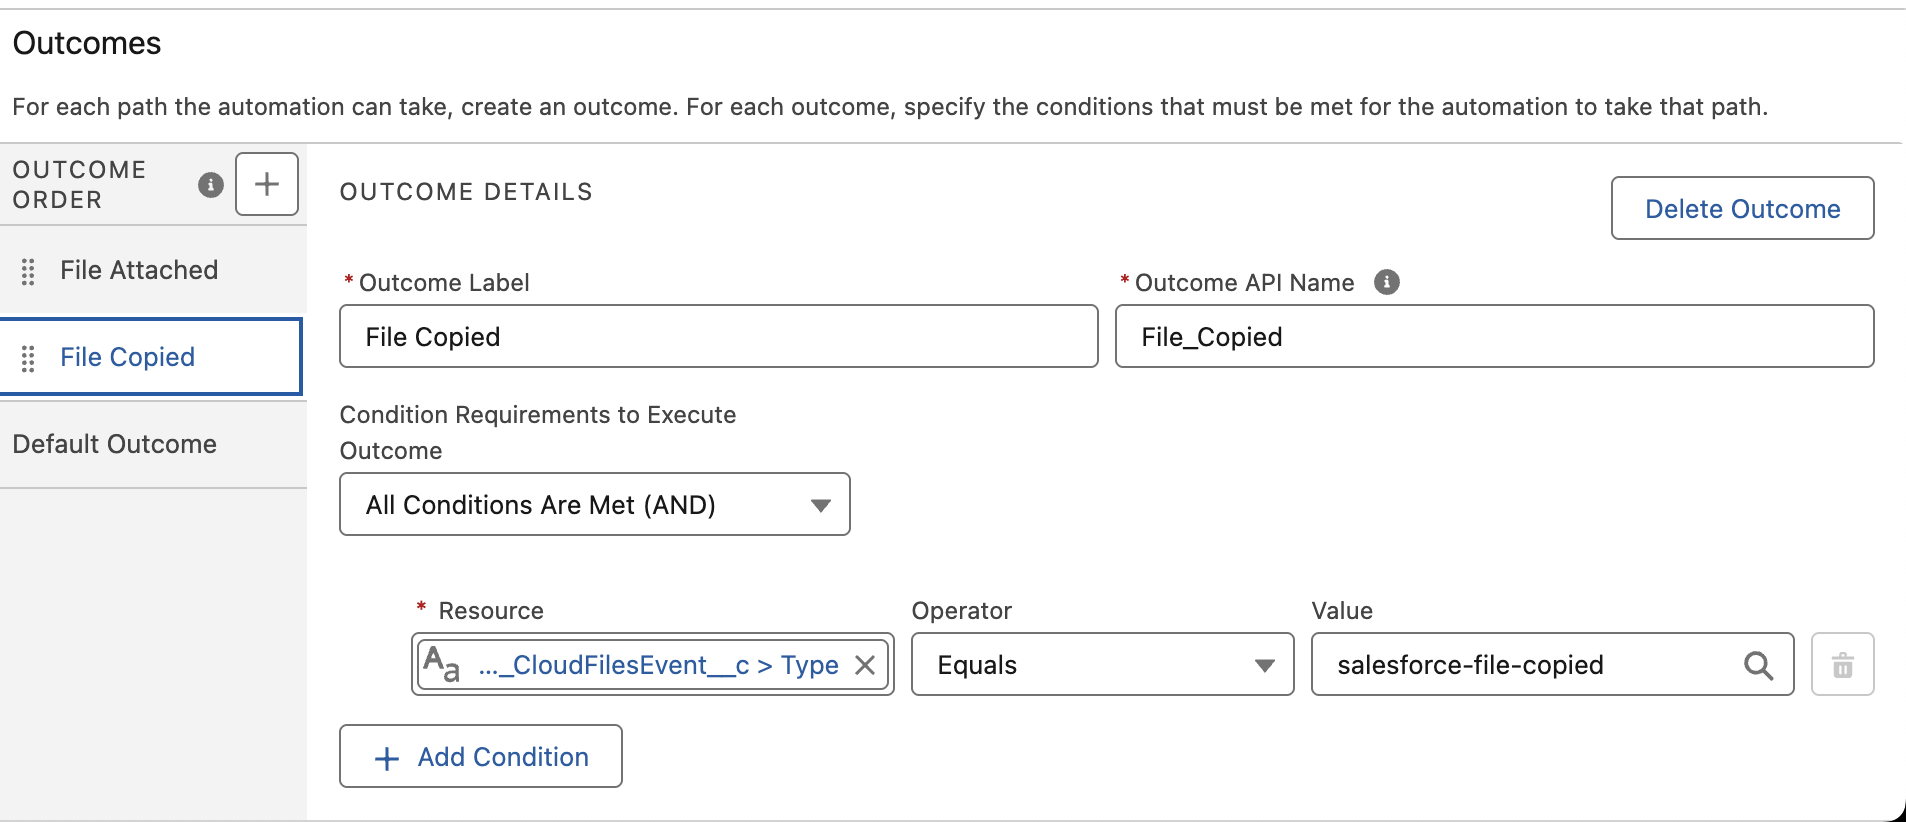
1 - Use a Decision Element to Identify Salesforce File Attached Events
Start by adding a Decision element to the flow. This element is used to filter CloudFiles Event records and ensure that the flow proceeds only when a file is uploaded to Salesforce storage.
Create a new outcome specifically for file upload events and configure the condition as follows:
- $Record → Type equals salesforce-file-attached
This condition ensures that only events generated when a file is attached in Salesforce are processed in this branch of the flow.
This is how the Outcome Details configuration looks.
Once the file upload event is identified, we need to determine which Account the file was uploaded to. To retrieve the required Account and folder information, we will use two CloudFiles actions:
These actions allow us to extract the Account ID from the event and locate the corresponding Account folder in external storage.
2 - Get Salesforce File Attached Event Details Using the Get Event Details Action
To retrieve detailed information about the Salesforce File Attached event, add the Get Event Details action to the flow. This action provides key metadata related to the event, including the Salesforce record ID (Account ID) associated with the file upload.
This Account ID is required in the subsequent steps to locate the Account’s connected folder in external storage.
When configuring the action:
- Add the Get Event Details CloudFiles action
- In the Event (Custom Object) placeholder, select Triggering Record
Refer to the GIF below for a visual walkthrough of configuring the Get Event Details action.
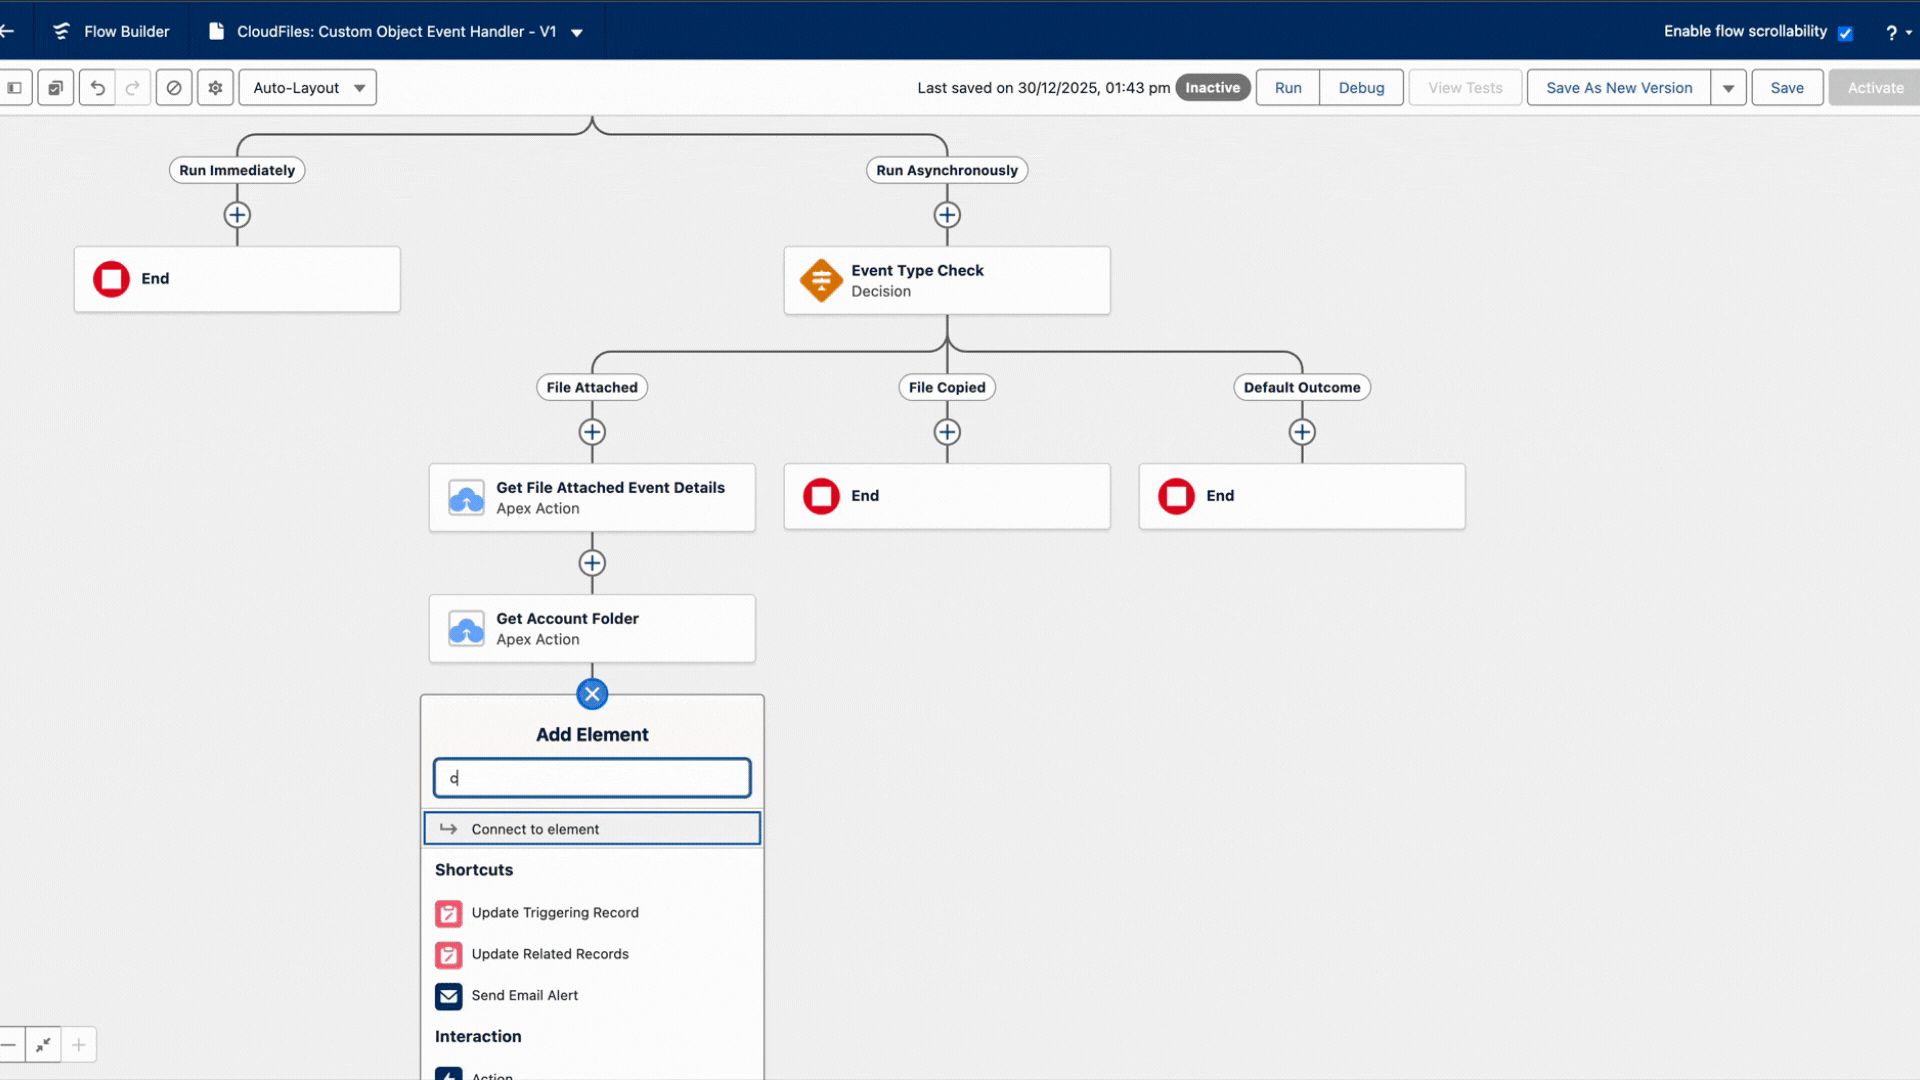
3 - Get Account Folder Details Using the Get Connected Folder Action
The previous step returns several outputs, including the Salesforce record (Account) ID associated with the file upload event. To locate the corresponding Account folder in external storage, we will use the Get Connected Folder action.
When configuring this action:
- Add the Get Connected Folder CloudFiles action
- In the Parent ID field, select Get File Attached Event Details -> SalesforceFiles Details → ParentId
This configuration allows CloudFiles to identify and retrieve the connected external storage folder associated with the Account.
Refer to the GIF below for a visual walkthrough of configuring the Get Connected Folder action.
Once the Account’s parent folder details are retrieved, we can proceed to copy the uploaded files from Salesforce storage to the external storage system.
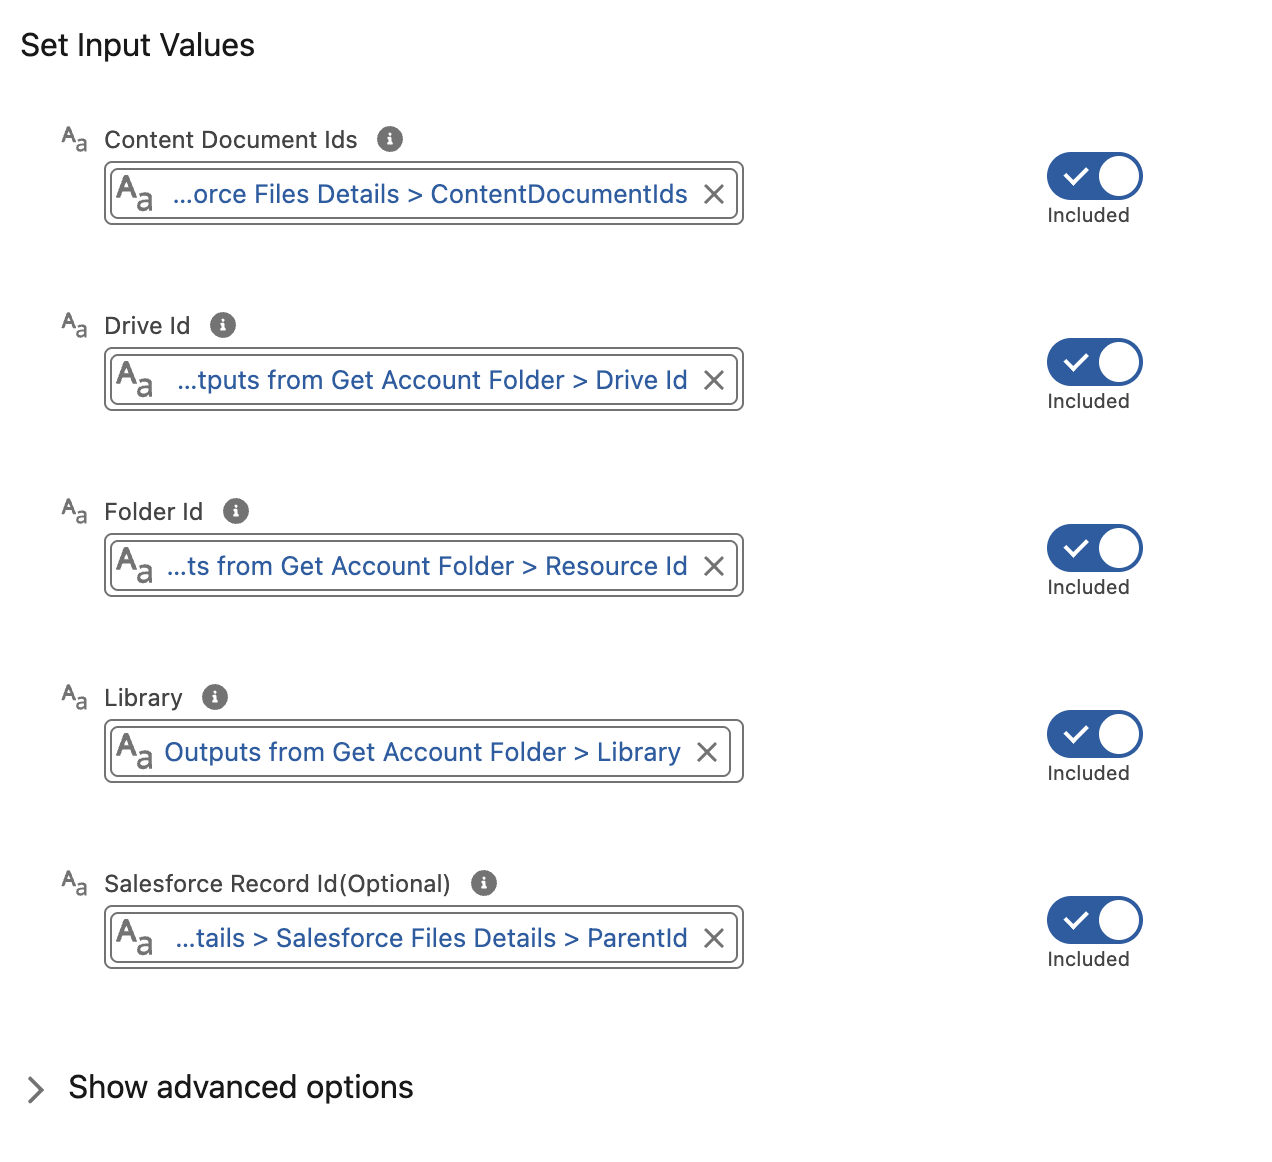
4 - Copy Uploaded Files to External Storage Using the Copy Salesforce Files Action
To copy files from Salesforce storage to an external storage system (such as SharePoint, Google Drive, or other supported providers), we will use the Copy Salesforce Files action.
Add the Copy Salesforce Files CloudFiles action to the flow and configure the following parameters:
- Content Document IDs Specify the Salesforce IDs of the uploaded files. Select Get File Attached Event Details -> SalesforceFiles Details → ContentDocumentIds from the output of the Get Event Details action.
- Drive ID Identify the external storage drive where the file should be copied. Select DriveId from the output of the Get Connected Folder action.
- Folder ID Specify the target folder in the external storage system where the file should be copied. Select the appropriate Folder ID from the output of the Get Connected Folder action.
- Library Select the external storage provider (for example, SharePoint, Google Drive, etc.).
- Salesforce Record ID Specify the Salesforce record to which the original file was attached. Select Get File Attached Event Details -> SalesforceFiles Details → ParentId from the output of the Get Event Details action.
This configuration ensures that the uploaded file is copied to the correct Account folder in external storage and remains properly associated with the Salesforce record.
This is how the Copy Salesforce Files action is configured in the flow.
Refer to the GIF below for a visual walkthrough of this step.
Delete files from the Salesforce storage
Once the files have been successfully copied from Salesforce storage to the external storage system, the final step is to delete the original files from Salesforce storage. This ensures that files are retained only in external storage, helping reduce Salesforce storage usage.
To achieve this, we will add another branch to the existing Decision element in the flow. This branch will handle events that confirm a successful file copy and will initiate the deletion process.
The detailed configuration of this branch is covered in the steps that follow.
1 - Use a Decision Element to Identify Successful File Copy Events
Add a new outcome to the existing Decision element to determine when a file has been successfully copied from Salesforce storage to external storage.
Configure the outcome with the following condition:
- $Record → Type equals salesforce-file-copied
This condition ensures that the flow proceeds only after CloudFiles confirms that the file copy operation has completed successfully.
This is how the Outcome Details configuration looks.
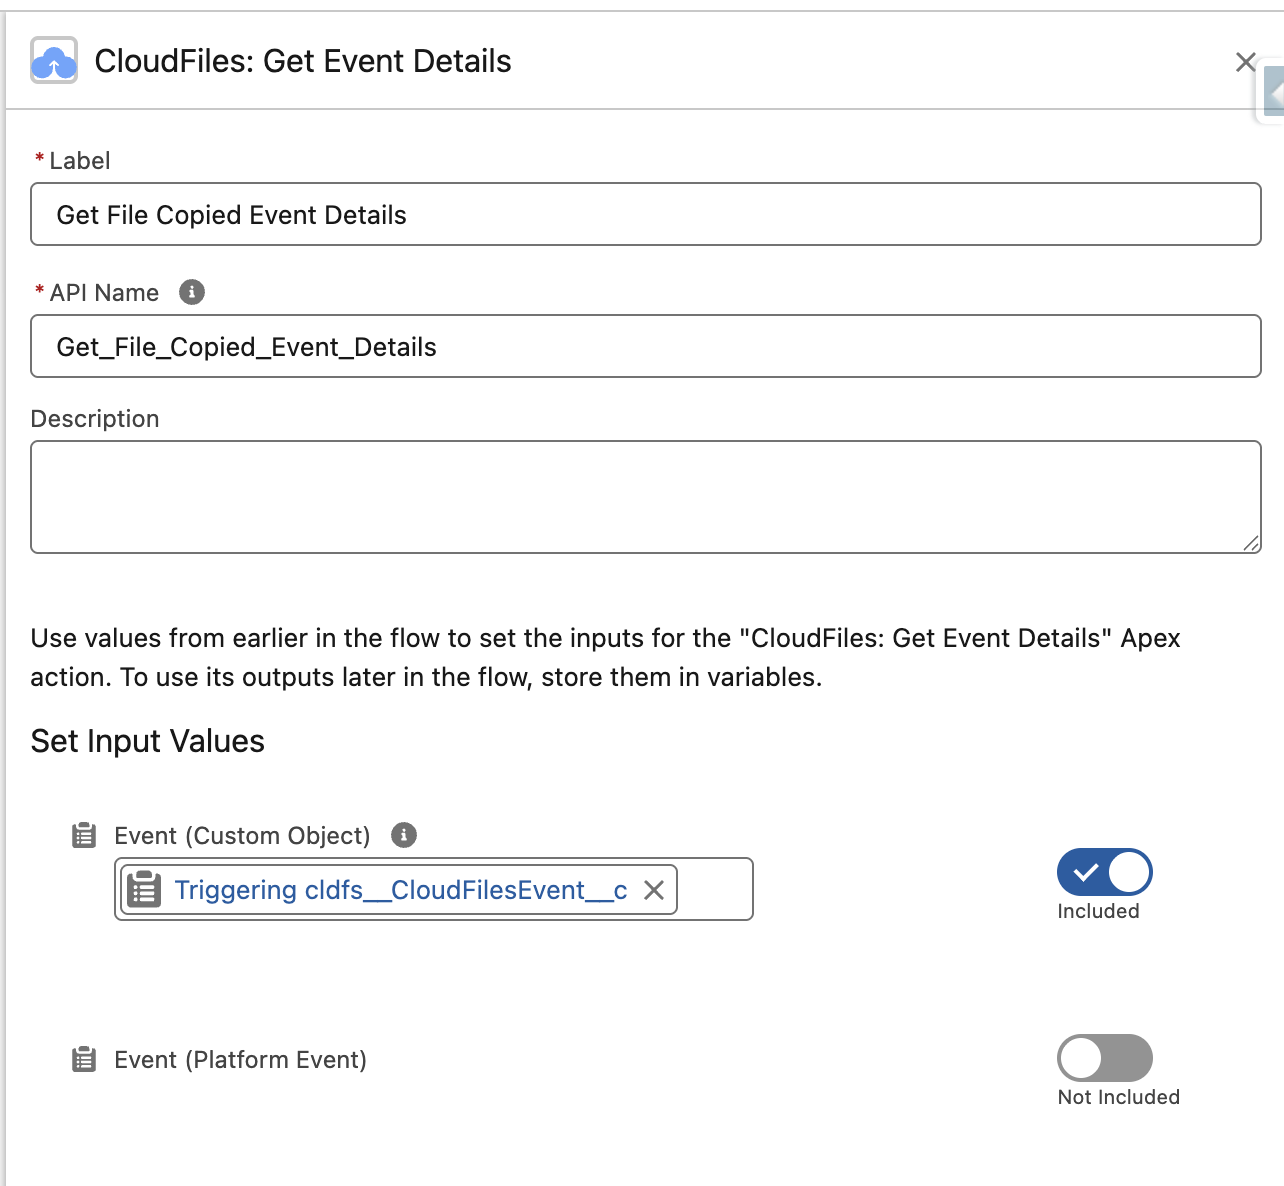
2 - Get Copied File Event Details Using the Get Event Details Action
To retrieve details of the Salesforce File Copied event, add the Get Event Details action to the flow. This action provides information related to the copied file, including the Content Version ID, which is required for identifying and deleting the original file in Salesforce storage.
When configuring this action:
- Add the Get Event Details CloudFiles action
- In the Event (Custom Object) dropdown, select Triggering Record
This is how the Get Event Details action is configured in the flow.
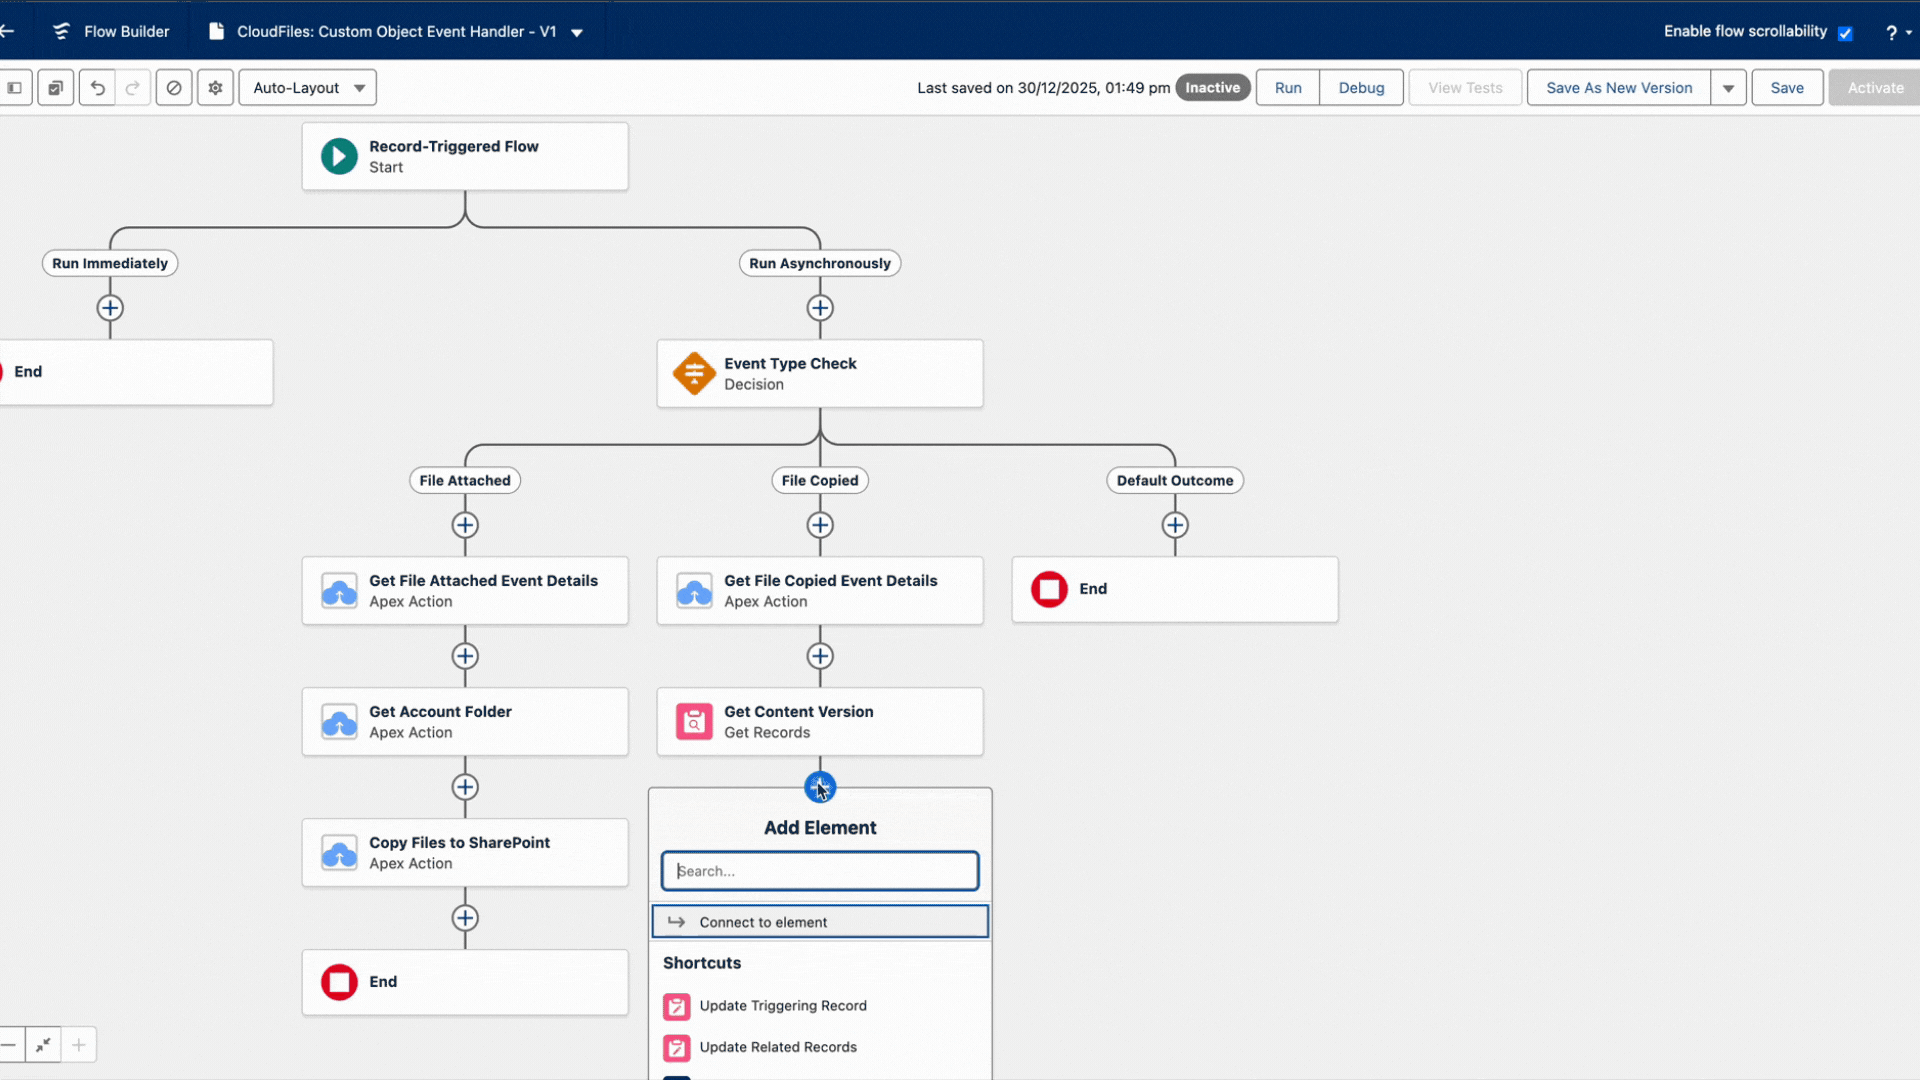
3 - Get the Content Version of the Original Salesforce File Using Get Records
To identify the original file uploaded to Salesforce storage, we need to retrieve its Content Version record. A Content Version represents a specific version of a file stored in Salesforce and contains the reference required to delete the associated document.
To do this, add a Get Records element to the flow and configure it as follows:
- Object: ContentVersion
- Condition: ContentVersionId equals Get File Copied Event Details -> SalesforceFileCopied → ContentVersionId (This value is obtained from the output of the previous Get File Copied Event Details action.)
This configuration allows the flow to locate the correct Content Version associated with the copied file.
Refer to the GIF below for a visual walkthrough of configuring the Get Records element.
4 - Delete original file using 'Delete Records' action
Once the Content Version of the original file has been retrieved, the final step is to delete the corresponding Content Document from Salesforce storage.
To do this, add a Delete Records element to the flow and configure it as follows:
- Object: ContentDocument
- Condition: ContentDocumentId equals Get Content Version -> ContentDocumentId (This value is obtained from the output of the previous Get Records action.)
This step permanently removes the original file from Salesforce storage after it has been successfully copied to external storage.
Refer to the GIF below for a visual walkthrough of configuring the Delete Records element.
That's it! Save and activate the flow to complete the setup.
Test the flow in action
Now that the setup is complete, let's test the flow to verify that files are automatically moved from Salesforce storage to the Account folder in external storage.
Follow the steps below to validate the configuration:
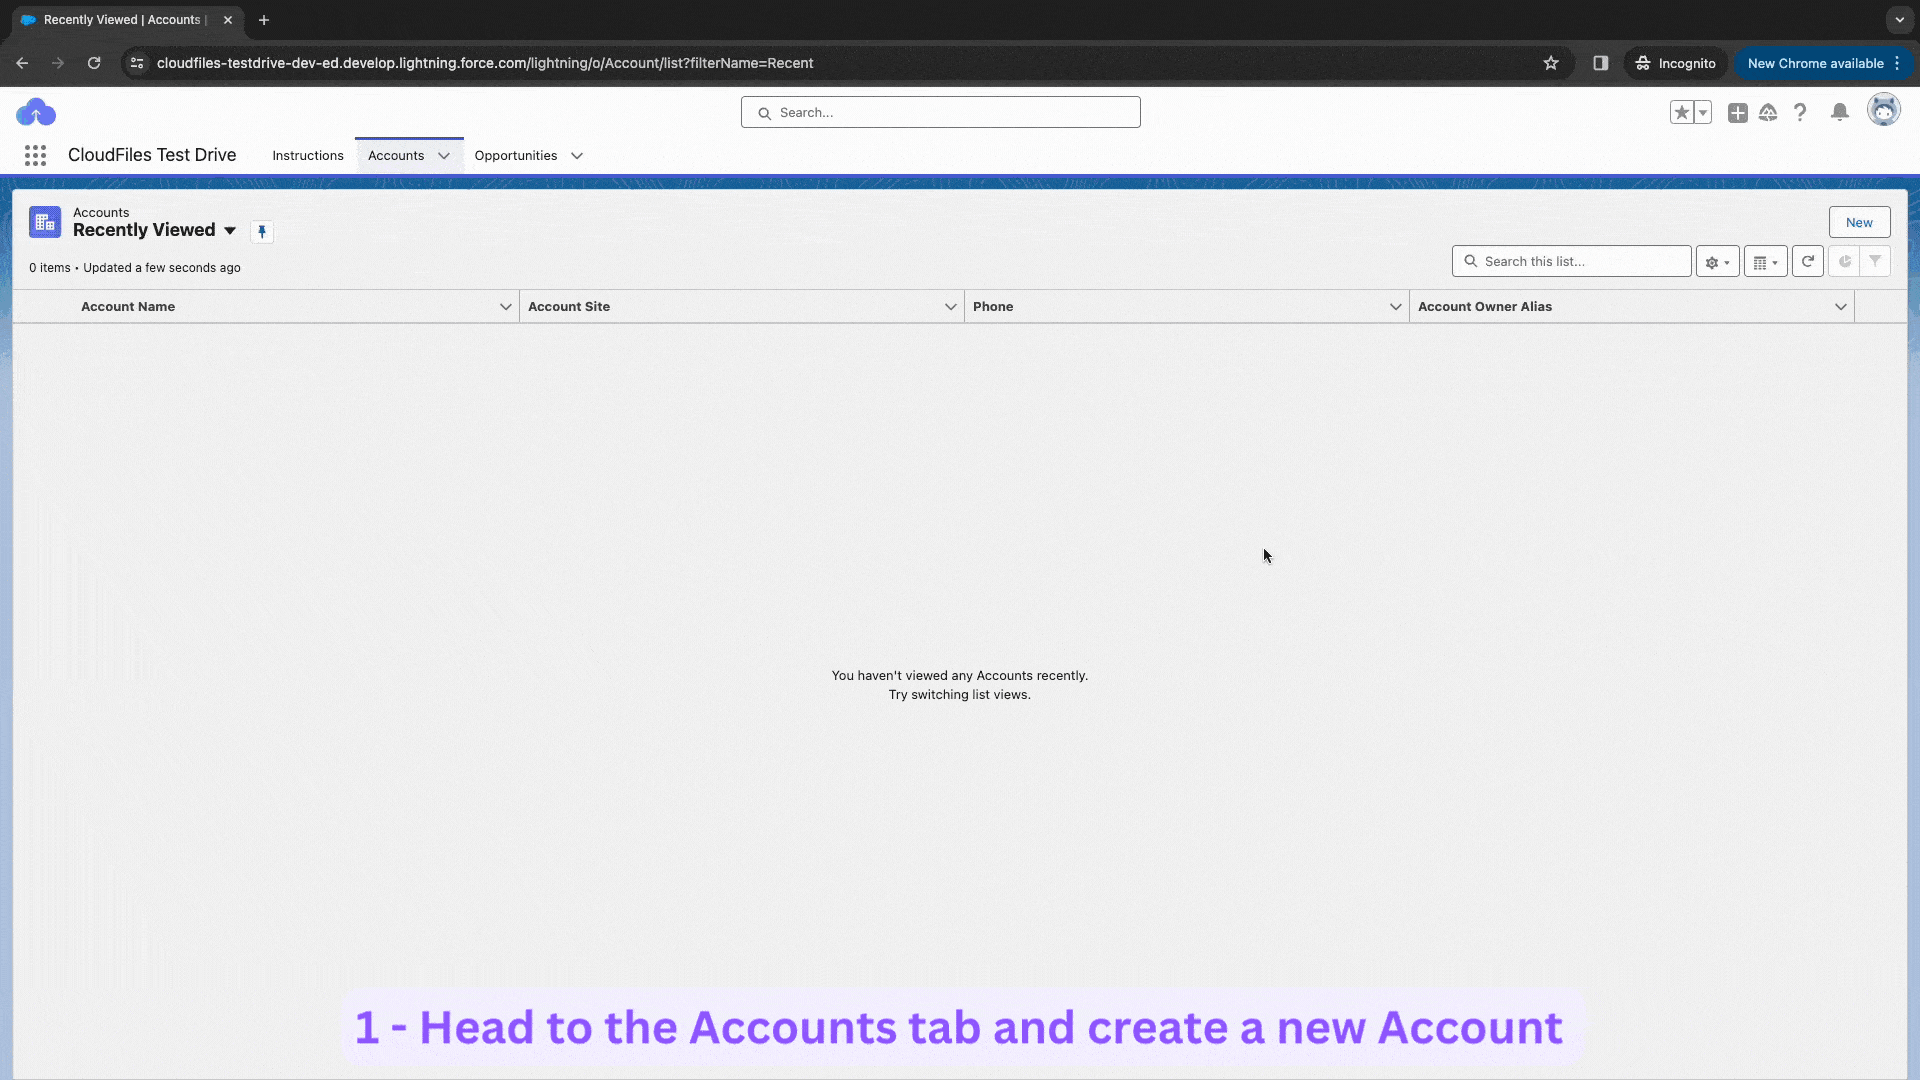
- Upload a file to an Account
- Create a new Account record or open an existing one.
- Upload a file in the Notes & Attachments section.
- Verify the file in external storage
- Navigate to the Files tab.
- The flow may take a few seconds to execute, so click the refresh icon in the top-right corner of the CloudFiles widget if needed.
- Confirm that the uploaded file appears in the Account's folder in external storage.
- Confirm deletion from Salesforce storage
- Navigate back to Notes & Attachments.
- Verify that the original file has been removed from Salesforce storage.
Congratulations! You've successfully configured the automation to move files from Salesforce storage to the corresponding Account folder in external storage.