Overview
In this tutorial, we will see how CloudFiles can be used with Salesforce flow automations to extract multiple properties from documents using custom metadata. Each time a file is uploaded into Salesforce or external storage, the following actions will occur:
- The file is processed using CloudFiles Document AI.
- The natural language query is stored as a field in Custom Metadata and is used to extract information from the document. .
- The extracted data is processed using Salesforce Apex.
In order to setup this automation, you first need to have some pre-requisites. After this you can start setting up some query automations and updates to achieve your use-case. Check the sections below for more information.
Pre-requisites
Before starting with this tutorial, you need to ensure that CloudFiles Document AI is properly installed & configured in your system. Additionally, you also need to create some initial automations to process the files before you can query them. Check the 2 sections below carefully -
Installation & Configuration
Ensure the following before starting:
- CloudFiles Document AI Installation and Configuration are complete.
- You have an Active Subscription or Trial of CloudFiles Document AI.
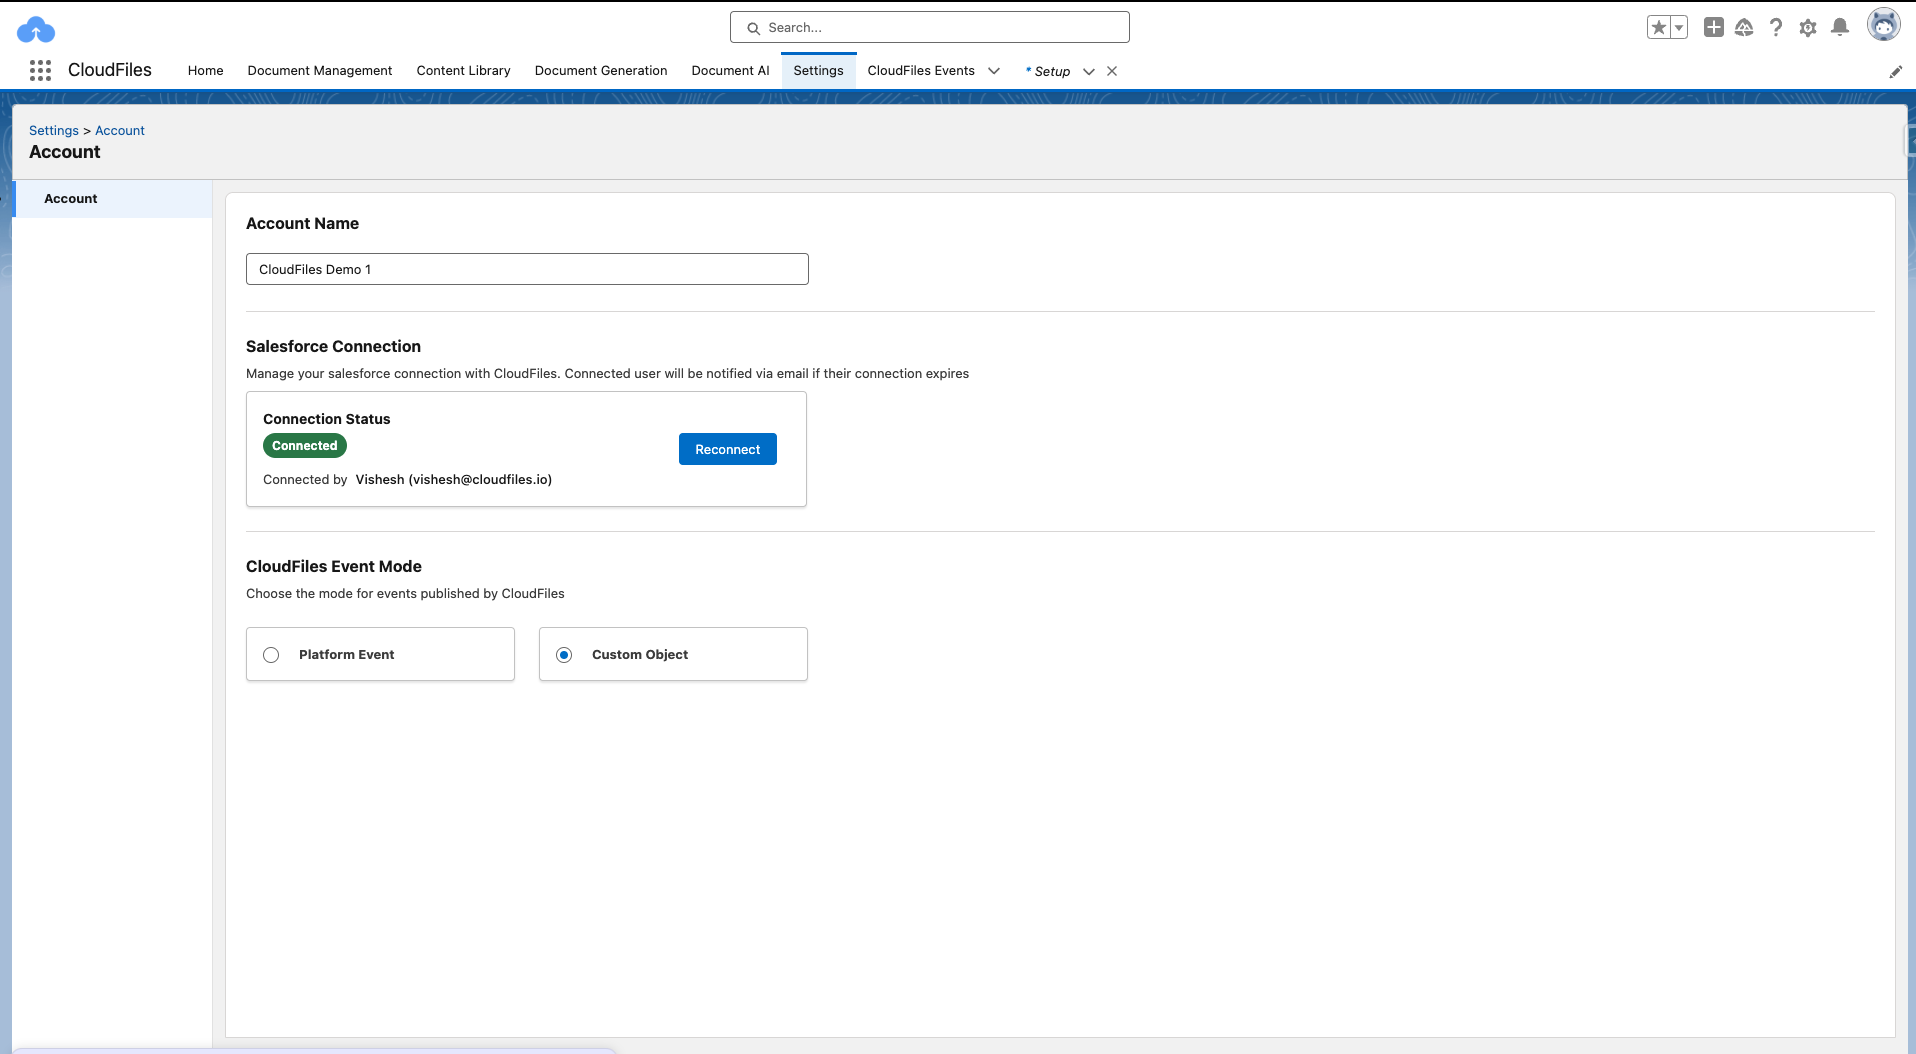
- The CloudFiles Event Mode setting is set to Custom Object
Initial Automation Setup
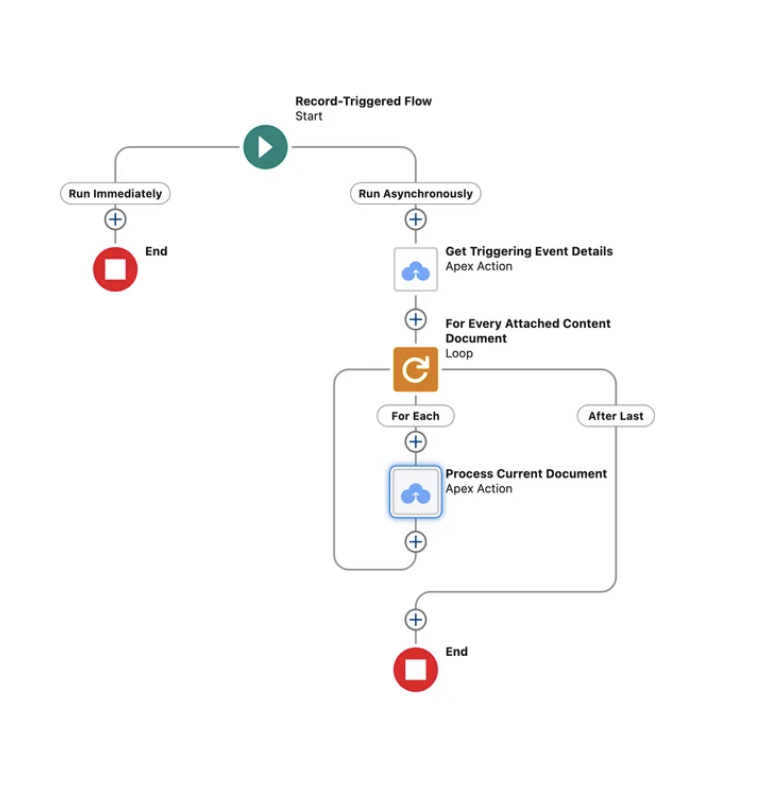
There are 2 flows you will need to set up to process the uploaded files. The first flow is triggered when the document is uploaded into Salesforce . This flow sends the file to AI for processing. This might take a few seconds. Once the AI is done with processing, the second flow will trigger which will contain the processed document. You can then run queries on this processed document.
- Flow 1: Send Document For Processing - Triggered when file is uploaded into Salesforce or external storage. Sends the file for processing which may take a few seconds to a minute.
- Flow 2: Document Processing Complete - Triggered when the file has been processed by AI. Performs queries on the file to extract the data.
All information related to setting up these flows is given in the AI Flows - Initial Setup Guide article. Please go through this article carefully to set up these flows.
Once your flow setup is complete, your flows should look like the following.
Configure the Custom Metadata
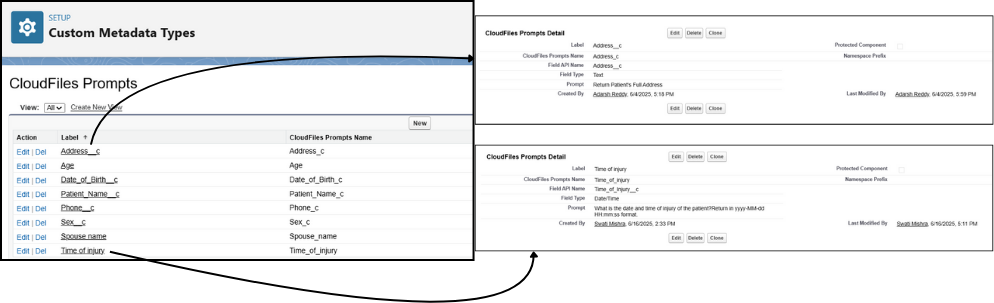
Custom Metadata is lightweight, efficient, supports org-to-org transfers, and runs in the background. In this tutorial, we use a Custom Metadata type called CloudFiles Prompts which includes four fields: Label, Field_API_Name__c, Field_Type__c (e.g., Date, String, Integer), and Prompt__c.
Prompt__c stores a natural language query used to fetch a value, mapped to the field defined in Field_API_Name__c, with its type specified in Field_Type__c.
Steps to Add a New Record to Custom Metadata:
- Go to Setup (click the gear icon → Setup).
- In the Quick Find box, type "Custom Metadata Types" and click it.
- Click on your custom metadata type (e.g., CloudFiles_Prompts).
- Under the custom metadata details, click "Manage Records".
- Click the "New" button to add a new record.
- Fill in the required fields.
- Click Save.
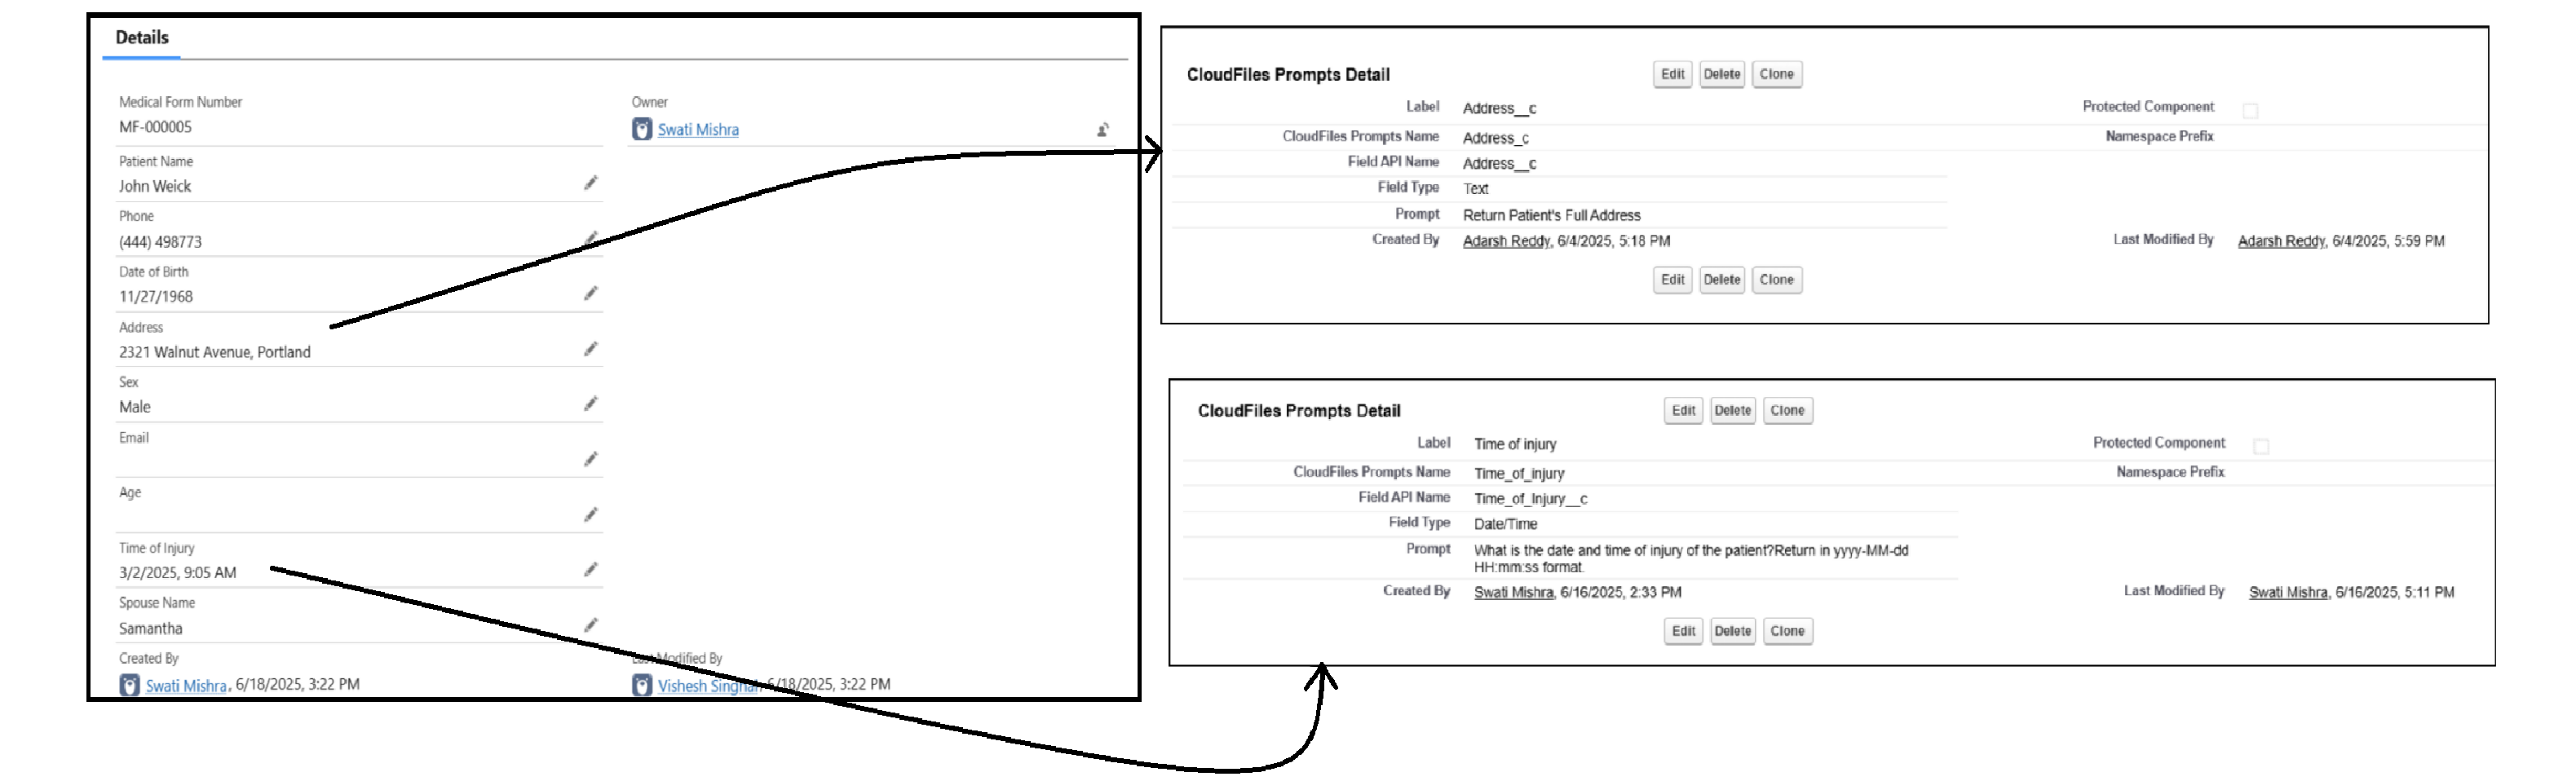
Below is an example of two entries in the CloudFiles Prompts ,Custom Metadata, showing the mapped fields and prompt details:
Query Automation Setup
Now that you have the initial automation setup, we can take the document processed flow and extend it to query the document and update the required fields. In this section, we show how to query the processed document, check the results and perform the necessary updates.
Get the Custom Metadata
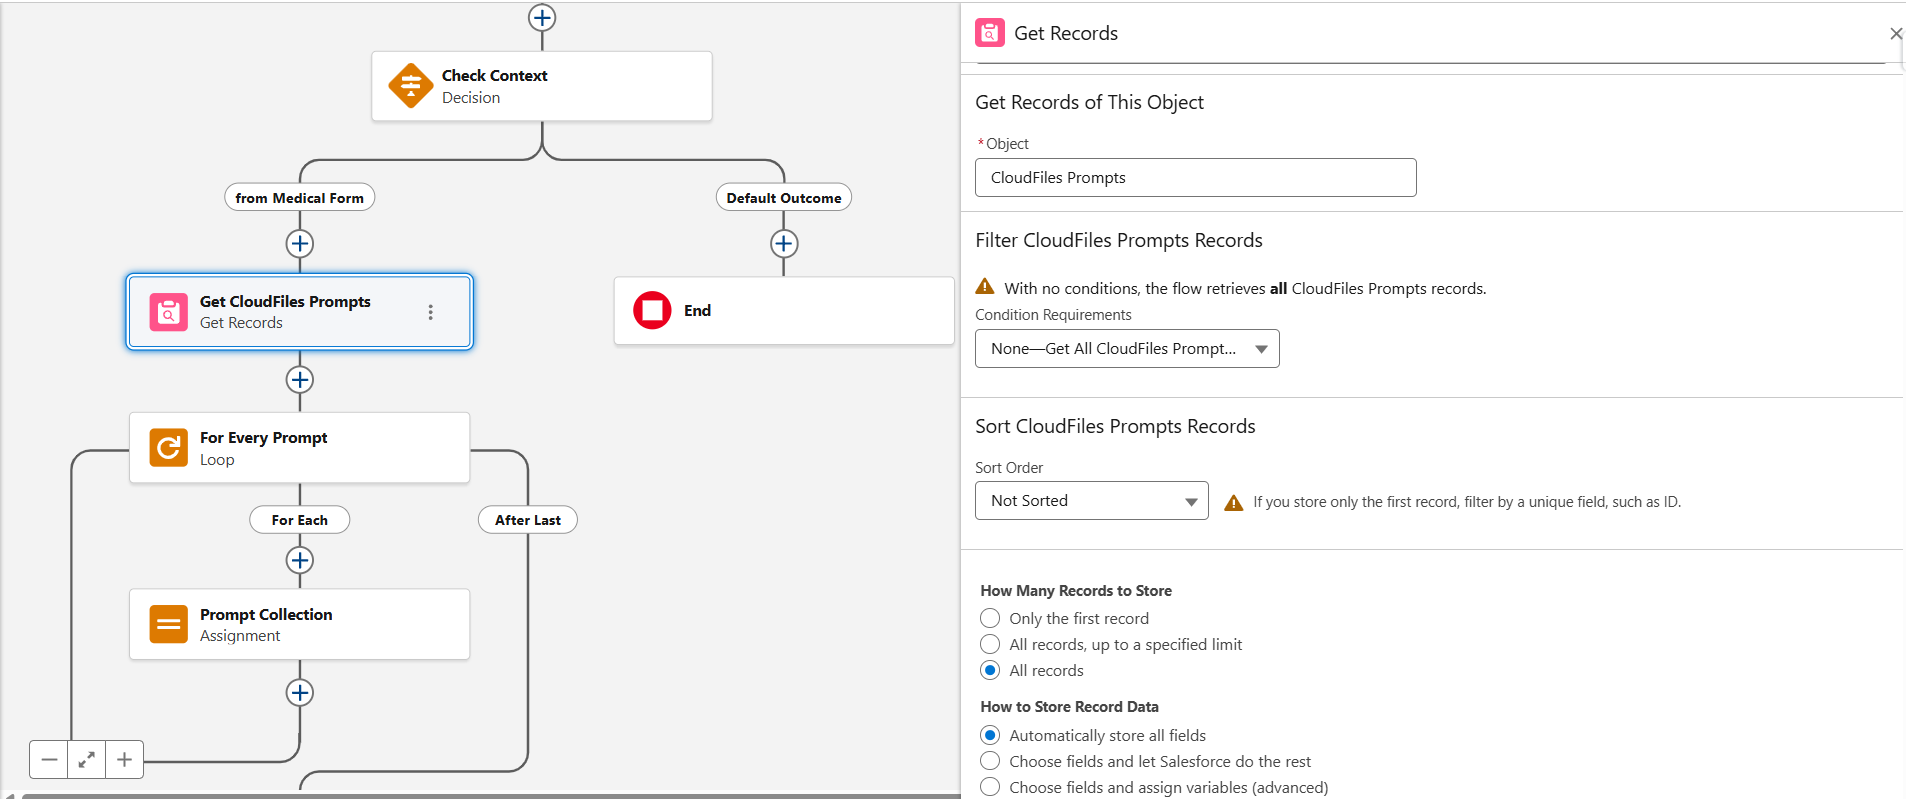
Now to use the Custom Metadata we created, use a Get Records element to fetch all created CloudFiles Prompts records.
Since Custom Metadata behaves like standard records, we can use 'Get Records' to query and retrieve its entries in flows.
Create a Prompt Collection
Once the CloudFiles Prompts records have been successfully retrieved, we add a Loop element to iterate through the output CloudFiles Prompts record collection. For each record in the loop,we create an Apex-defined variable Var_Prompt to hold structured data such that:
- {!Var_Prompt.id} <- {!For_Every_Prompt.Field_API_Name__c}
- {!Var_Prompt.query} <- {!For_Every_Prompt.Prompt__c}
Then the populated Var_Prompt is added into the Apex-defined collection variable VarColl_Prompt.
Execute queries in batch
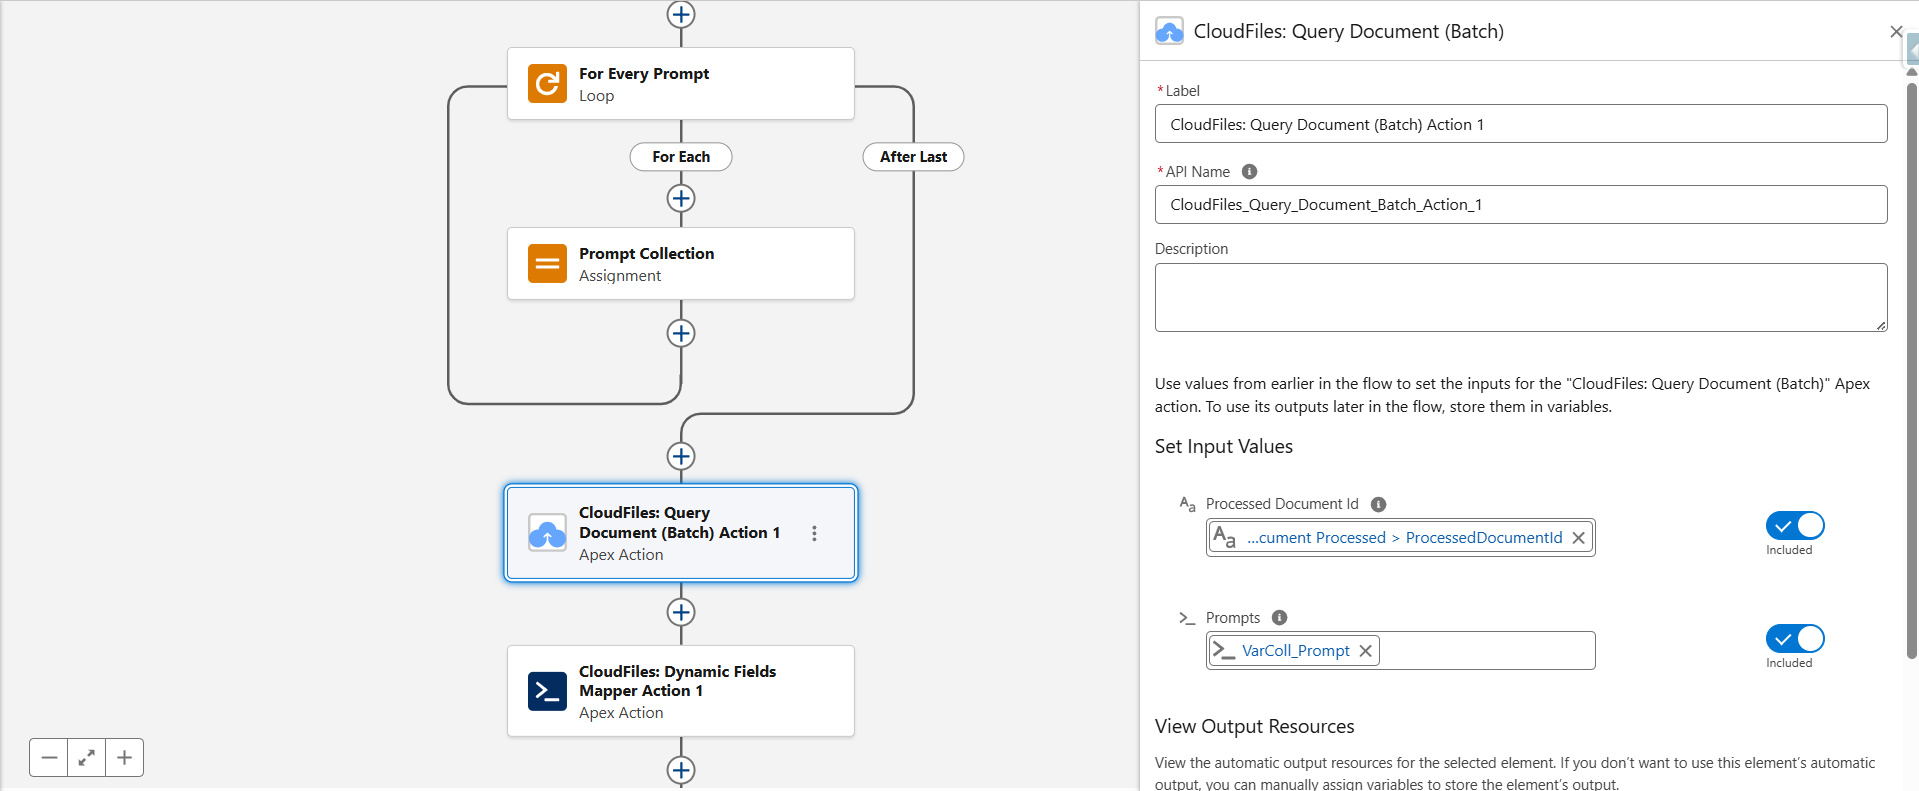
The previous steps consolidates all queries into a single collection, preparing them for batch execution using Query Document/Dataset (Batch). In this step, we will actually use this action along with the collection variable from previous step to execute these queries. This action takes in 2 inputs -
- Processed Document Id: Select Triggering cldfs__CloudFilesEvent__c {!Get_Triggering_Event_Details.DocumentProcessed.ProcessedDocumentId}
- Prompts: Select VarColl_Prompt (the previously created query collection)
The final action with the inputs is shown below -
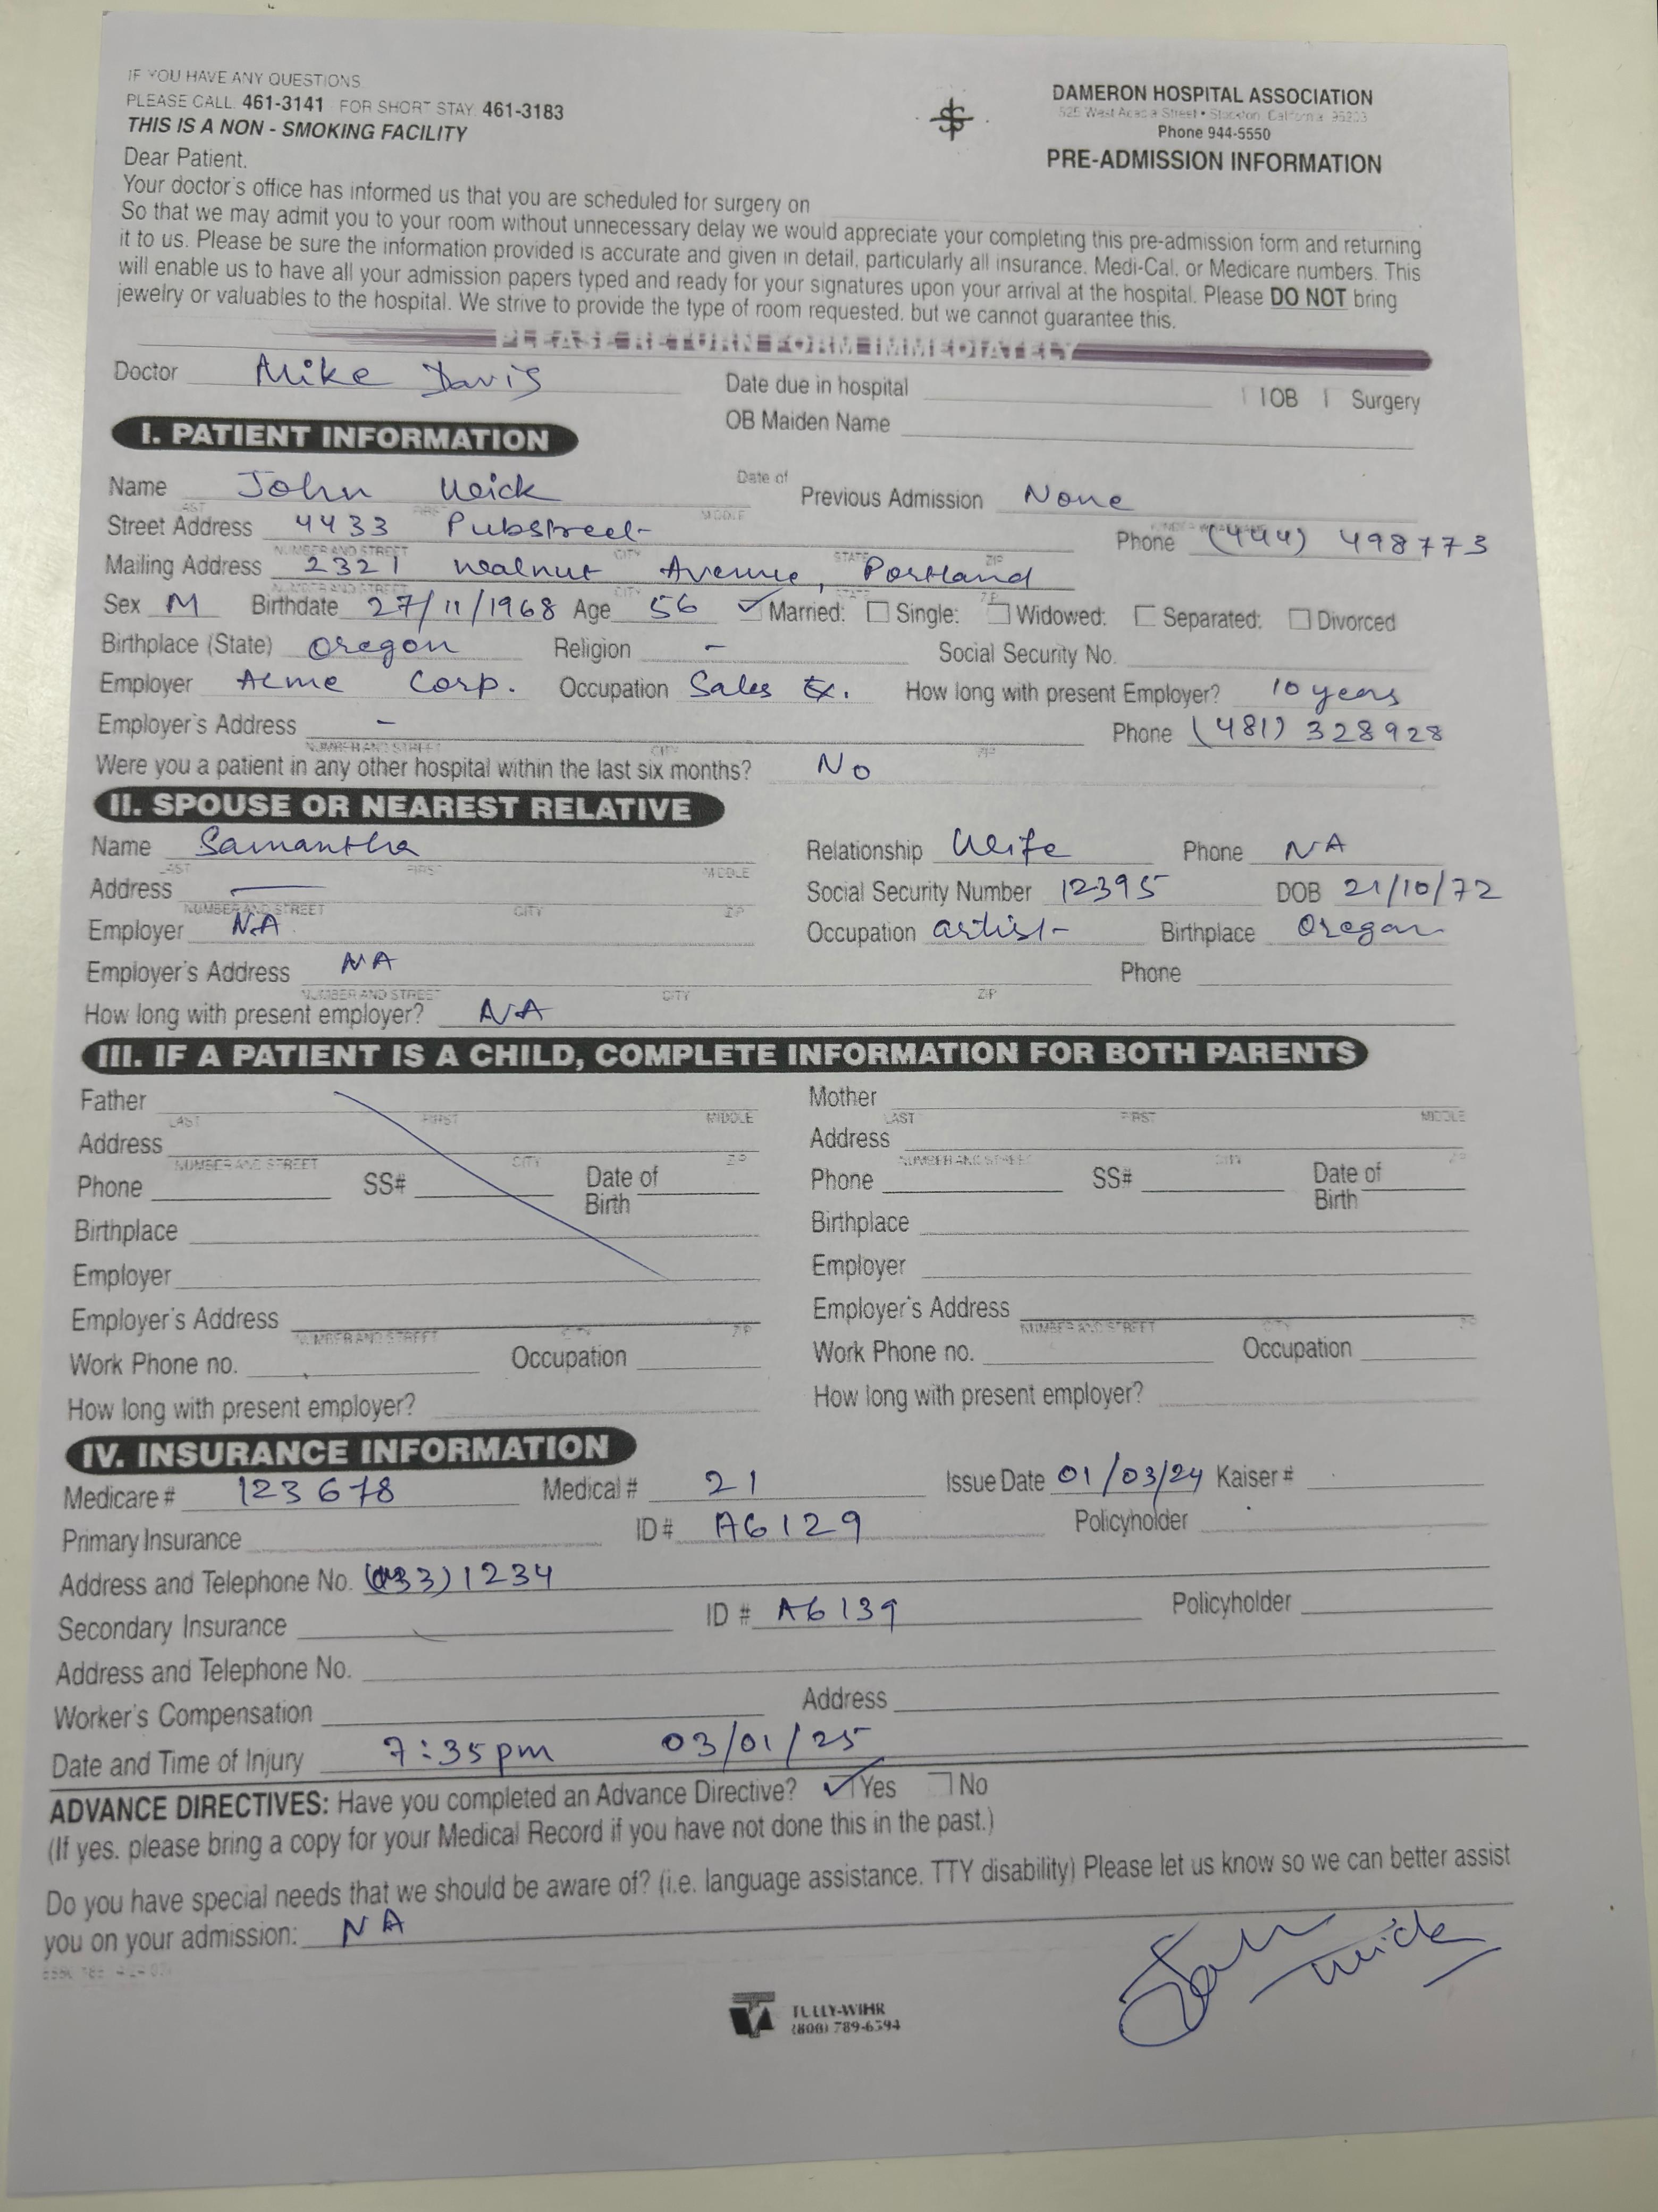
Suppose the medical form shown below is uploaded to the Files section of the corresponding record.
The image below illustrates how values extracted using prompts stored in Custom Metadata are mapped to their respective fields on the Salesforce details page of the medical form.
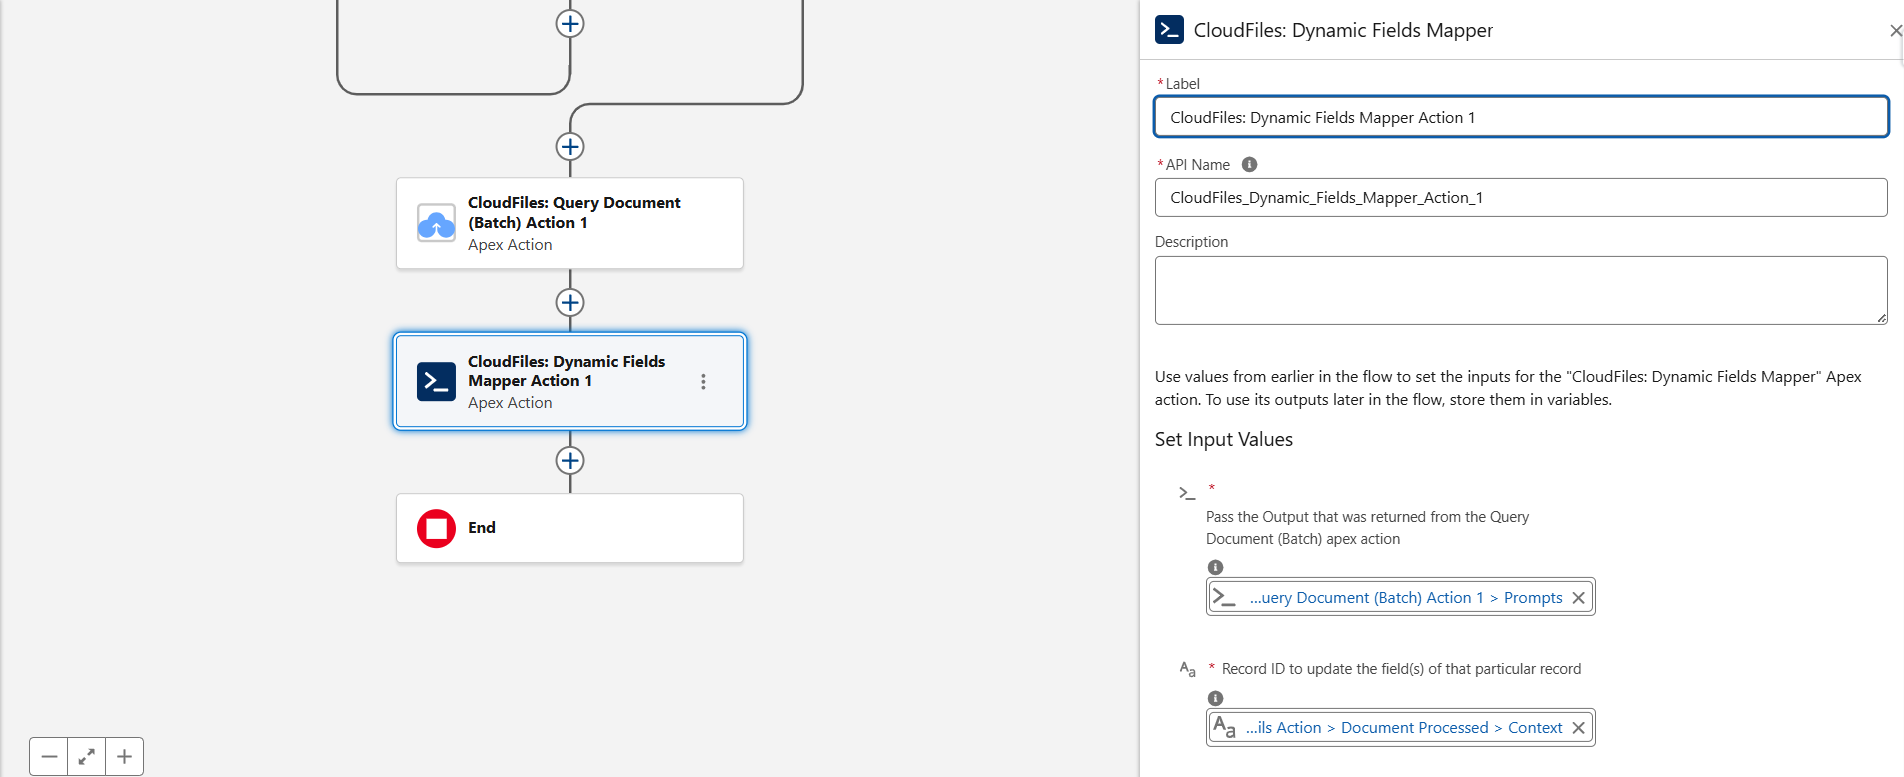
Process AI Output Using Apex Action
Once the AI output is received from the Query (Batch) action, a Apex action is used to handle the data. This Apex class maps the AI-generated prompt results to fields on Medical Form records using the custom metadata type CloudFiles Prompts. It loops through each record and its prompts, checks the field type, sets the field values, and updates the records in Salesforce.
This is the Apex code used to process the AI output:
See it in Action
Now that everything is set up, you can test your flows. When a Medical form is uploaded as a Salesforce File on the record, the properties are extracted and updated in the record.
Note: As Flow Automation executions and document processing via AI may take a short time, the field updates will not reflect immediately. To view the updates, wait briefly and refresh the page.
Whenever a file is processed using the Process Document using AI action, a Document Processed object record is published.
You can query these event object records to verify successful file processing and debug the flow.
Example SOQL Query:
To check Document Processed events sorted by the most recent:
SELECT Id, Name, CreatedDate, cldfs__Data__c
FROM cldfs__CloudFilesEvent__c
WHERE cldfs__Type__c = 'document-processed'
ORDER BY CreatedDate DESC
You can check the Context and File Details in the Data Field of the record.
When a flow runs in debug mode and executes Query Document/Dataset action, you can check the results and modify the queries if required.