E.g. while your community users can upload files into the notes & attachments section, your internal users can only share files with community users using a chatter feed. Moreover, these files are not synced with your cloud storage (e.g. Google Drive, SharePoint, Dropbox etc...).
In this article, we illustrate how a simple CloudFiles widget enables bi-directional file-syncing between your cloud storage, your Salesforce objects and your community users. Although there are a lot of customizations possible, we have focused this article on a specific use-case of associating a SharePoint folder with a Lead Object, exposing the folder contents to an experience site, and then selectively providing access to contents of that folder to the experience site user.
This article is divided into the following sections -
- Installation & Setup (Pre-requisites)- Quick steps on getting ready to use the CloudFiles app
- Connect SharePoint Folder to Salesforce Lead- The folder widget will be used by internal users to do all the SharePoint file management from Salesforce Leads
- Add Folder Widget to Experience Site- The folder widget can also be used on the experience site to make files accessible to experience site users
- Adding permissions for community users - In this section, we add the necessary CloudFiles permission set for the external users
- Accessing files as community user- Here we see how a community user can preview, download, update & upload files directly from the experience site to SharePoint folders
- Setting access control for community users - Internal users can easily choose which files the community users can see or upload etc... We talk about these settings in this section.
1 - Installation & Setup (Pre-requisites)
If you have not already done so, install the CloudFiles app in your production or sandbox environment and connect it to a CloudFiles account
- Install the CloudFiles app from the Salesforce AppExchange.
- Use the CloudFiles App Launcher to connect a CloudFiles account to your Salesforce org.
- Connect integration user for SharePoint. Since Experience cloud users wouldn't be the users in your company's SharePoint, the access works through the integration user. Access control and permissions are handled by CloudFiles for community users.
You can check detailed instructions along with screenshots in our Installation guide here.
2 - Connect SharePoint Folder to Salesforce Lead
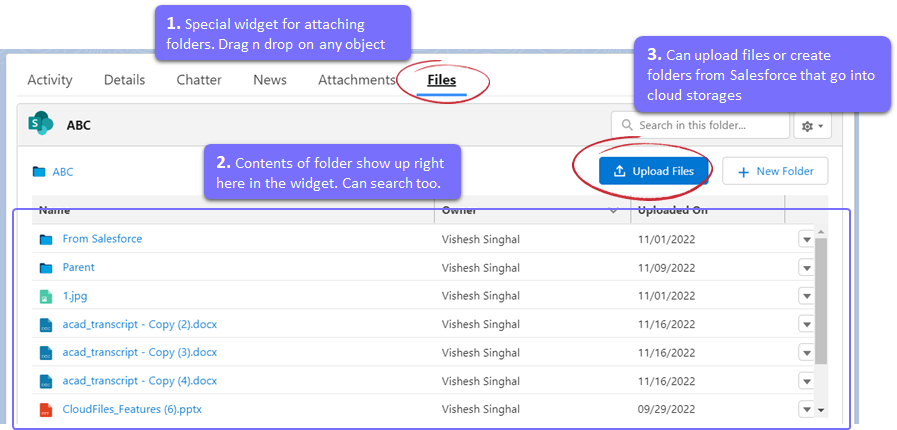
In order to share files on a experience site, we first need to associate some files or folders to a Salesforce object that we wish to share. In this step we use the CloudFiles folder widget to link a SharePoint folder with a Salesforce Lead Object.
Moreover, while we are linking the folder manually in this step, it can also be automated using Salesforce Flows. You can check this article on Connect external folder to a record which has detailed screenshots on the setup.
As shown in Steps 1 & 2 of the above article, you can drag and drop the Folder widget onto the lead objects and then use the link folder button to connect a folder from SharePoint to the record.
Once the folder is connected, its live contents start showing on the record instantly as shown in the screenshot below -
Now that our internal folder is setup on the lead object, we can share this with our community users using the Salesforce Experience Site Builder
3 - Add Folder Widget to Experience Site
Go to Salesforce Setup and search "Digital Experiences". Click on All Sites option under Digital Experiences and click on the "Builder" button of the site where you want to add the file sharing to. For our example, we will add a folder widget to the lead details page of our experience site.
On the left side panel, select components and scroll down to find the 'CloudFiles' Component. Drag and drop this component. Next you need to set reference to a record in your internal salesforce, as well as the record type, to tell this widget where to pick files from. For this example, we simply picked the files from the associated lead using it's recordId.
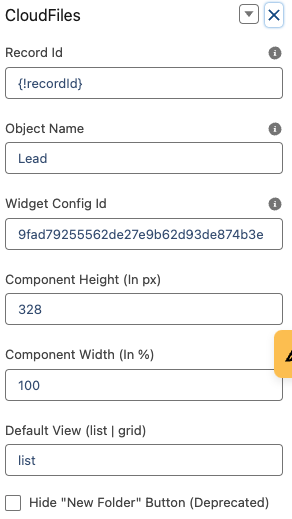
Parameters
- Record Id - Id of the Salesforce object. Use can use the standard variable {!recordId} to show the files/folder related to the displayed record
- Object Name - API name of the object. For example - Lead. For the custom objects, please ensure the API name ends with __c
- Widget Config Id - Optional. Id of the widget configuration to apply to this widget
- Component Height - Optional. Height of the widget. Default value is 328px
- Component Width - Optional. Widget of the widget, in percentage of the total page width. Default value is 100% of the page width
- Default View - Optional. Allowed values are list or grid. Default value is list
- Hide "New Folder" button - This option is deprecated. It's no longer used
The steps are summarized in the video below -
Adding CloudFiles community widget outside of a record page
Sometime you might require to show content to your community users outside the context of a record. For example, in a customer community, you might show all files for the customer on Experience site home page. To achieve this, use the CloudFiles component as you would on the record pages, with following modifications in the parameters -
- Record Id - Account id for the logged in user. For example, if the experience cloud user is a contact in your CRM, this would be {!CurrentUser.accountId}. You can find the list of all expressions available on a Experience site page here
- Object Name - API name of the object. In this use case, Account
Make sure to link the customer folder to their account page in Salesforce
Adding CloudFiles community widget to your Experience site page code
If you want to use CloudFiles community widget in the HTML code of your Experience site page, you can use the following code snippet
Attributes -
- record-id- Id of the Salesforce record which has the content attached
- object-api-name - API name of the Salesforce record which has the content attached. For example - Account
- component-width - Optional. Widget of the widget, in percentage of the total page width. Default value is 100% of the page width
- component-height- Optional. Height of the widget. Default value is 328px
- widget-config-id - Optional. Id of the widget configuration to apply to this widget
That's it, now we are all set to see these files as a experience site user once we set the appropriate permissions for the experience site users.
4 - Add Permissions for experience cloud users
Before your experience site users can see the connected folders, you need to enable appropriate permissions for them. This process can also be automated. Follow the simple steps below -
- Go to Setup > Permission Sets. Select the 'CloudFiles External Users'
- Click on Manage Assignments. Then Click Add Assignment.
- Choose the users you want to add the CloudFiles Permission for.
- Follow the prompts to finish the assignment process.
Now we are ready to see the files as a community user would.
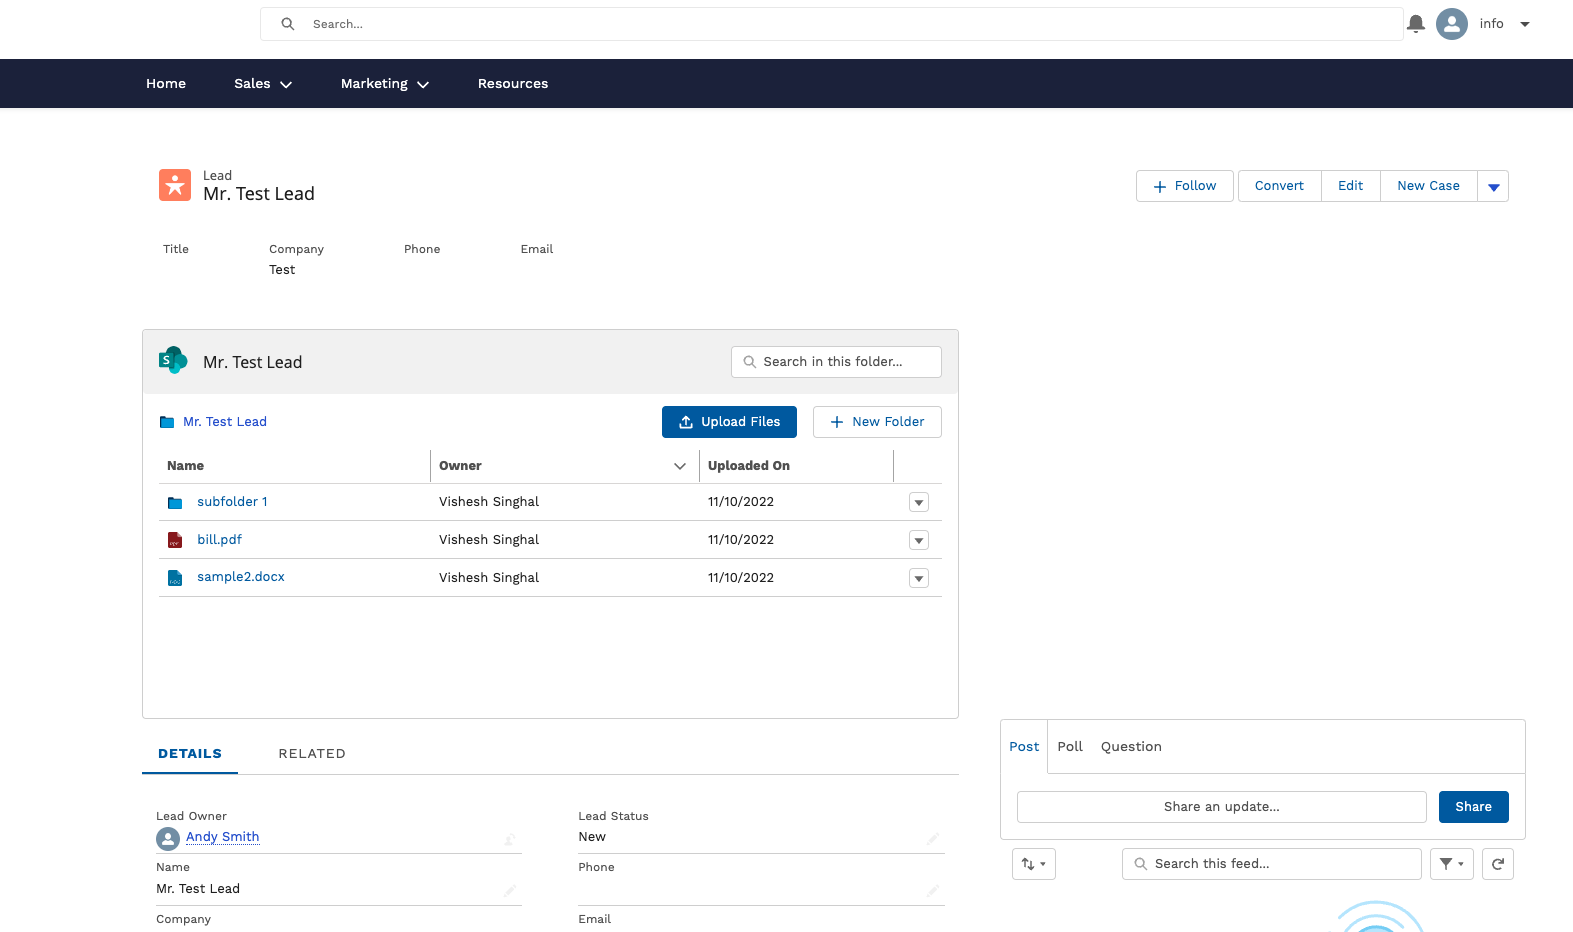
5 - Accessing files as community user
Now login to your experience site as a user. Go to the appropriate page. You should be able to see the Files from the connected folder. You should also be able to upload, download, preview or search the files from right here. Here are the common file & folder operations supported by the CloudFiles Experience Cloud Widget.
- Upload Files, Preview Files, Download Files, Edit / Replace Files -
- New Folder, Rename Folder
- Search for file / folder
- Other operations such as create external sharing link, view analytics etc.. for community users.
The screenshot below shows this in action -
6 - Setting access control for community users
In the previous step, as a community user, you could read and write all the files in the associated Sharepoint folder. However, a common requirement is to restrict this access. For example, you may want the community users to be able to see only certain files in that folder. Moreover, you may also want to restrict the upload or download flexibility.
As an internal user who has access to the Lead Object, you can do easily do this right from Salesforce.