A configuration is a reusable set of rules that tells Document Mapper what to extract from a document and where to write it in Salesforce. Each saved configuration has a unique Config ID that can be reused across list view buttons, detail page buttons, and the Document Mapper Flow Action.
The workflow has these stages, each detailed below:
- Create the configuration and set its objective.
- Add and map fields.
- Test against sample documents.
- Save to generate the Config ID.
- Attach the configuration to a button or Flow.
- Review and approve runs that are held for review.
- Monitor runs.
Create the Configuration
In the CloudFiles app, open the Document AI tab and select Document Mapper to see your existing configurations. Select Create New Configuration to open the setup dialog.
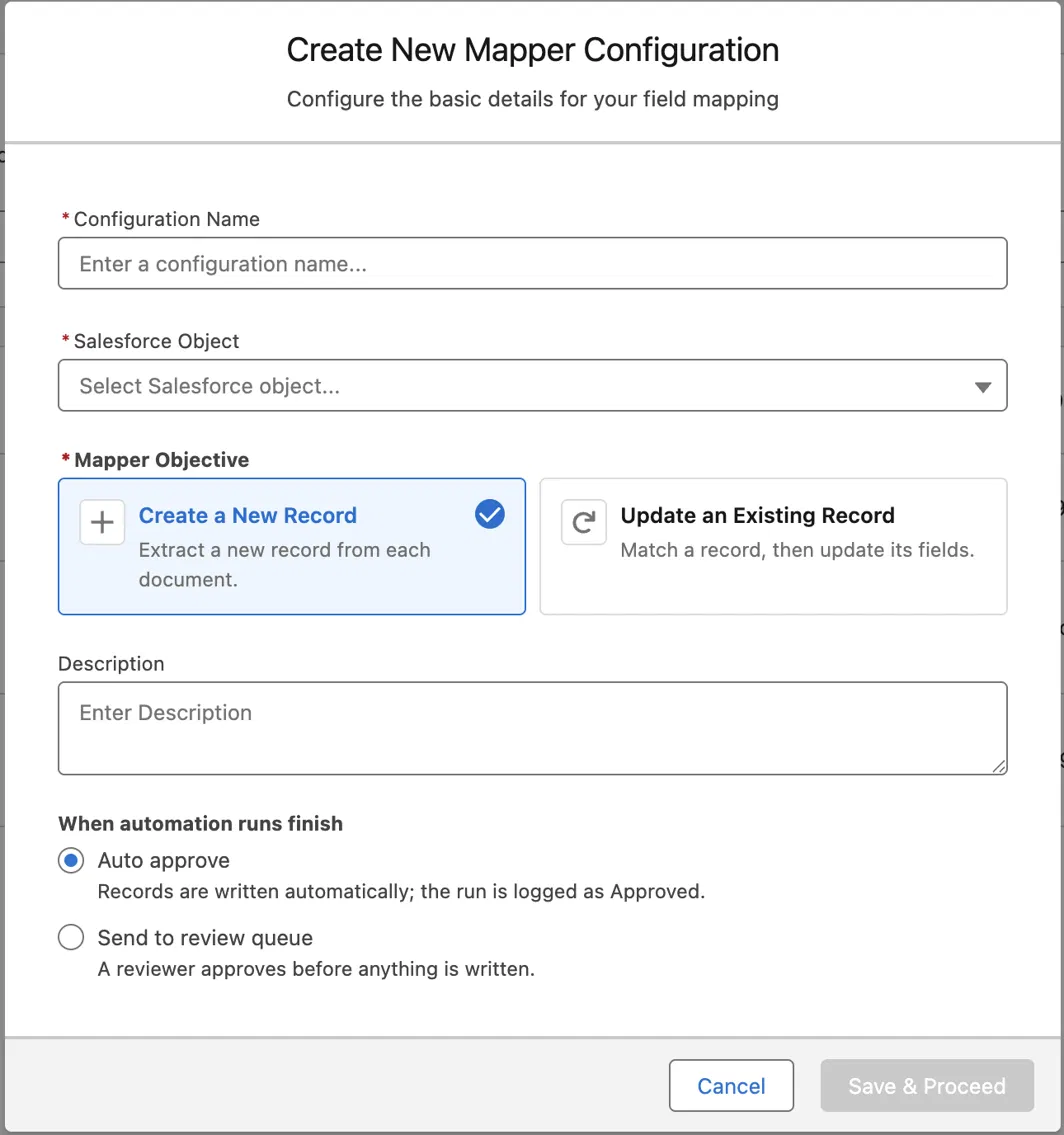
In the dialog, provide the following:
- Enter a Configuration Name (required). Choose a name you will recognize later in the list — for example,
Vendor Invoice → Account. - Select the Salesforce Object (required) — the object records will be written to (for example, Account). This choice determines which fields, lookups, and child relationships become available to map, so it cannot be changed casually later.
- Choose the Mapper Objective (required) by selecting one of the two cards:
| Objective | What it does |
|---|---|
| Create a New Record | Extracts and creates a record of the selected Salesforce object from each document. Choose this when every document should produce a fresh record. |
| Update an Existing Record | Matches an existing record of the selected Salesforce object first, then updates its fields and/or creates child records against it. Choose this when documents carry data that belongs on records you already have. |
- (Optional) Enter a Description to note what the configuration is for. This is helpful when several configurations exist for the same object.
- Under When automation runs finish, choose what happens after each production run:
| Option | Behavior |
|---|---|
| Auto approve | The run processes the document end to end — extraction, matching, and record creation — and commits the result to Salesforce automatically when it finishes, logging the run as Approved. No human step. Use once you trust the mapping. |
| Send to review queue | Results are held with status Pending Review; nothing is written until a person approves it. Use while validating, or for high-stakes objects. See Review and Approve Runs below. |
- Select Save & Proceed. The field mapping workspace opens.
This setting is the default for the whole configuration. Independently of it, an individual run can still be routed to review by a fallback — for example, a lookup that finds no match or several matches. Such a run lands in the same review queue even when the configuration is set to Auto approve.
The Field Mapping Workspace
The workspace has three areas:
| Area | Purpose |
|---|---|
| Mapped Fields (left) | The list of fields you have added, grouped by role |
| Field editor (center) | The settings for whichever field is selected |
| Document preview (right) | Where uploaded test documents appear |
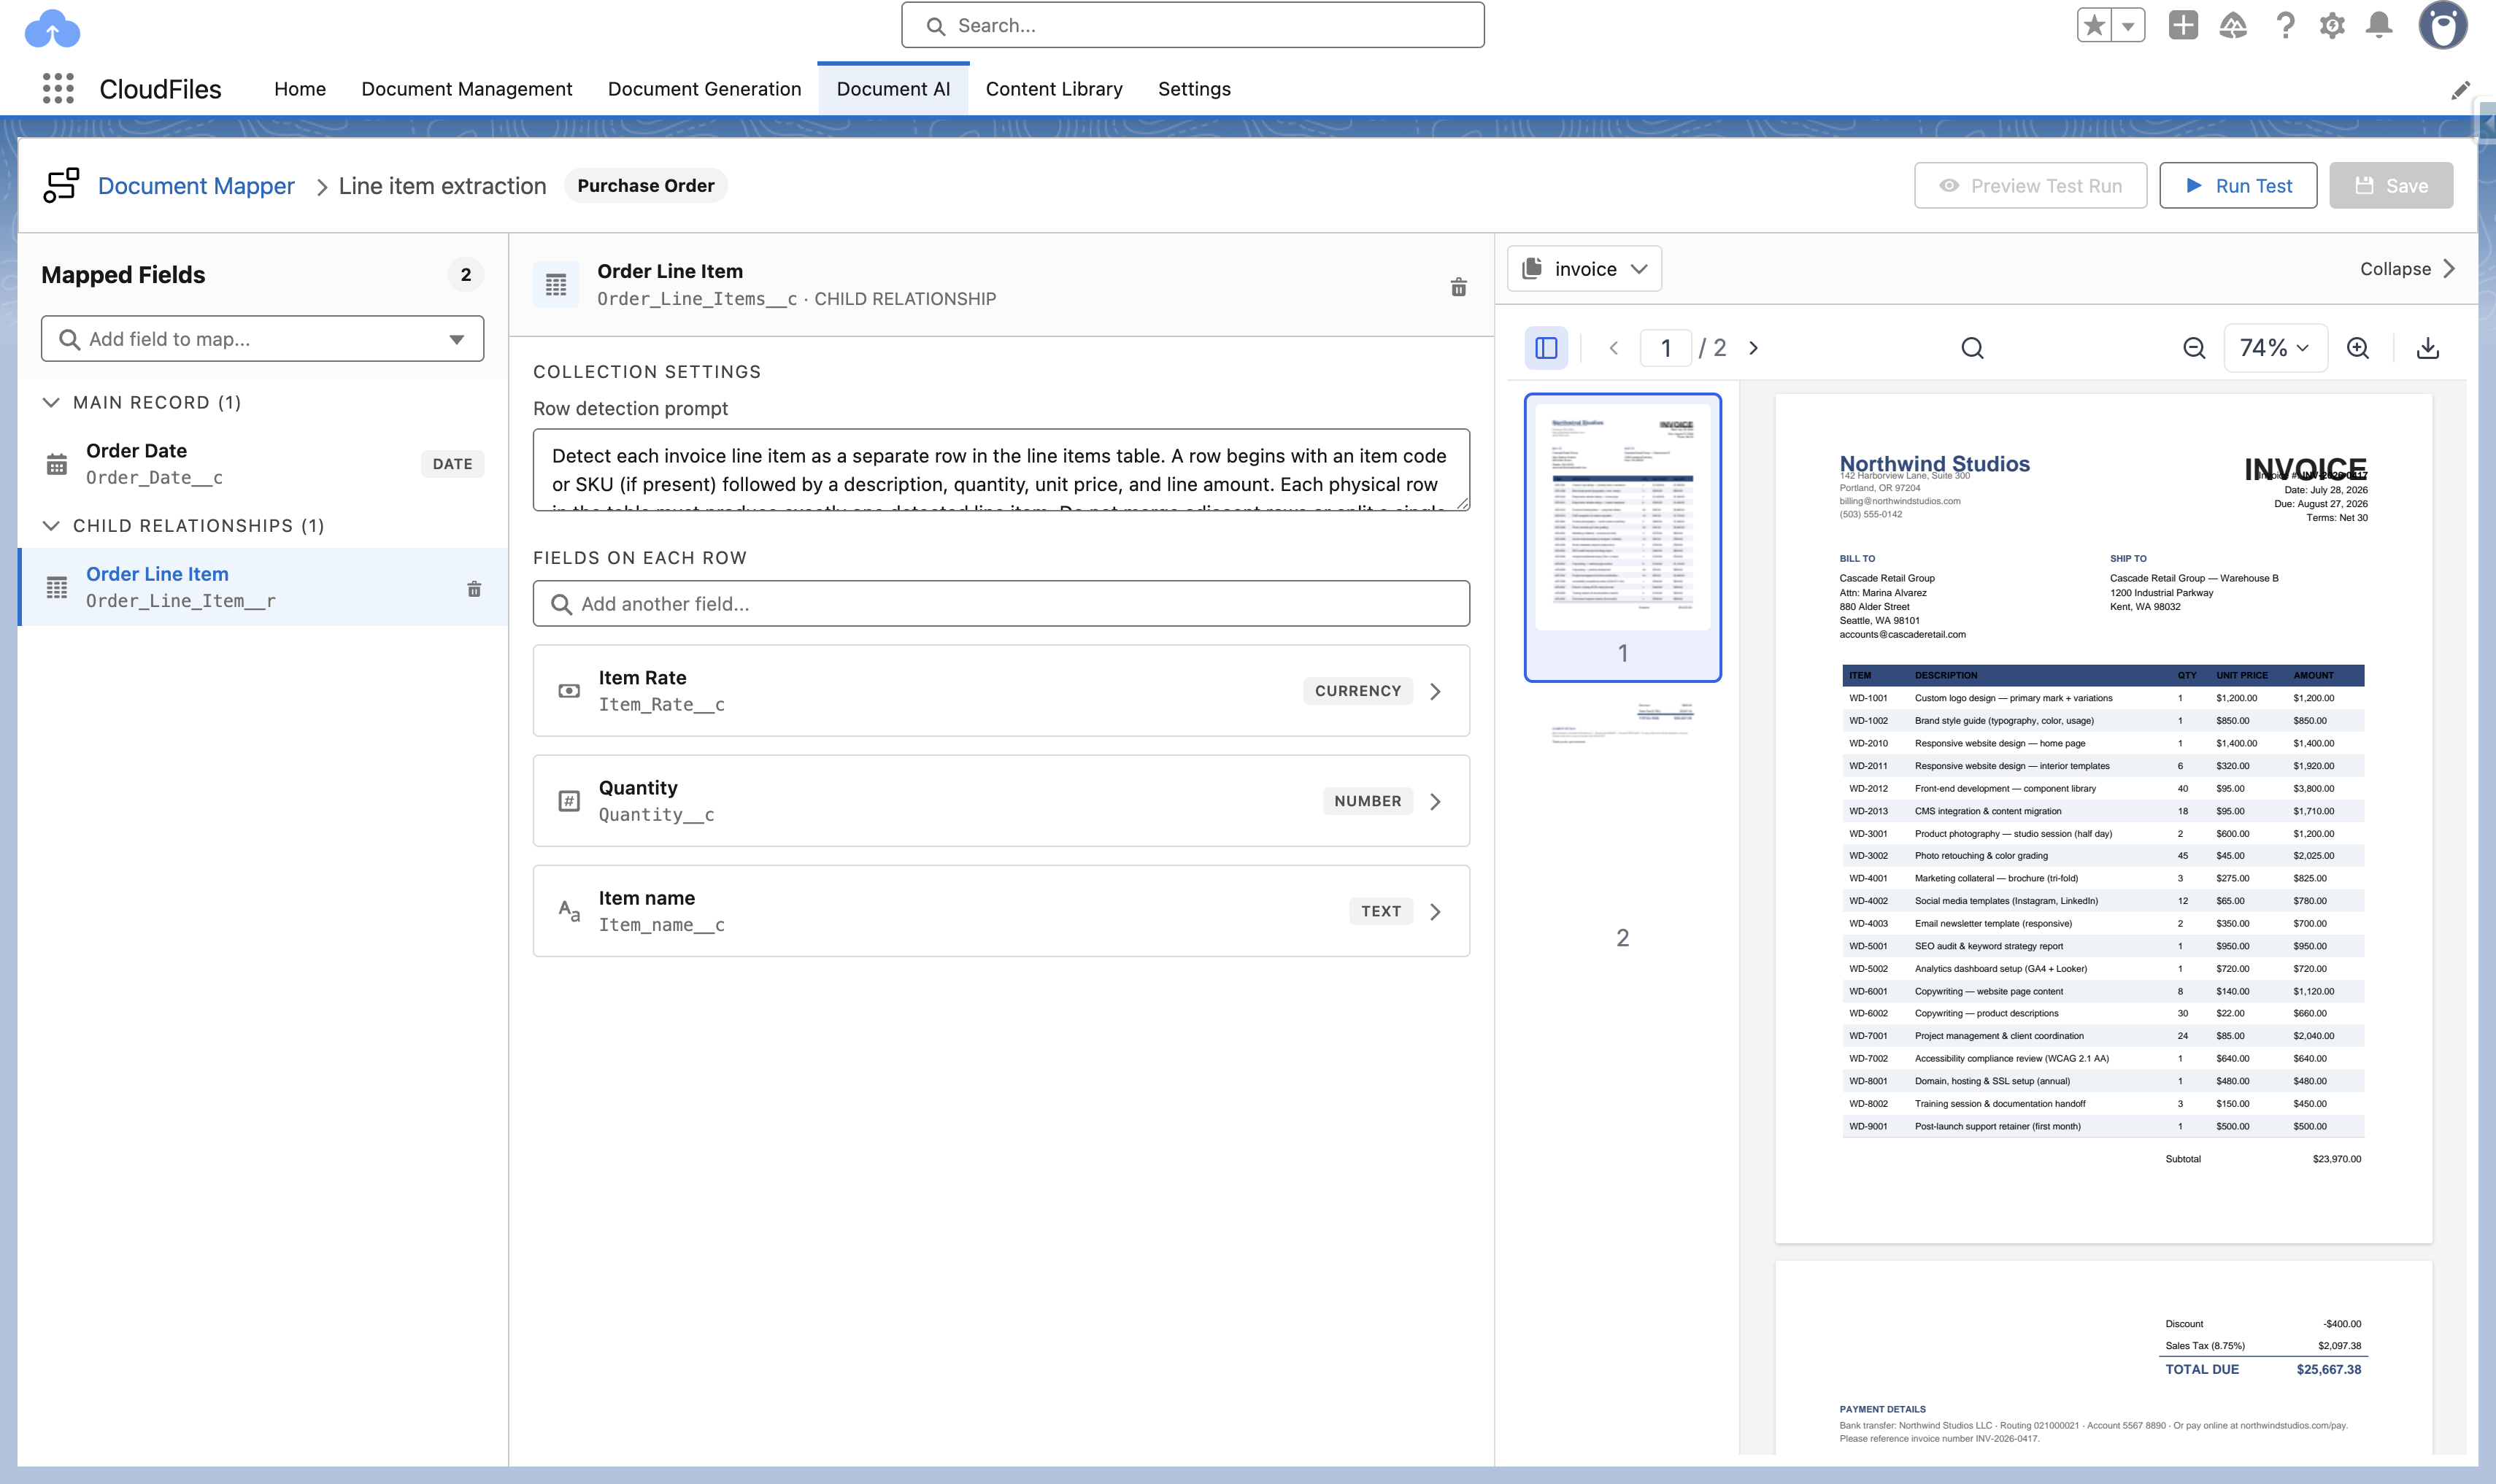
Fields are grouped automatically into three sections in the left rail, each with a live count:
- Main Record — fields written directly to the main record being created or updated.
- Lookups — reference fields that resolve to another Salesforce record, either by matching an existing one or via a flow (see Lookup Fields below).
- Child Relationships — related records created alongside the main record.
Adding a field.
- Select the Add field to map search box at the top of the left rail.
- Type part of the field's name or API name. Matching fields from the selected object appear in the dropdown.
- Select the field. It is added to the appropriate group — Main Record, Lookups, or Child Relationships — automatically, based on its type.
- Select the field in the left rail to open its editor in the center panel.
Each field row shows the field's label, its API name, and a type badge — TEXT, PICKLIST, CURRENCY, DATE, REFERENCE (lookup), CHILD RELATIONSHIP, and so on. Required fields carry a red asterisk and a red dot; you must map these before the configuration can run. The sections below describe the editor for each field type.
Mapping Fields
Document Mapper can map any field on the object — Text, Number, Currency, Date, Percent, Checkbox, Email, Phone, Picklist, Lookup, and child relationships. Most fields are mapped the same way, with a single Source Mapping prompt. Three types offer extra configuration and have their own steps below: picklists, lookups, and child relationships. To map a field with a Source Mapping prompt:
- Select the field in the left rail.
- In the Source Mapping box, describe in plain language how the value should be found in the document.
- Move to the next field. The AI extracts the value at run time and formats it to the field's data type automatically.
Guidance for writing a strong source-mapping prompt:
- Name the location or label the value appears under — “the total in the Payment Terms section,” or “the company in the Company Contact Information block.”
- Disambiguate similar values — if a document has more than one date, say “the invoice date, not the due date.”
- Only describe format when it matters — the AI coerces values into the field's type, so you rarely need to specify date formats or currency symbols.
- Leave a field unmapped if you do not want it populated; there is no penalty for mapping only some fields.
Picklist Fields
A picklist field is constrained to its Salesforce Allowed Values, so the AI can only return one of those valid options.
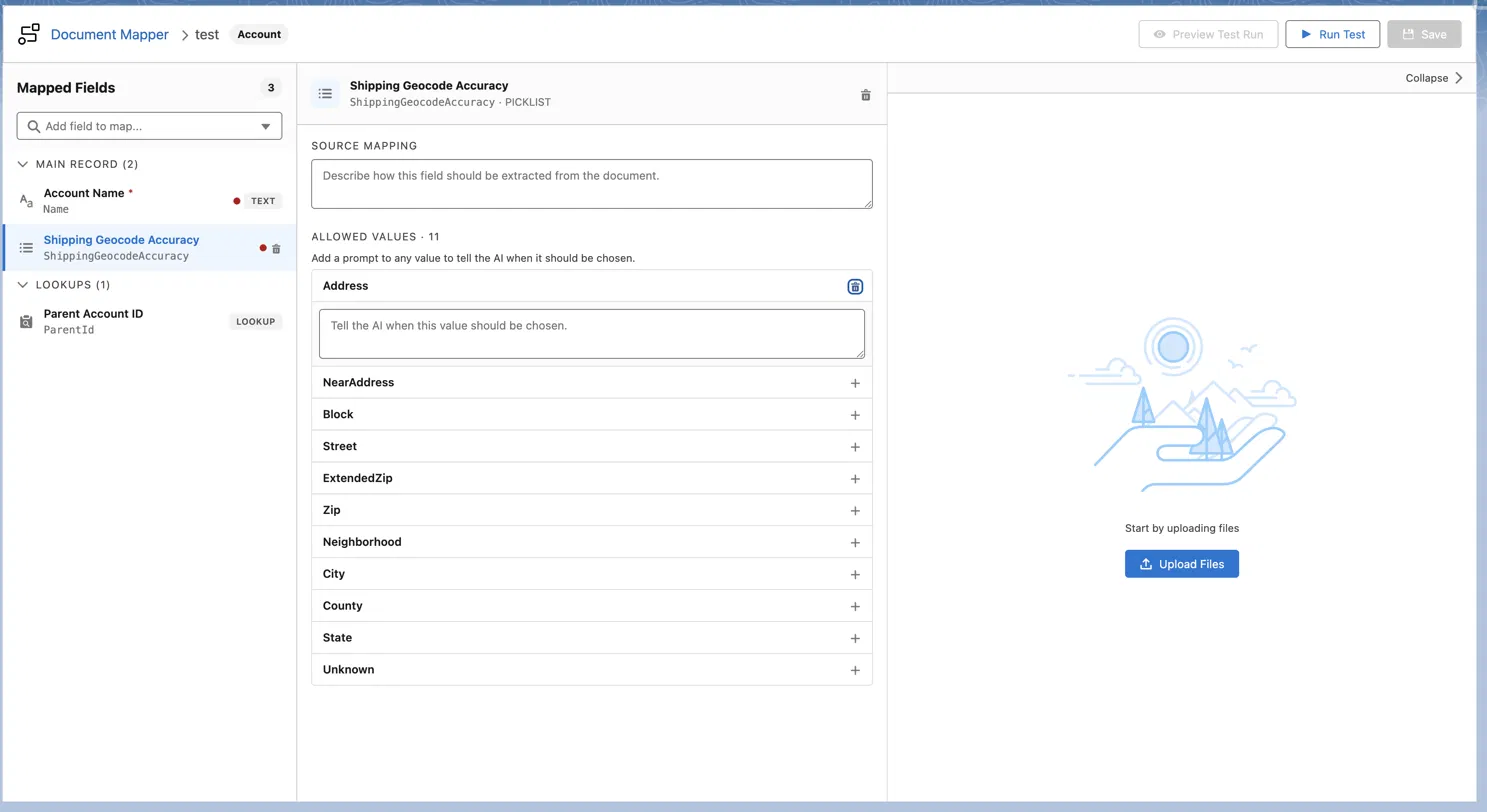
- Select the picklist field in the left rail. The editor shows a Source Mapping box and the full list of Allowed Values (with a count).
- In Source Mapping, describe where the value comes from in the document, the same as any other field.
- Add a per-value prompt for any value that needs clarification (optional):
- Select a value in the Allowed Values list to expand it.
- In the “Tell the AI when this value should be chosen” box, describe the condition under which that value applies — for example, choose
Addressonly when a full street address is present, orCitywhen only a city is given. - Repeat for any other values the AI might otherwise confuse.
- Leave values without a prompt if their meaning is already clear from the label. Per-value prompts are optional and only needed for ambiguous options.
Lookup Fields
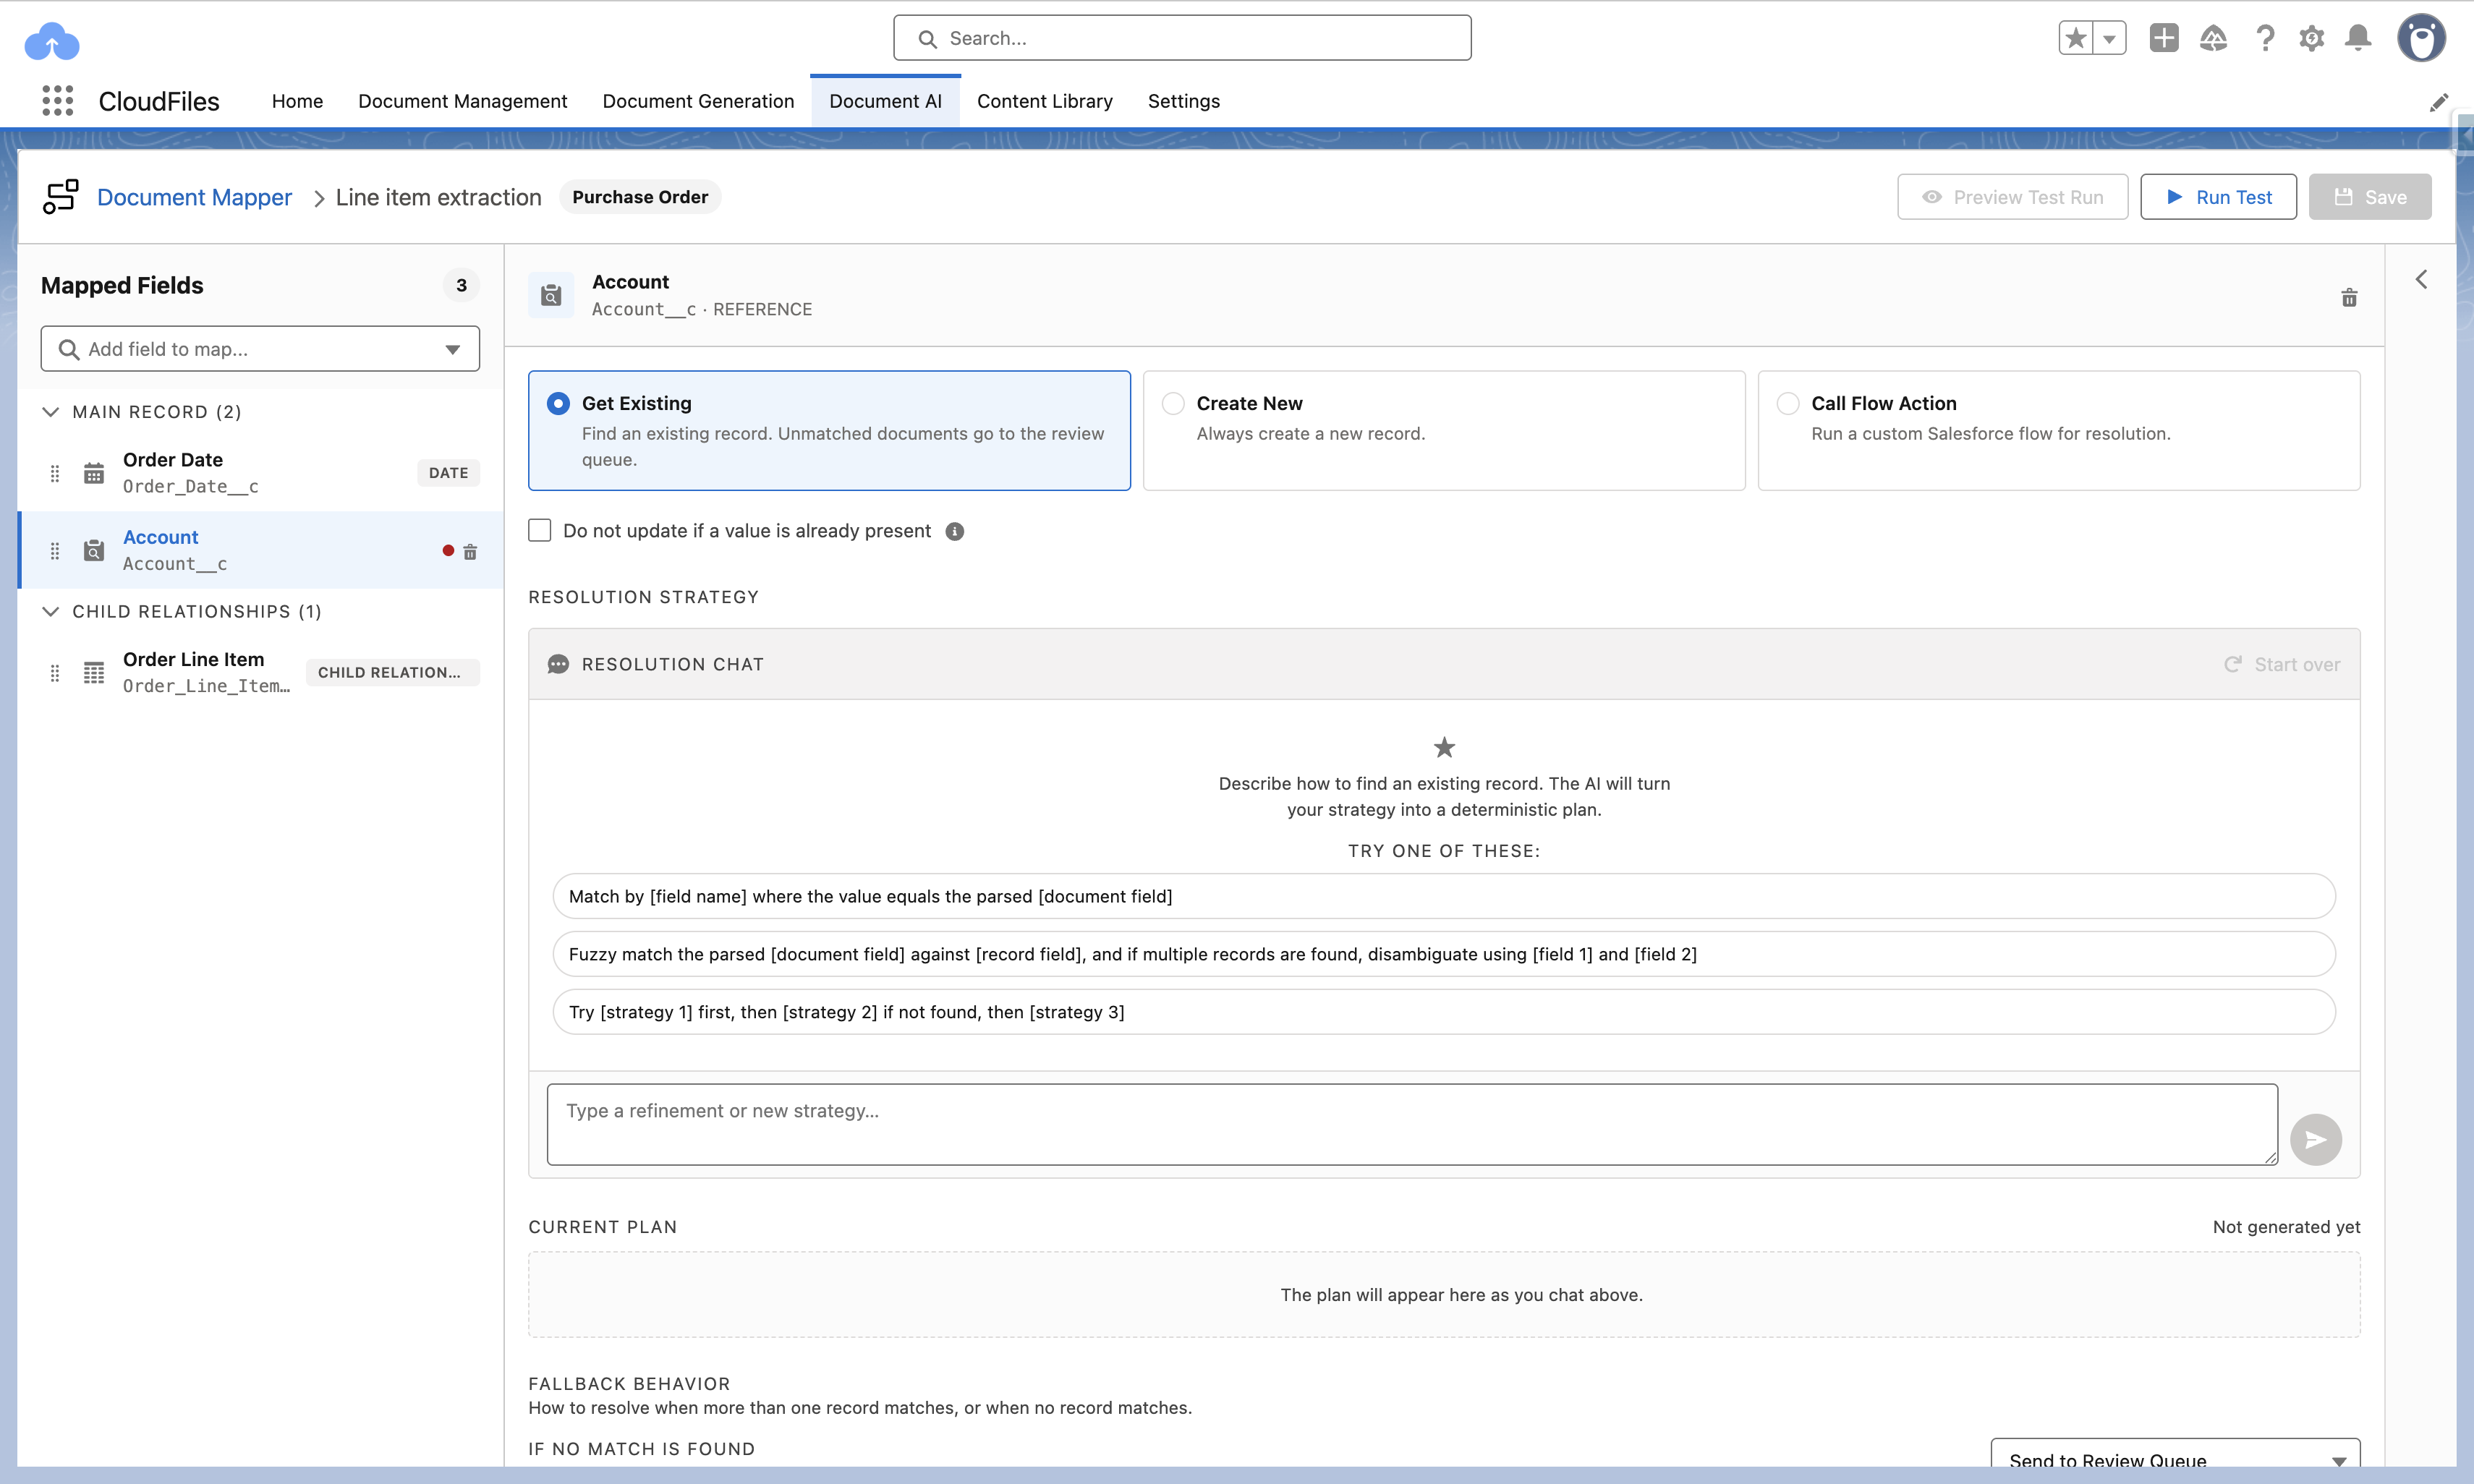
A lookup (REFERENCE) field points to another Salesforce record, so mapping it means resolving the document to that record's Id. You choose how the Id is resolved using the three cards at the top of the editor:
- Get Existing — match a record that already exists by describing the match in plain language. If no record matches, the lookup is left unresolved and the document is routed according to your fallback setting; a record is never created.
- Create New — always create a new record from fields extracted off the document, and link the lookup to it. No matching is attempted.
- Call Flow Action — hand resolution to a custom Salesforce Flow, which can find an existing record or create a new one and return its Id.
Do not update if a value is already present appears on all three operations. When it is checked and the lookup on the target record already holds a value, that value is kept and the document does not overwrite it. Use it when documents may be reprocessed and the link written the first time should win.
For a deeper reference on choosing and writing a resolution strategy — the deterministic, fuzzy, context, static, and multi-strategy approaches, with a sample resolution prompt for each — see Lookup Strategy Resolution.
Method 1 — Get Existing. Use Get Existing to find the record with a matching plan you build in plain language. You describe the strategy in the Resolution Chat, and the AI compiles it into a deterministic execution plan — a fixed sequence of steps and queries that runs the same way every time, so results are predictable rather than left to the AI's discretion at run time.
Matching strategies. Three kinds of strategy are available. You can use one on its own or combine them into a chain.
| Strategy | When to use it | How to phrase it |
|---|---|---|
| Exact match | The document carries a reliable, unambiguous key — account number, email, external Id. | Match by Account Number where the value equals the parsed account number. |
| Fuzzy match | The document and record may differ slightly in spelling, spacing, punctuation, or casing (e.g. “Acme Corp.” vs “Acme Corporation”). Each fuzzy step has a confidence threshold (e.g. 85%) — raise it to be stricter, lower it to be more forgiving. | Fuzzy match the parsed company name against the Account Name field at 85% confidence. If more than one account clears the threshold, narrow it down using the Billing City parsed from the document, and if still ambiguous, send to the review queue. |
| Multi-step (chained) | You want to lead with a precise key and fall back to looser matches. Runs strategies in order, falling through only when the current one finds no match. | Try the account number exact match first; if not found, fuzzy match on company name; if still not found, fuzzy match on billing email. |
Building the plan.
- Select the lookup field, then select the Get Existing card.
- In the Resolution Chat, describe how to find the matching record. You can start from one of the suggested patterns shown in the chat and edit it.
- Send the message. The AI replies, may ask a clarifying question (for example, whether to exclude the current record to avoid a parent account matching itself), and generates the Current Plan.
- Review the Current Plan. Each step is numbered and shows exactly what will run:
- the step type (for example, FUZZY MATCH) and, for a fuzzy step, its confidence threshold (for example, 85%);
- a plain-language summary of the step (for example, “Match parent by Account Name”);
- the field-to-value binding (for example,
Name ← {company_name}); - the underlying SOQL query it will execute (for example,
SELECT Id FROM Account WHERE Name = :company_name); - what happens next — whether to continue to the next step, and how to handle one match versus several.
- Refine if needed by typing further instructions in the chat (for example, “raise the threshold to 90%,” “also match on Billing City,” or “exclude the current record”). The plan regenerates with each refinement. To discard everything and begin again, select Start over.
- Set the Fallback Behavior — what happens after the plan runs and the outcome is not a single clean match. The two outcomes are handled differently:
- If no match is found — select the behavior from the dropdown. Send to Review Queue holds the document for a person rather than writing an empty lookup.
- If multiple matches are found — always Send to Review Queue. This is fixed and cannot be changed: an ambiguous match is never written.
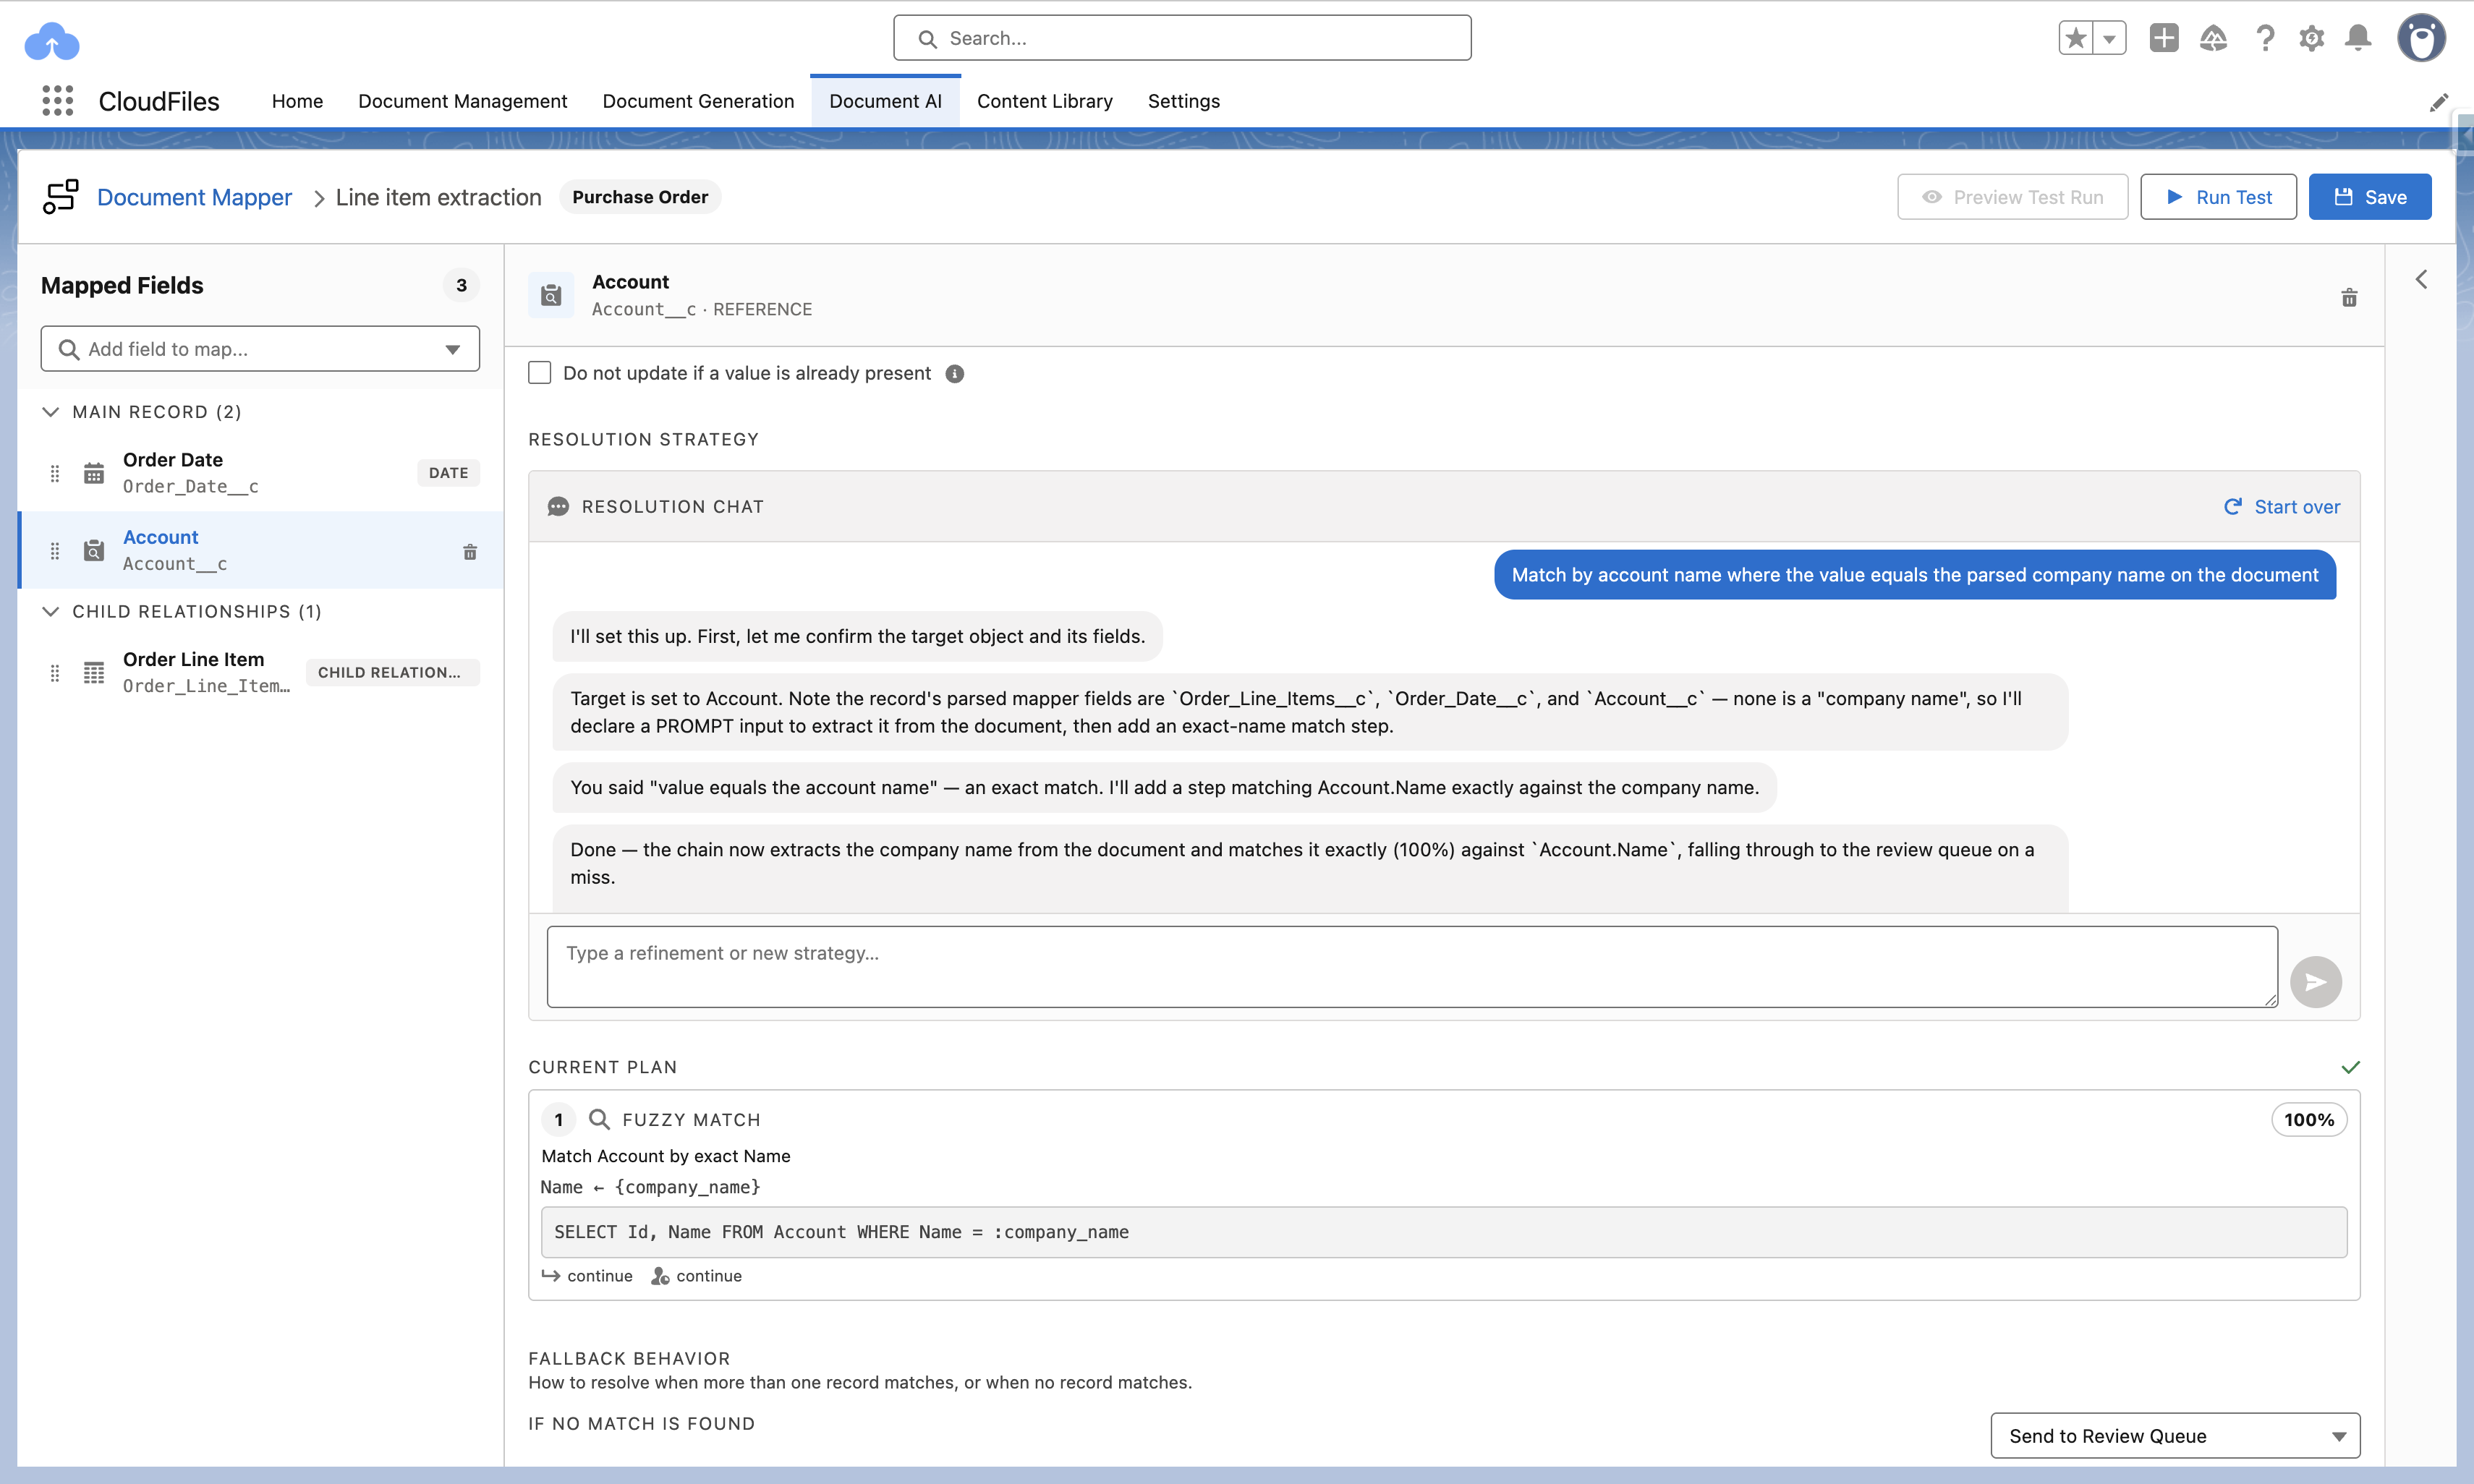
Get Existing only matches records that are already in the org. It never creates one, so a document that does not resolve to exactly one record is always routed by one of the two fallbacks above.
Method 2 — Create New. Use Create New when the document should always produce a fresh record for the lookup to point at — no search, no matching plan, no Resolution Chat. This suits documents that routinely introduce records the org does not have yet (a new supplier on every intake form, a new project record per signed order), or staging objects where every document is meant to stand on its own. If existing records should be reused where they exist, use Get Existing instead; if creation needs to happen only under certain conditions, use Call Flow Action.
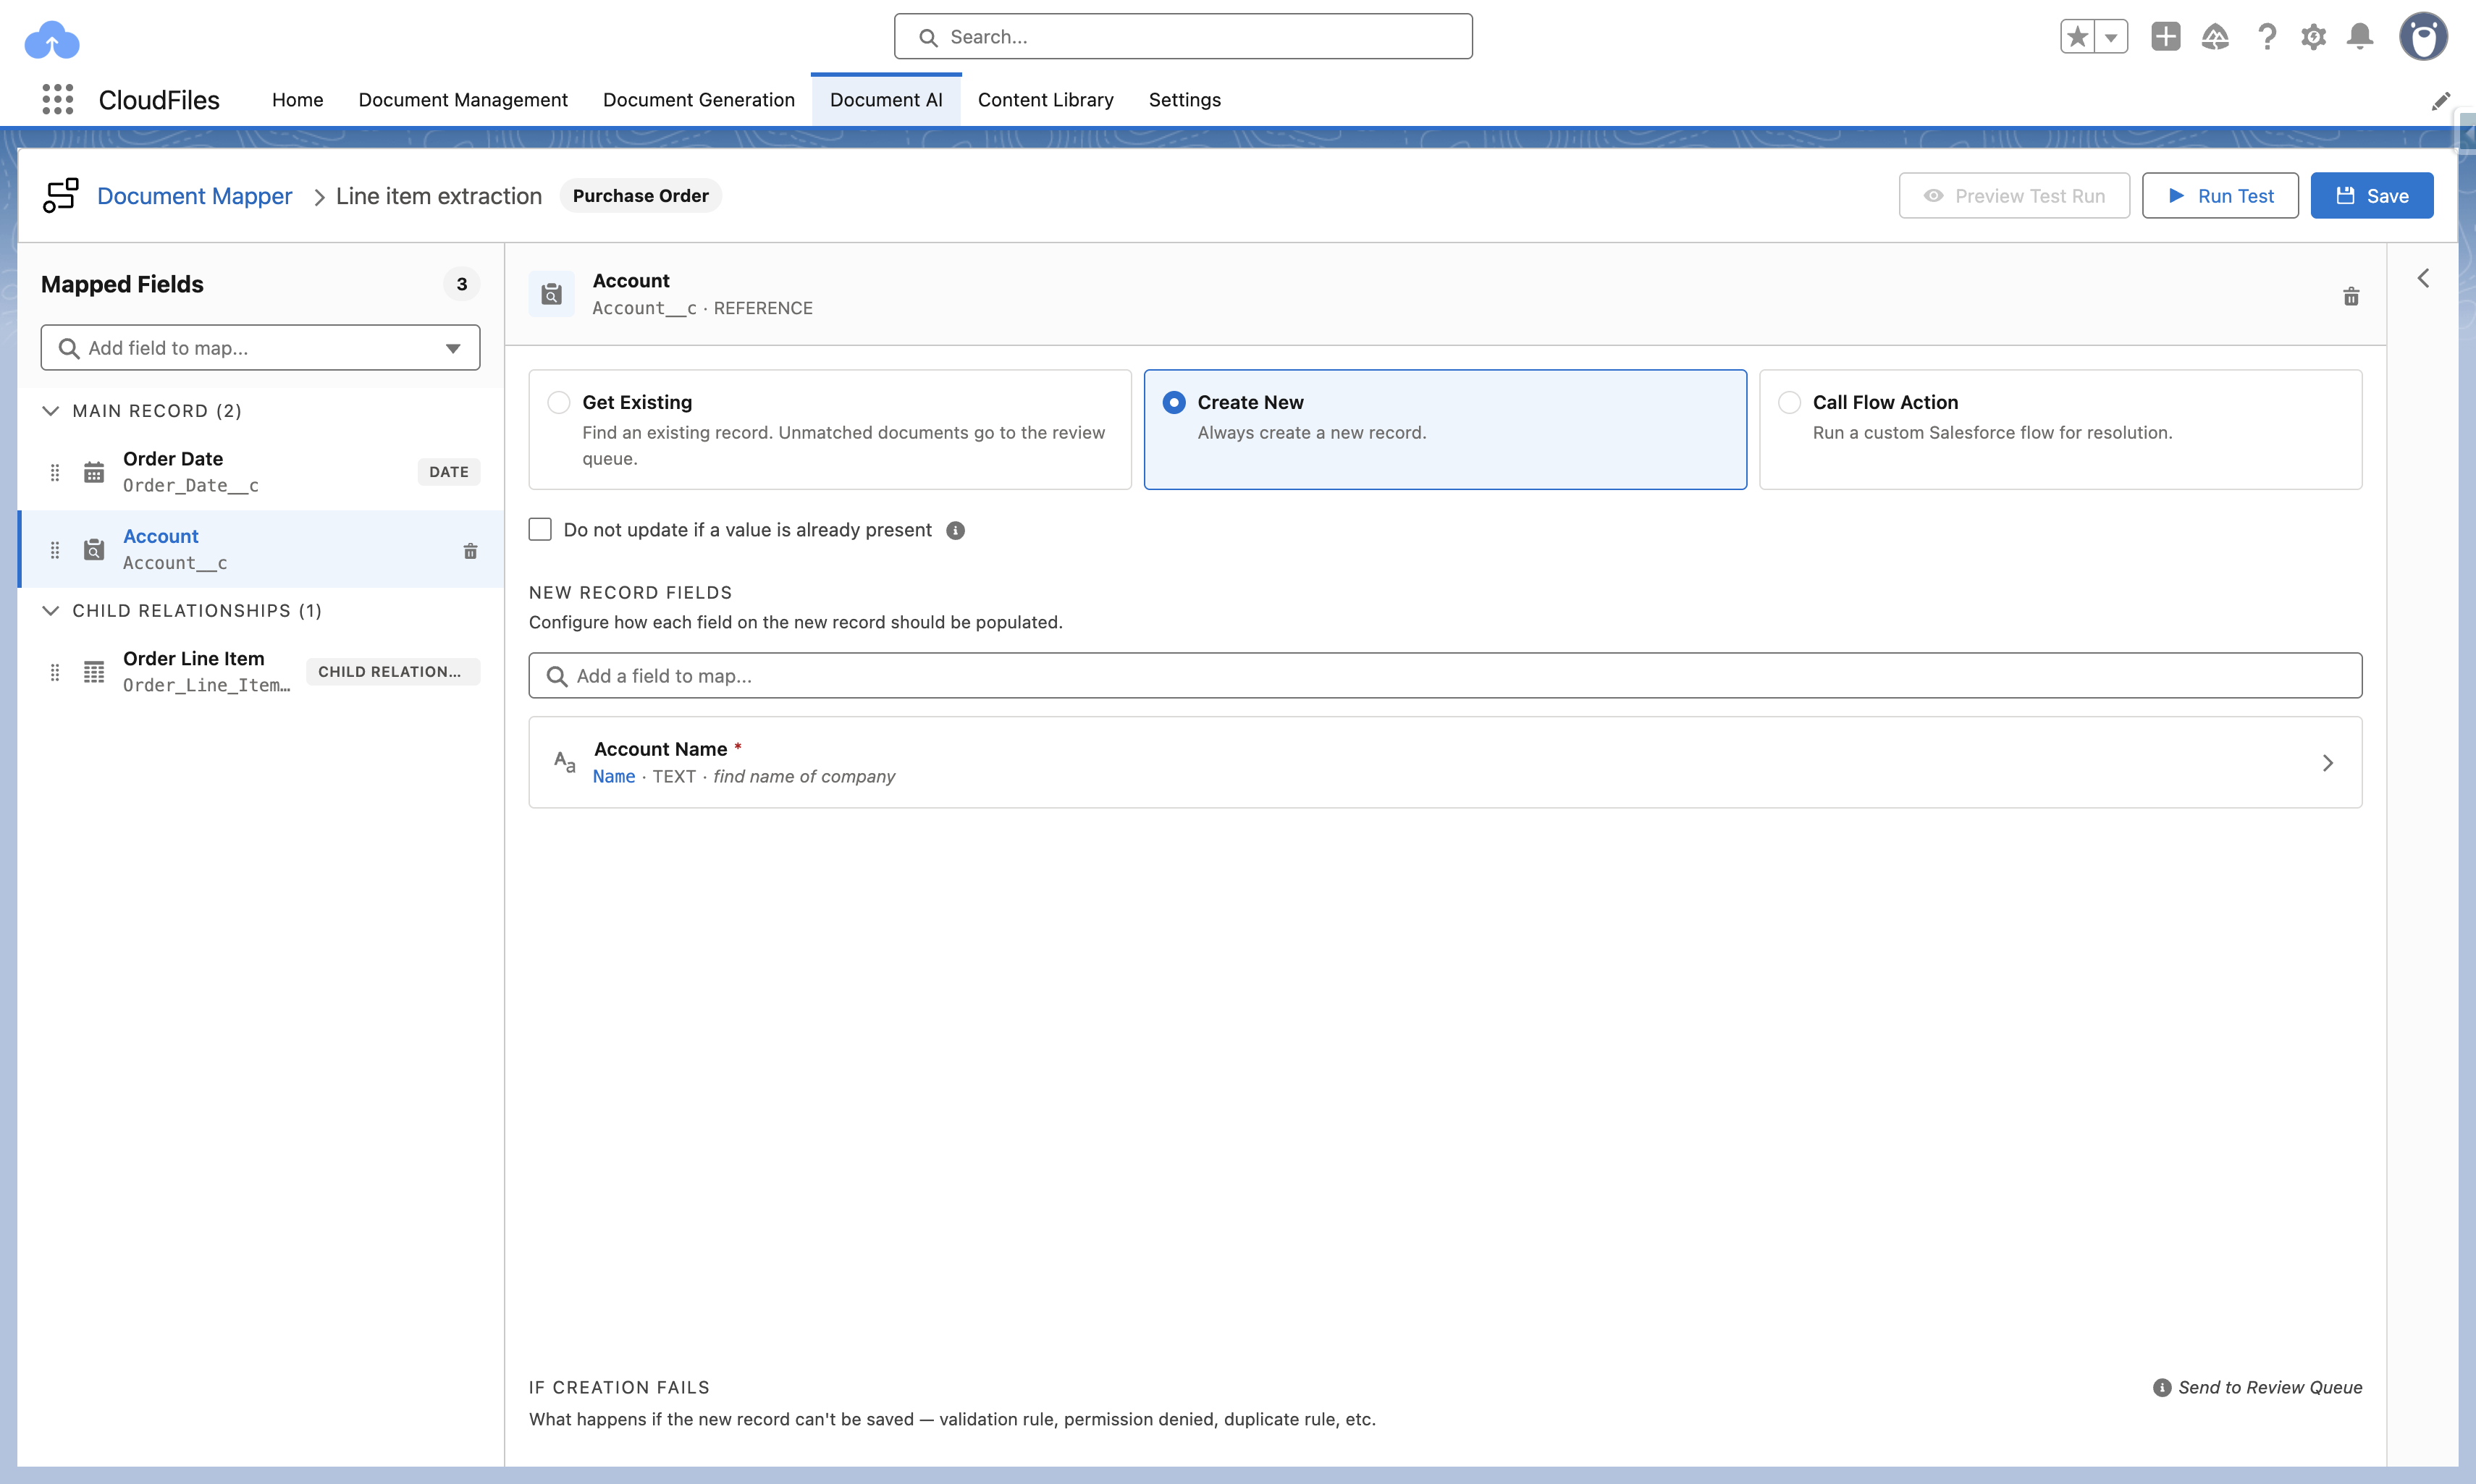
- Select the lookup field, then select the Create New card.
- Under New Record Fields, configure how each field on the new record should be populated. Required fields on the target object appear automatically and are marked with a red asterisk (for example, Account Name on Account) — the mapping cannot be saved until each one is populated. Use Add a field to map… to include any other fields you want set at creation, such as Billing City or a record type.
- Configure each field as you would on the main record. Each row shows the field label, its API name and type, and the extraction prompt beneath it (for example,
Name · TEXT · find name of company); select the row to open and edit it. - Review If creation fails. Documents whose record cannot be saved are sent to the review queue. This is fixed and cannot be changed, and it applies only when Salesforce itself refuses the save — a validation rule, a missing permission, a duplicate rule.
Create New has no other fallback. Nothing is searched for, so there is no no-match or multiple-match outcome to route; a refused save is the only failure.
Because every document creates a record, the same entity appearing on two documents produces two records. Pair Create New with a Salesforce duplicate rule, or use Get Existing, if that matters for the object.
Method 3 — Call Flow Action. Use Call Flow Action to resolve the record with a custom Salesforce Flow — appropriate when the matching logic is too complex for a query, or should reuse existing automation. Because the flow can contain any logic, it can both search for a record and create one if nothing is found, returning either Id — the “match, then create” behavior that neither Get Existing nor Create New provides on its own.
All resolution logic lives in the flow. Document Mapper does not search, retry, or fall back to another method; it passes the inputs in and uses the Id that comes back.
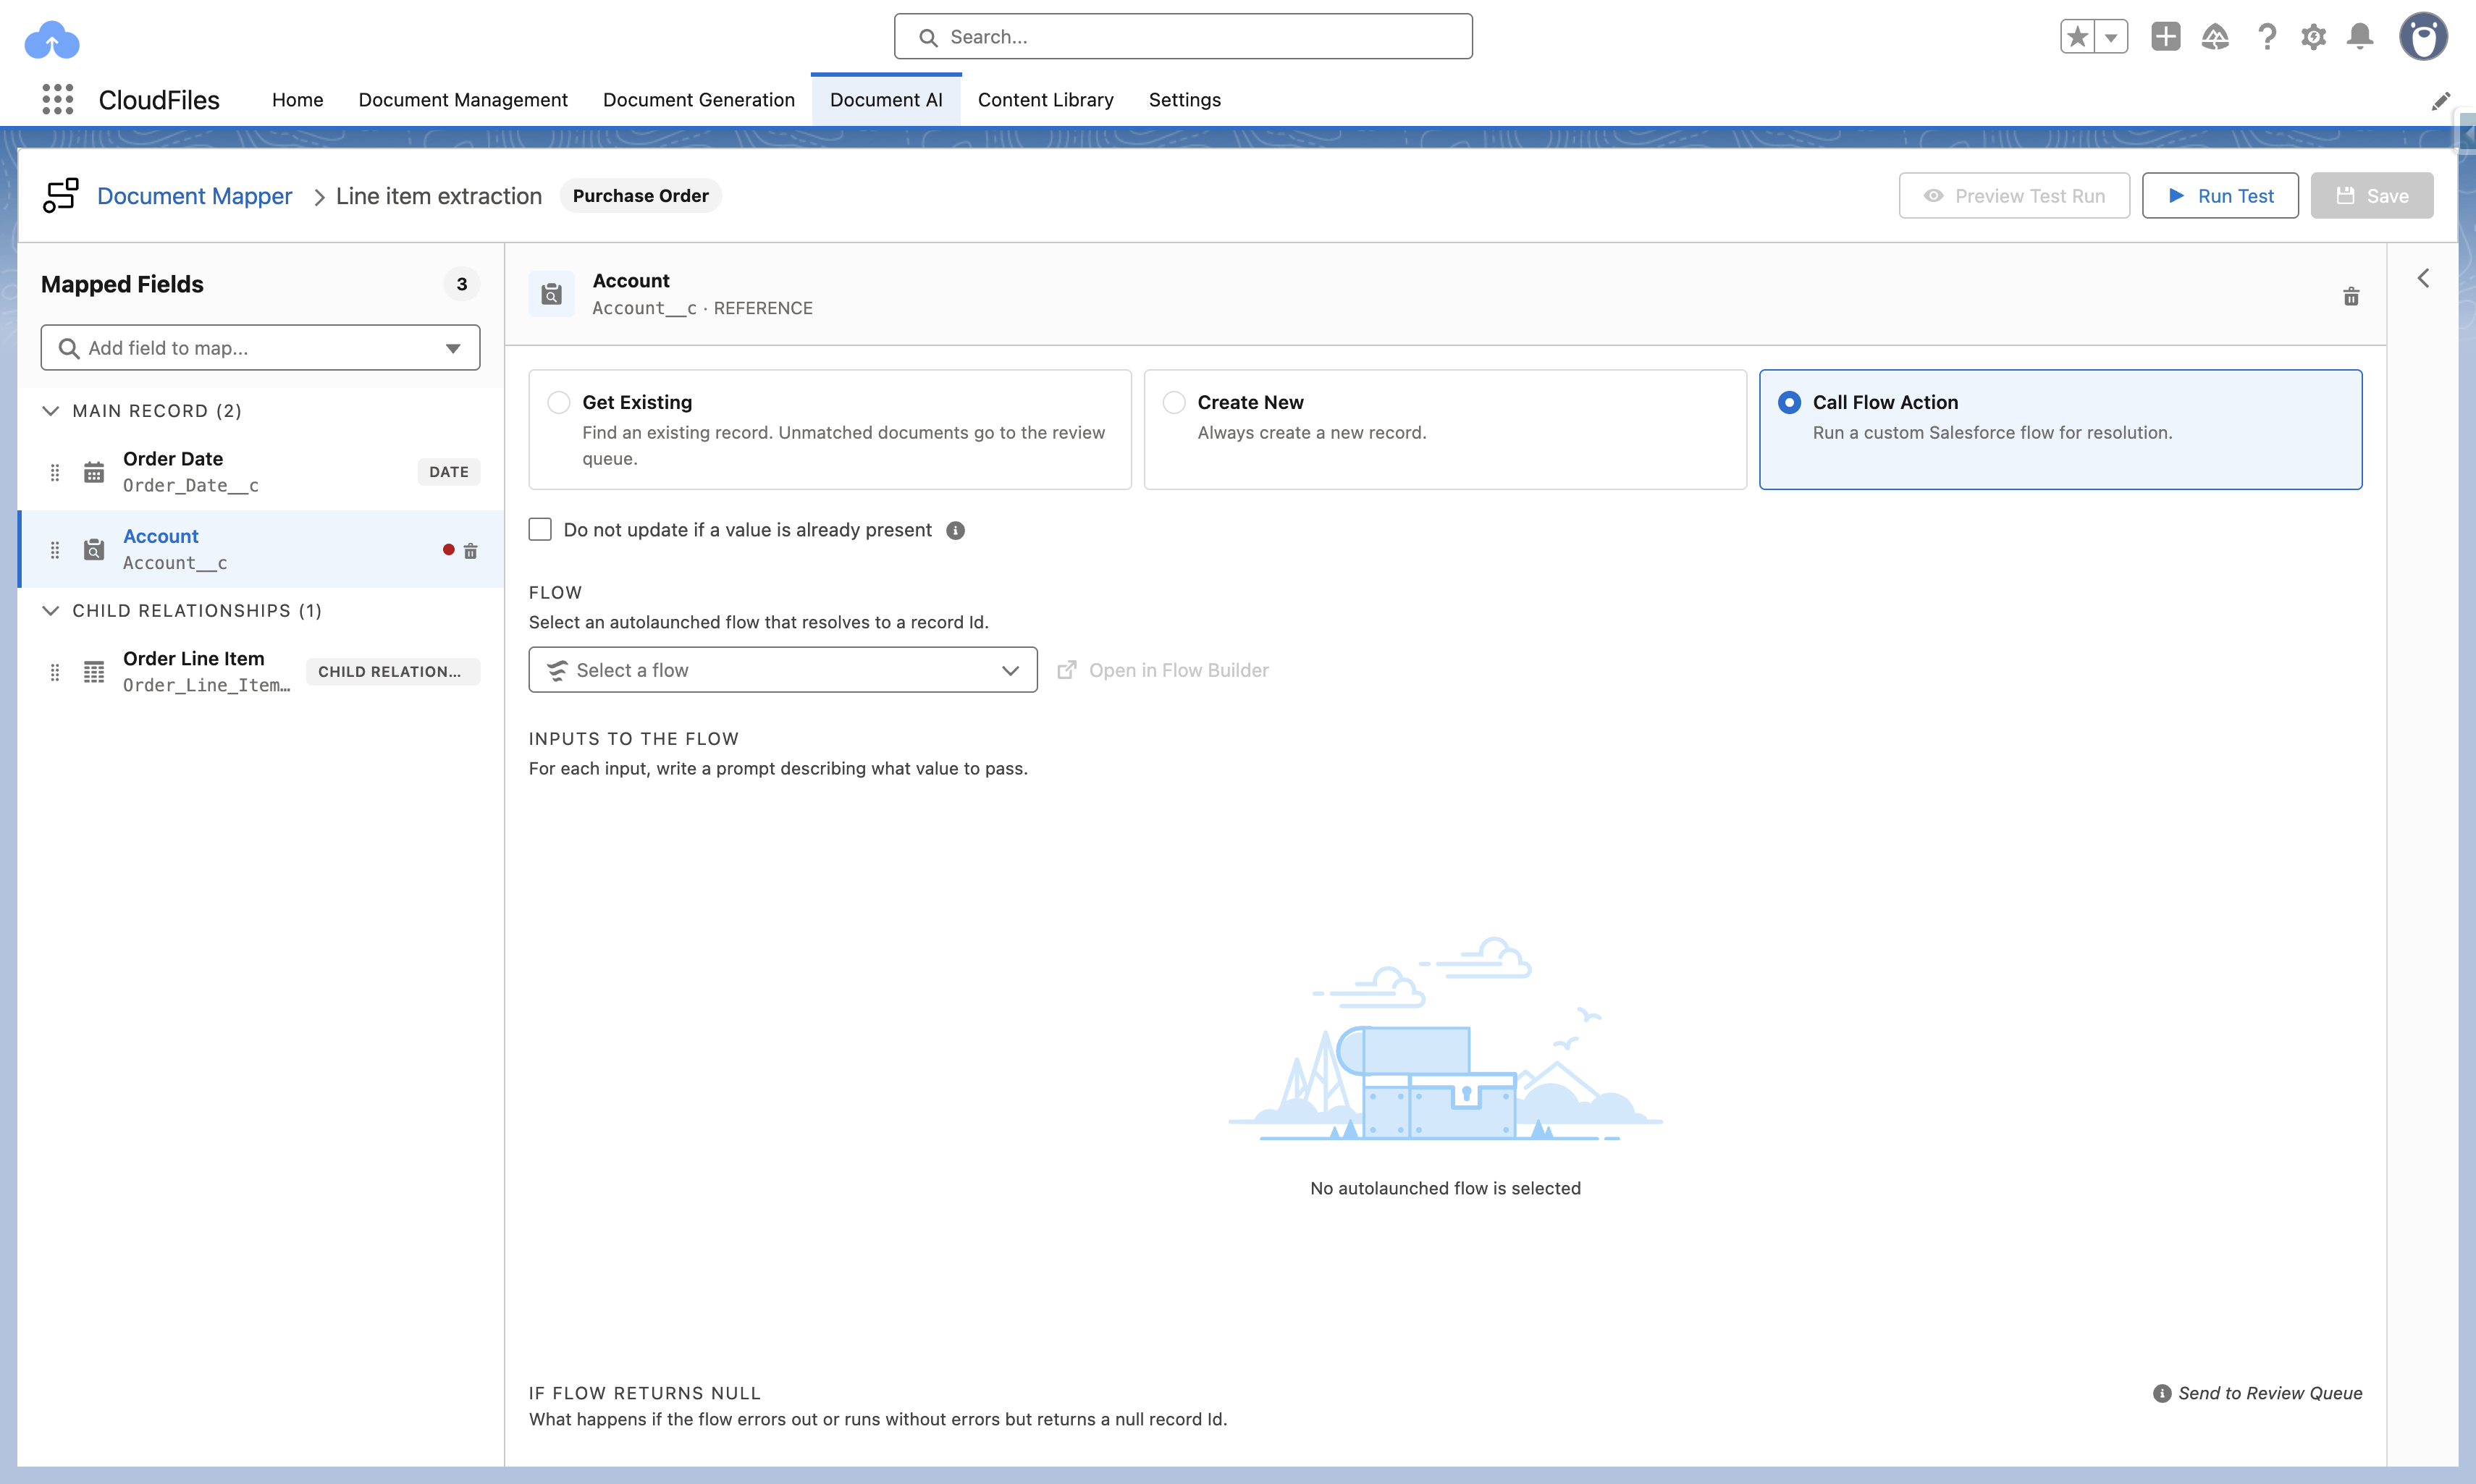
- Select the lookup field, then select the Call Flow Action card.
- Under Flow, select an autolaunched flow that resolves to a record Id from the dropdown. The flow must be autolaunched and must return a single record Id. Select Open in Flow Builder if you need to inspect or edit the flow in Salesforce.
- Under Inputs to the Flow, each of the flow's input variables appears with its own prompt box. For each input, write a prompt describing what value to pass from the document (for example, for a
contactRecordinput, “the primary contact named on the order form”). - Review If flow returns null. When the flow errors out, or runs cleanly but returns no record Id, the document is sent to the review queue. This is fixed and cannot be changed — which is why the flow needs to handle every case it is meant to resolve.
Child Relationships
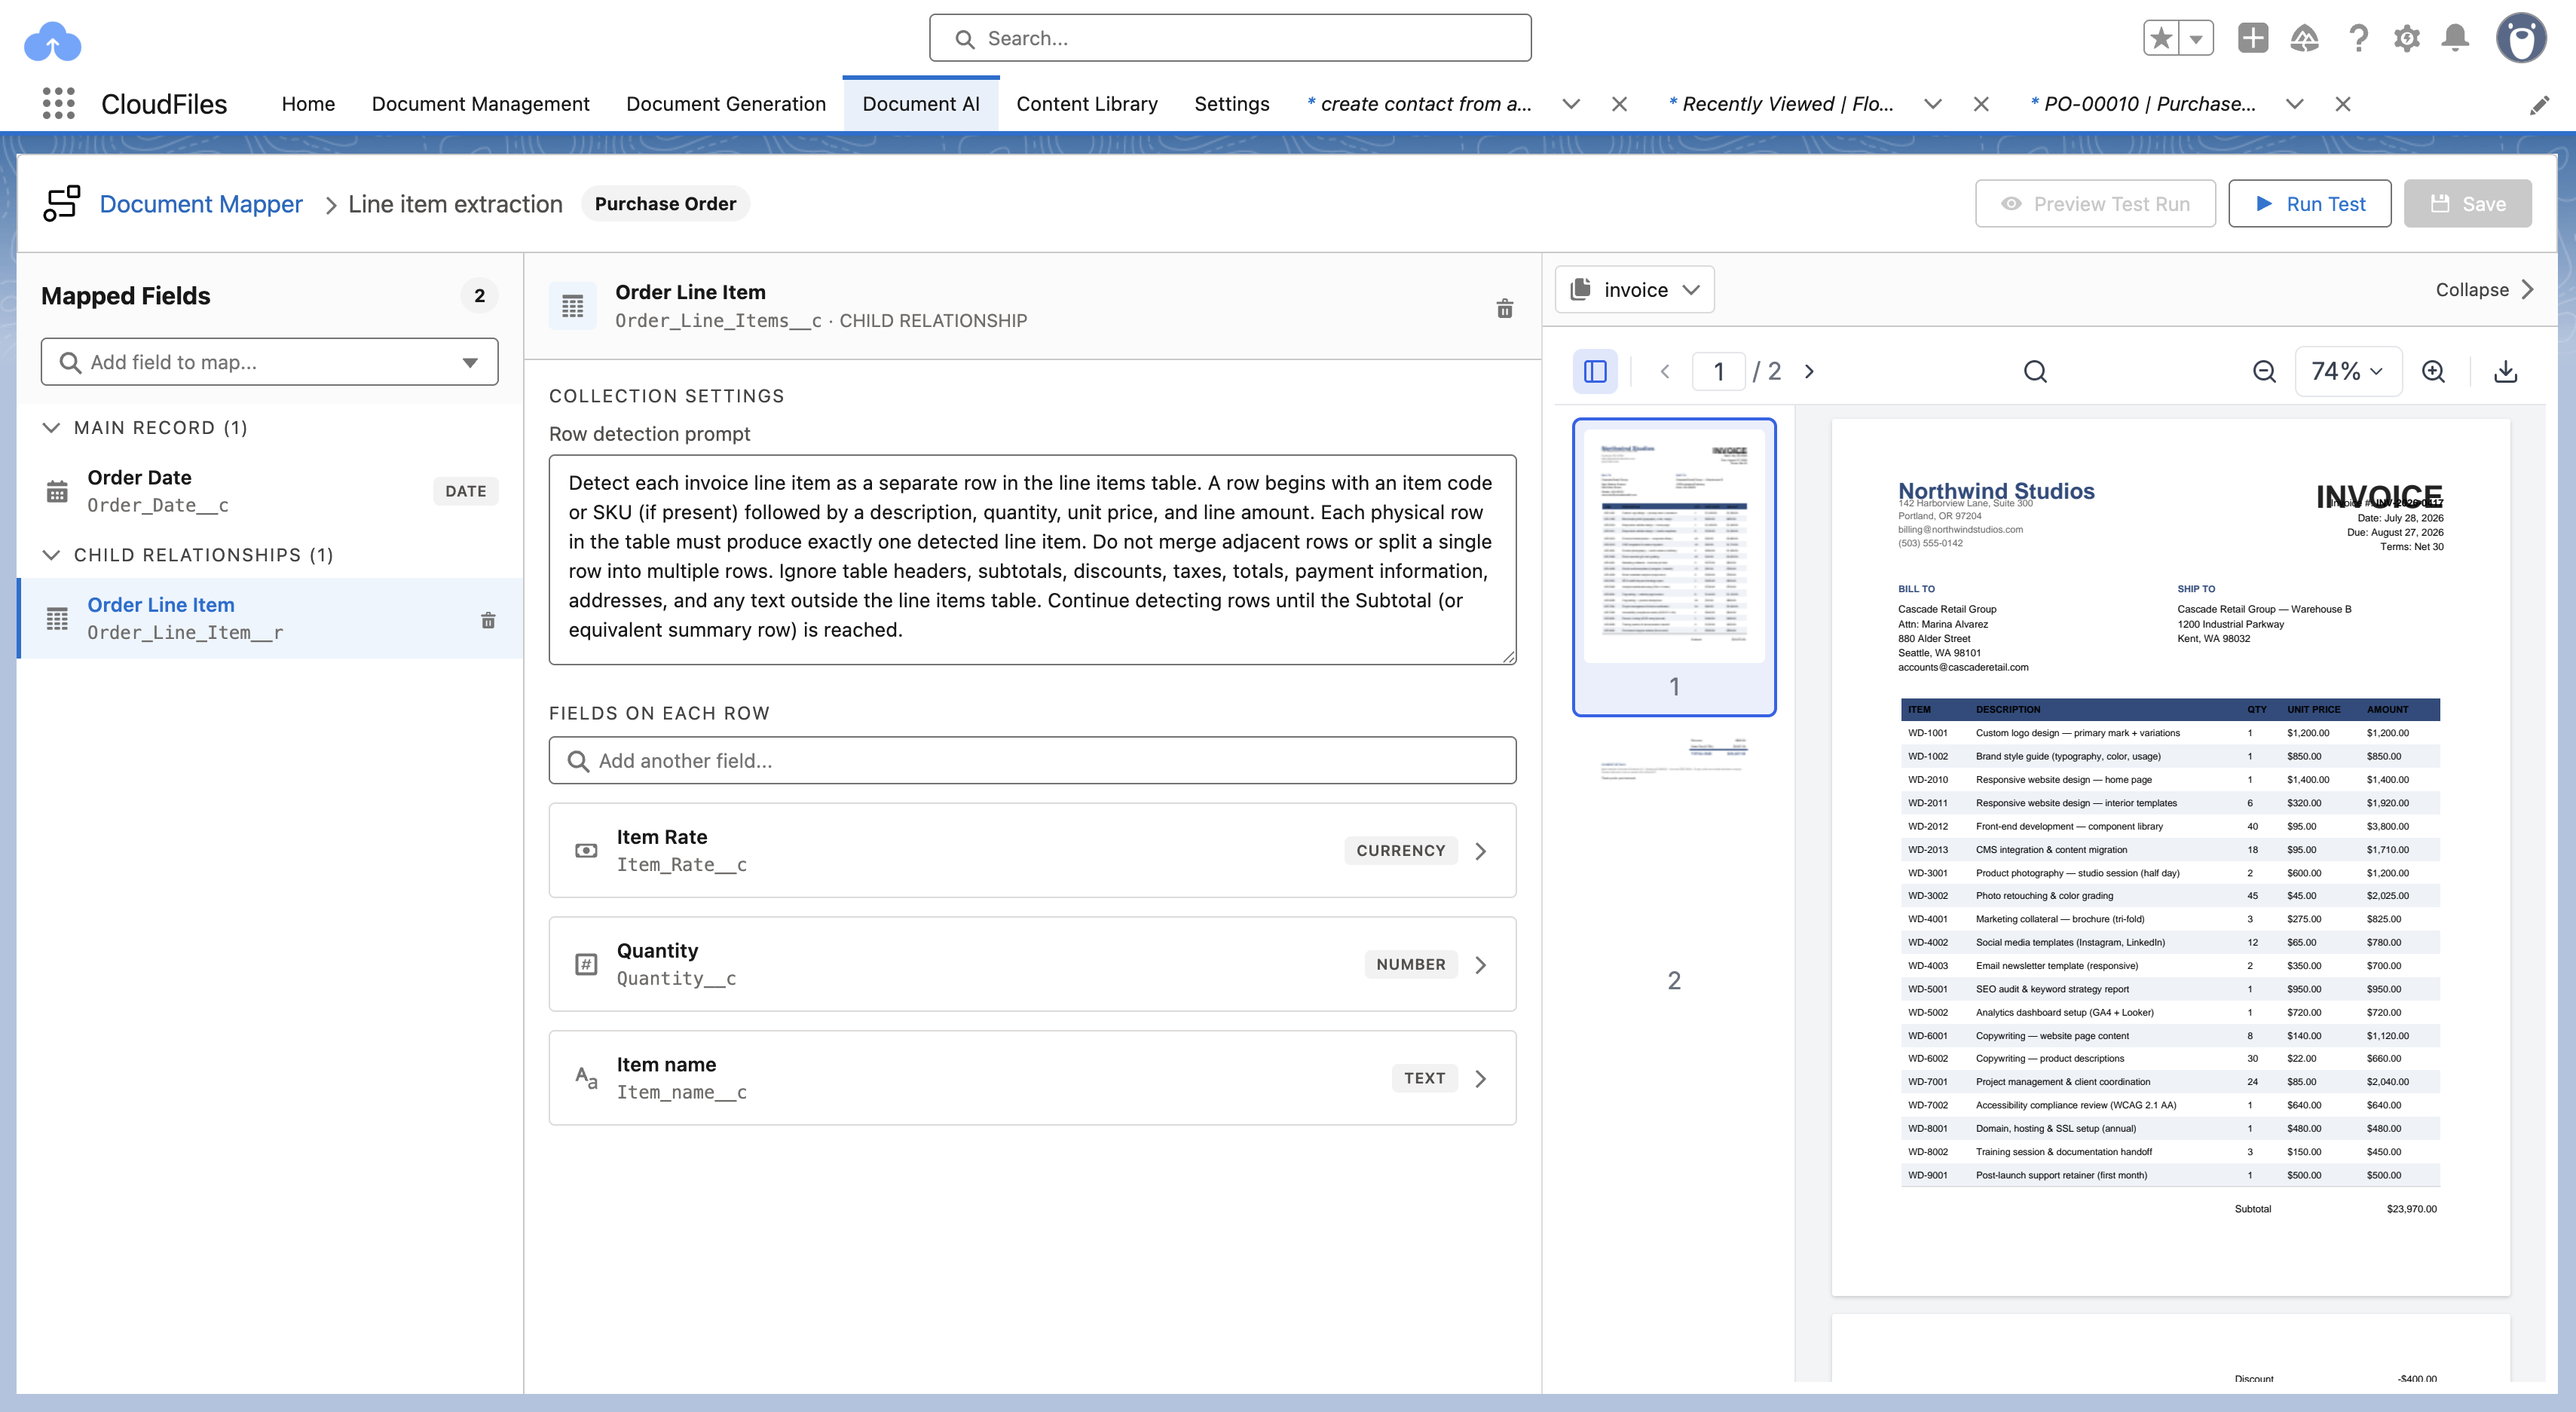
A child relationship creates several related records from a single document — for example, multiple line items, partners, or purchase orders tied to one parent. In Salesforce, these are the relationships exposed on the parent object; custom relationship names end in __r.
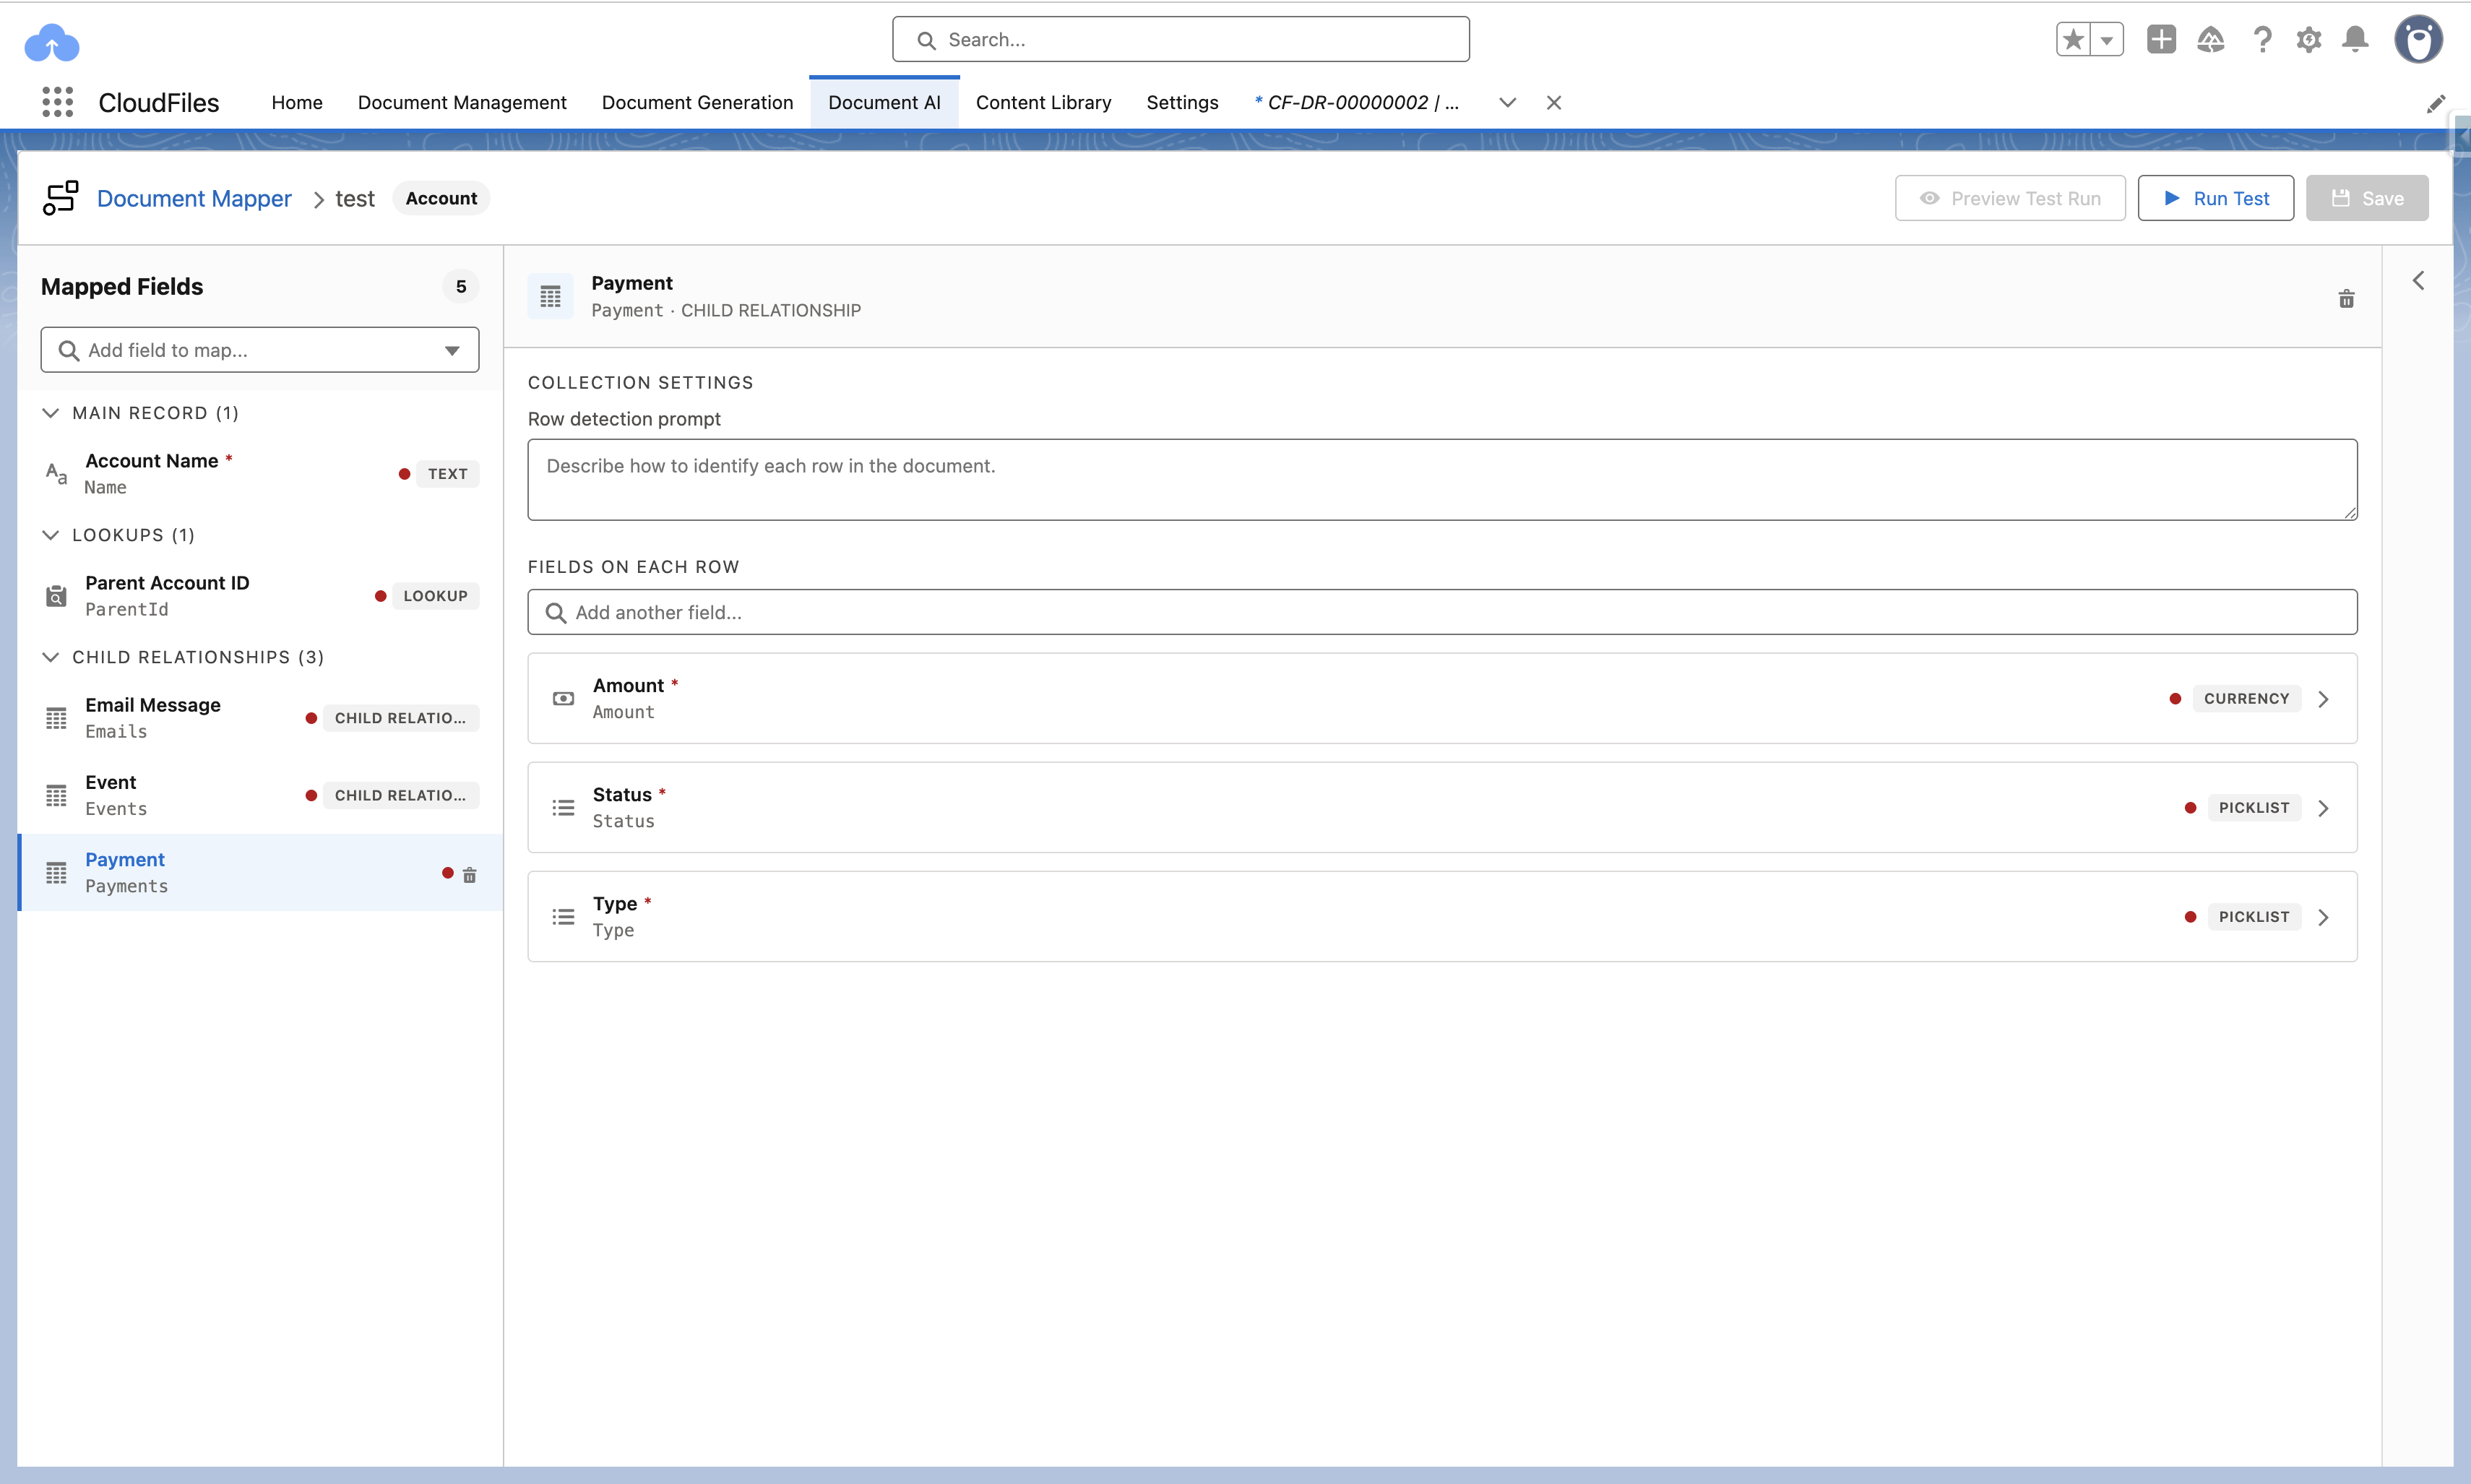
- Add the child relationship from Add field to map — it appears under the Child Relationships group. Select it to open its editor.
- Under Collection Settings, fill in the Row detection prompt (required). Describe how to identify each row in the document, so the mapper knows where one child record ends and the next begins. Be specific about what marks the start of a row and about not merging or splitting rows — for example: “Detect each invoice line item as a separate row in the line items table. A row begins with an item code or SKU (if present) followed by a description, quantity, unit price, and line amount. Each physical row in the table must produce exactly one detected line item.”
- Under Fields on each row, select Add another field and choose a field of the child object. It is added to the row's field list with its type badge and an expand arrow.
- Select a row field's expand arrow to open its editor. Here you set its Source Mapping (or, for a lookup, its resolution — see below). A breadcrumb (for example,
PURCHASE_ORDER__C › ORDER_LINE_ITEMS__C) shows you are editing a field within the child collection; the back arrow returns you to the row's field list.
- Repeat Steps 3–4 for every field the child records need. Required fields on the child object (marked with a red asterisk) must be mapped, or the row cannot be written.
- If a field on the row is itself a lookup, configure it as described below.
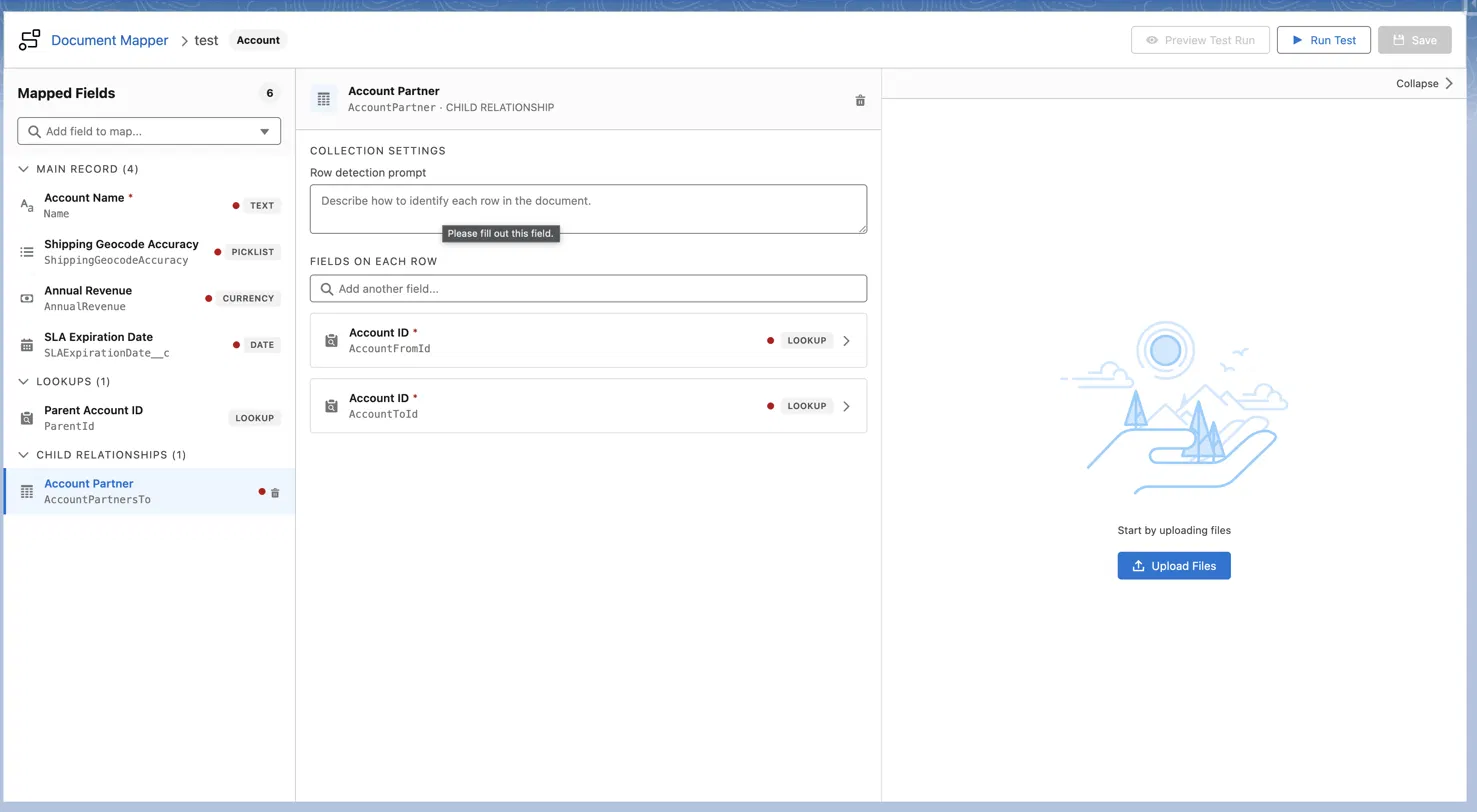
Lookups inside child rows. A child object often points at another record — for example, each order line item references a Product, or each partner references an Account. Document Mapper resolves these row-level lookups once per row: as it detects each row, it runs that row's resolution plan against the values parsed from that row and links the result to the child record it is about to create. Child-collection lookups support Get Existing only — Create New and Call Flow Action are not available inside a child row, and the editor displays this notice at the top of a child-row lookup.
- In Fields on each row, add the lookup field of the child object. It appears as a lookup (LOOKUP / REFERENCE) row with an expand arrow.
- Open it. A breadcrumb at the top shows you are inside the child collection (for example,
ACCOUNT › ACCOUNTPARTNER), and a back arrow returns you to the row's field list. Build the match in the Resolution Chat exactly as for a main-record Get Existing lookup: describe the strategy, review the generated Current Plan, and refine as needed. The parsed values the plan references come from the current row (for example, a per-rowproduct_code). - Set the row-level Fallback Behavior — If no match is found and If multiple matches are found (for example, Send to Review Queue for both).
Two rules apply to child-row lookups:
- Existing records only. As with any lookup, no new record is created to satisfy it. If a row's lookup cannot be resolved, that row is handled according to its fallback setting.
- Independent per row. Each row resolves its own lookup separately, so one document can link twenty line items to twenty different products in a single run.
Test the Configuration
Test against real documents before saving. Testing runs asynchronously, so you can start a run and return to it later. You can run a test on individual documents or on a document set, which is several related files read together to create or update one record. The steps are the same for both. See Document Sets.
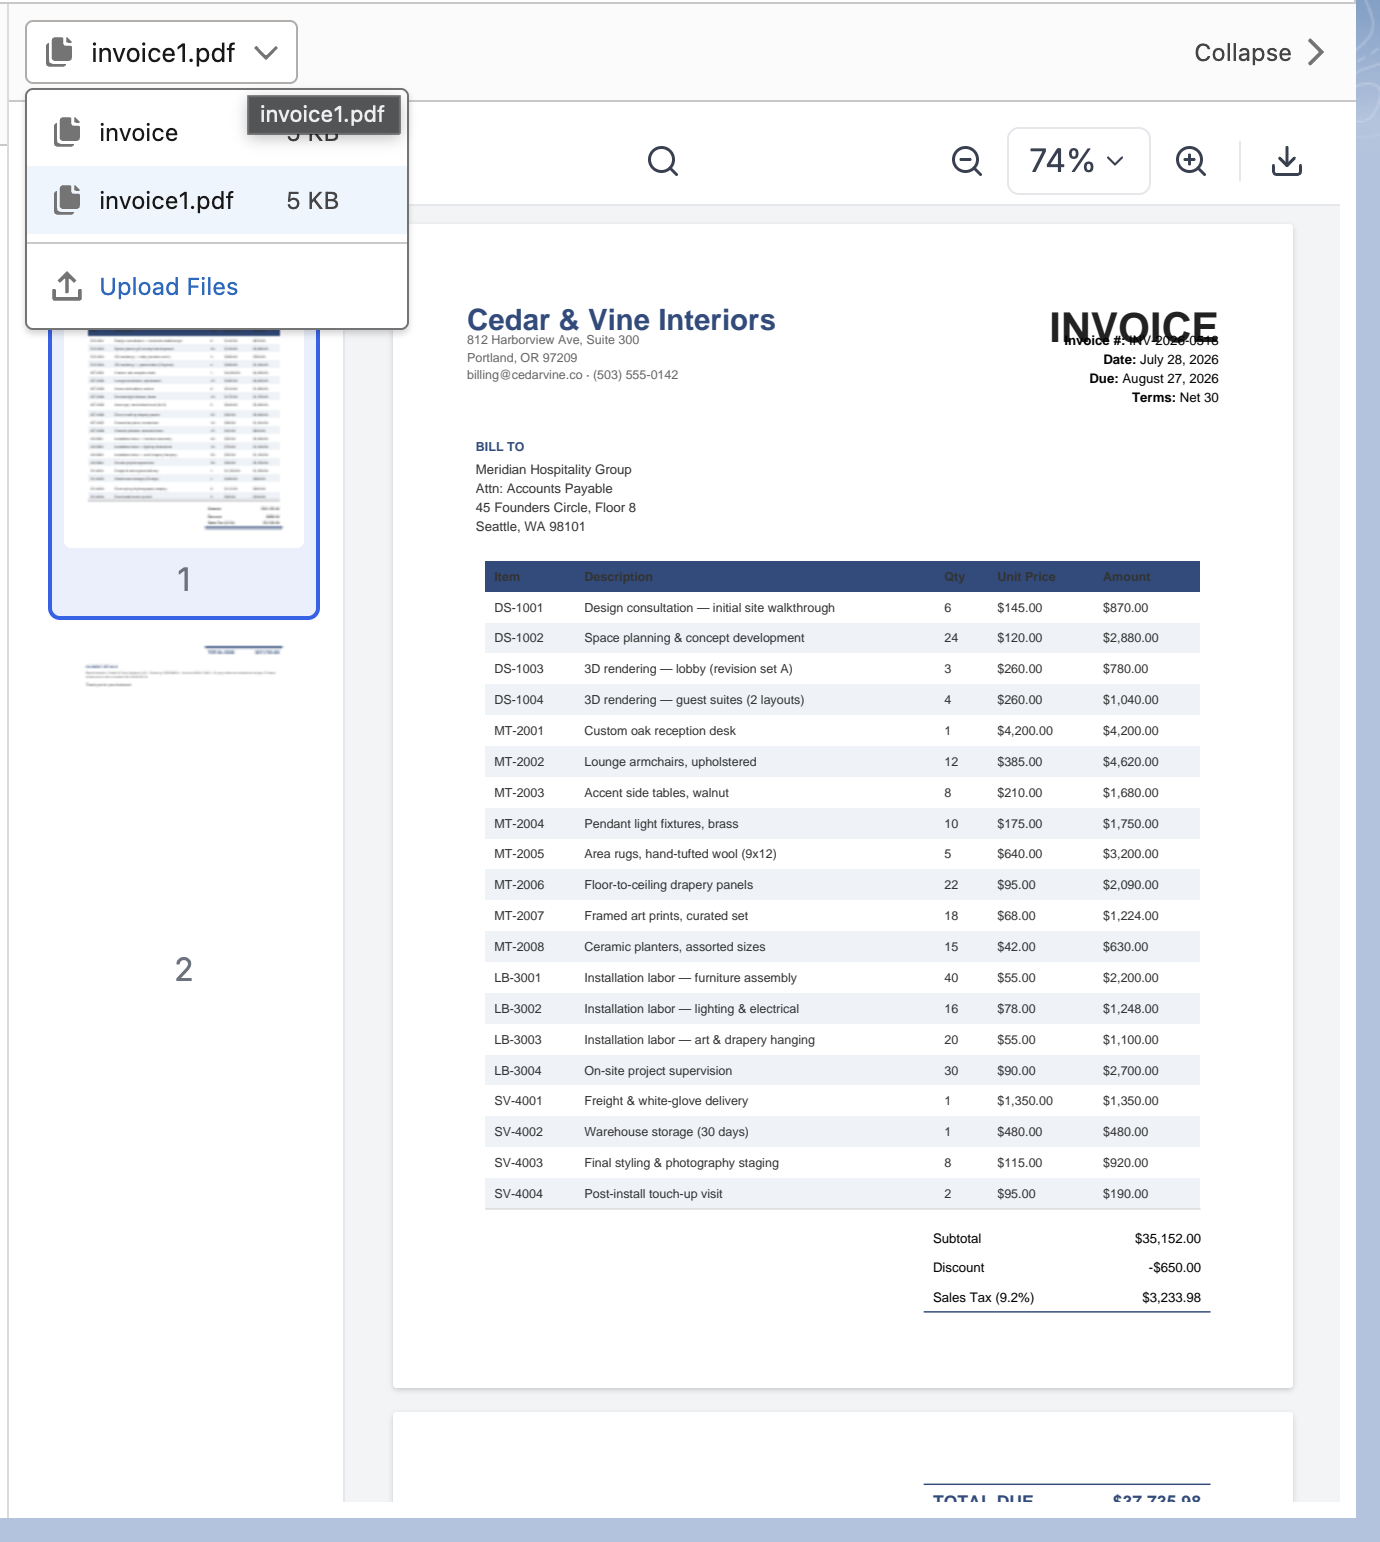
- Select Upload Files (in the preview pane, or from the file dropdown at the top right) and choose one or more sample documents. Uploaded files appear in the dropdown and render in the preview pane, where you can page through, zoom, and search.
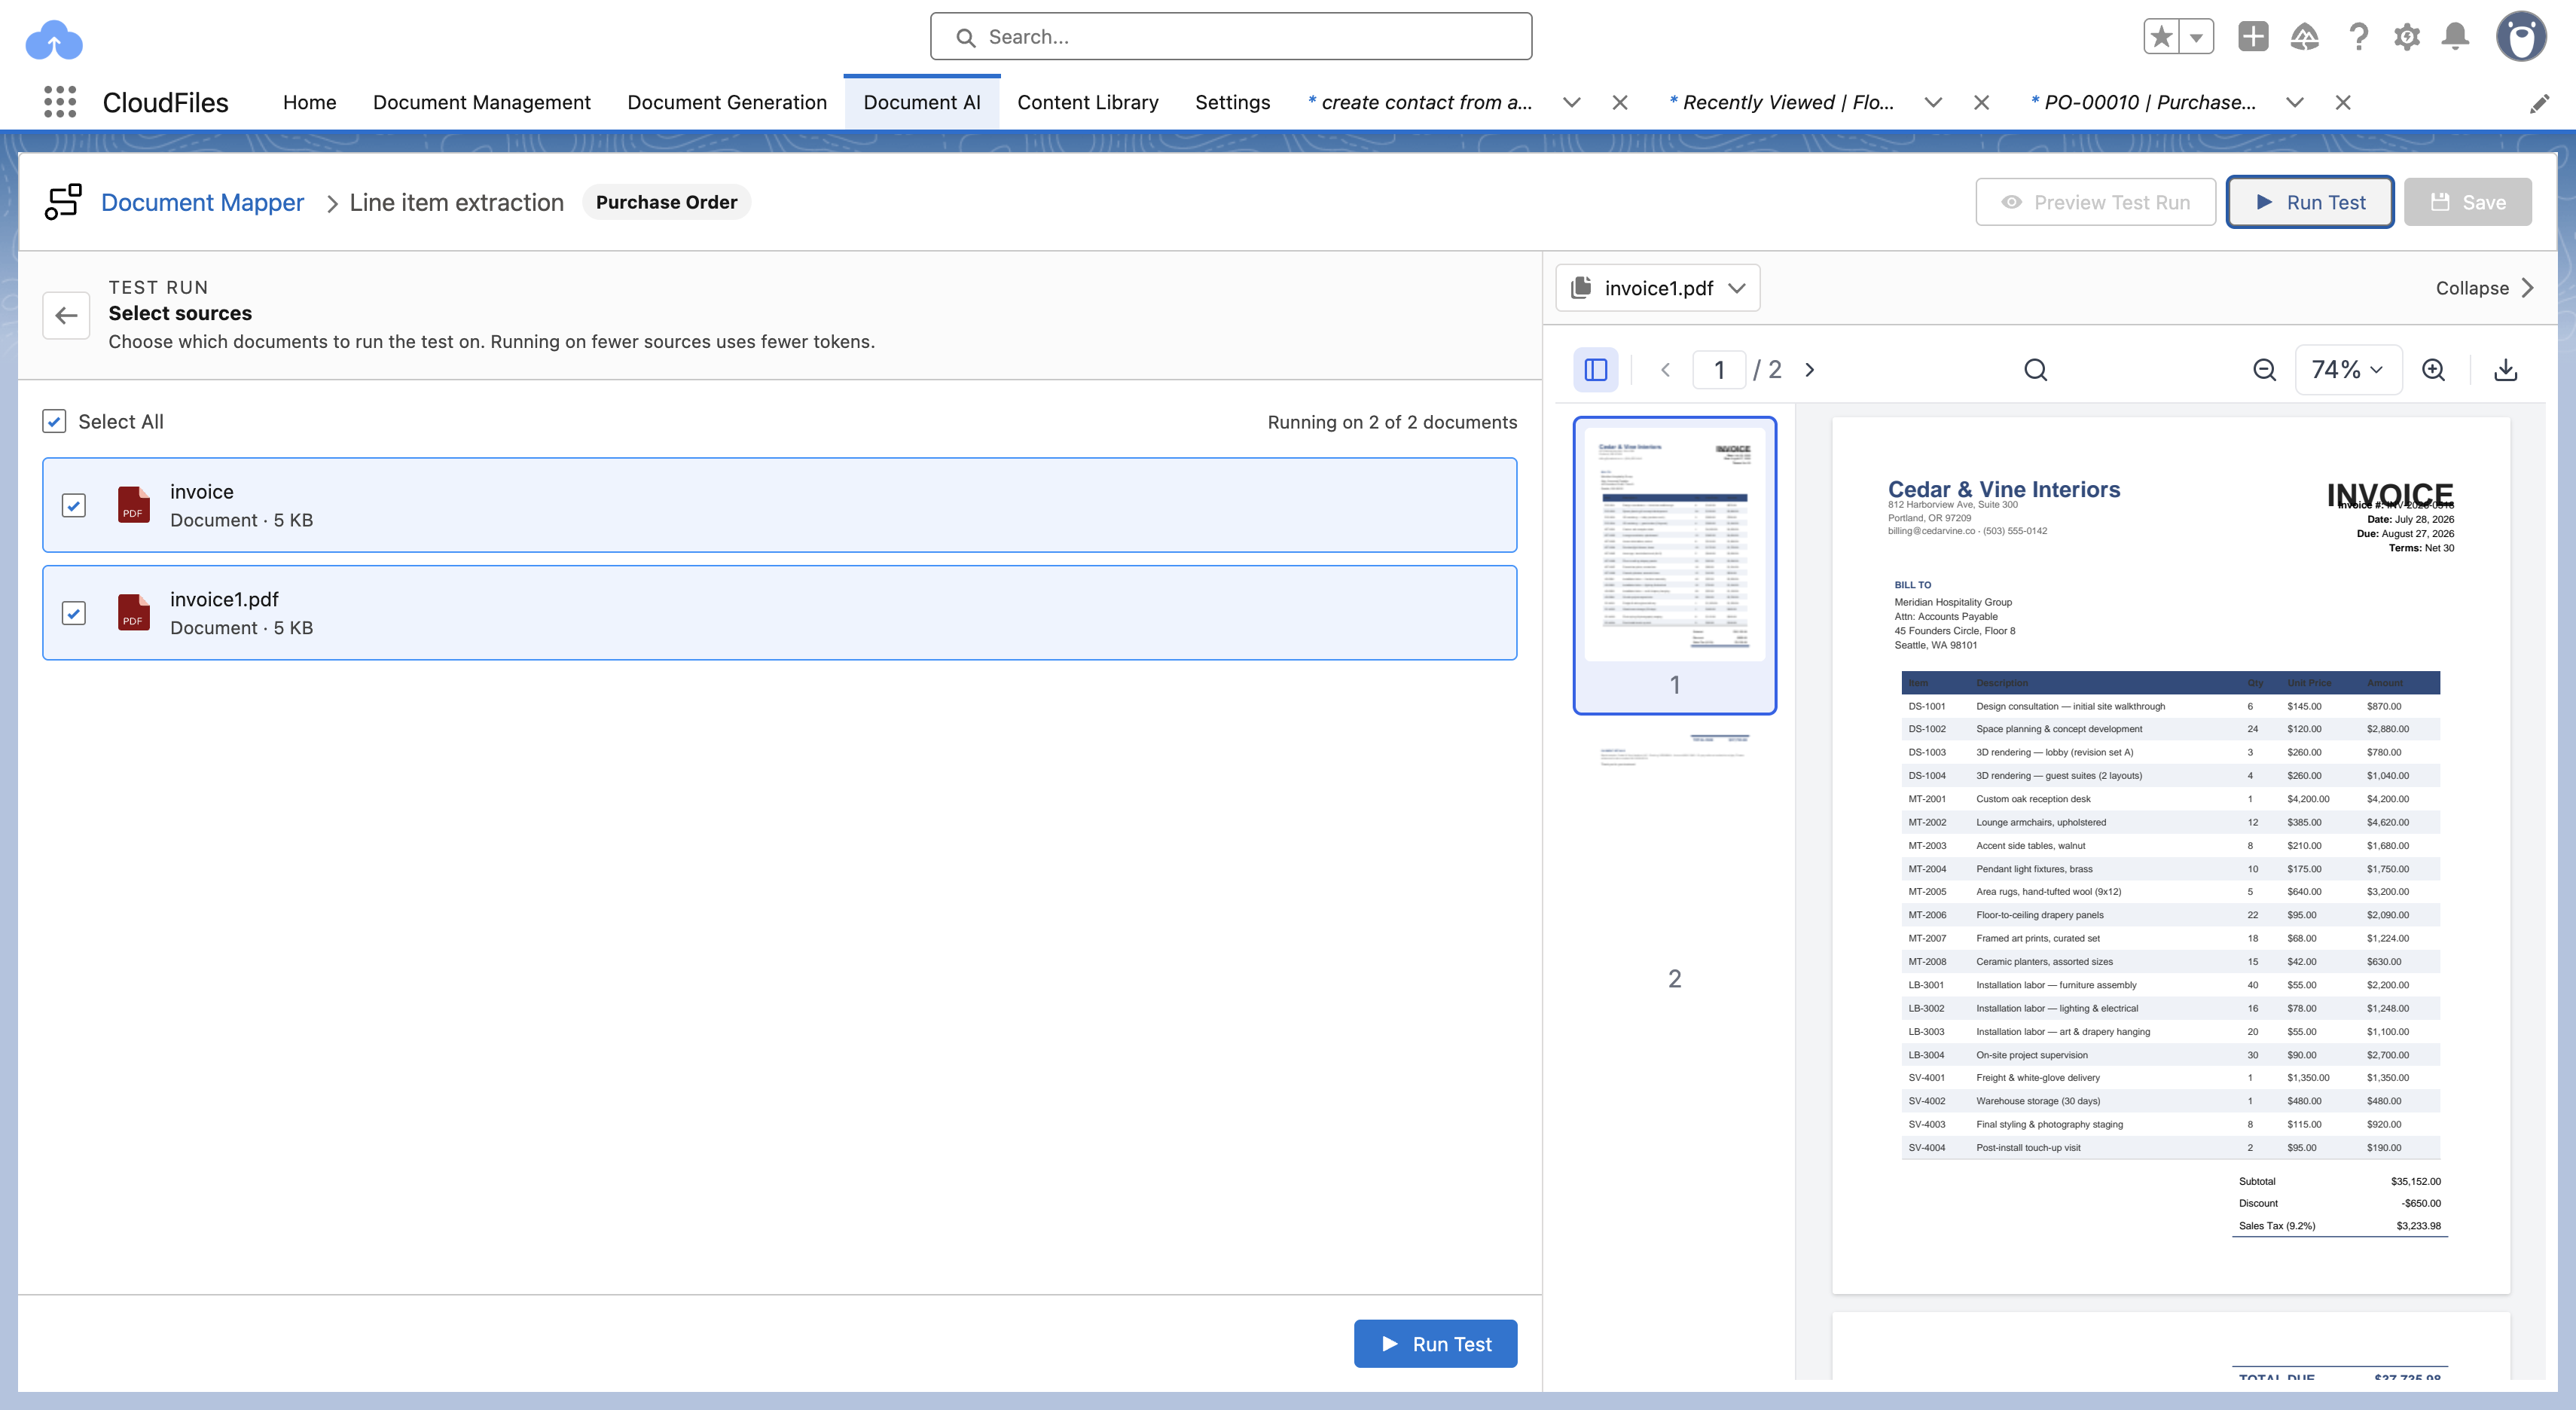
- Select Run Test. The Select sources step opens.
- Choose which uploaded documents to run on — use Select All, or tick a subset. Testing on fewer documents uses fewer tokens.
- Select Run Test to begin processing. A run can take a little while; you can leave the screen and return — processing continues in the background.
- When the run finishes, review the Test Results, which open with two tabs:
- Record — every mapped field with the value the AI extracted. Expand any field to see the AI's reasoning and a confidence score (for example, 0.98). Fields that could not be populated show a dash.
- Related Objects — each child relationship with the number of rows extracted, expandable into a table of the extracted values.
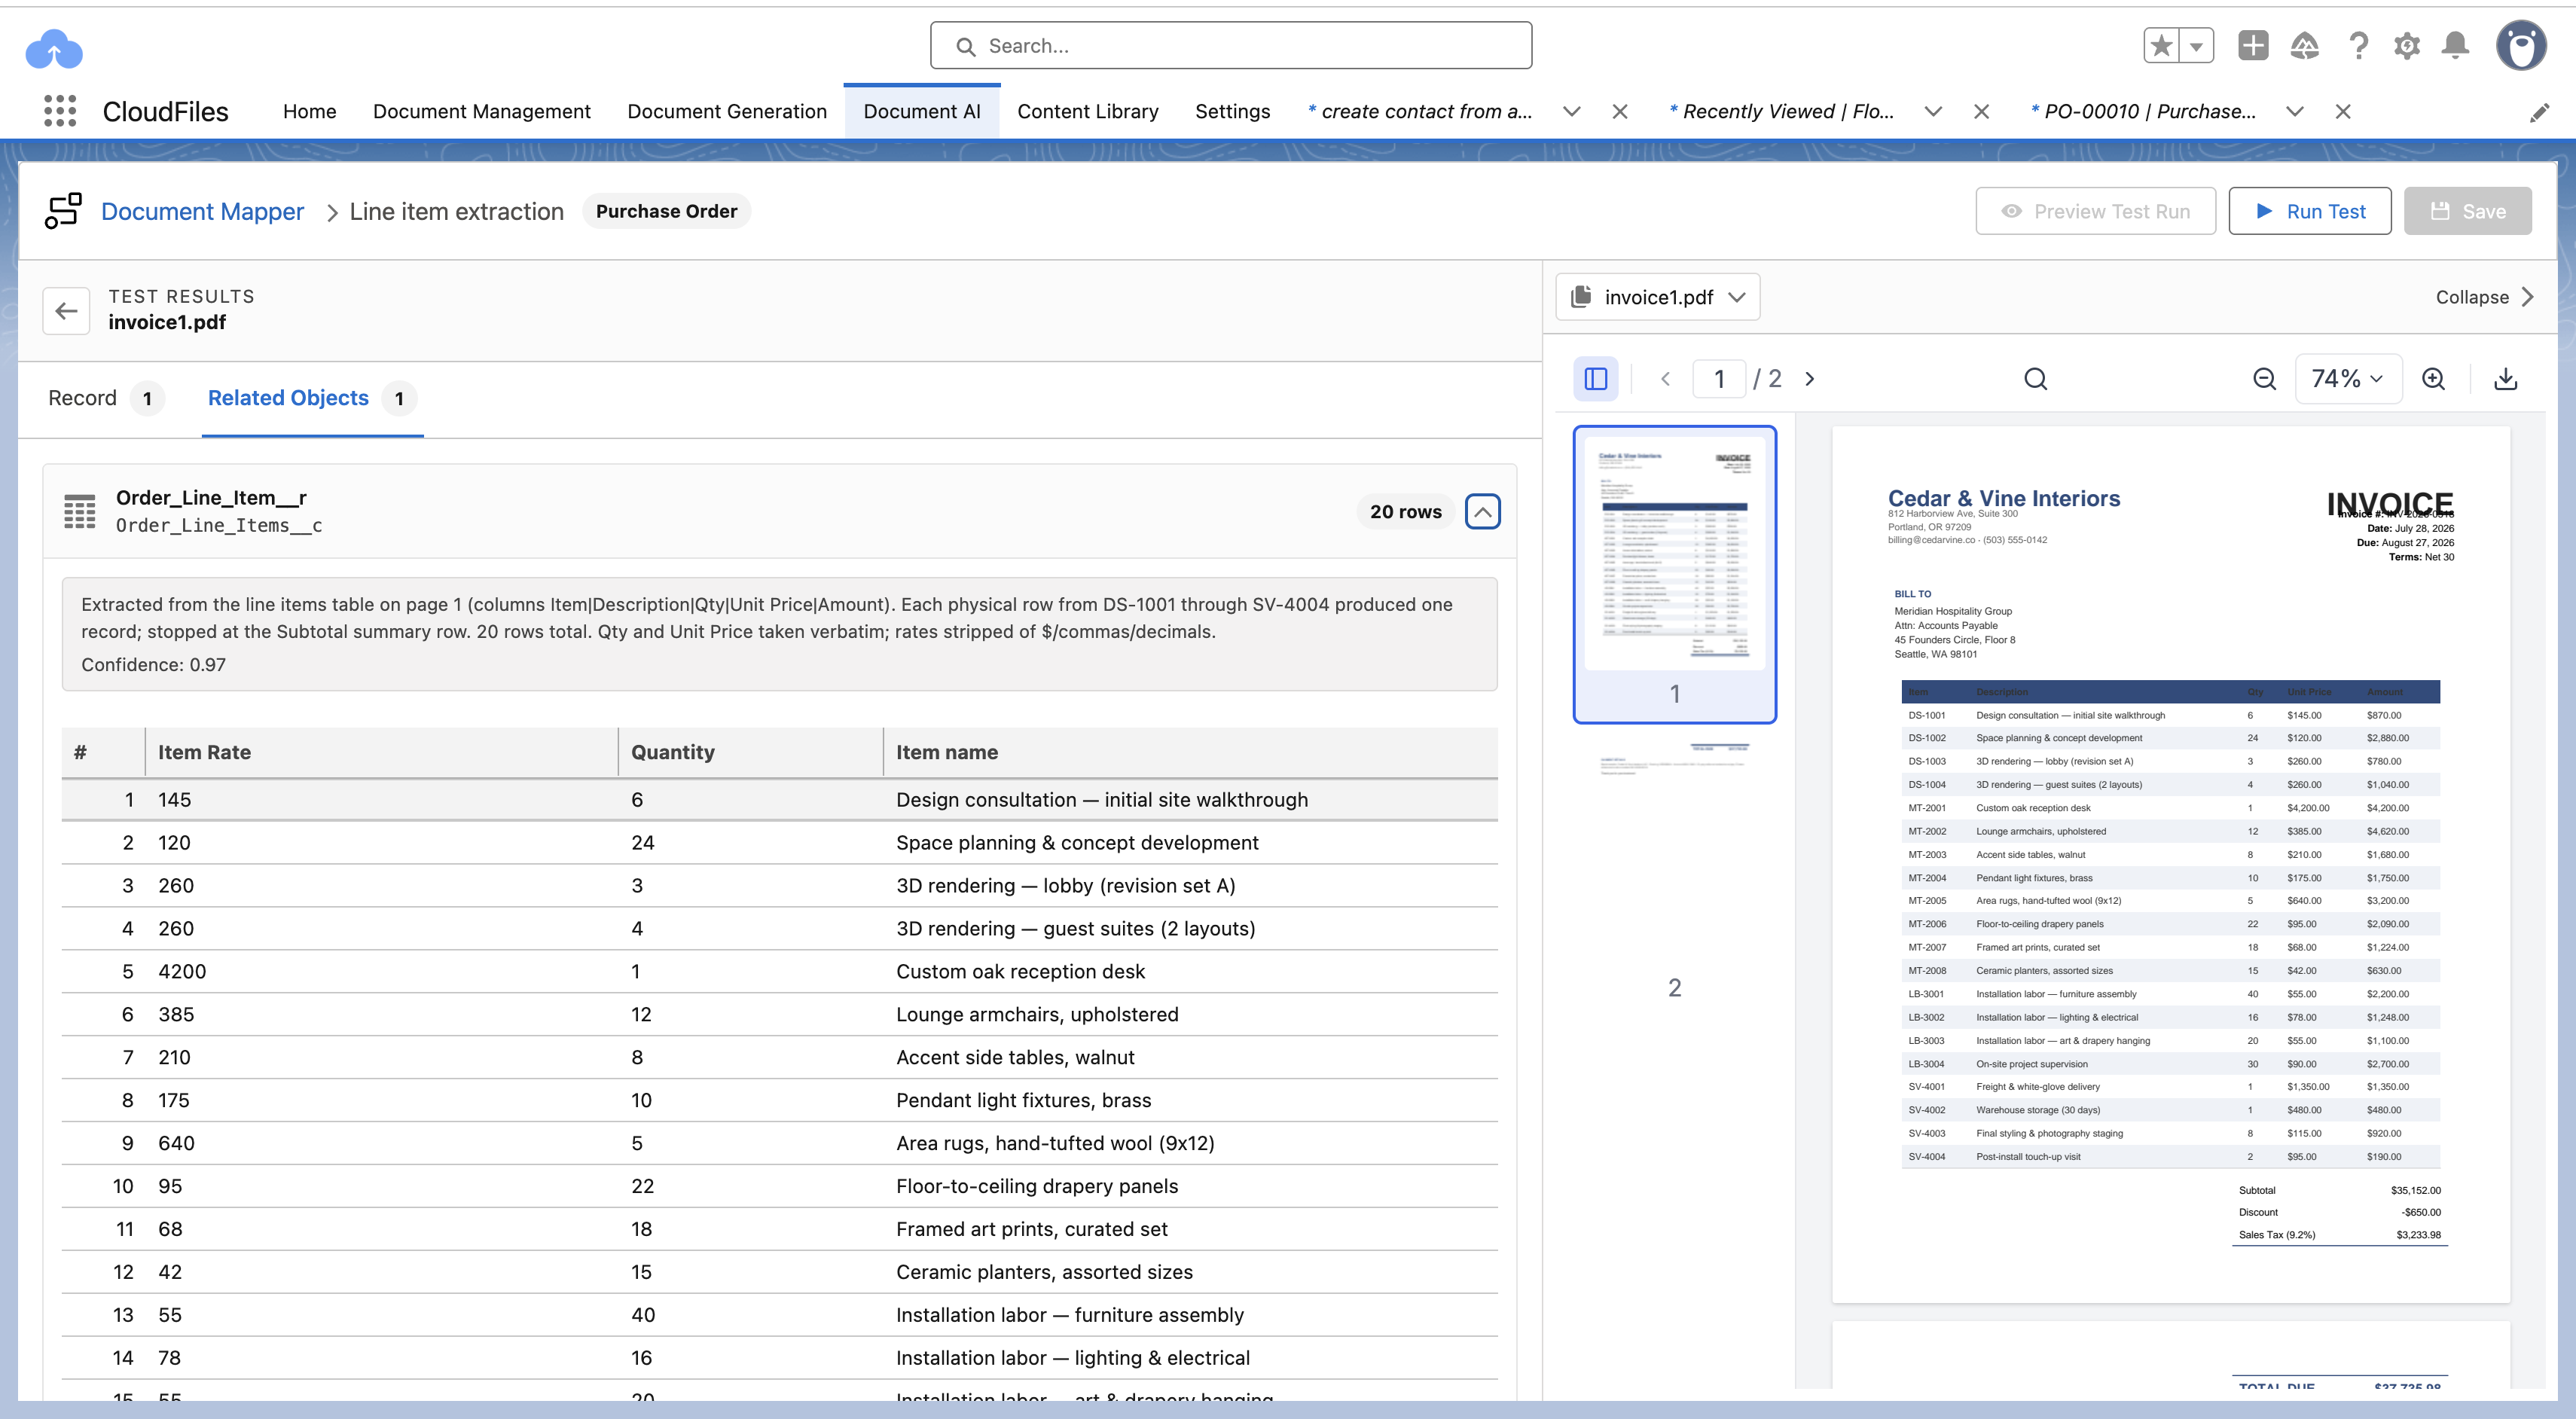
- Adjust prompts, matching plans, and fallback settings based on the results, then re-run. Repeat until the output is correct. To reopen the most recent result at any time, select Preview Test Run.
Save the Configuration
Select Save. This generates (or updates) the configuration's Config ID and returns you to the Document Mapper list. Copy the Config ID — you will need it when attaching the configuration to a button or Flow.
Attach the Configuration
Put the Config ID to work through any of these methods:
| Method | Use it to |
|---|---|
| List View Button | Upload a document and create new records directly from a list view. |
| Detail Page Button | Upload a document against an existing record to update its fields or add related records. |
| Document Mapper Flow Action | Call the configuration from within a Salesforce Flow, passing the Config ID and the source document, or several documents as a set. |
Review and Approve Runs
When a run is set to Send to review queue — either because the configuration's default is Send to review queue, or because a fallback routed it there — the run does not write to Salesforce on its own. Instead it is held for a person to check and approve. Both the queue and the approval happen on the CloudFiles DocAI Run object.
- Open the CloudFiles DocAI Runs tab and find the runs with Status: Pending Review. These are the items waiting on you - filtering the list view by Status is the simplest way to see just the queue.
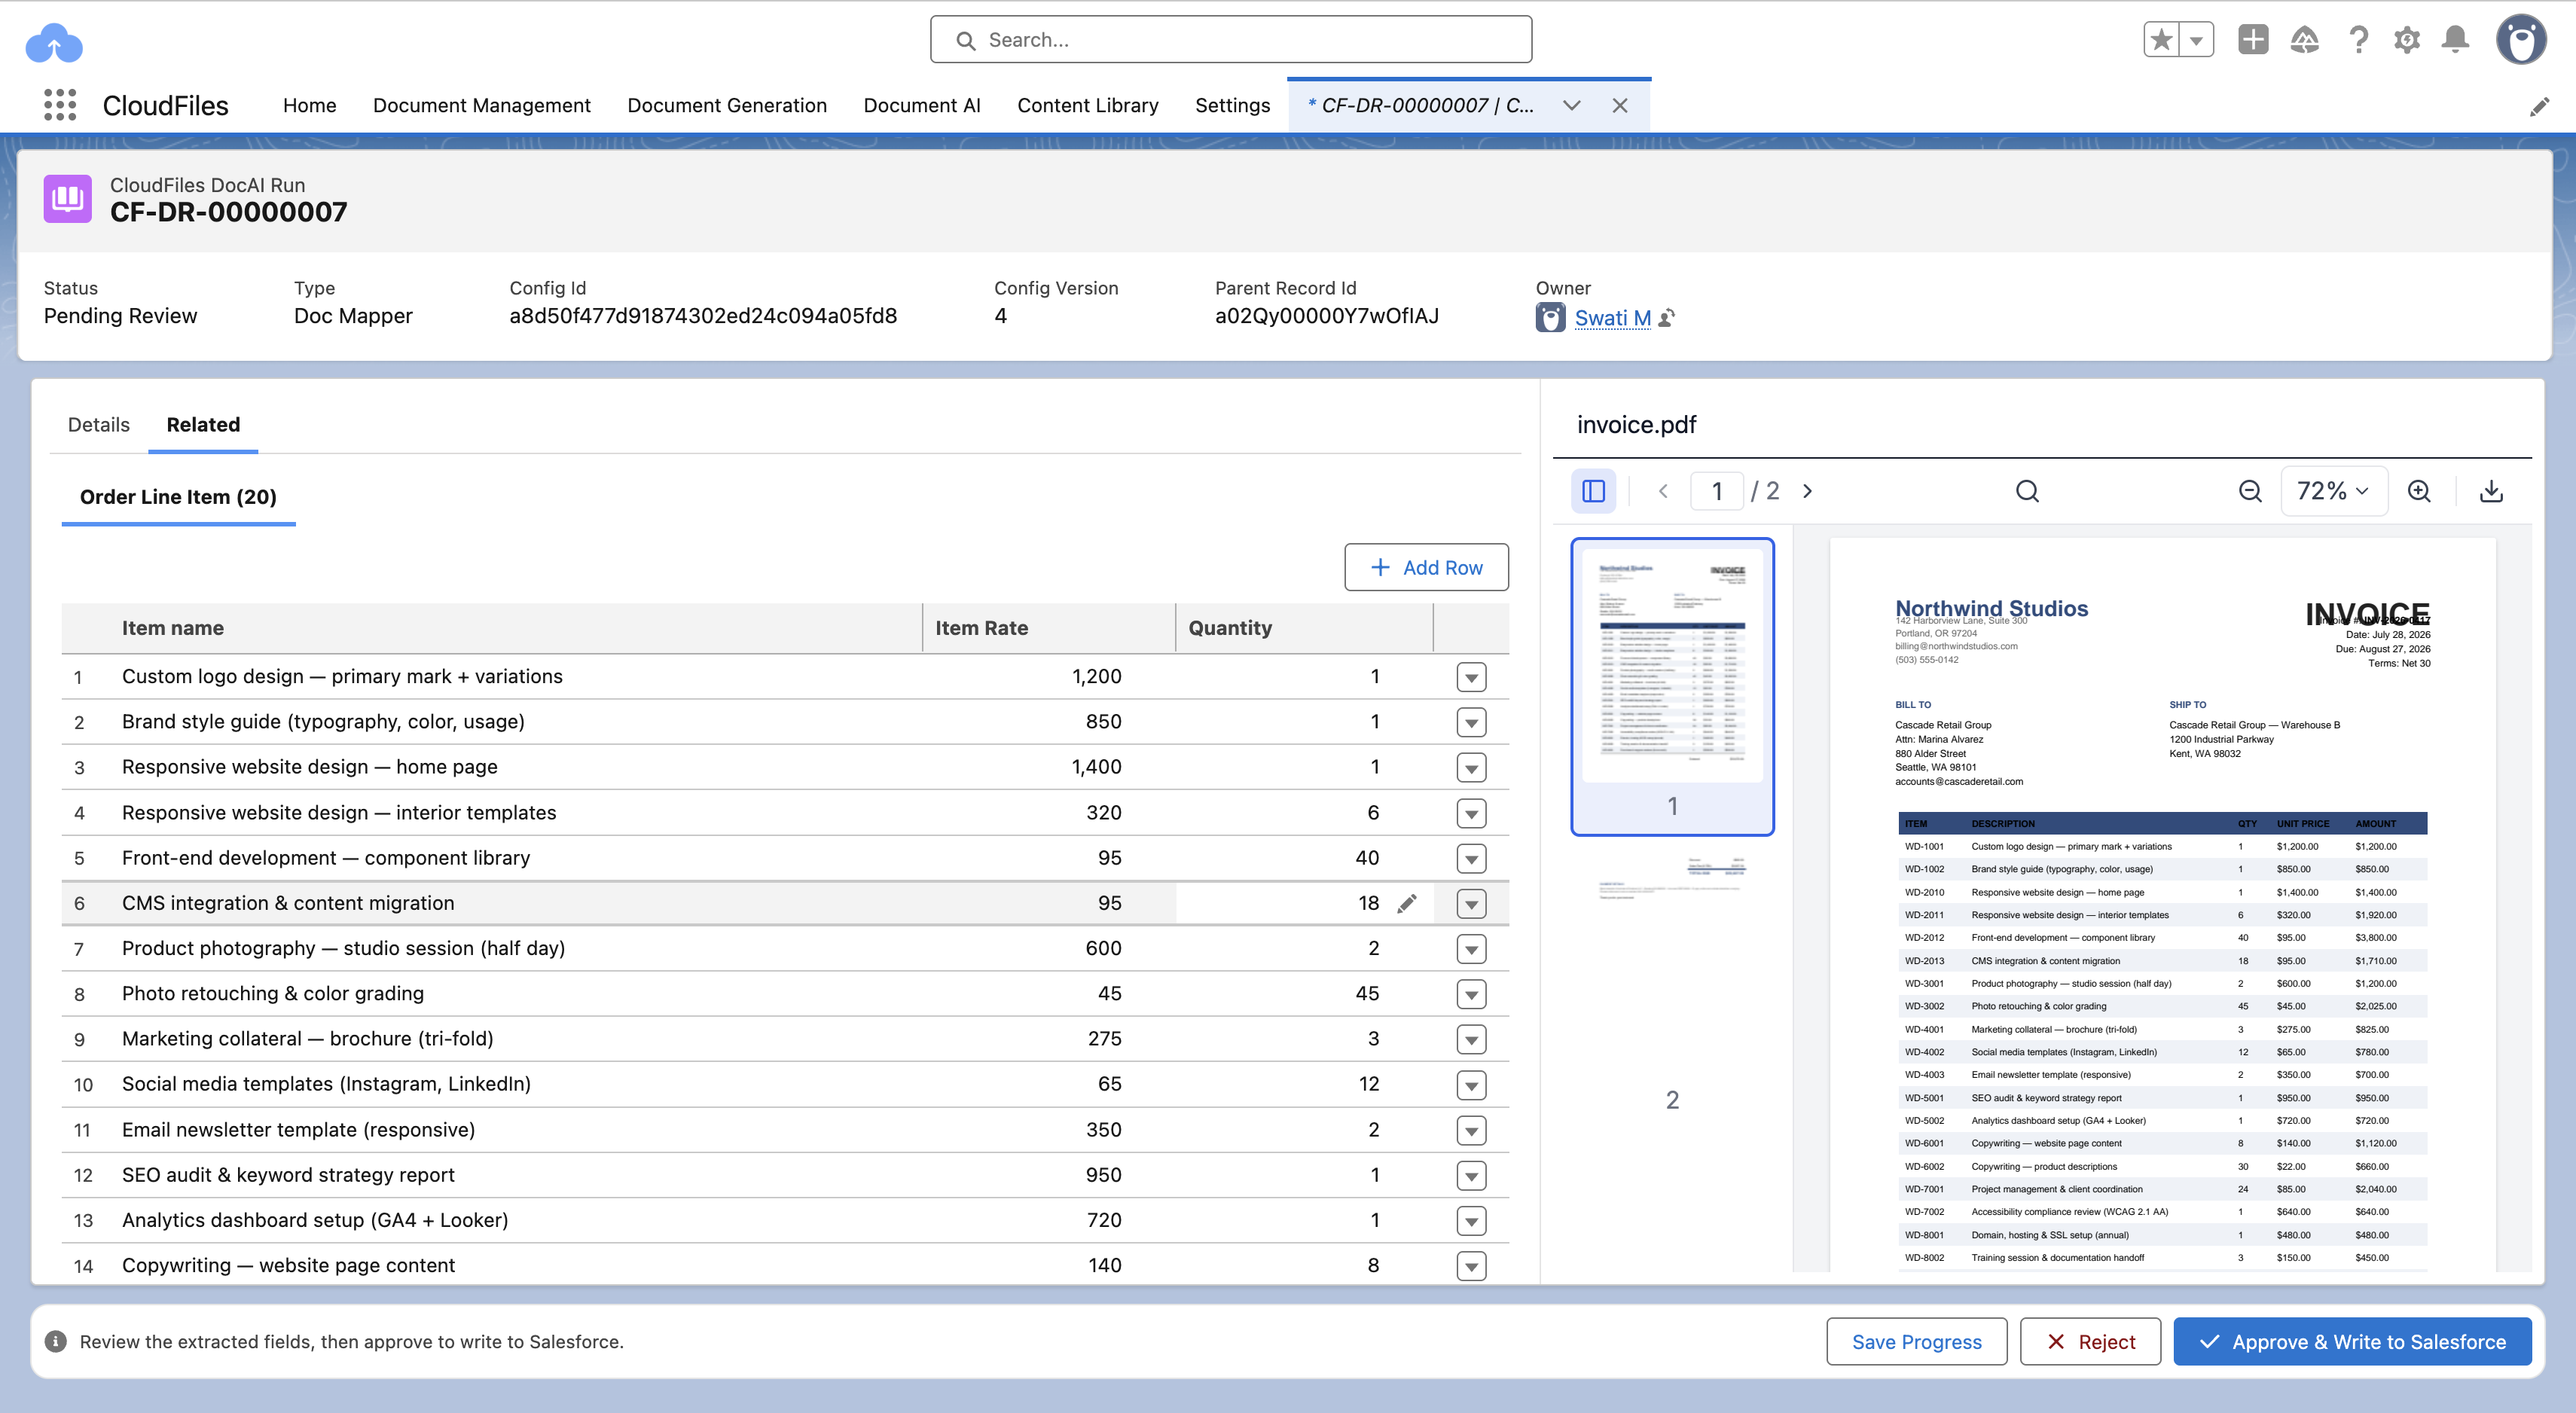
- Open a pending run. The record shows the run header - Status, Type, Config Id, Config Version, Parent Record Id, and Owner - with the source document rendered on the right for side-by-side checking. For a document set run, a Document set dropdown above the preview opens each document in the set.
- Check the extracted data:
- The Details tab shows the main-record fields that were extracted.
- The Related tab shows each child relationship with its extracted rows in a table (for example, “Order Line Item (20)”).
- Correct anything that is wrong before approving:
- Edit a cell in place using its edit (pencil) control.
- Use the row dropdown to act on an individual row.
- Select Add Row to add a record the extraction missed.
- Choose an action in the footer:
| Action | Result |
|---|---|
| Save Progress | Save your edits and keep the run in Pending Review to finish later. Nothing is written to Salesforce yet. |
| Reject | Discard the run without writing anything to Salesforce. |
| Approve & Write to Salesforce | Commit the reviewed data. The main record and all related rows are written, the run leaves the queue, and the Document Mapper Run event is published (see Monitor Runs). |
Only Approve & Write to Salesforce writes data; until then the extracted results live only on the run record.
Monitor Runs
Every execution — in testing or in production — is logged as a CloudFiles DocAI Run record.
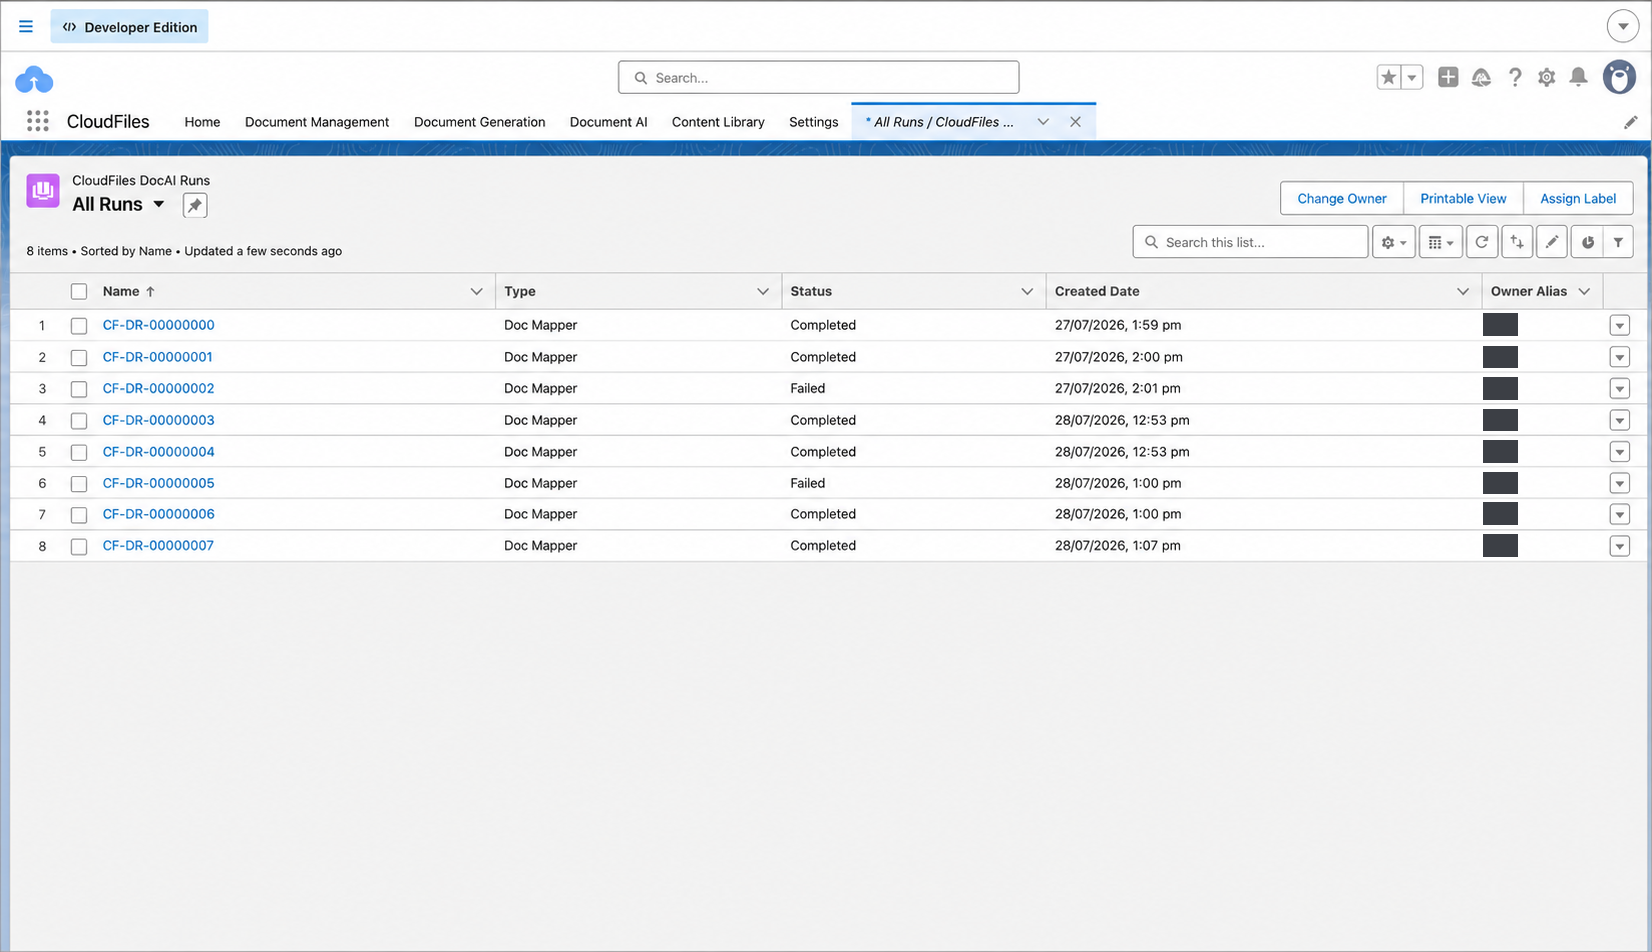
- Open the CloudFiles DocAI Runs tab (or the All Runs list view) to see the full, searchable history.
- Open any run to view its Status, Type (Doc Mapper), Config Id, Config Version, Parent Record Id, and Owner.
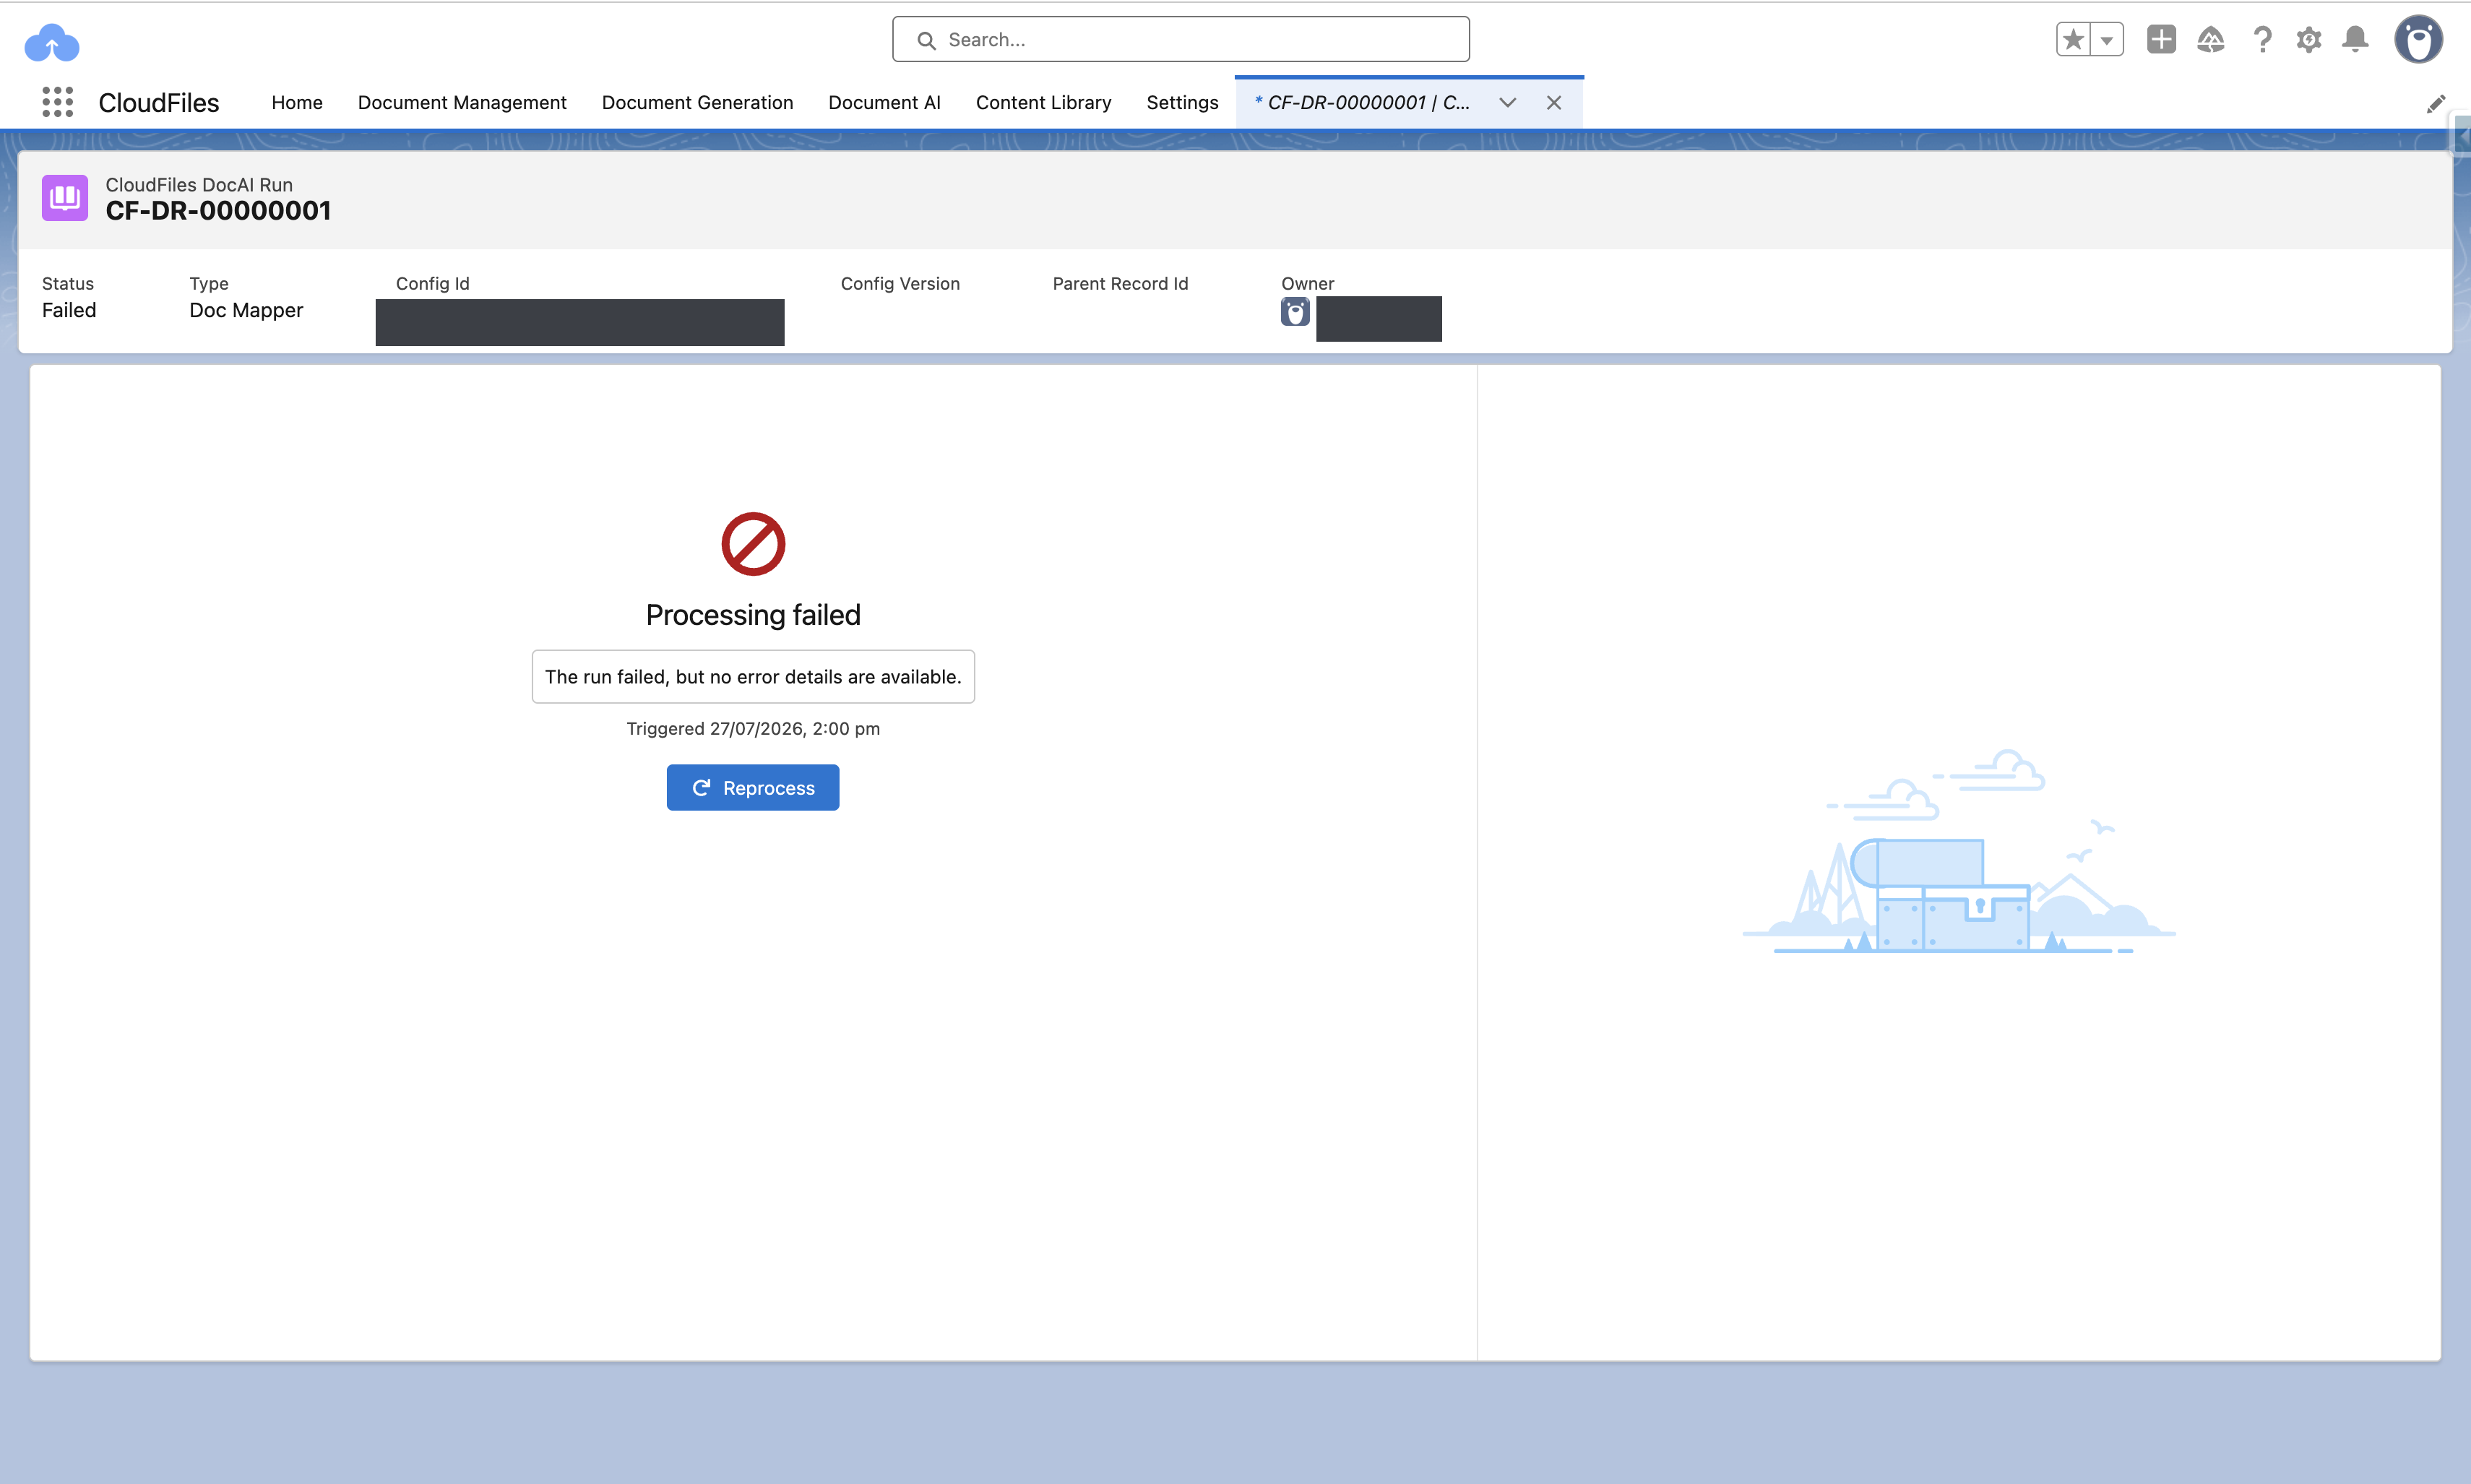
- If a run shows Failed, open it to read any available error detail.
- Select Reprocess to retry a failed run. Reprocessing creates a new run record rather than overwriting the original, so the history stays intact. For a document set, Reprocess runs every document in the set again.
A Document Mapper Run event is published only when a run successfully writes its records to Salesforce — you can subscribe to it for custom post-processing automation. For a run held in the review queue, the event is not published when it enters Pending Review; it fires only after you select Approve & Write to Salesforce and the write succeeds. Runs that are rejected, that fail, or that are still awaiting review do not emit the event.
For a worked end-to-end example, see the Document Mapper Tutorial.