Overview
In this tutorial, we will see how CloudFiles can be used with Salesforce flow automations to classify incoming documents and update the checklist appropriately. Each time a file is uploaded into Salesforce or external storage, the following actions will occur:
- The file is processed using CloudFiles Document AI.
- A Natural Language Query executes to classify the uploaded files.
- Based on the classification, document checklist is updated.
In order to setup this automation, you first need to have some pre-requisites. After this you can start setting up some query automations and updates to achieve your use-case. Check the sections below for more information.
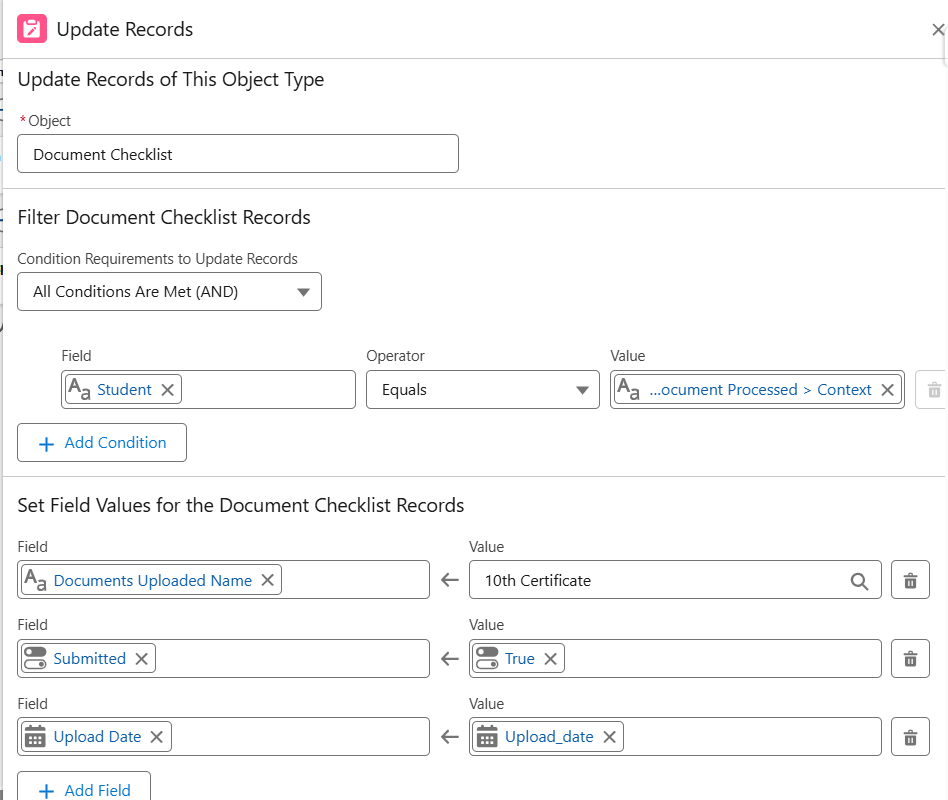
This tutorial showcases how academic documents uploaded to a student's record in Salesforce is classified using CloudFiles Document AI. Based on the classification, the related Document Checklist (a child object) is updated with the document name, submission status, and upload date, ensuring automated tracking of student submissions.
Pre-requisites
Before starting with this tutorial, you need to ensure that CloudFiles Document AI is properly installed & configured in your system. Additionally, you also need to create some initial automations to process the files before you can query them. Check the 2 sections below carefully -
Installation & Configuration
Ensure the following before starting:
- CloudFiles Document AI Installation and Configuration are complete.
- You have an Active Subscription or Trial of CloudFiles Document AI.
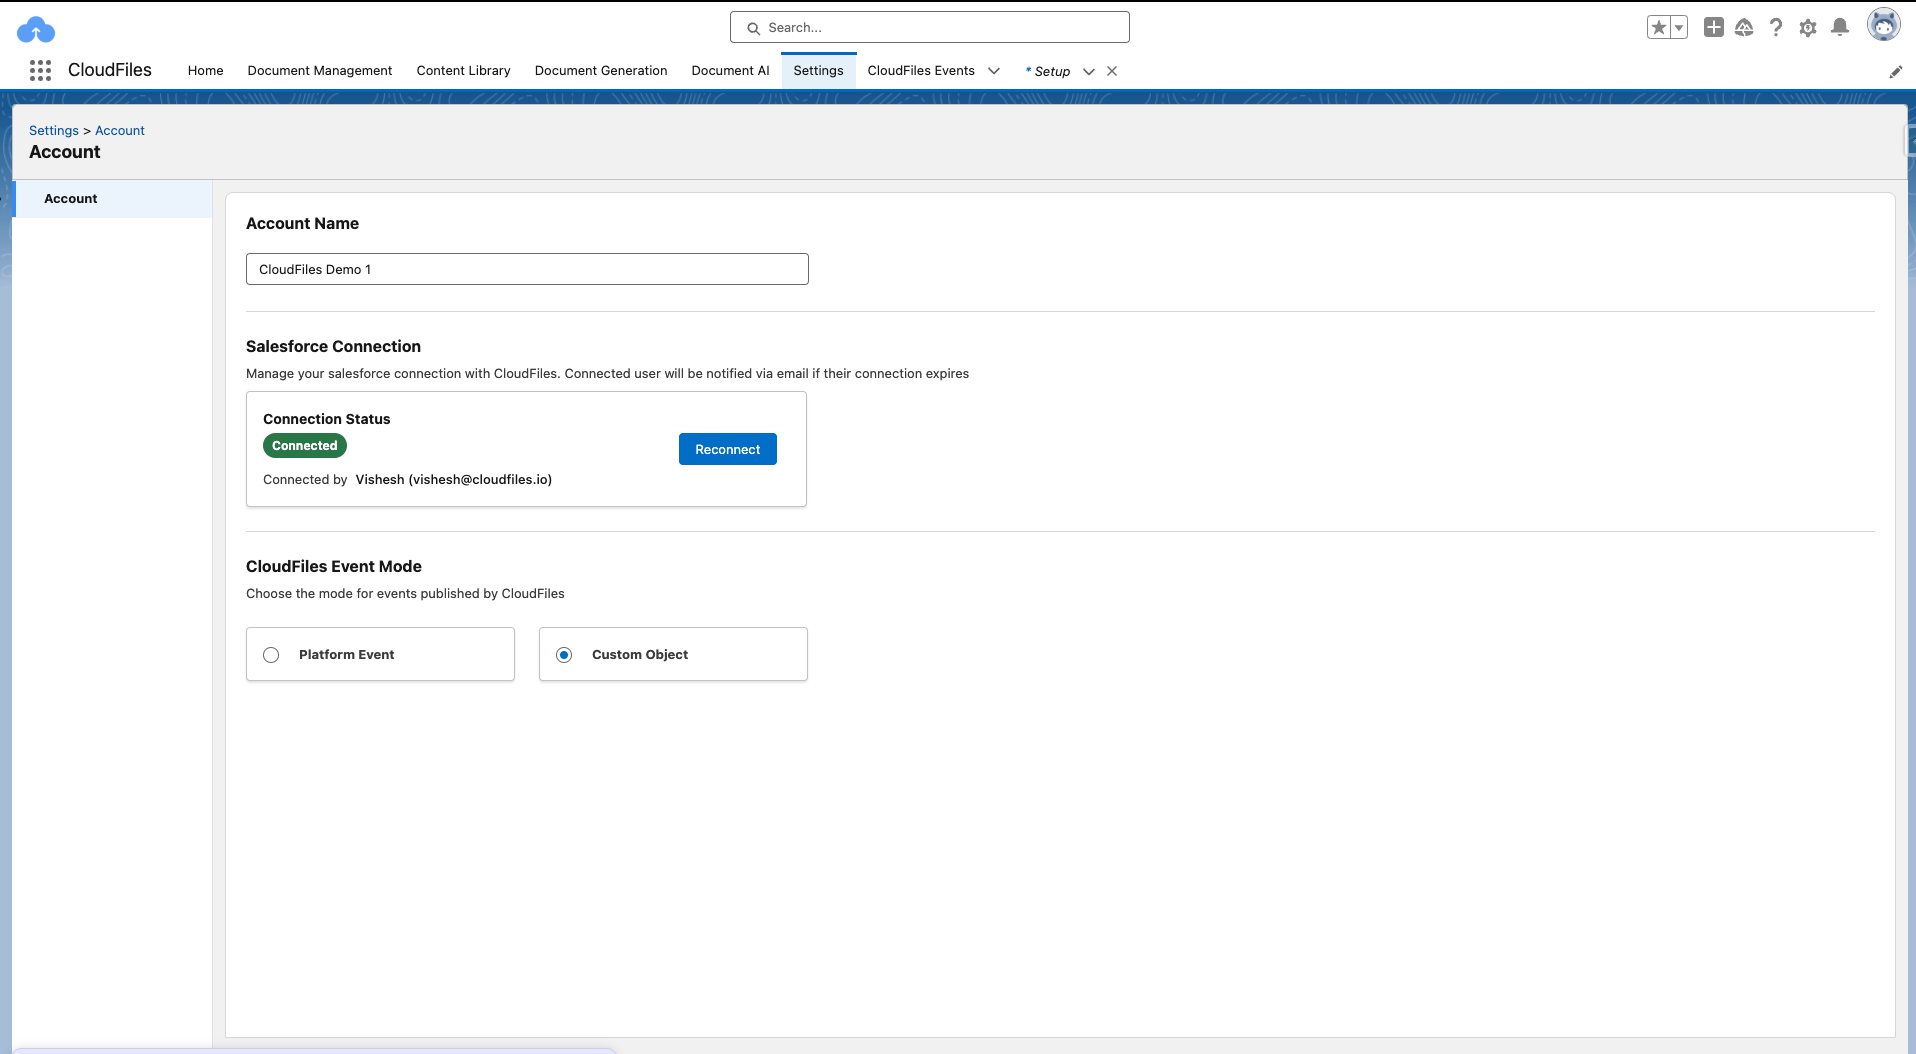
- The CloudFiles Event Mode setting is set to Custom Object
Initial Automation Setup
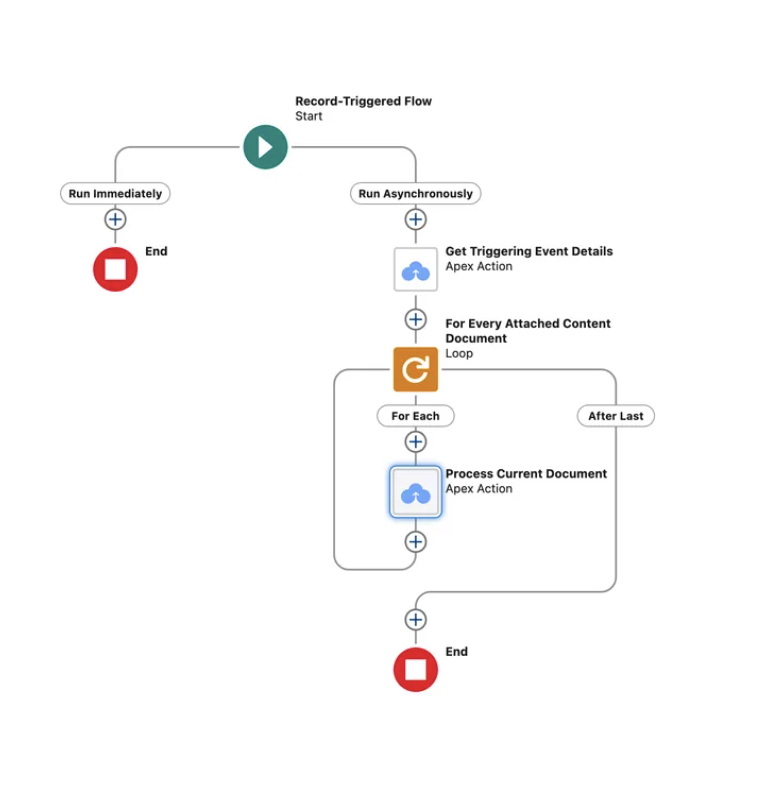
There are 2 flows you will need to setup to process the uploaded files. The first flow is triggered when the document is uploaded into Salesforce or external storage. This flow sends the file to AI for processing. This might take a few seconds. Once the AI is done with processing, the second flow will trigger which will contain the processed document. You can then run queries on this processed document.
- Flow 1: Send Document For Processing - Triggered when file is uploaded into Salesforce or external storage. Sends the file for processing which may take a few seconds to a minute.
- Flow 2: Document Processing Complete - Triggered when the file has been processed by AI. Performs queries on the file to extract the data.
Read the article on AI Flows - Initial Setup Guide carefully to setup both the flows. Once your initial flows are setup as shown above, you are ready to move to the next step.
Once your flow setup is complete, your flows should look like the following.
Query Automation Setup
Now that you have the initial automation setup, we can take the document processed flow and extend it to query the document and update the required fields. In this section, we show how to query the processed document, check the results and perform the necessary updates.
Querying the document
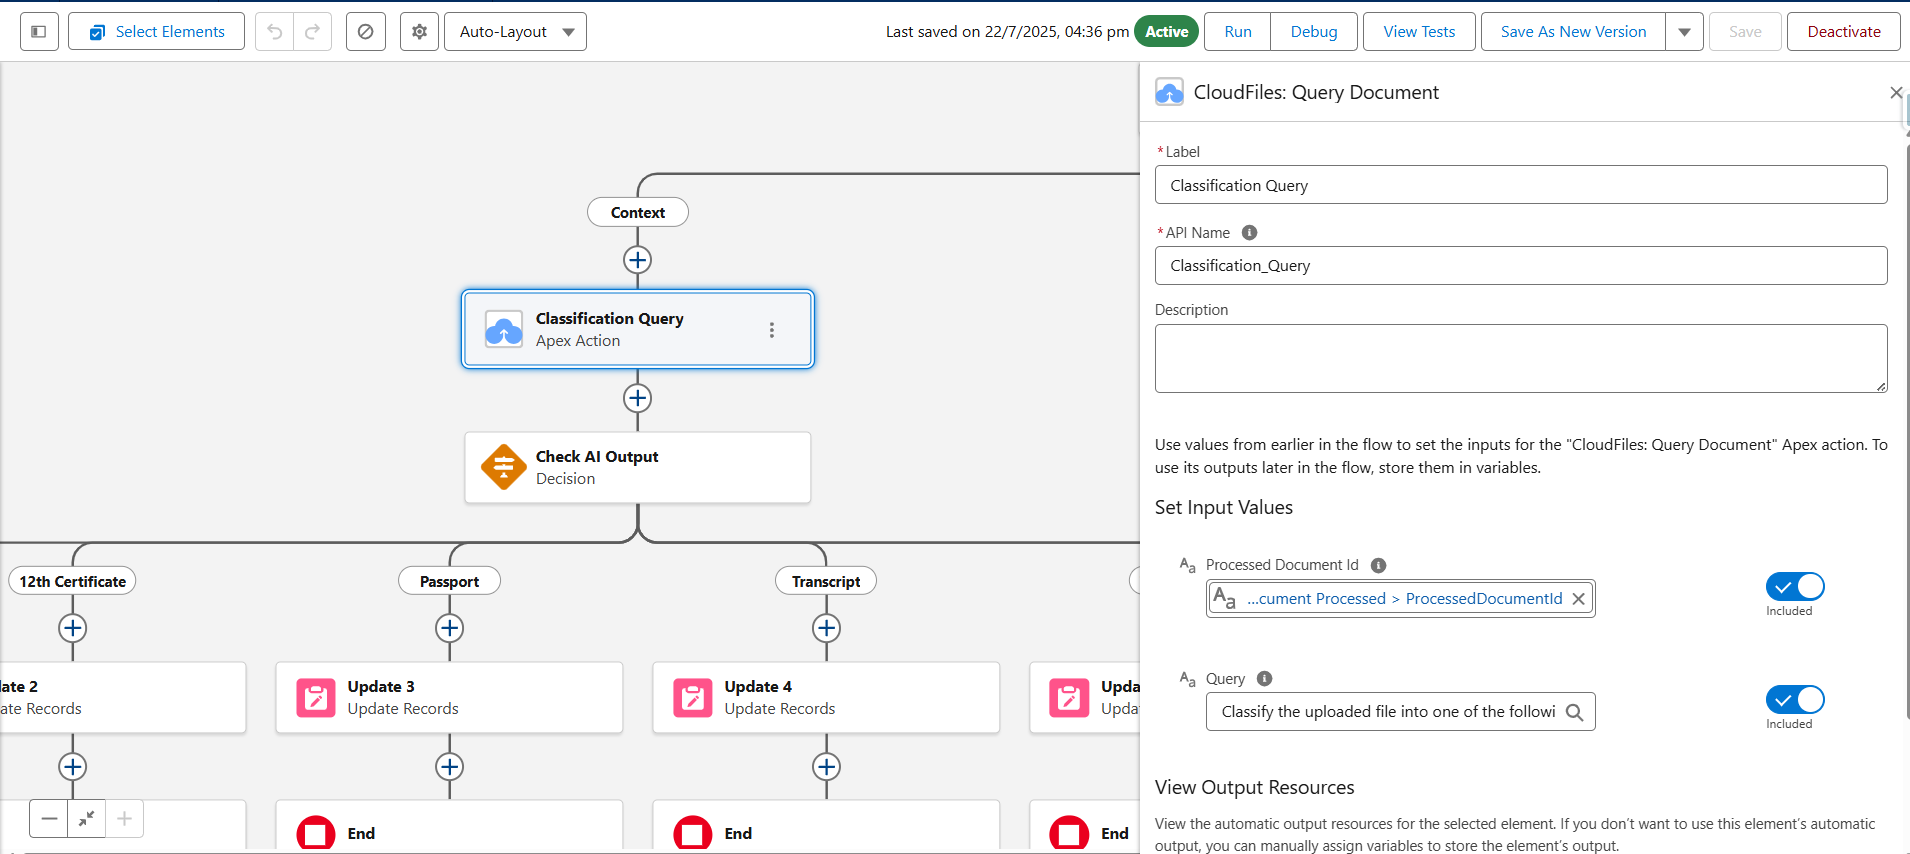
In order to query the document, we will simply use the Query Document/Dataset flow action. This action takes a processed document ID and a text query as input. The processed document ID is available as output of the Get Event Details action. Here are the full inputs used in the image below.
Processed Document Id :
( {!Get_Triggering_Event_Details.DocumentProcessed.ProcessedDocumentId} )
Query = Enter a clear Natural Language Classification Prompt .
This prompt is used to classify academic documents uploaded to a student’s record in Salesforce. The goal is to identify the type of document and update the associated checklist accordingly.
Classify the uploaded file into one of the following categories: 10th Marksheet, 12th Marksheet, Passport, Transcript, or Transfer Certificate. Based on the document type identified, return a specific number as follows: return 1 if the file is a 10th Marksheet, 2 if it is a 12th Marksheet, 3 for a Passport, 4 for a Transcript, and 5 for a Transfer Certificate. If the document does not match any of these categories, return 0. Only return the corresponding number with no additional explanation or text.
For example, if a 12th Marksheet is uploaded , then the AI Output will be 2.
Checking the answers
The Query document action above outputs a text variable which is the full response of AI for the given query. You can use this text response with Flow decision branches to perform relevant actions based on the document type. Below, we have used the response from AI to create 5 separate branches based on the document type, which we will use in the next step.
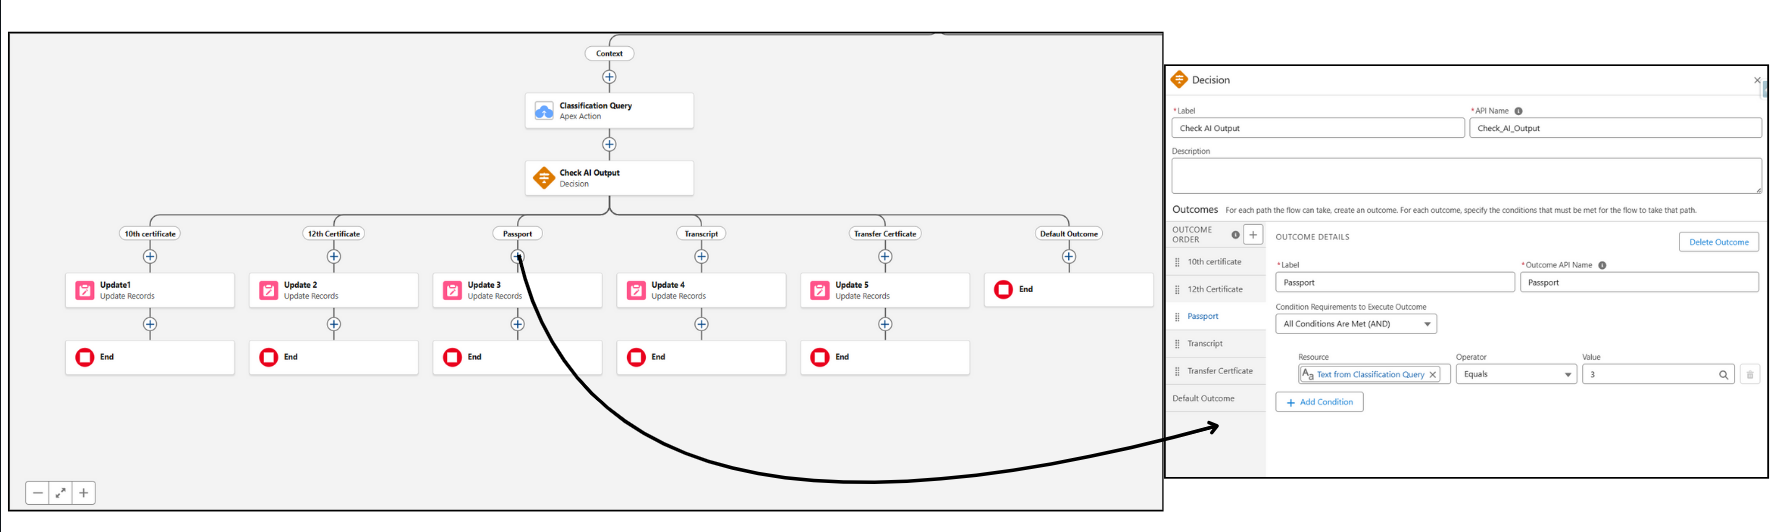
This step ensures the flow accurately identifies the type of document processed, allowing appropriate subsequent record updating actions.
Updating Document Checklist
Once the classification result is received and matched using decision branches, the corresponding entry in the Document Checklist, a child object of the Student record, can be filtered and updated. Each time a document is uploaded and processed, its status in the checklist is updated accordingly.
See it in Action
Now that everything is set up, you can test your flows. When a document is uploaded as a Salesforce File on the record, the document checklist is automatically updated.
Note: As Flow Automation executions and document processing via AI may take a short time, the field updates will not reflect immediately. To view the updates, wait briefly and refresh the page.
Whenever a file is processed using the Process Document using AI action, a Document Processed object record is published.
You can query these event object records to verify successful file processing and debug the flow.
Example SOQL Query:
To check Document Processed events sorted by the most recent:
SELECT Id, Name, CreatedDate, cldfs__Data__c
FROM cldfs__CloudFilesEvent__c
WHERE cldfs__Type__c = 'document-processed'
ORDER BY CreatedDate DESC
You can check the Context and File Details in the Data Field of the record.
When a flow runs in debug mode and executes Query Document/Dataset action, you can check the results and modify the queries if required.