What to Expect
By the end of this tutorial, you will learn how to:
- Configure a fillable PDF template using actions like Insert Field and Insert Checkbox to map Salesforce data.
- Publish the template for both manual use (from record pages) and automated use (with Salesforce Flows or processes).
Prerequisites
Install CloudFiles in Salesforce
CloudFiles is available on the Salesforce AppExchange and can be installed using the standard app installation process. Check out Installation and Configuration guides to set up your account and user access.
Have a Fillable PDF Form Ready
To build a template in CloudFiles, you'll need a fillable PDF form. A fillable PDF is not just a static document — it's a PDF that has interactive fields such as text boxes and checkboxes layered on top of the form design. These fields can capture or display values, which makes them perfect for mapping to Salesforce data during document generation.
Common examples of fillable PDFs include:
- Government forms (e.g., W-9, I-9, tax forms)
- Application forms (e.g., bank loans, vendor onboarding)
- Standard business contracts with input fields
If your PDF doesn't already contain fillable fields, you can add them using tools like Adobe Acrobat (Prepare Form) or other PDF form editors before uploading it to CloudFiles.
Building the Template
For this tutorial, we'll use the IRS W-9 form as an example. The W-9 is widely used by businesses to collect tax-related information from vendors or organizations.
We'll connect this form to the Account object in Salesforce, since most of the details required on a W-9, such as Business Name, Address, Tax classification, and EIN are typically stored in Account records along with some custom fields. This makes Accounts the most natural fit for generating W-9s automatically.
1 - Upload a Template
Steps to upload a PDF form
Steps to upload a PDF form:
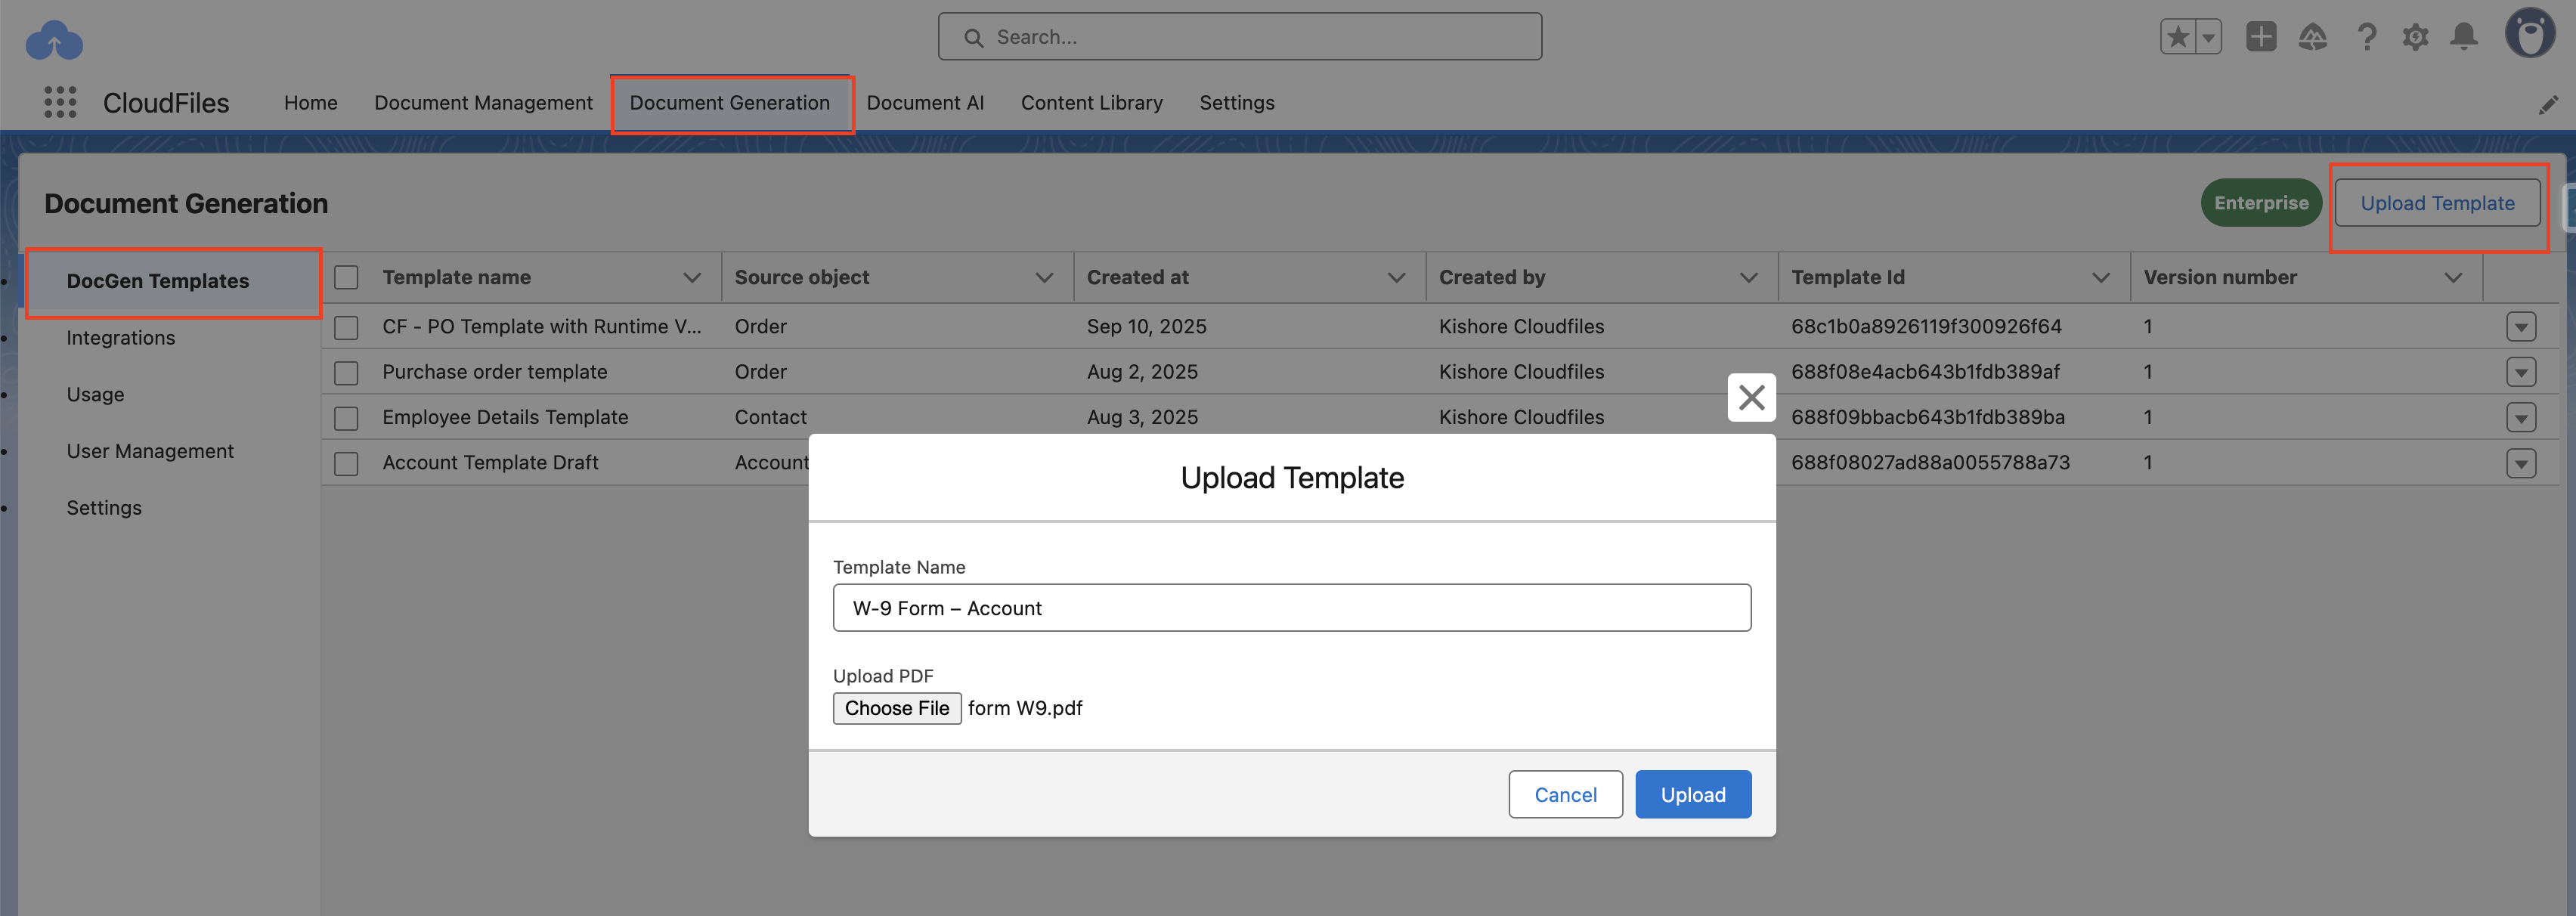
- In Salesforce, open the CloudFiles app and go to the Document Generation tab.
- Click Upload Template and select your IRS W-9 PDF.
- Enter a Template Name (e.g., "W-9 Form – Account").
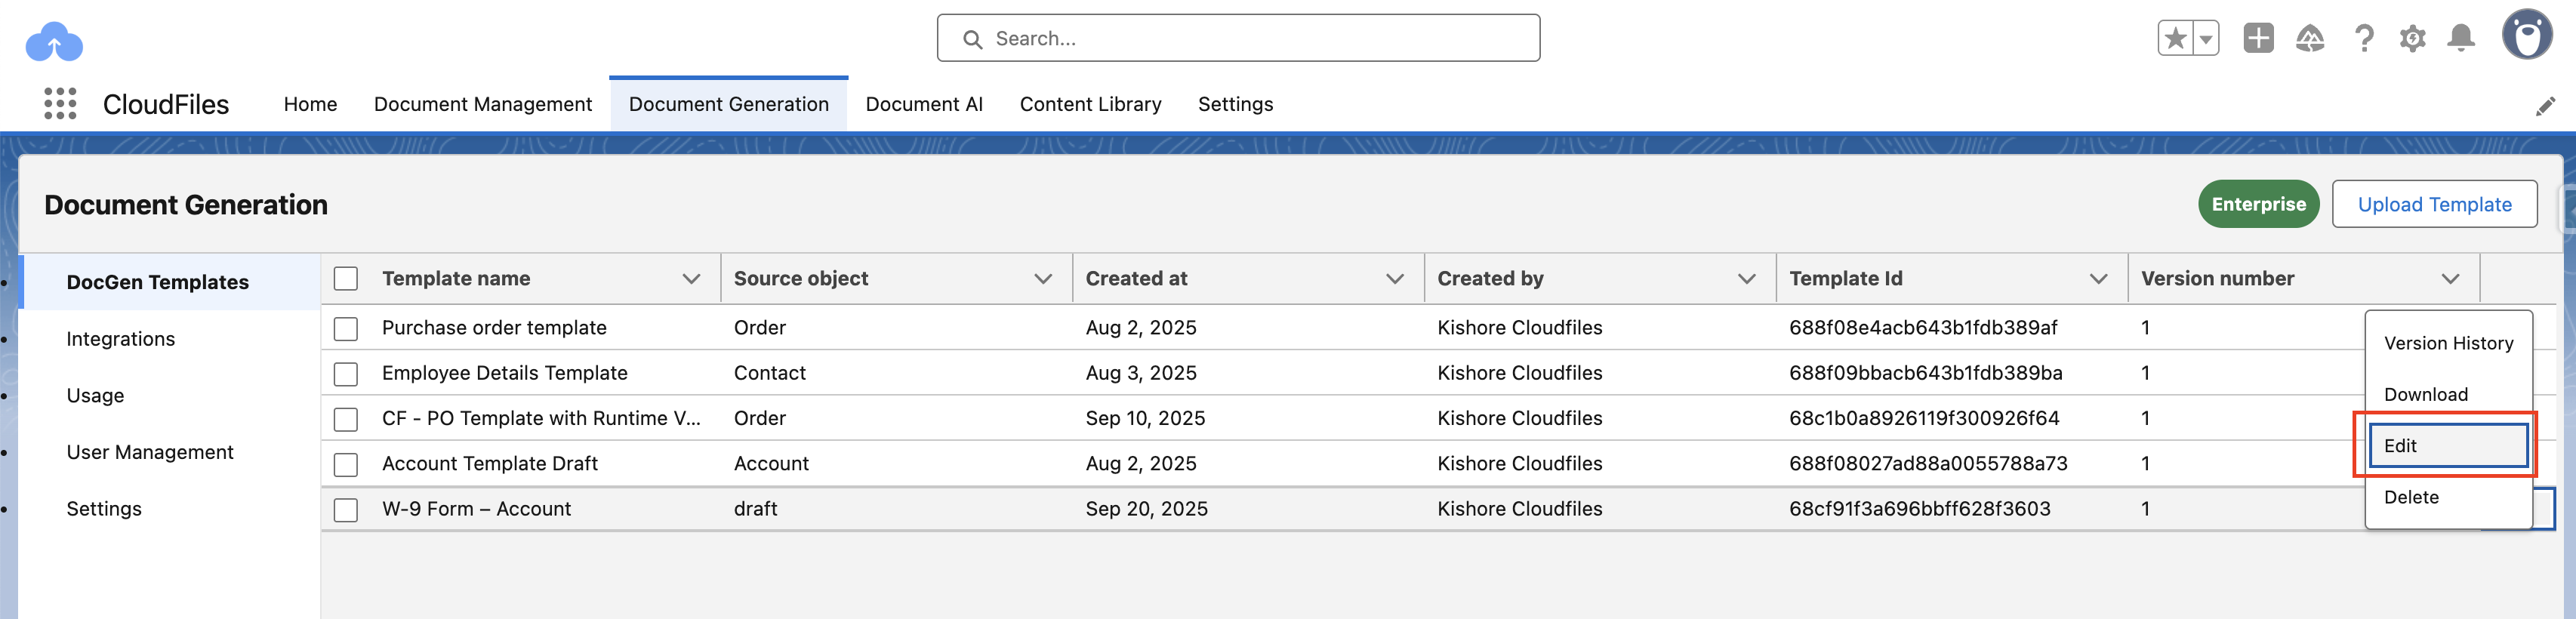
- Once uploaded, locate it in the list, click the menu icon (⋮), and choose Edit.
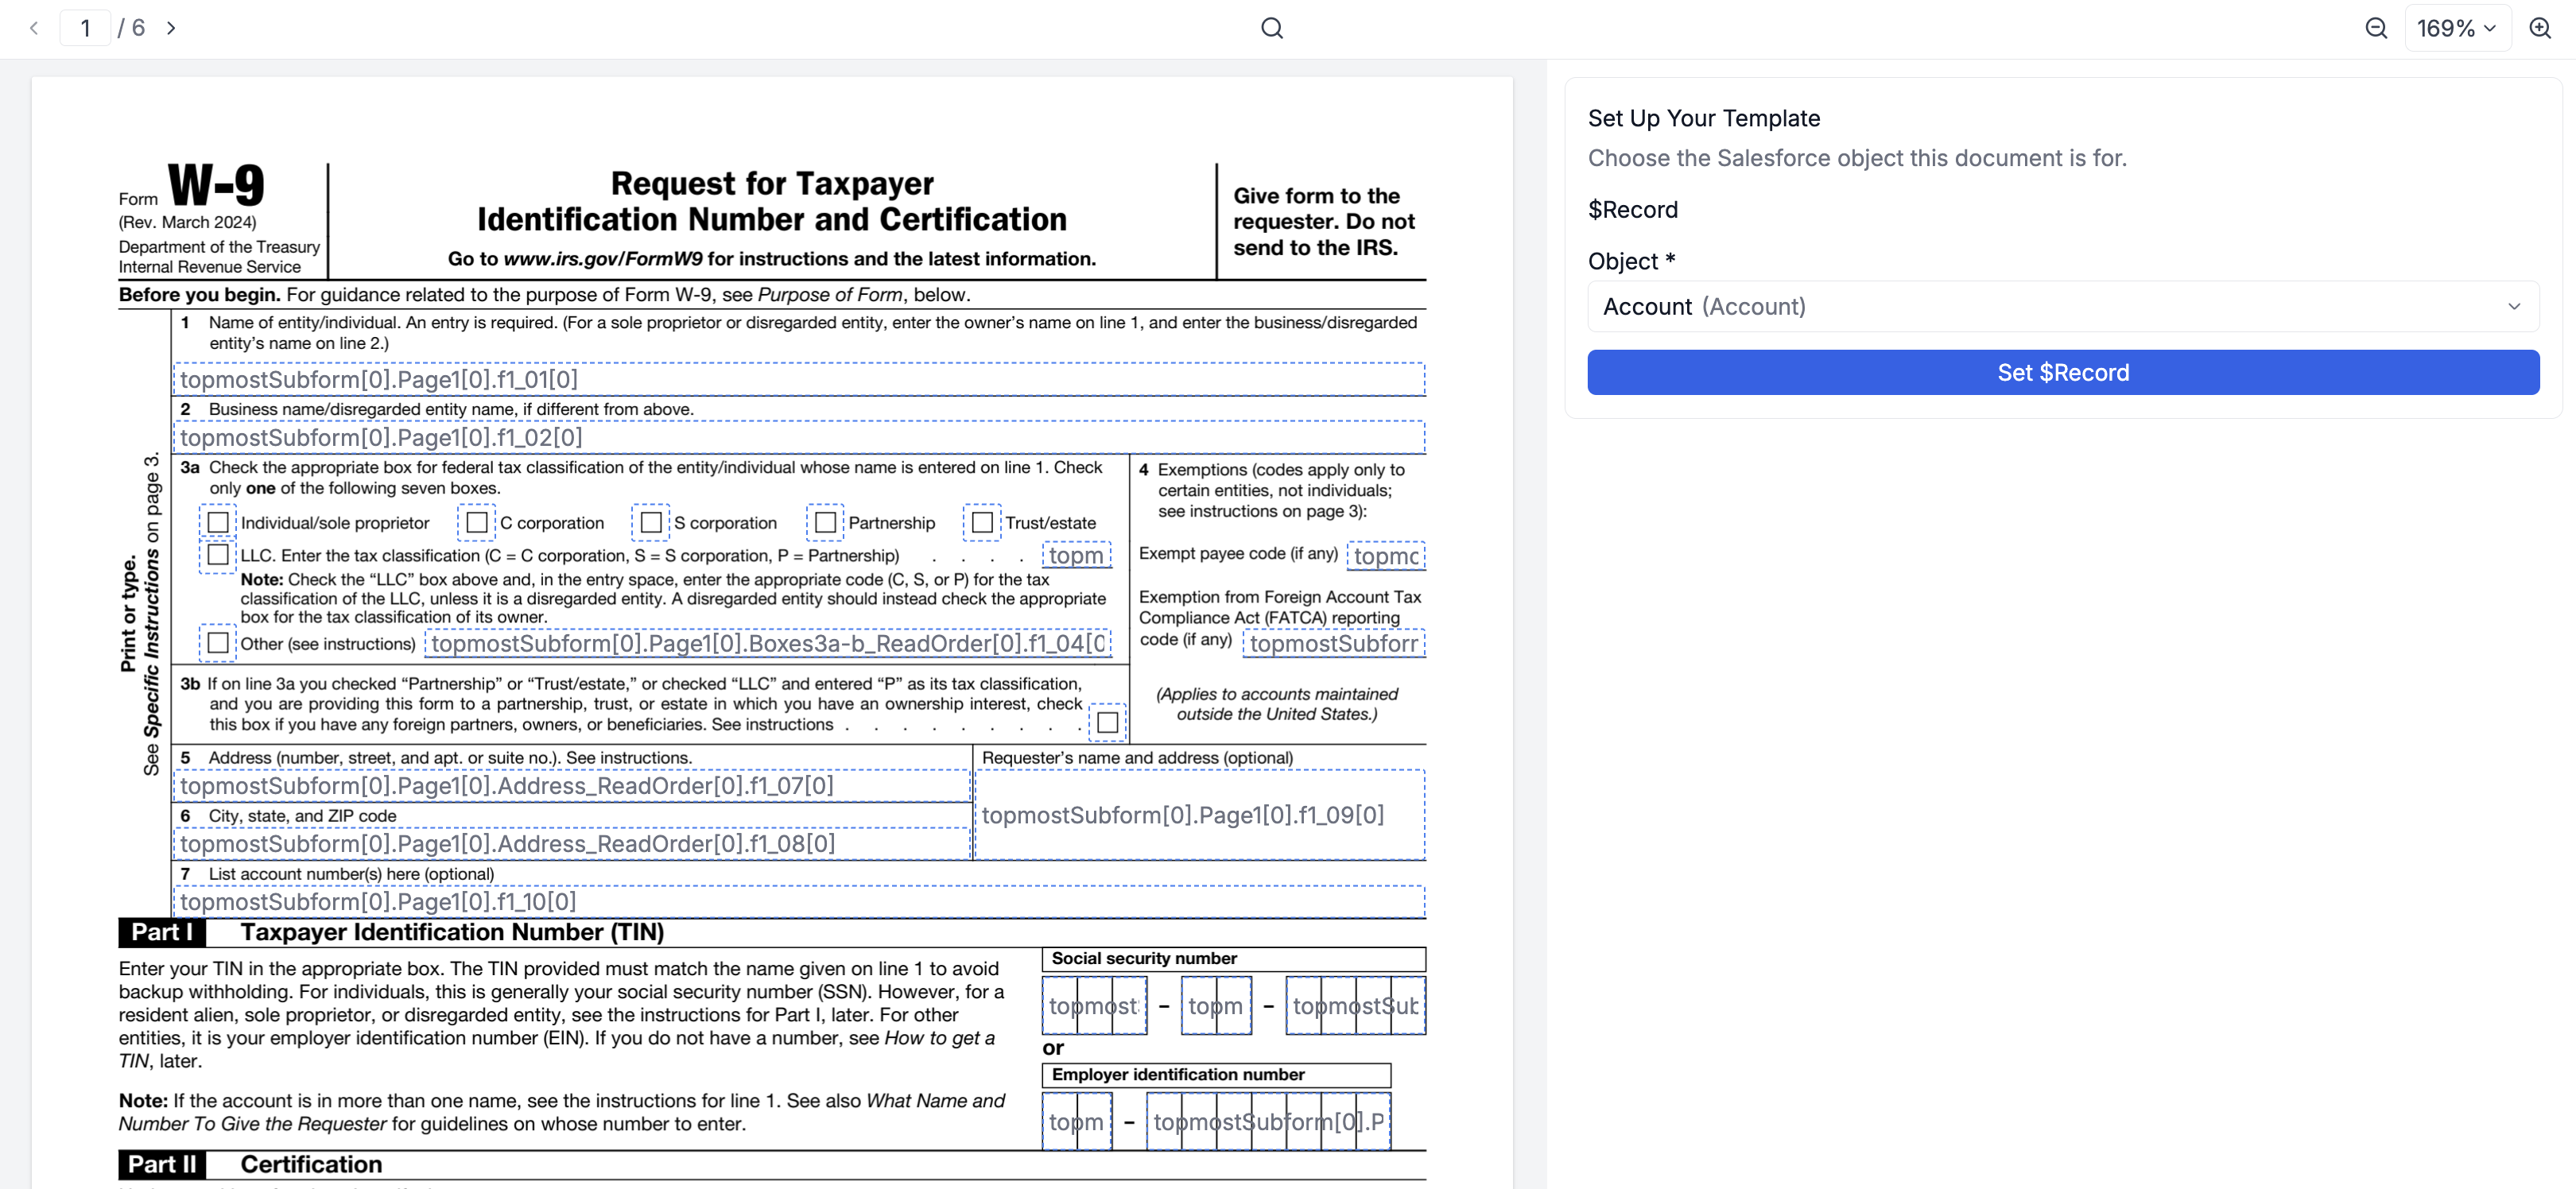
- In the side panel, select the Account object and click Set $Record. The PDF will now open in edit mode with Edit, Resources, Preview, and Publish tabs on the right panel, ready for mapping.
2 - Insert Text
Use Insert Text to place values from Salesforce fields into text areas of the PDF.
Map "Account Name" to "Name (Line 1)":
- Click the + Insert Text button in the right panel.
- Click the Name (Line 1) field on the PDF, or select it from the field list in the bottom panel.
- In the Insert Field section on the right, choose the field {!$Record.Name} (Account → Name) from the Field API Name dropdown.
- Click Apply.
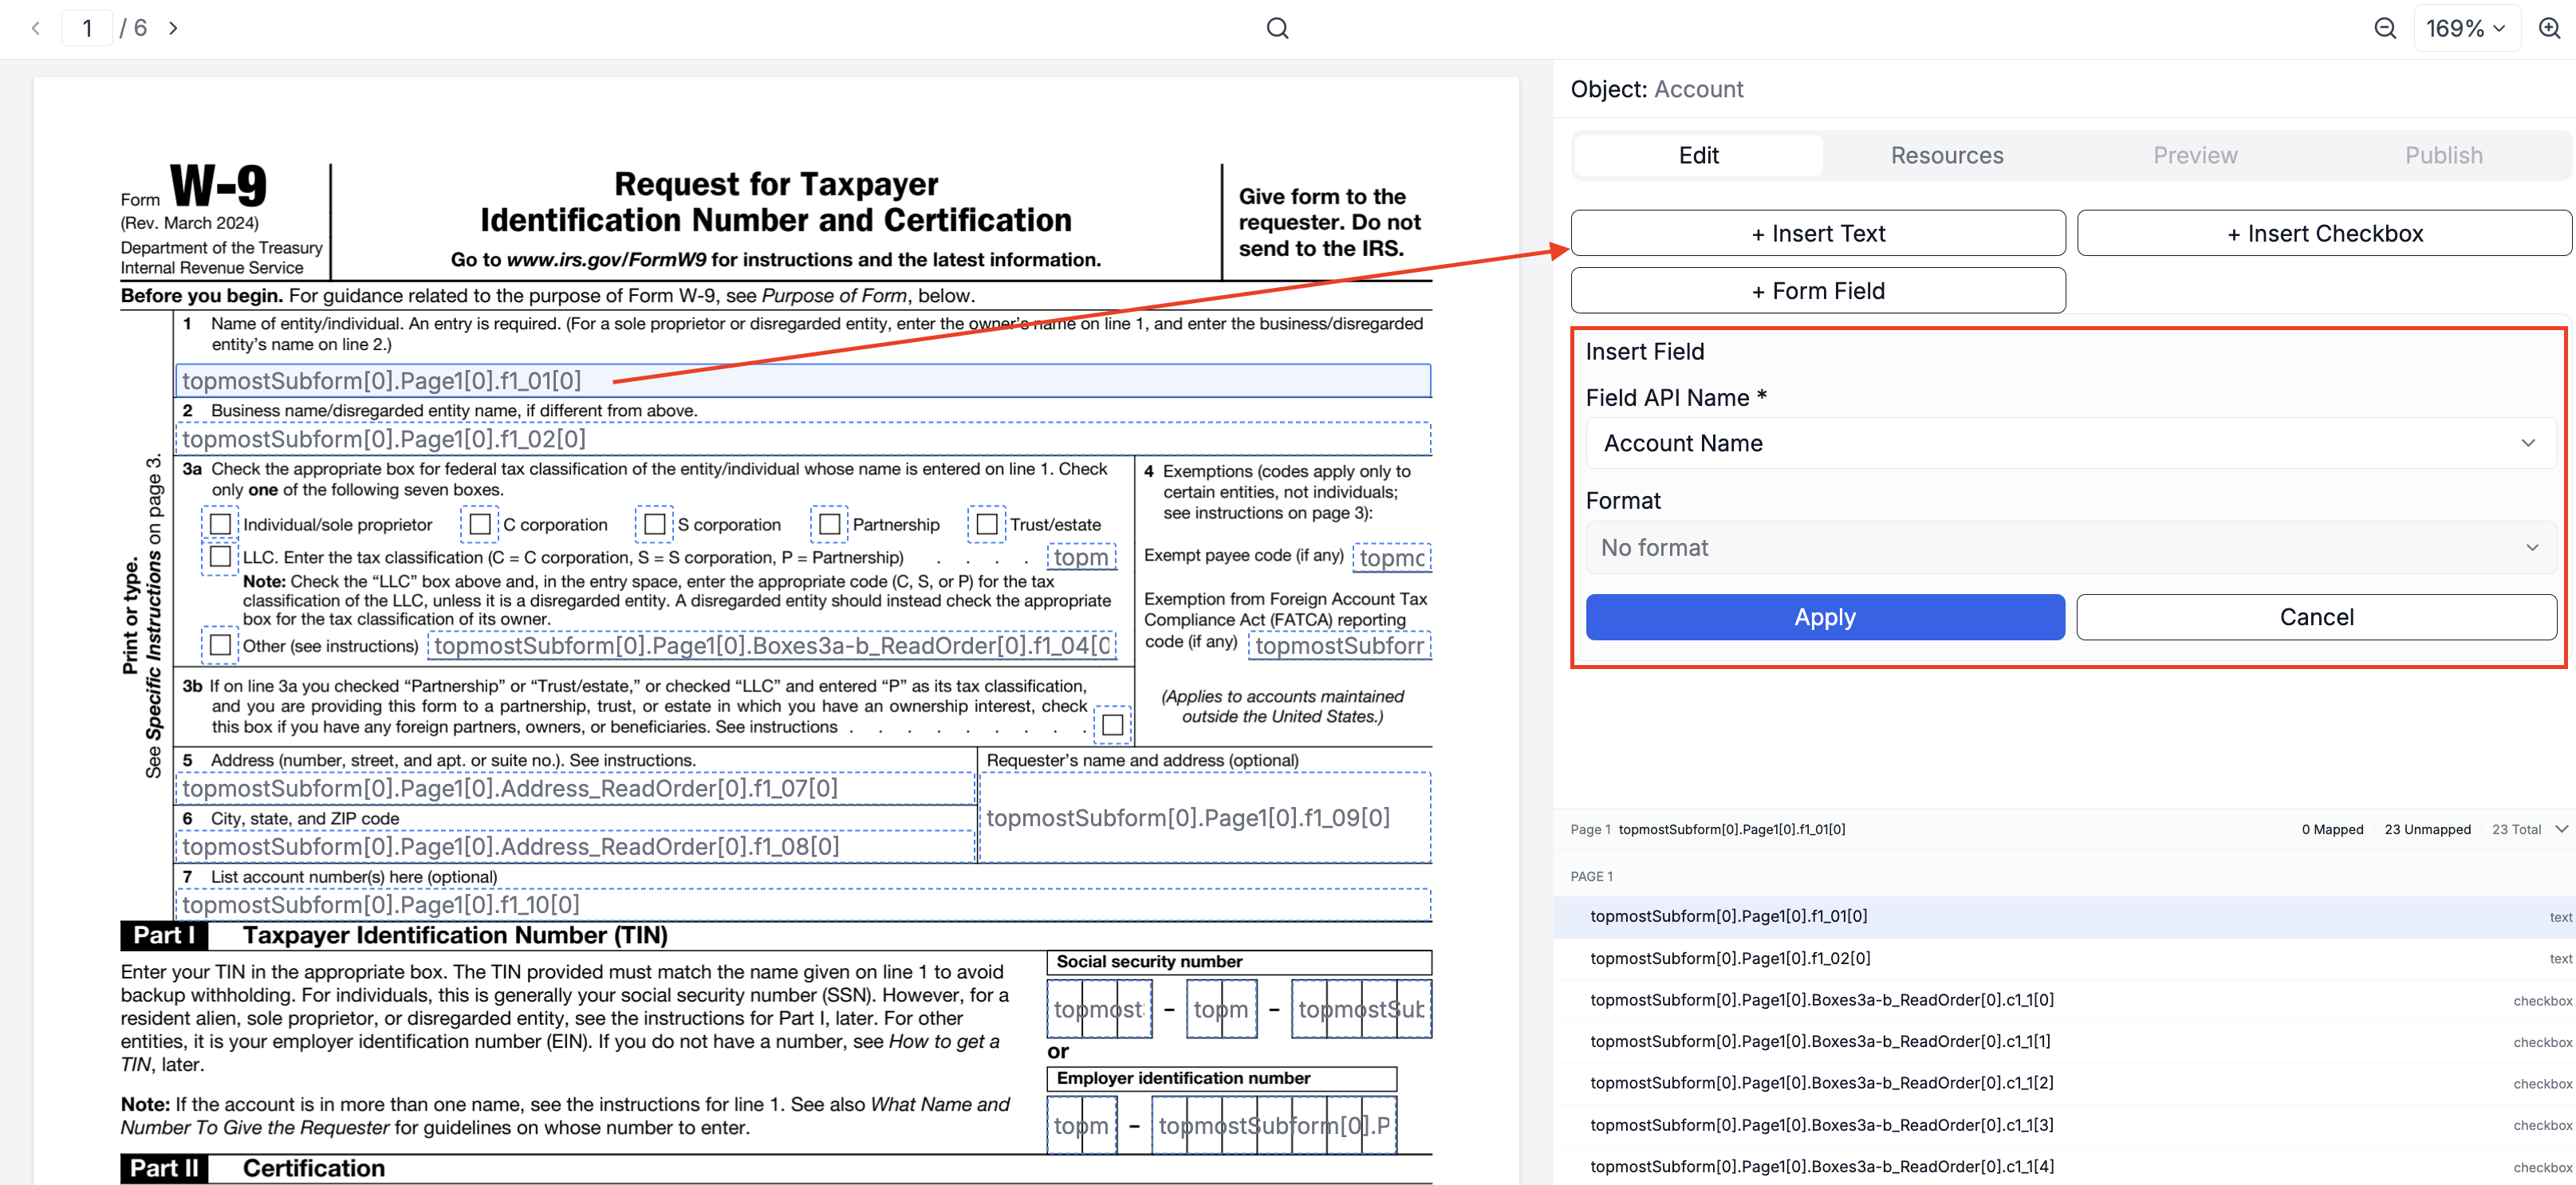
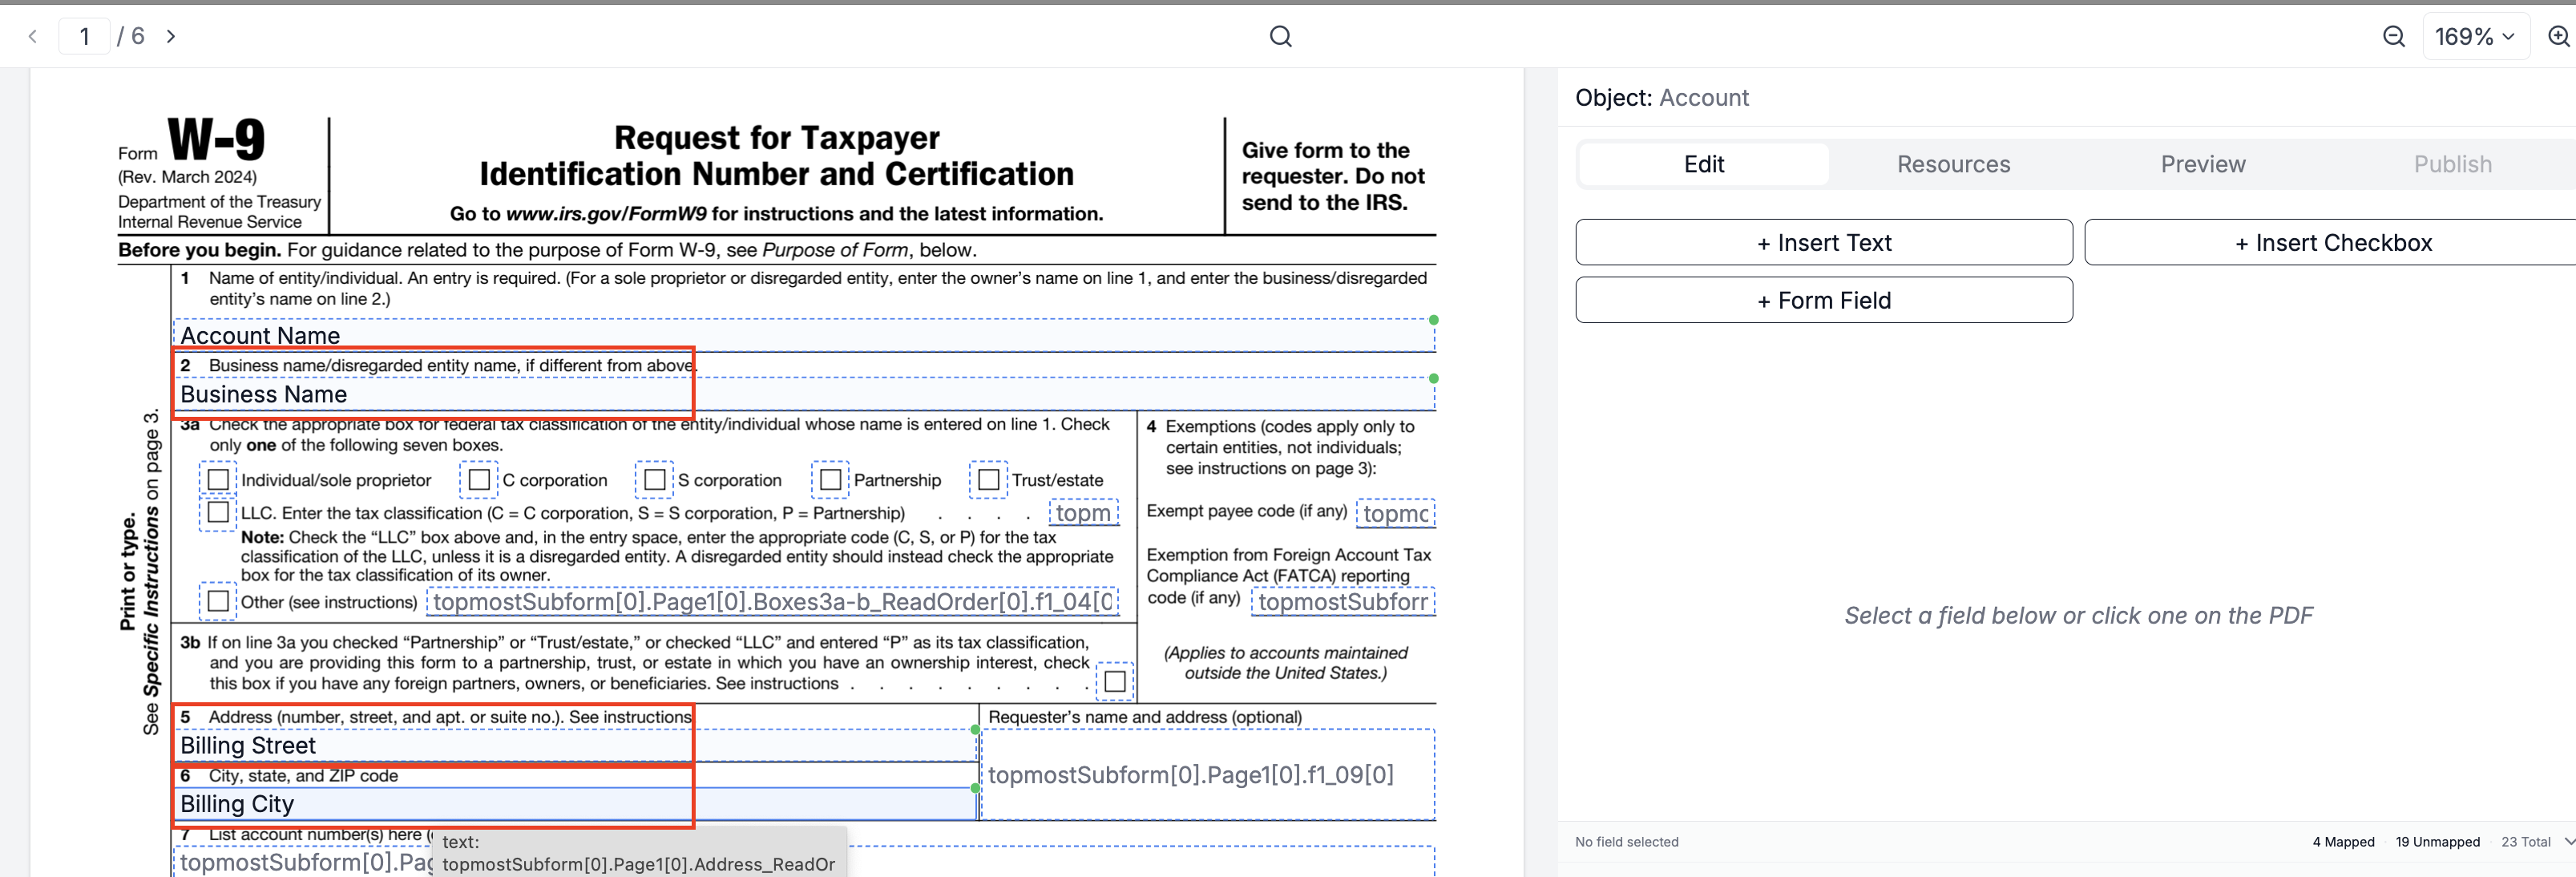
Map other fields as below:
- Business Name (Custom field) → Business name/disregarded entity (Line 2)
- Billing Street → Address (Line 5)
- Billing City → City (Line 6)
3 - Insert Checkbox
Use Insert Checkbox to control checkboxes in the PDF based on Salesforce data.
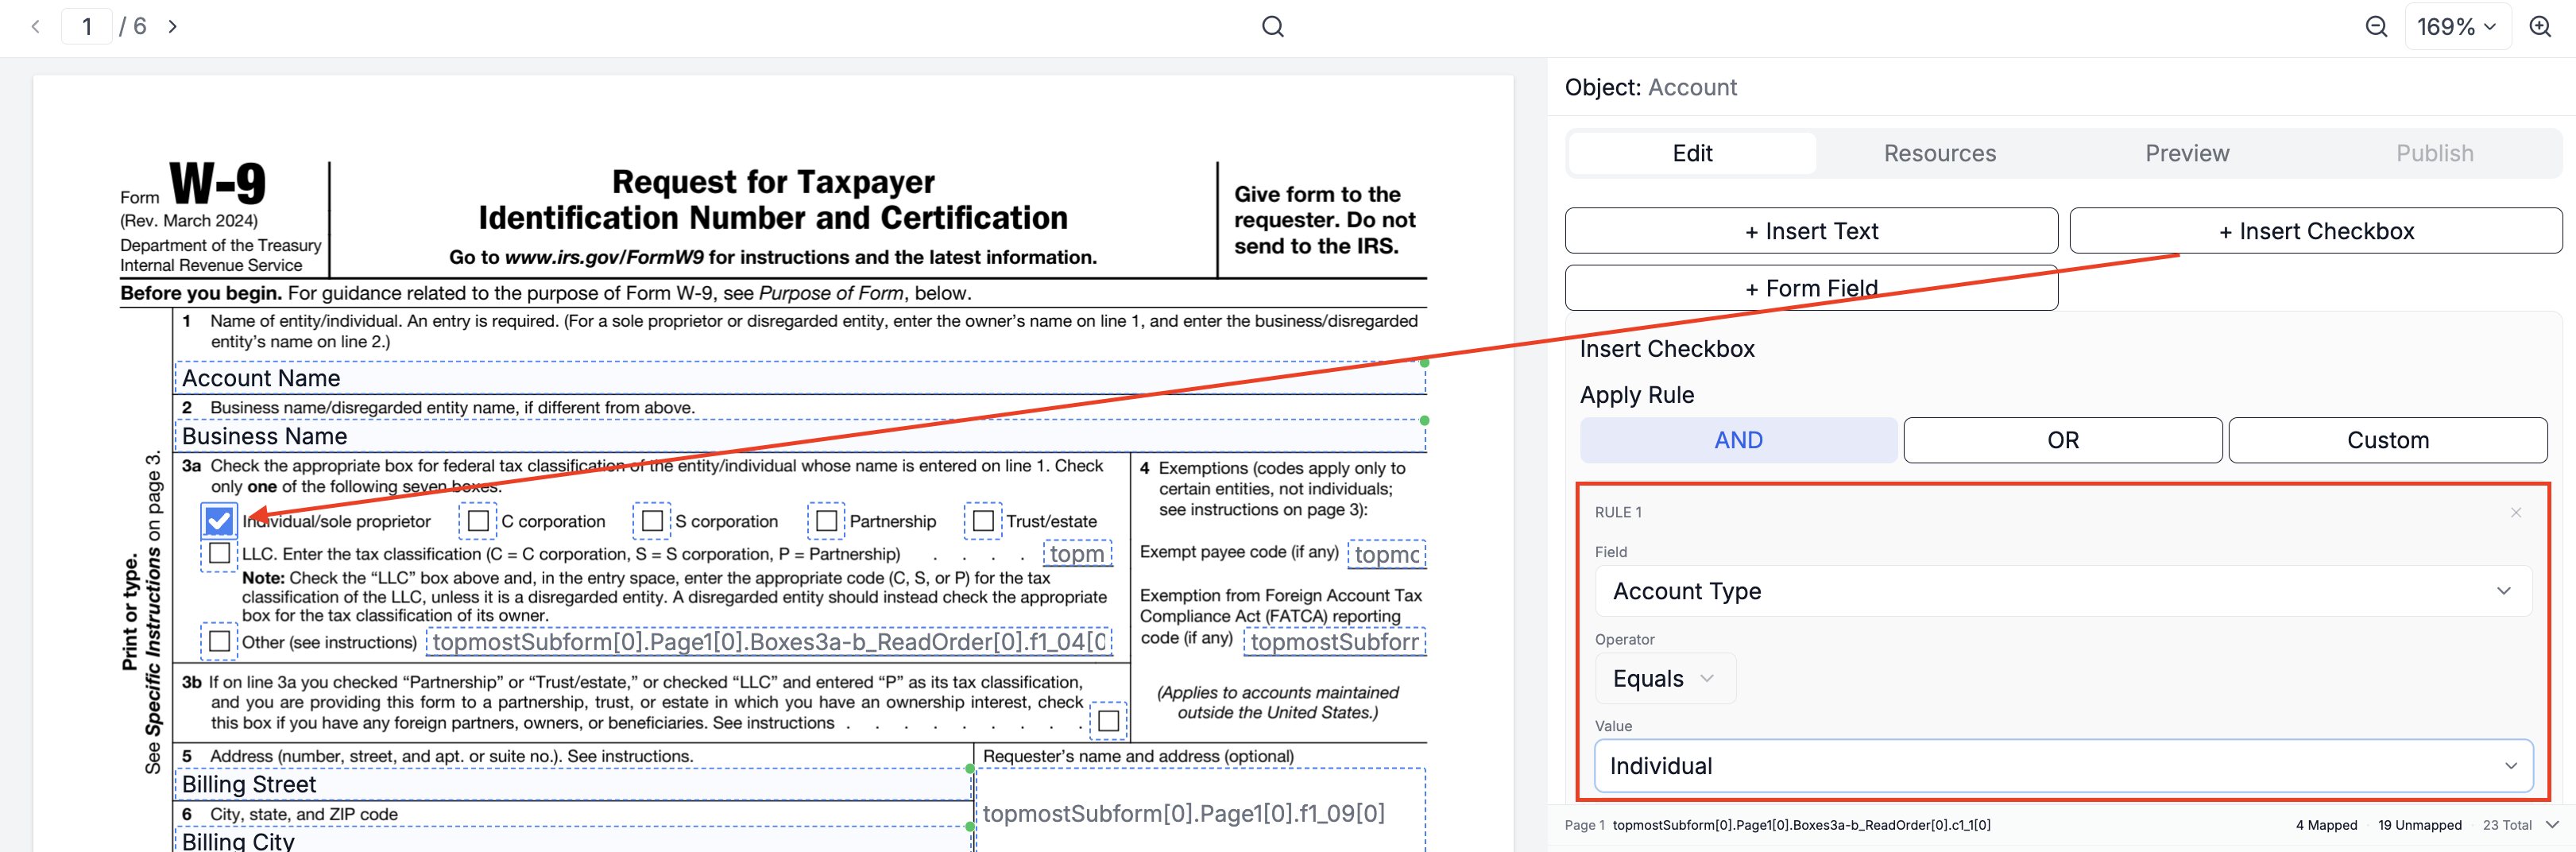
Map "Account Type = Individual" to "Individual/sole proprietor":
- Click the + Insert Checkbox button in the right panel.
- Click the checkbox for Individual/sole proprietor on the PDF, or select it from the bottom panel.
- In the condition builder on the right:
- Set Field → Account Type ({!$Record.Type}).
- Set Operator → Equals.
- Enter Value → Individual.
- Click Apply to confirm the condition.
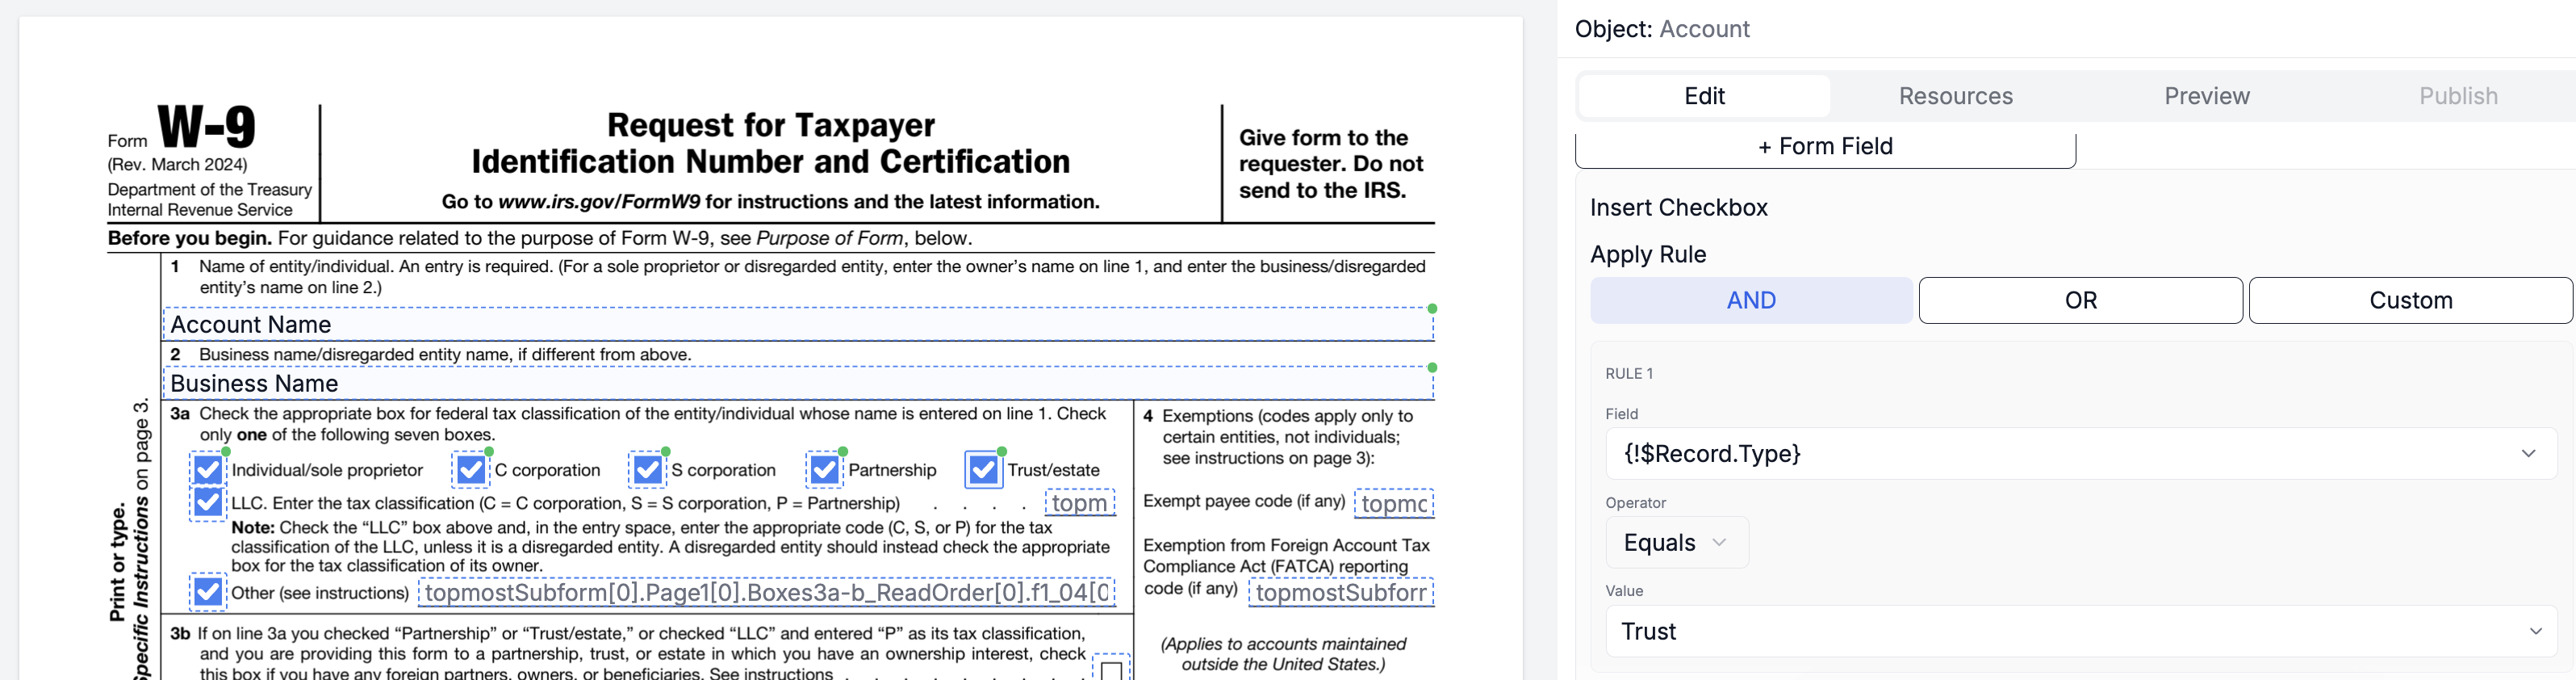
Map other fields as below:
- If Account Type = Corporation, tick C corporation.
- If Account Type = Partnership, tick Partnership.
4 - Use Resources (Optional)
Sometimes you'll need data beyond the main object (Account). Template - Resources let you pull in values from related records (using a Record Single Variable) or capture user-provided inputs (using a Runtime Variable).
Record Single Variable
A Record Single Variable is used when you need to bring values from a related or different object into your PDF template. Instead of being limited to the fields on the main object (e.g., Account), you can extend the template to include data from related records such as Contacts, Opportunities, or custom objects.
Why use it here?
In the W-9 form, the "Requester's name and address (optional)" field is not typically stored on the Account record. Instead, it may come from a related Contact (e.g., the primary requester). By using a Record Single Variable, you can fetch that Contact's details and map them into the optional field on the PDF.
Steps to Create and Use a Record Single Variable:
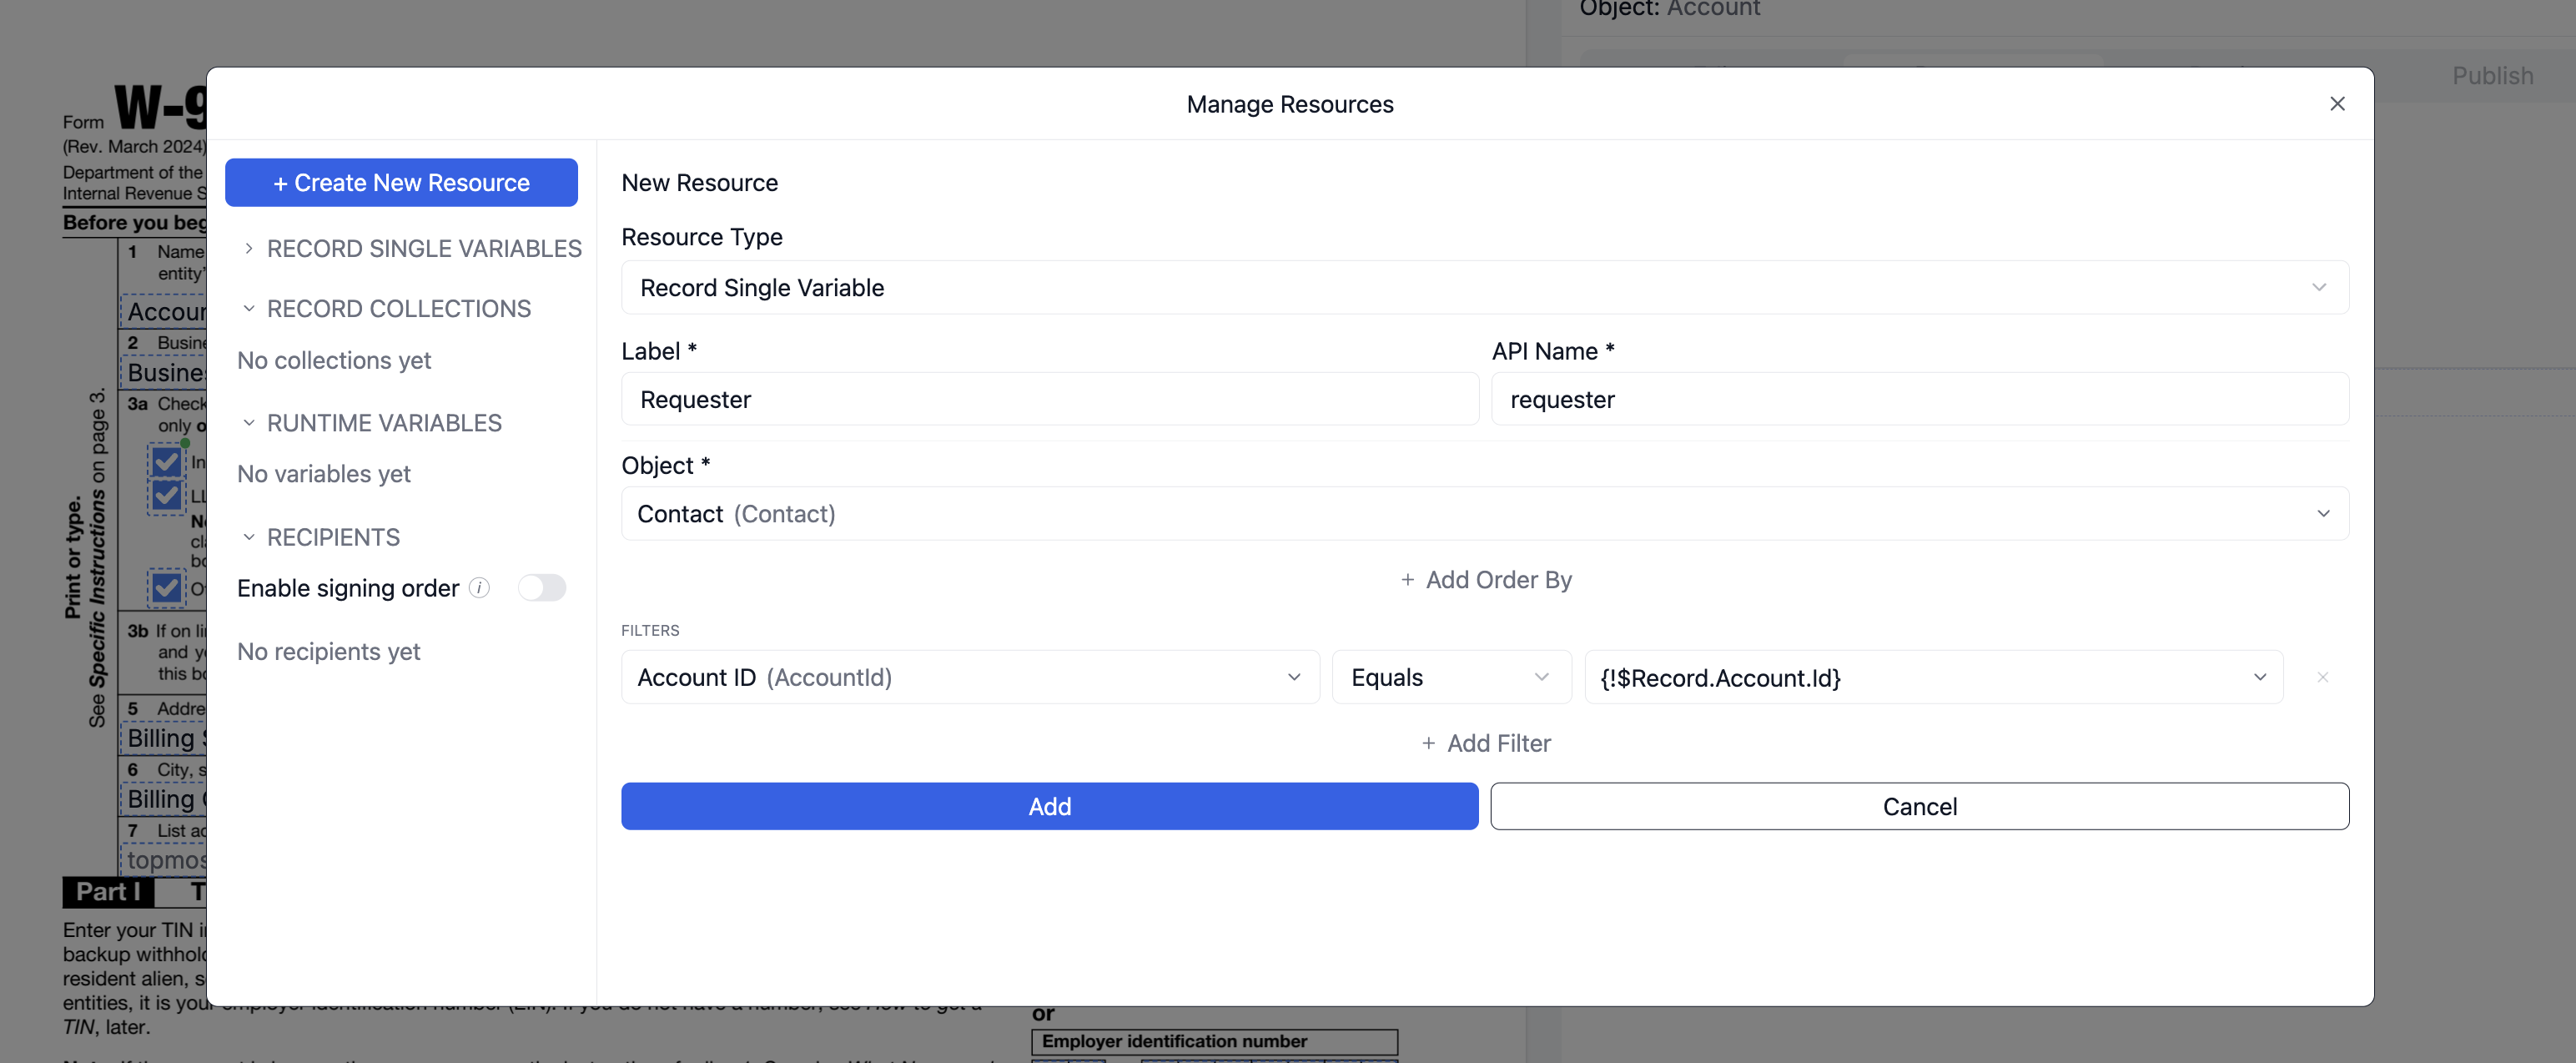
- Create the variable
- Go to the Resources tab → + Create New Resource.
- Select Record Single Variable.
- Set the Object as Contact.
- Give it a Label (e.g., Requester).
- Add filter criteria
- Add a condition: Account ID = {!$Record.Account.Id}.
- This links the Contact record to the Account being used.
- Insert the variable
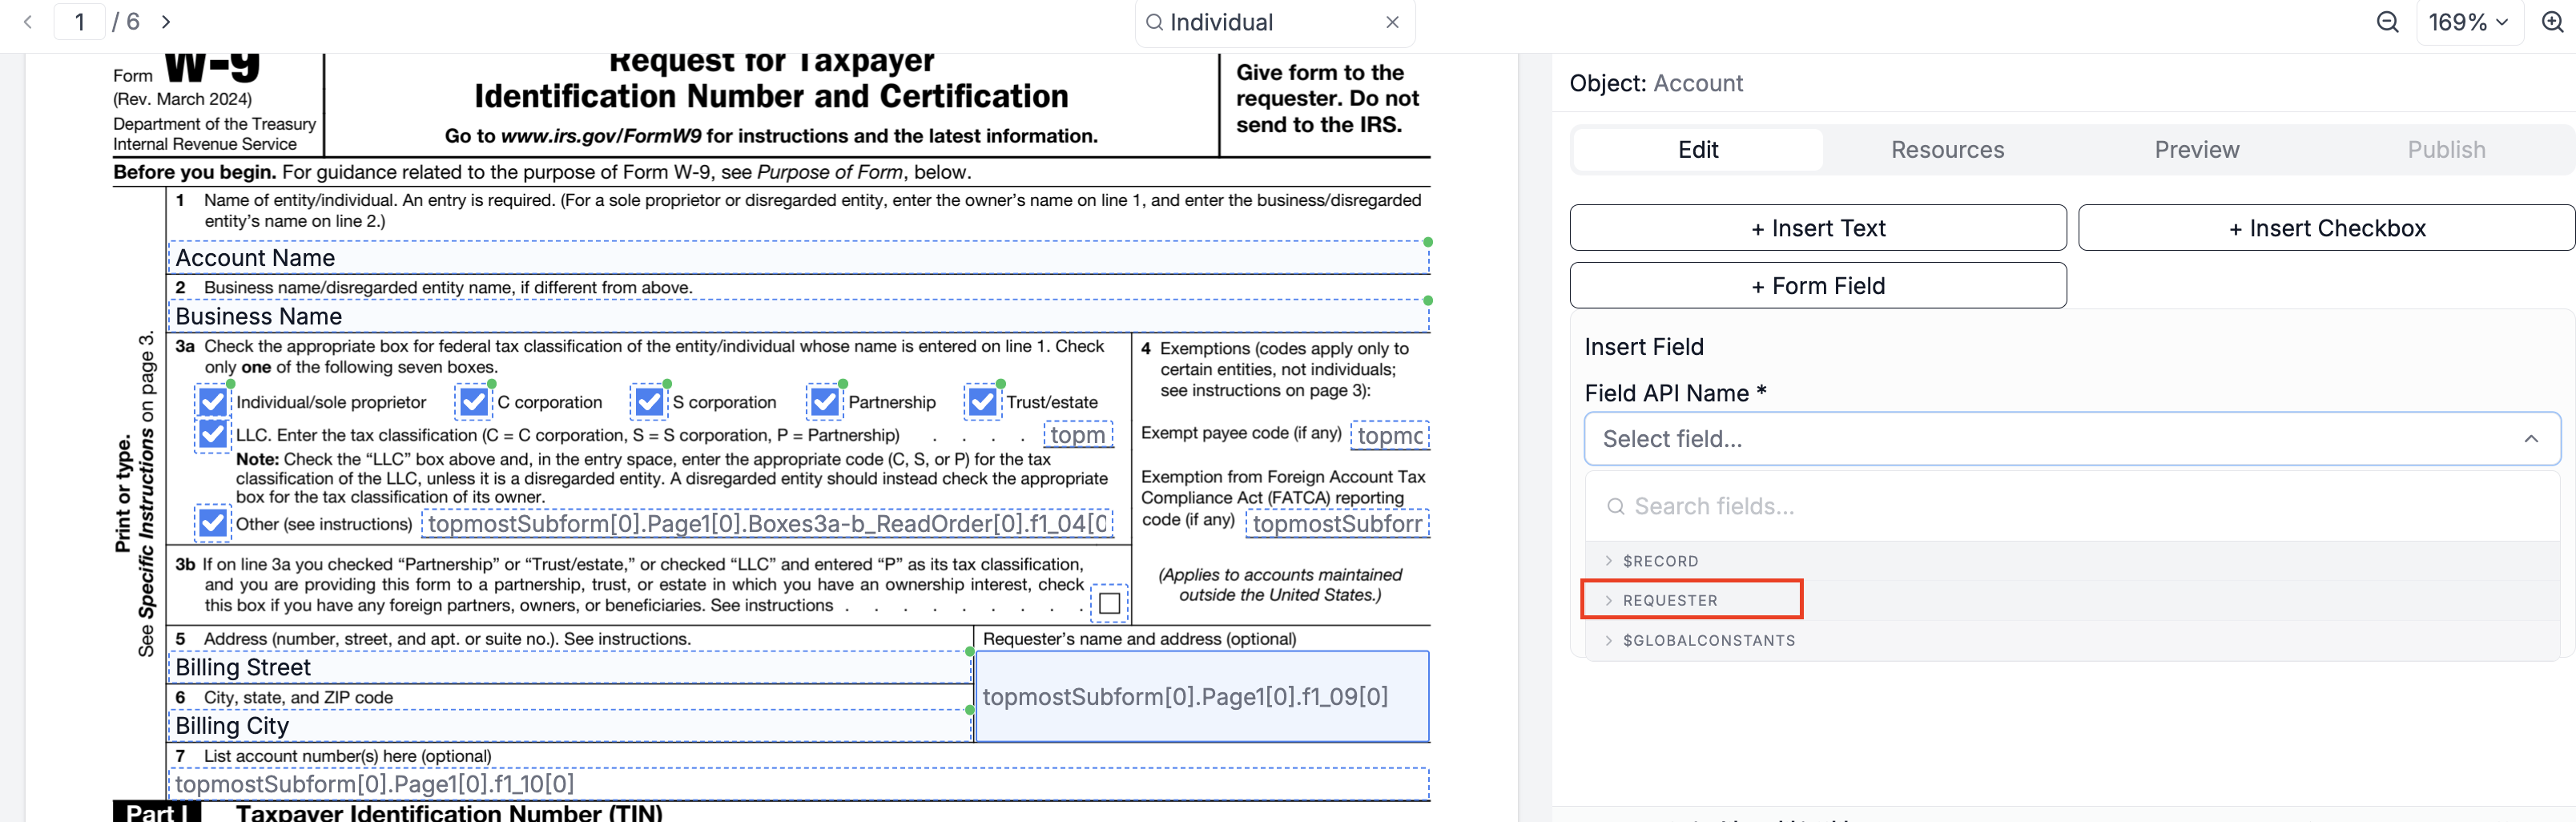
- The variable will now appear under RECORD (SINGLE) VARIABLES in the field selector.
- Map to the PDF
- Click the + Insert Text button, then click the Requester's name and address (optional) field in the PDF.
- In the Field API Name dropdown, choose the variable (e.g., Requester Name).
- Click Apply.
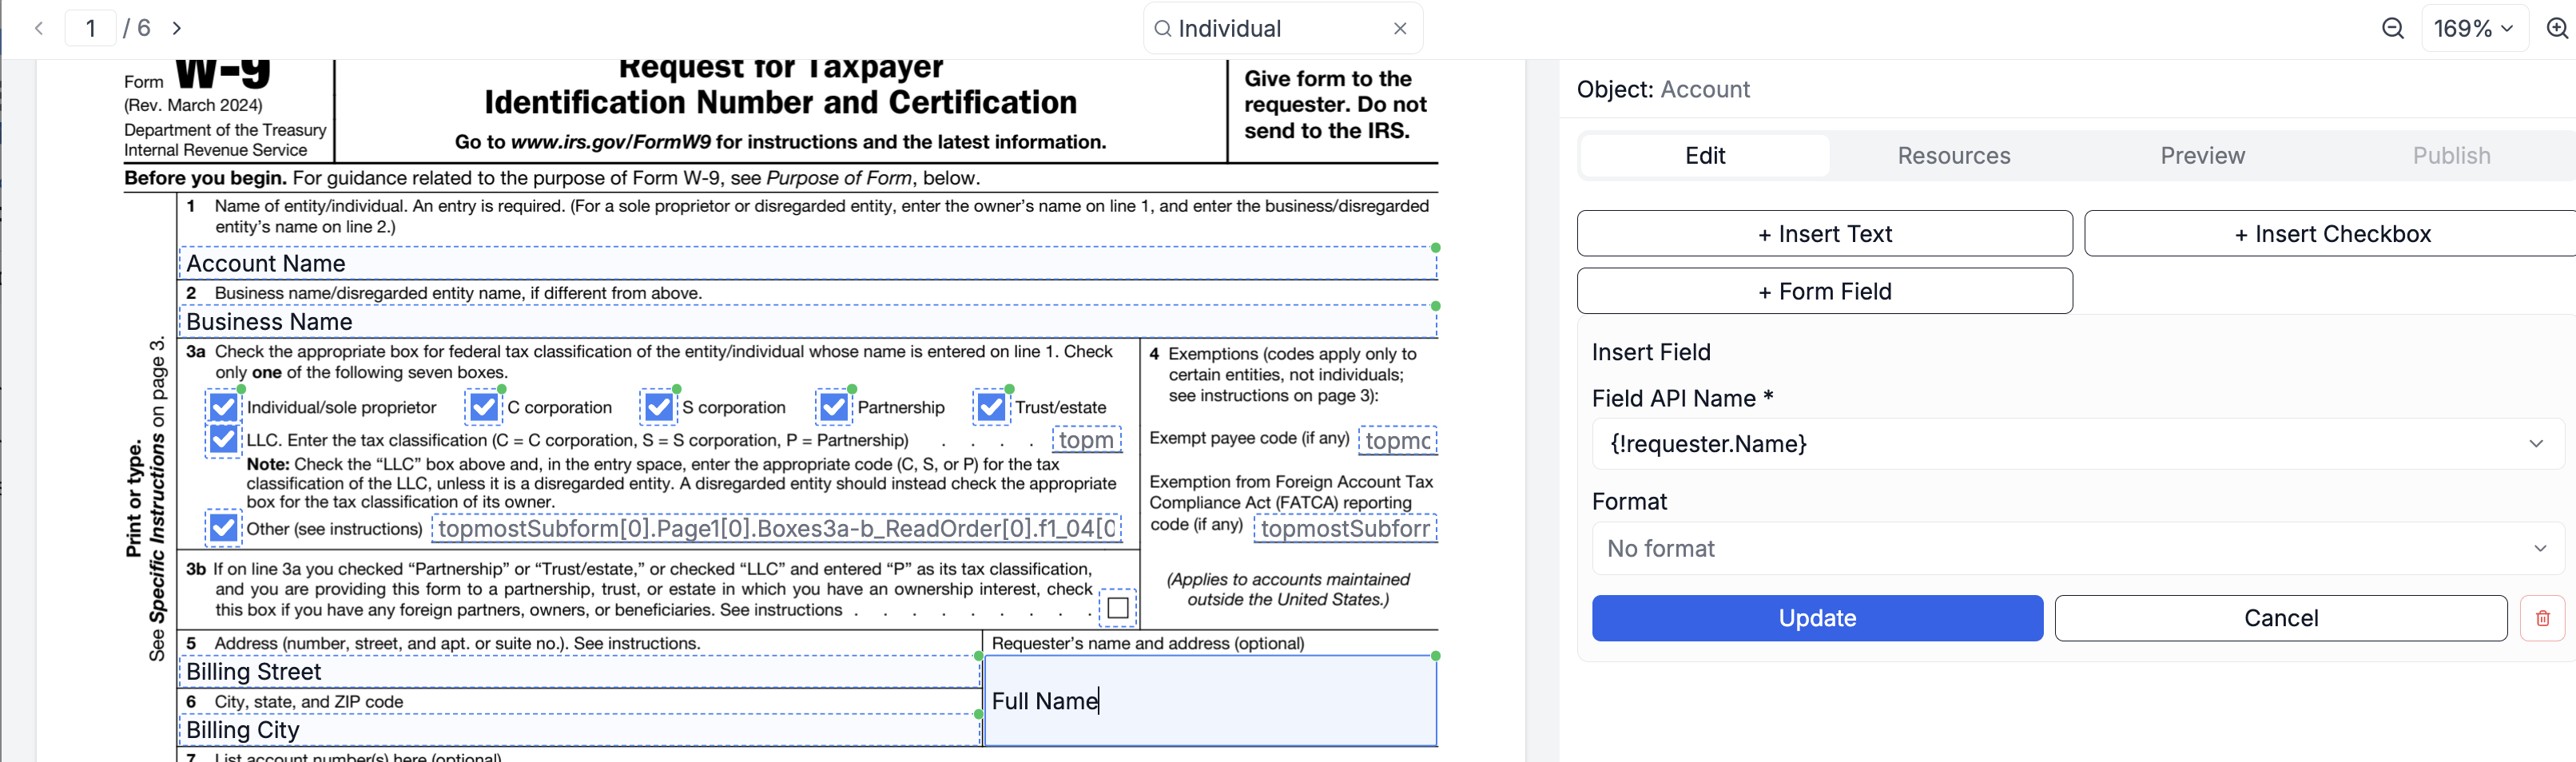
This ensures cross-object data like Contact details can flow into the W-9 even when the template is tied to Accounts. (Refer to Record Single Variable for more detailed steps on mapping.)
Runtime Variable
A Runtime Variable stores a value that can be passed from a Salesforce Flow and generated dynamically during execution using Doc Generation Flow Actions. It acts as a placeholder for data provided by the user at runtime, which can then be mapped to a field in the PDF template through Apex-Defined Variables.
Why use it here?
In the W-9 form, the "Other (see instructions)" checkbox under Tax Classification requires additional clarification text. Since this description varies (e.g., "Foreign partnership" or "Non-profit"), the value can be passed at runtime using a Runtime Variable and then mapped into the PDF field.
Steps to create a Runtime Variable:
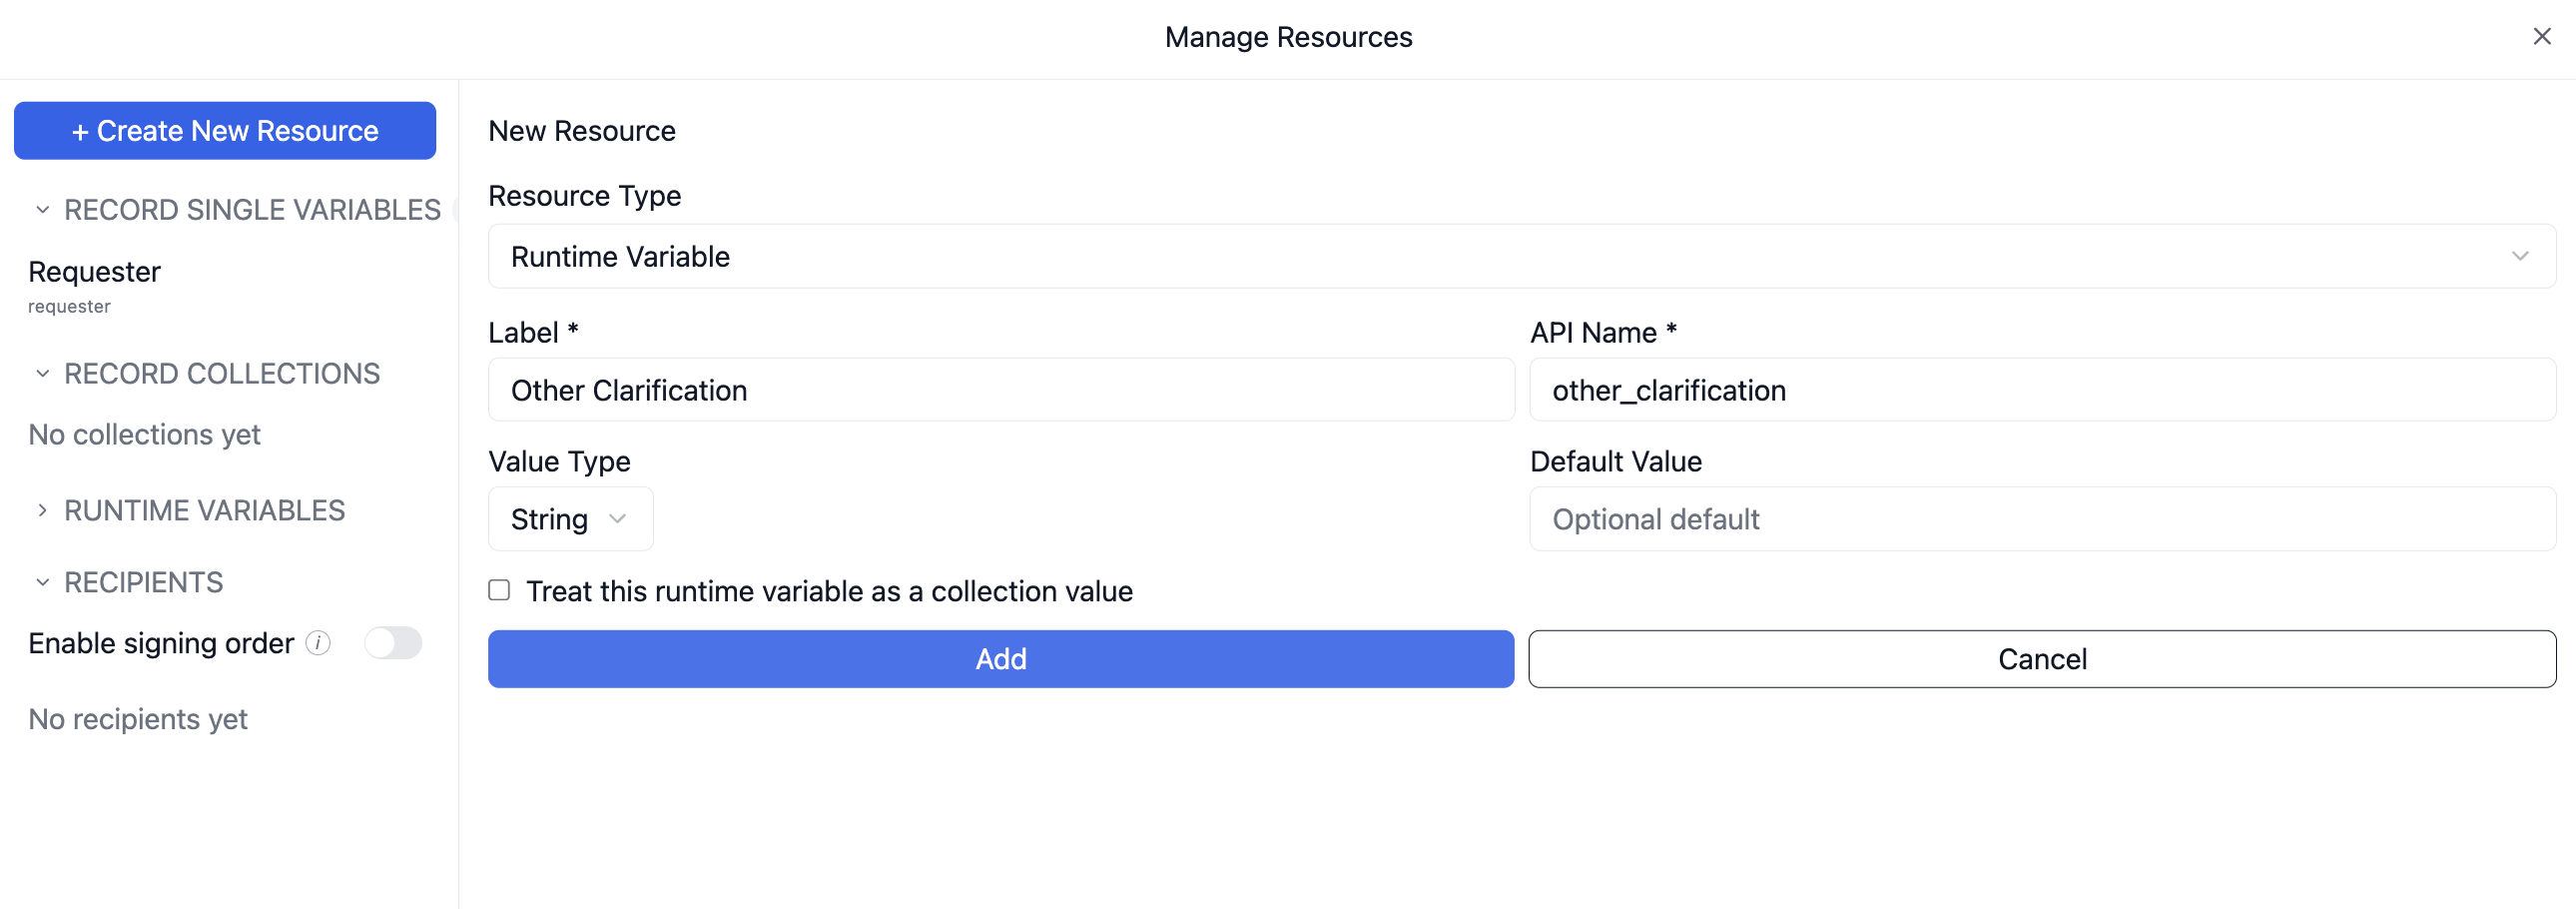
- Create the variable
- Go to the Resources tab → + Create New Resource and select Runtime Variable.
- Give it a Label (e.g., Other Clarification).
- Set Value Type as String.
- Insert the variable
- Click + Insert Text, then click the Other (see instructions) text field on the PDF.
- In the Field API Name dropdown, select the runtime variable (e.g., Other Clarification).
- Click Apply.
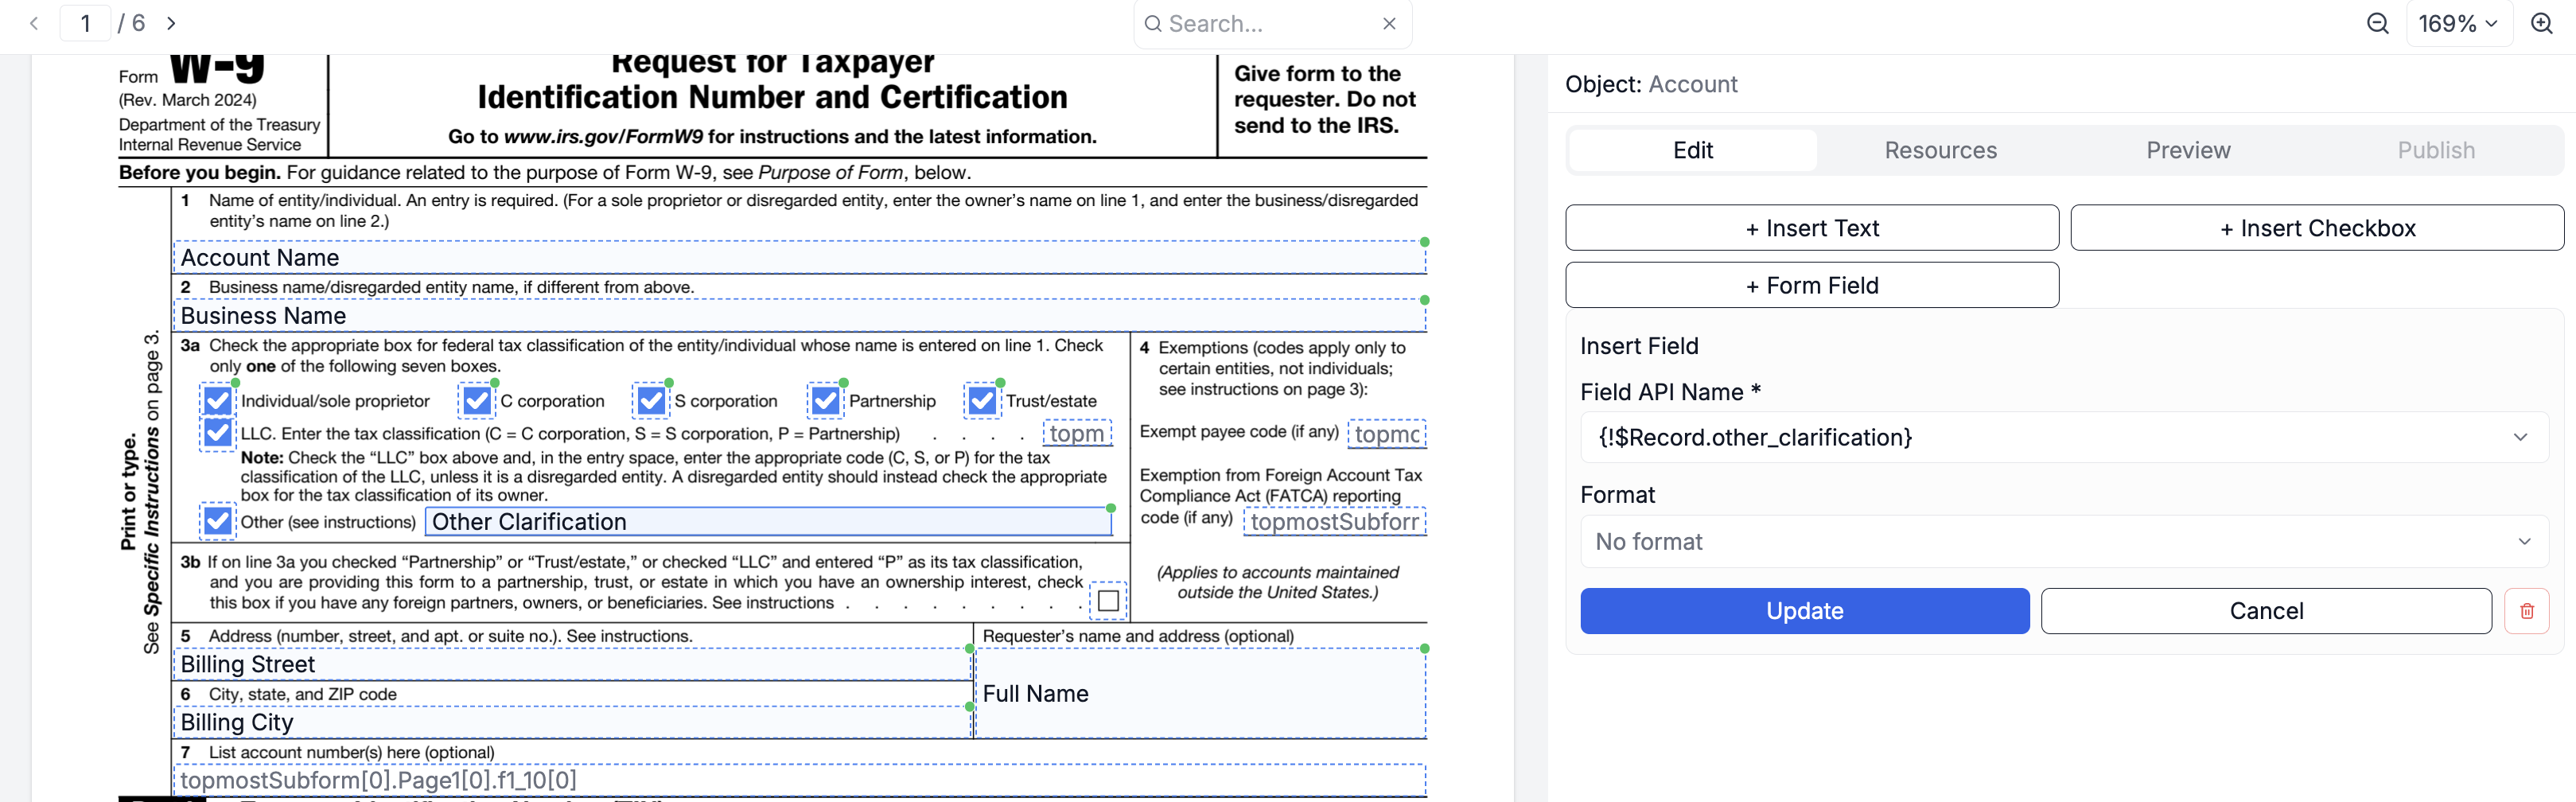
To pass a value for this Runtime Variable, you need to configure how it will be provided during document generation. This is typically done in a Salesforce Flow by creating an Apex-Defined Variable, where the value can be assigned based on user input. Refer to Runtime Variable for detailed instructions on configuring and mapping runtime variables in Flow.
5 - Publish
After mapping:
- Click the Publish tab in the right panel.
- Publish it as a new template (or overwrite an existing one).
- The template will now be available for generating W-9s from Account records and will appear under the Document Generation → DocGen Templates tab.
Test the setup
Once the template is published, it becomes available for use in two ways:
1 - Manual Usage from Widget
The published template will appear in the Document Generation widget on the related Salesforce record (e.g., Account record).
Steps to generate manually:
- Open the related record (e.g., Account: John Doe Consulting).
- In the CloudFiles DocGen widget, locate your published template in the list.
- Click Generate PDF to create the document.
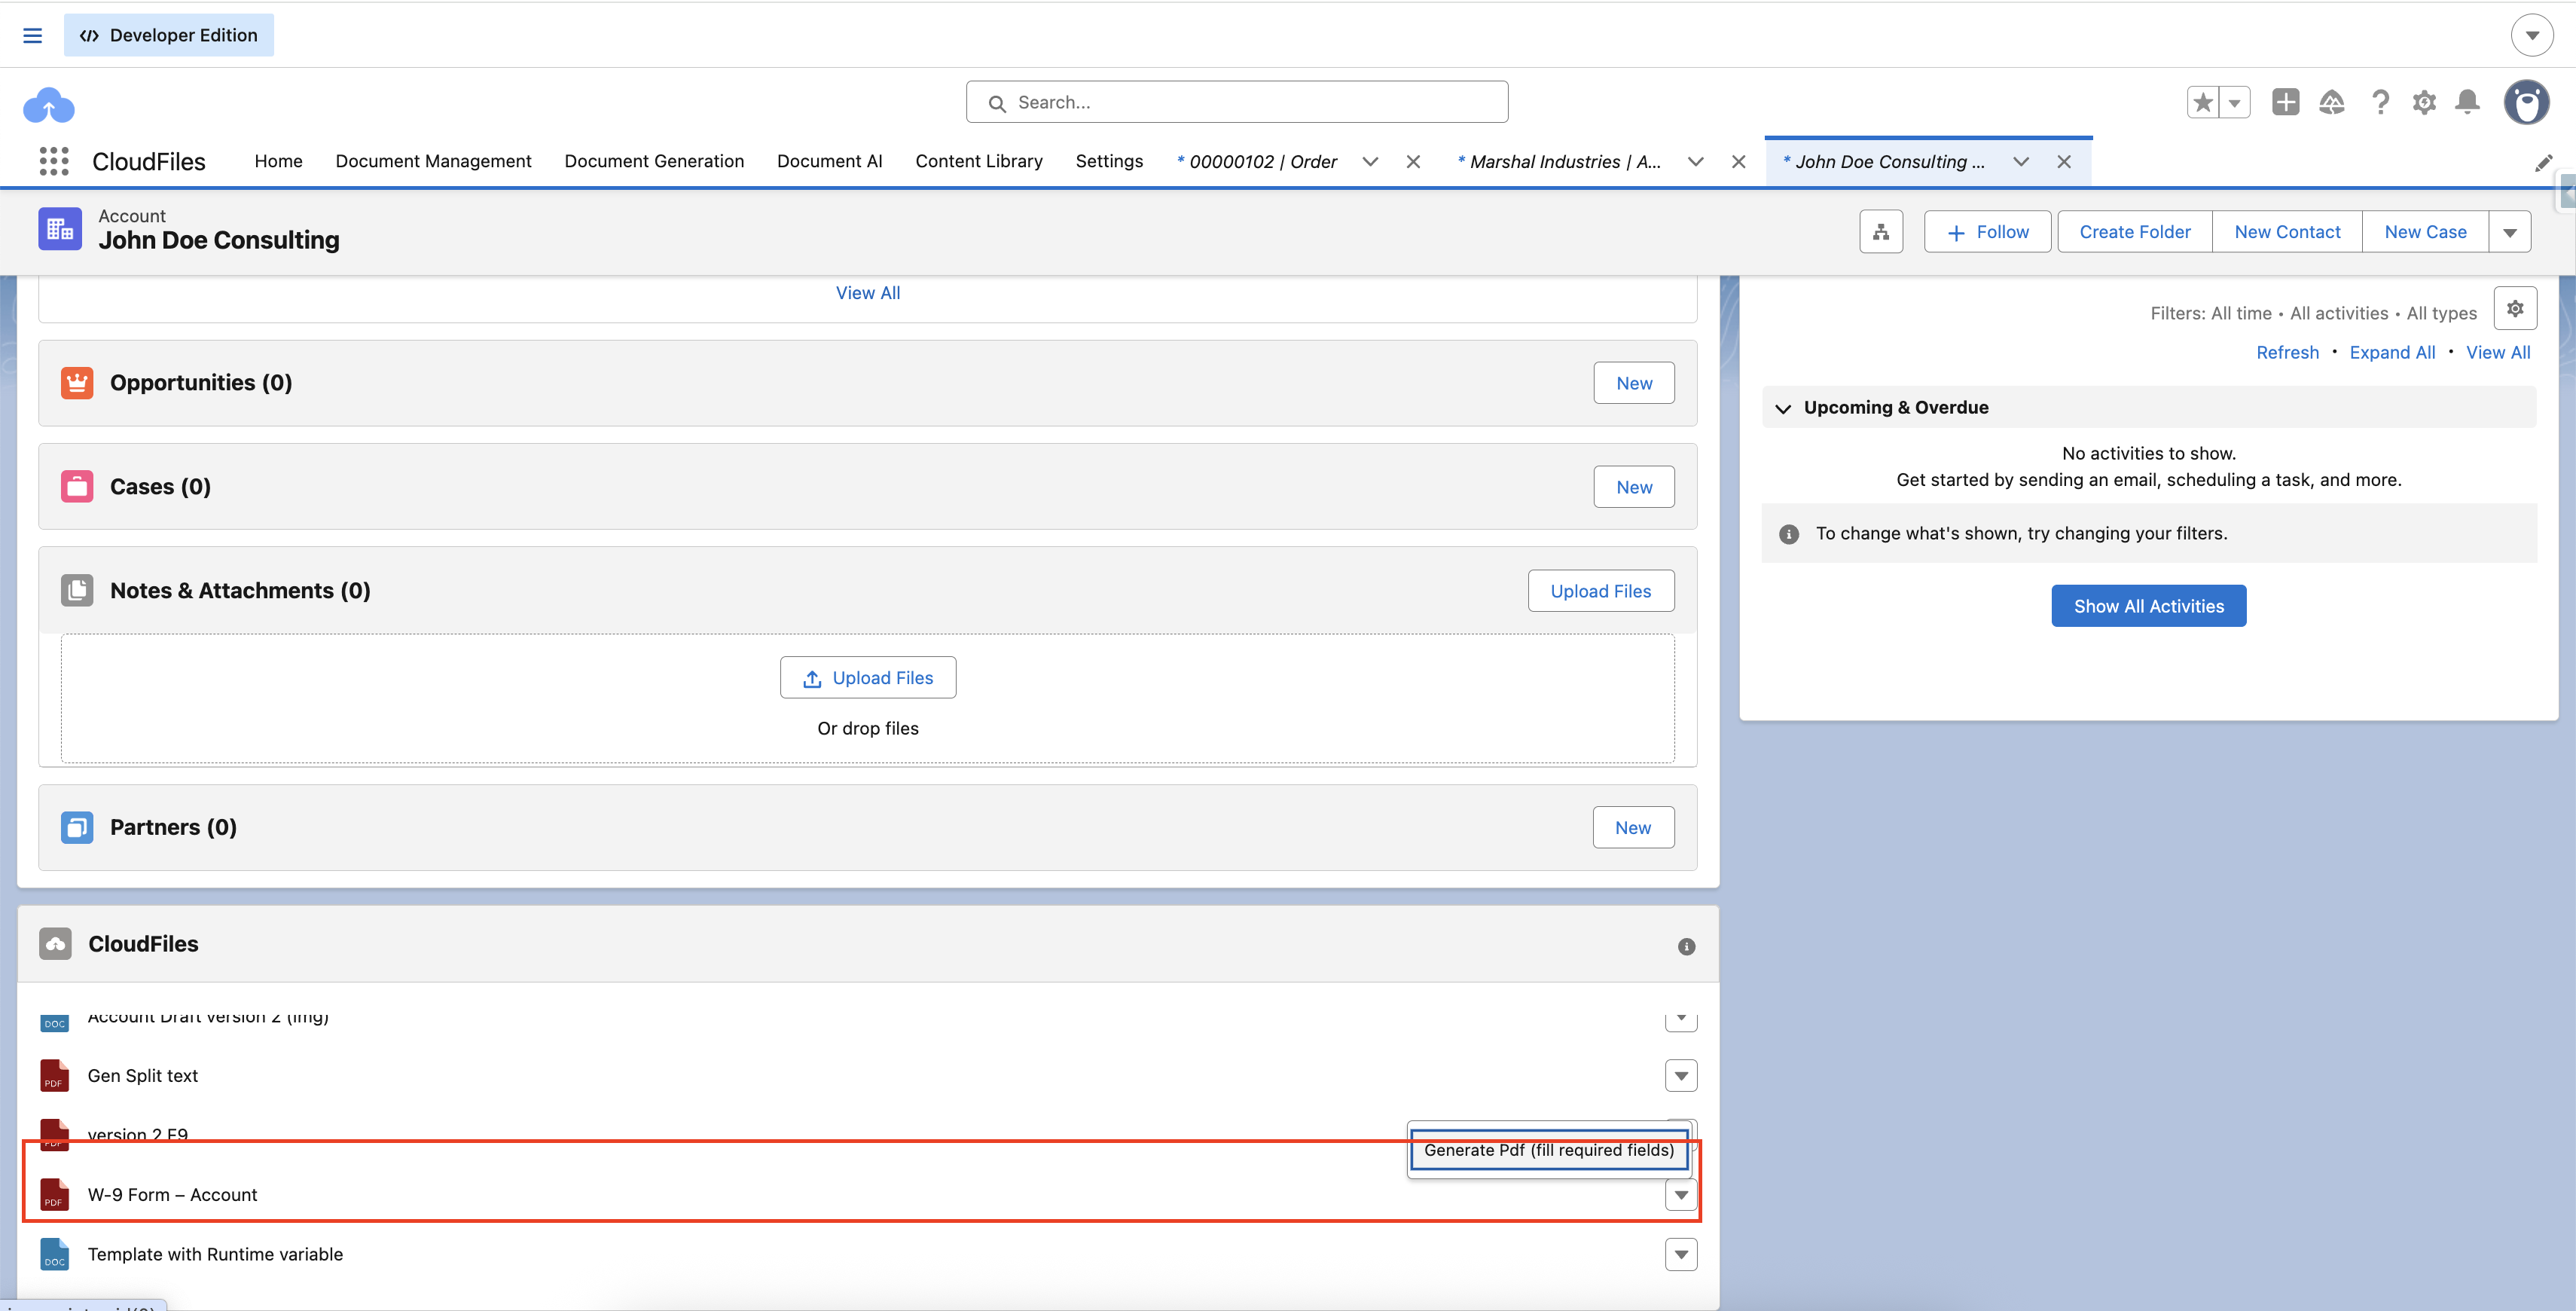
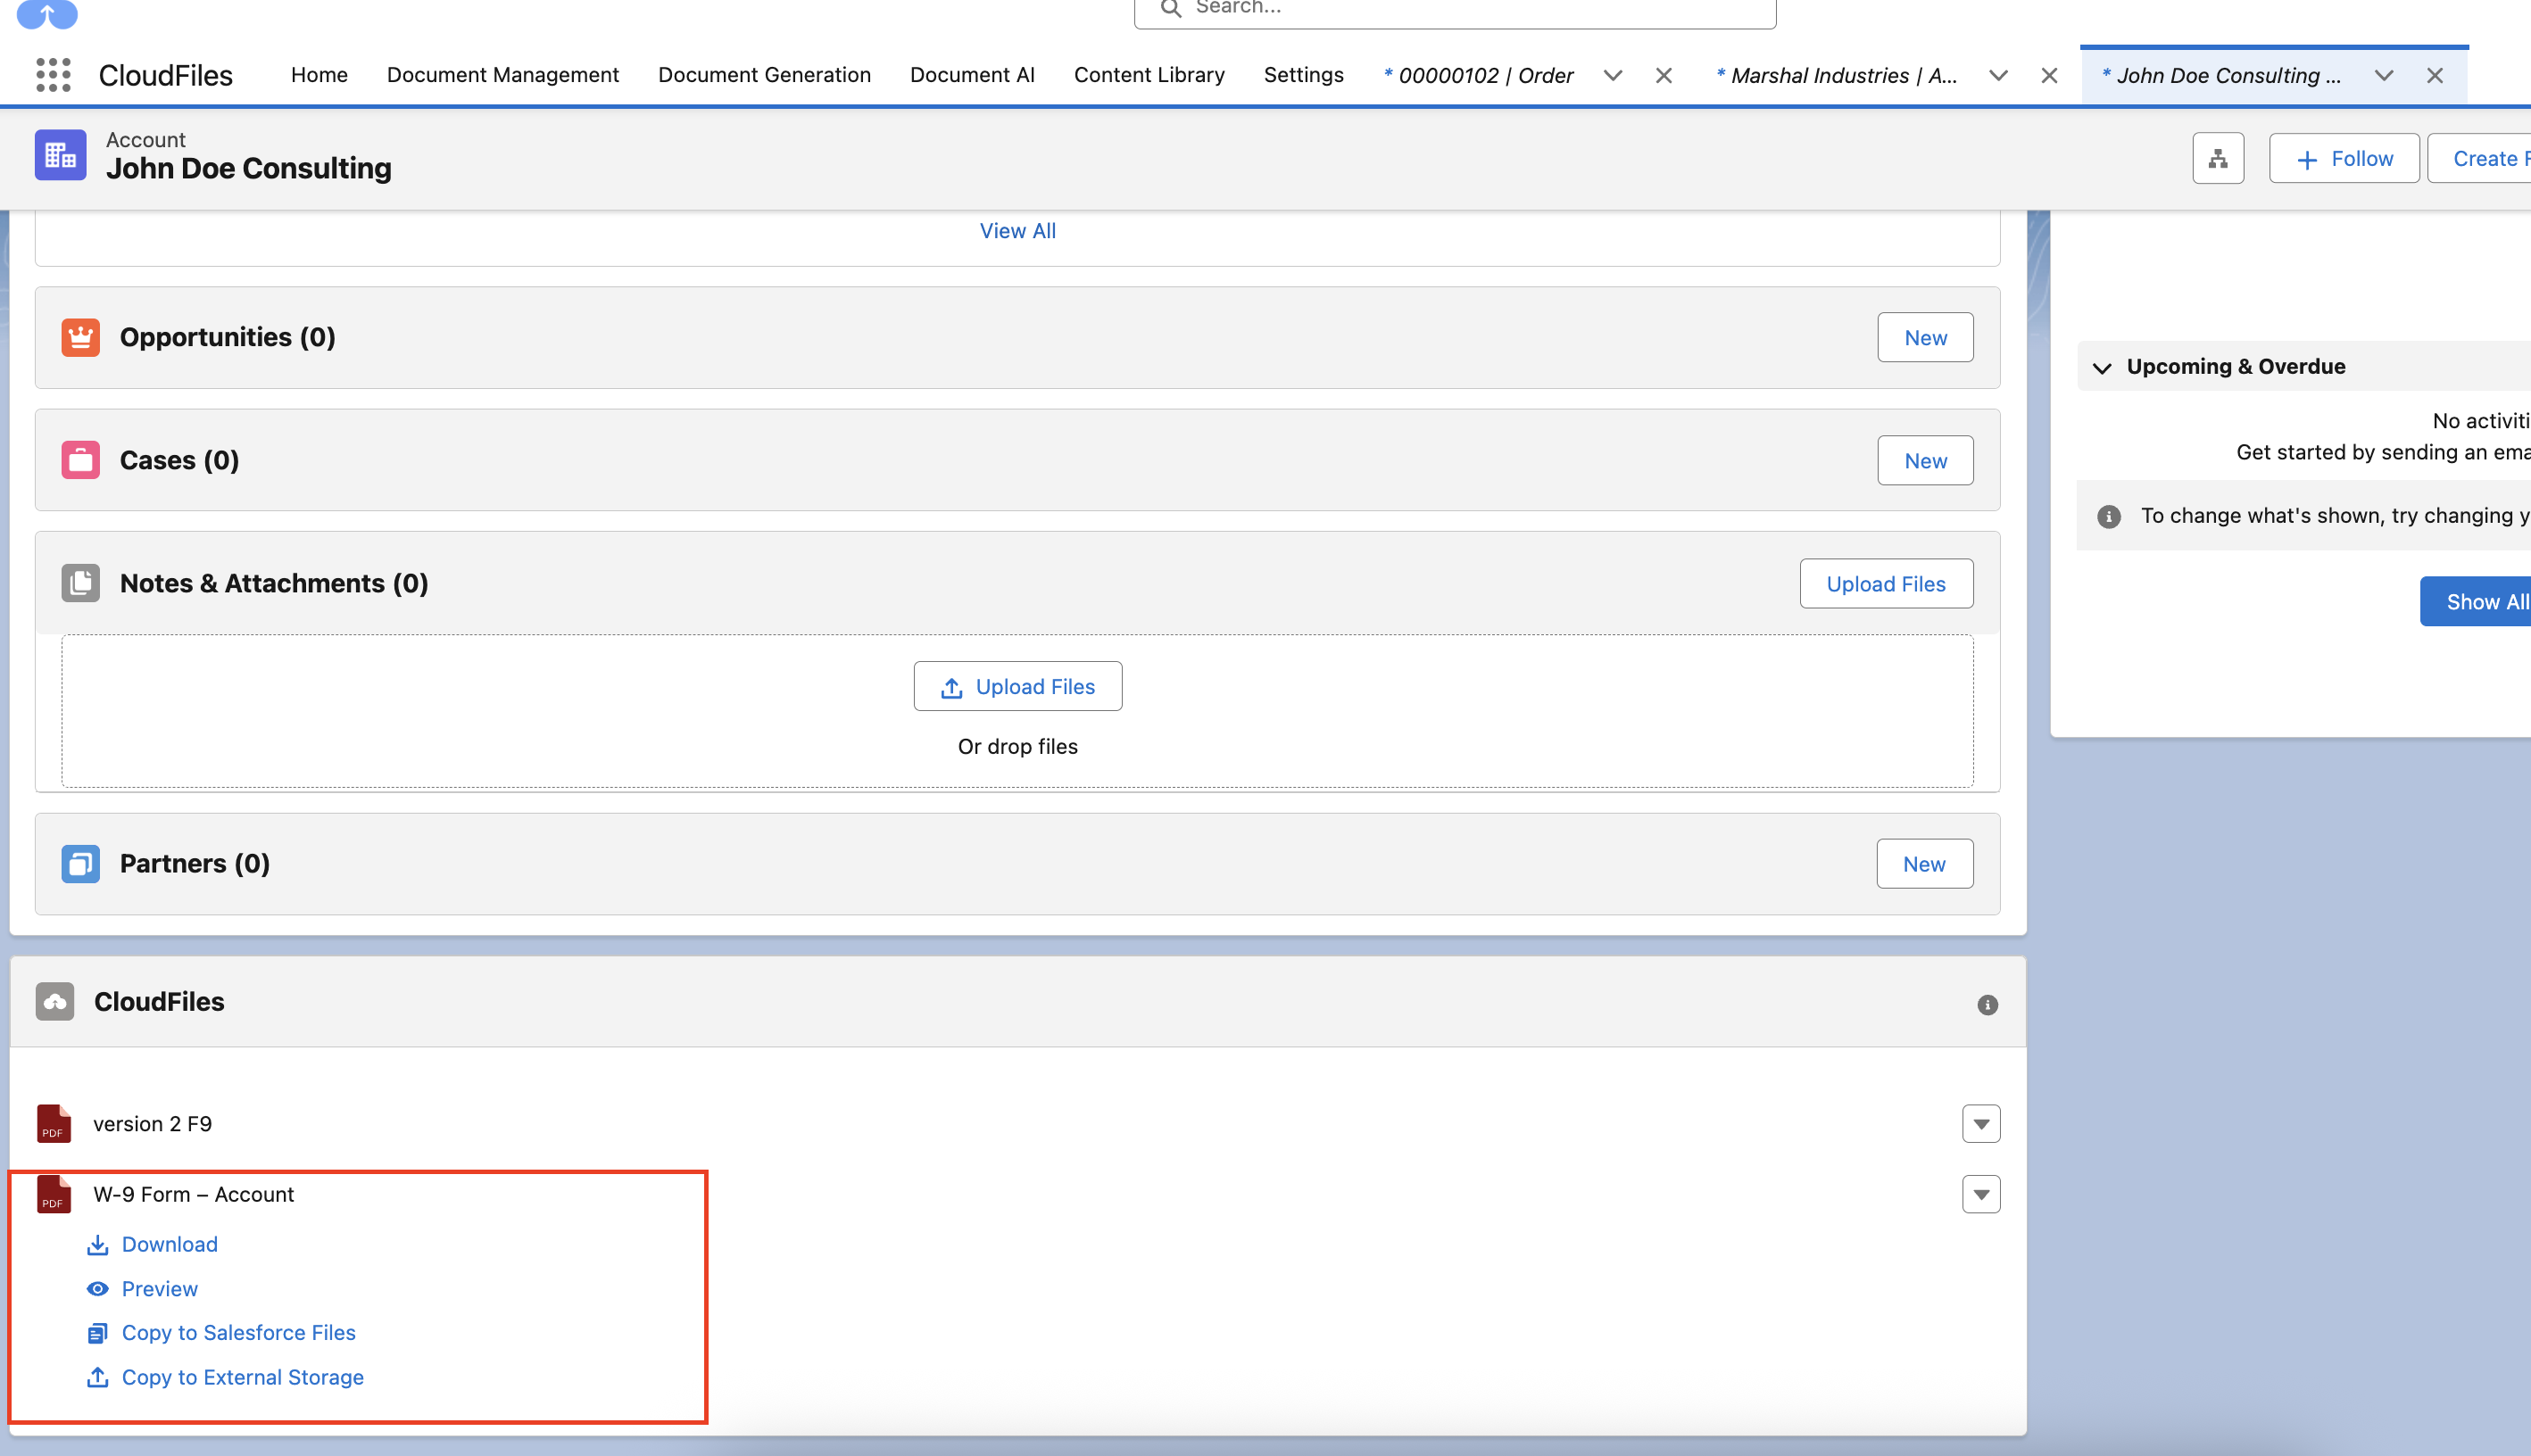
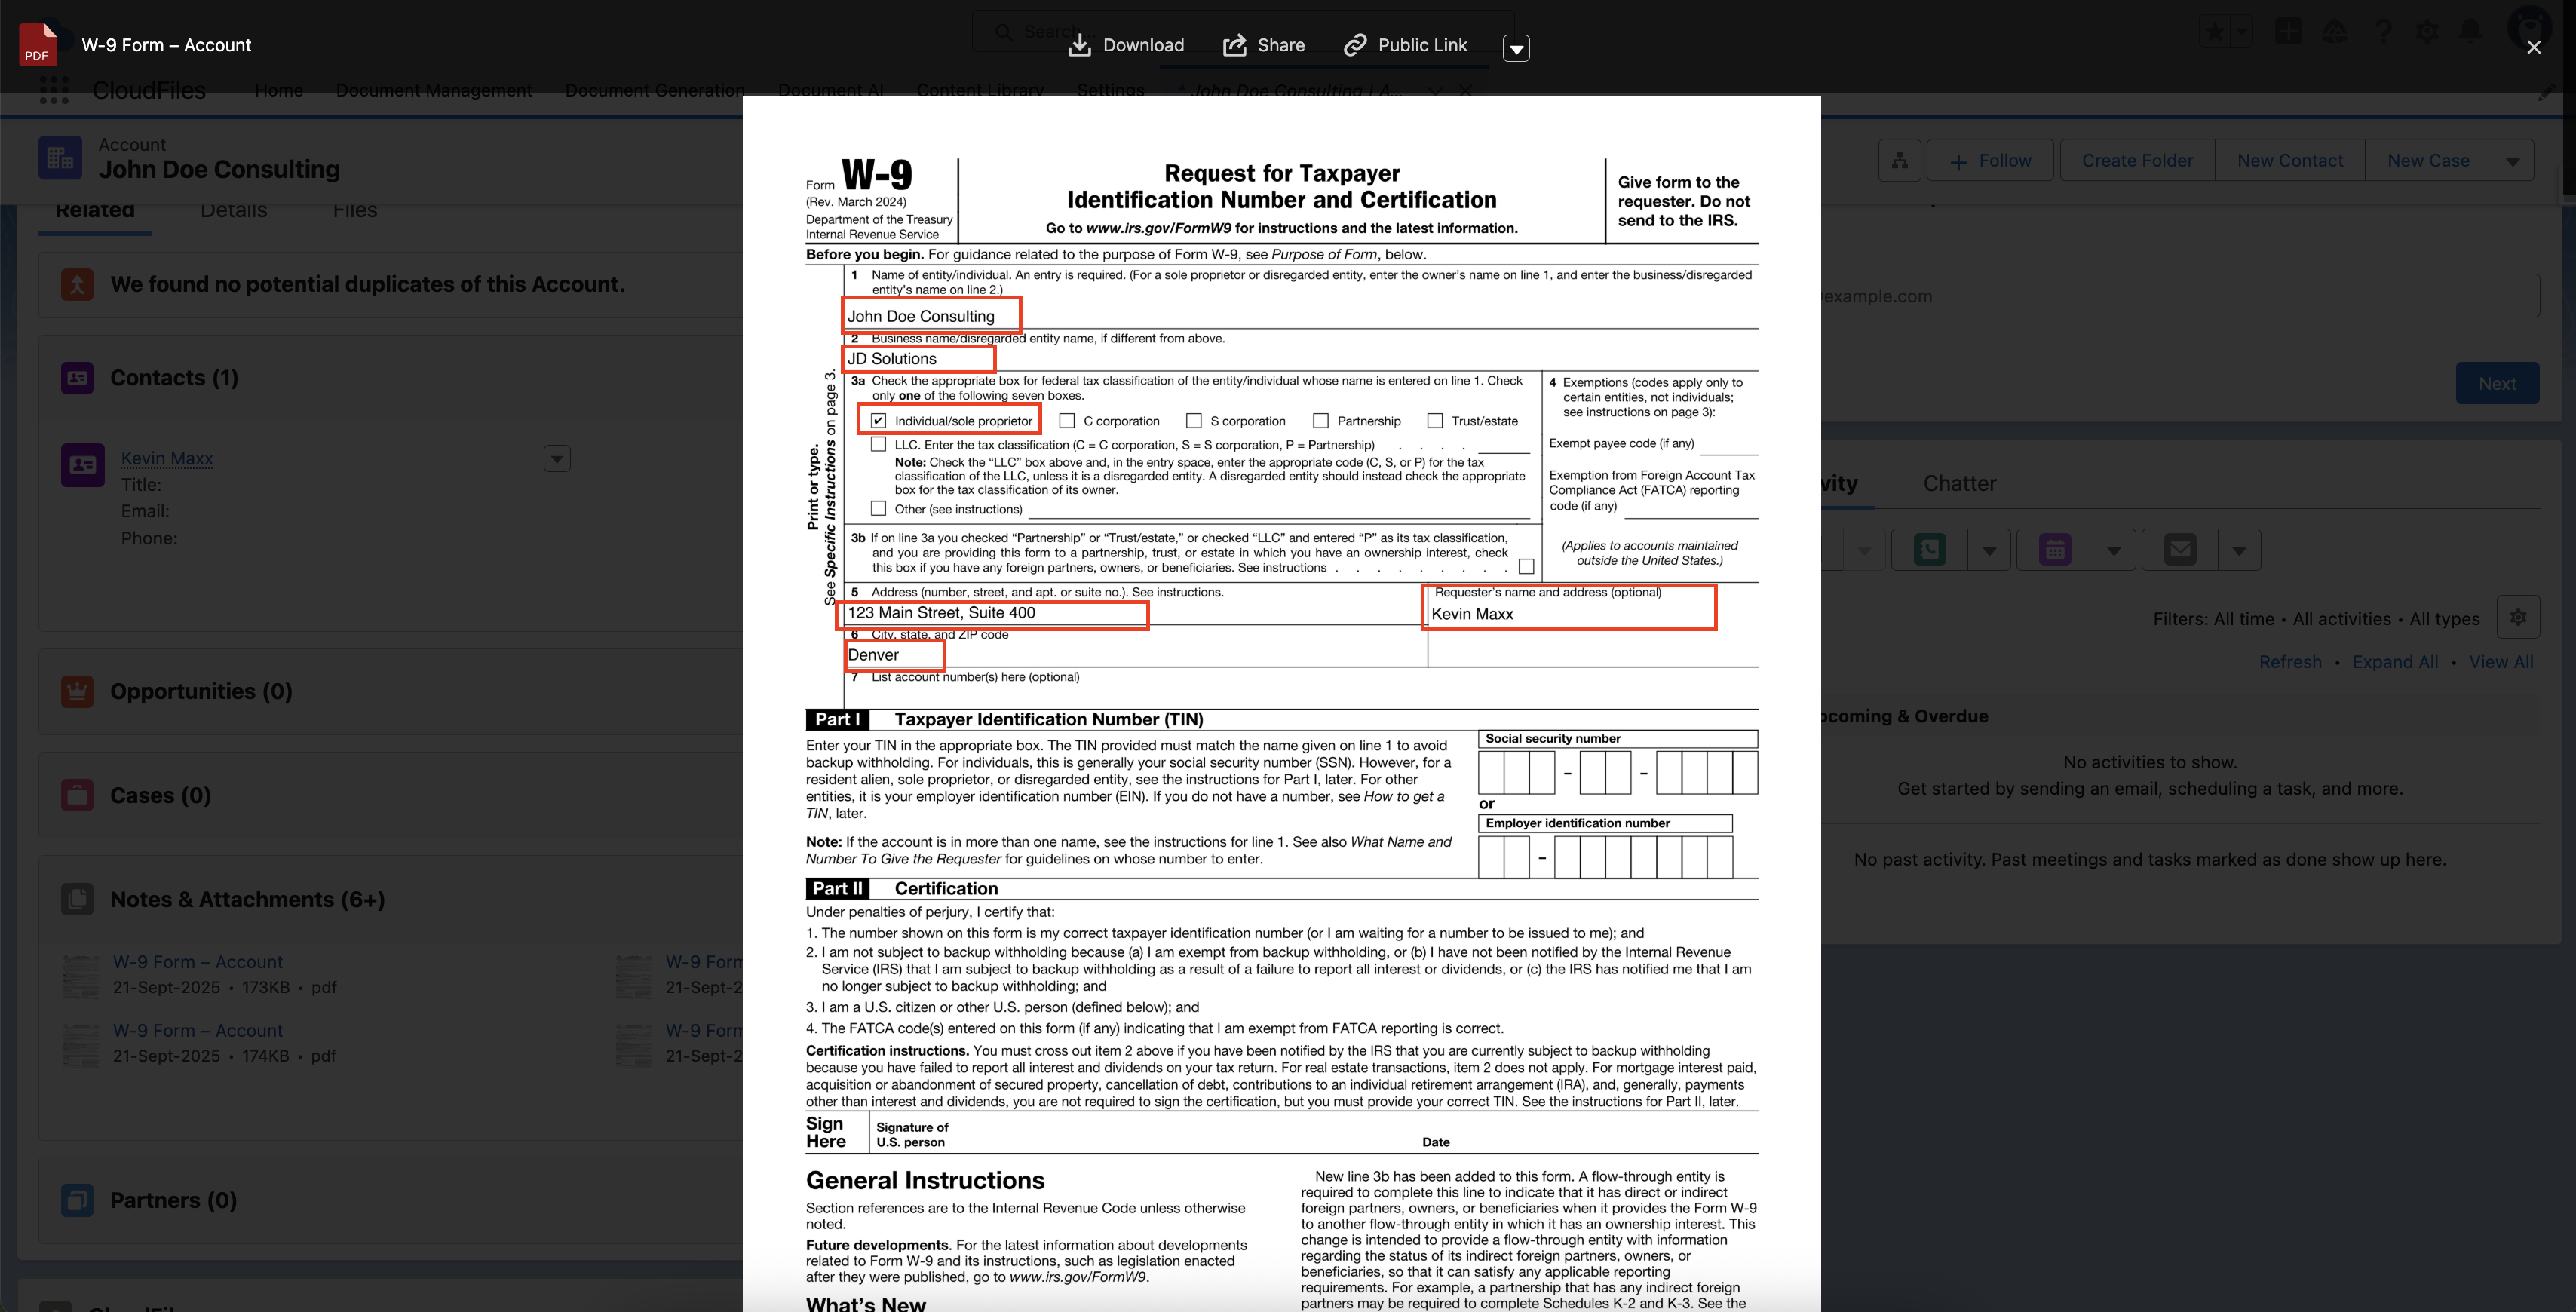
- Once generated, you can:
- Download the document.
- Preview the document inline in Salesforce.
- Copy to Salesforce Files for attaching directly to the record.
- Copy to External Storage for saving the document to a connected CloudFiles library.
This method is useful for one-off requests, such as when a user needs a form generated immediately.
2 - Automatic Usage with Flows
Every template in CloudFiles has a unique Template ID. This ID can be used in Salesforce Flow to trigger document generation automatically using Doc Generation Flow Actions.
For example:
- When a new Account record is created, a W-9 can be generated automatically.
- When a record is updated (e.g., stage changes -> “Onboarded” or “Contract Signed”), the related PDF template can be generated in the background.
Refer to Generate a document via automation for automatic document generation with record update.