In this tutorial, we'll walk through creating a resource action called “Internal Sharing Link.” Today, if someone wants to share a Google Drive file or folder with a colleague — e.g., pasting a link into an email or Teams message — they have to leave Salesforce, open Google Drive directly, re-find the same file they were already looking at in the CloudFiles widget, and use Google Drive's native “Copy link” feature. That's a full context switch just to copy a link for something they're already looking at.
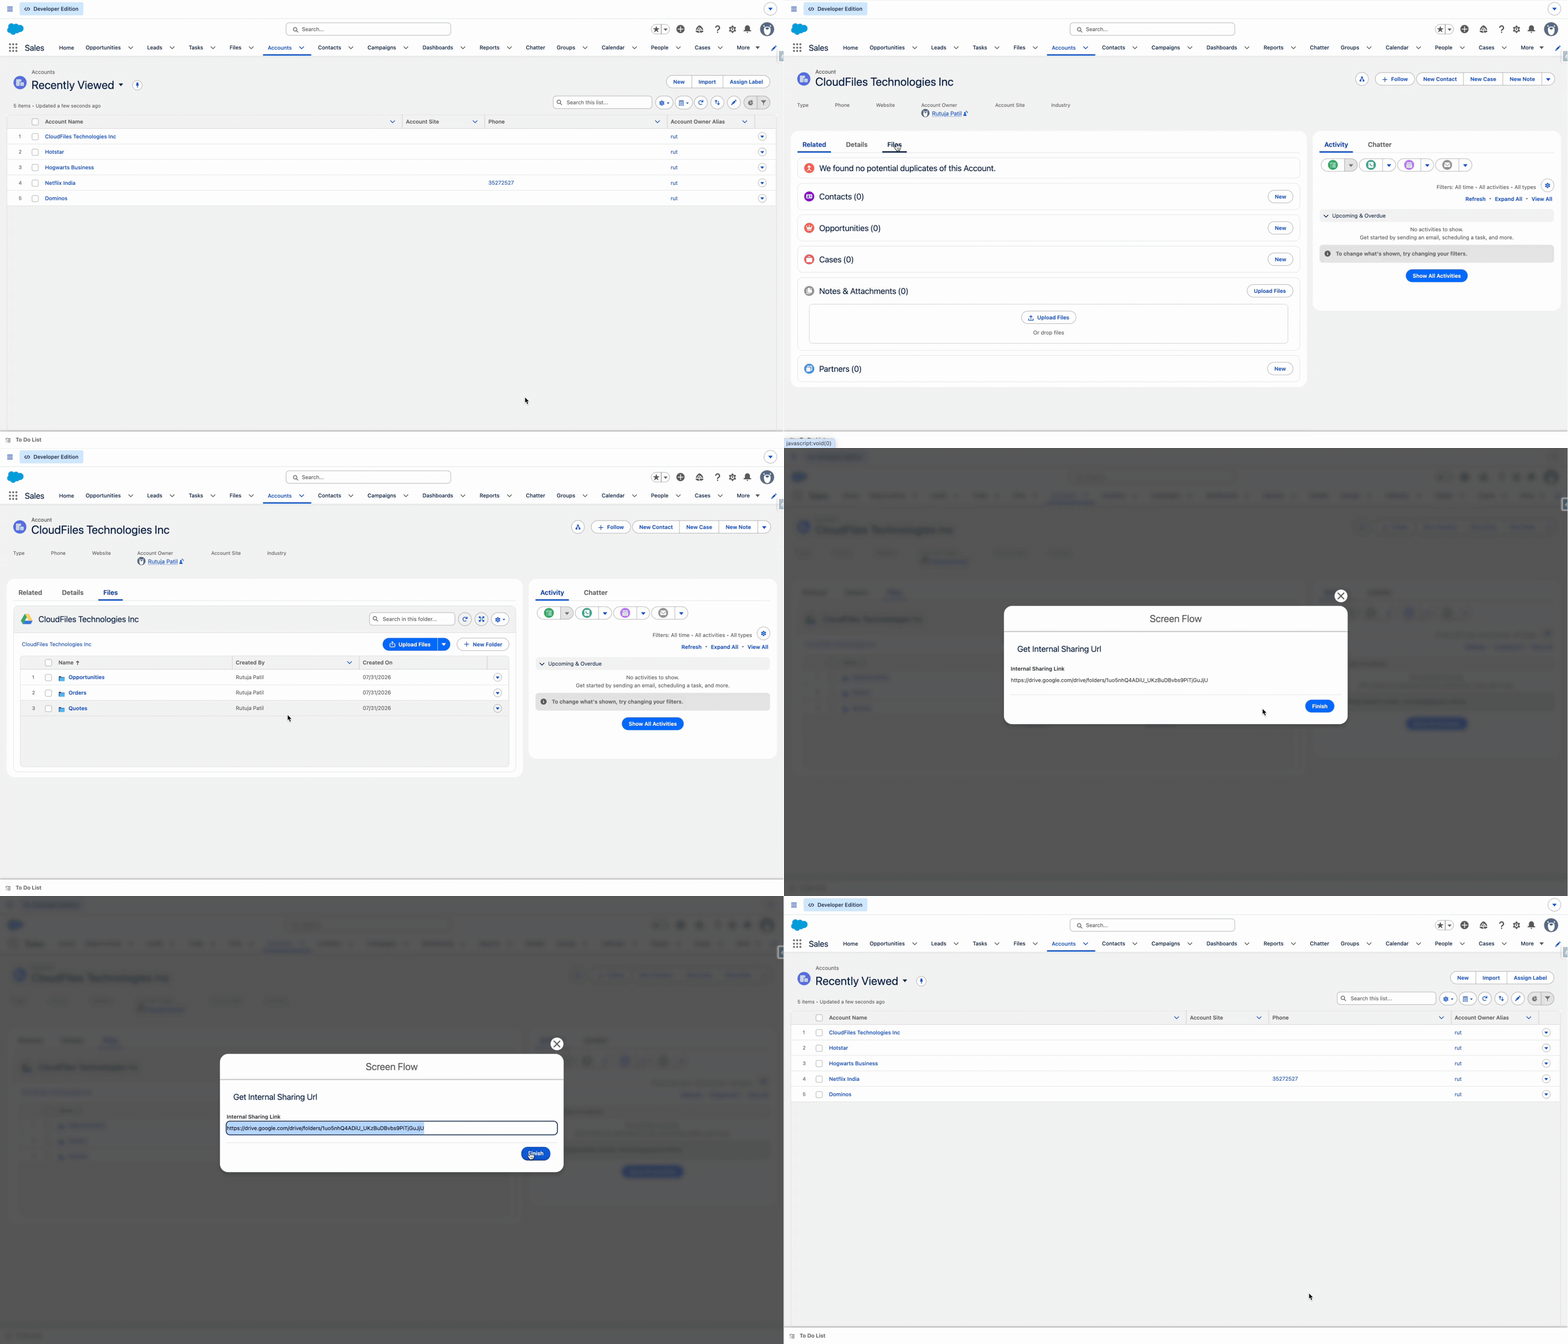
We'll set up a resource action that lets users grab that link from inside the CloudFiles widget itself: select a file or folder, click “Internal Sharing Link,” and a screen flow fetches the item's external URL — its Google Drive sharing link — and displays it right there, ready to copy and paste.
This is the file or folder's external URL — a permissioned sharing link, the kind Google Drive generates for people who already have access within your organization. It's a shortcut to something a permissioned colleague could already reach directly in Google Drive.
By the end of this guide, you'll have a working custom resource action you can configure yourself — ready to save your users a context switch every time they need to share a file link.
What to Expect
By the end of this tutorial, you will be able to:
- Add a custom resource action button (e.g., “Internal Sharing Link”) that appears in the CloudFiles widget when a user selects one file or folder on a Salesforce record page.
- Use that button to fetch the selected resource's external URL (its Google Drive sharing link — the File/Folder's URL from the external storage) and display it directly in the widget — without anyone needing to open Google Drive separately.
Resource Action vs. List Action
Before starting, it's worth being clear on the distinction:
- List action — appears when a user selects one or more items in the widget; the flow receives a collection variable (
resources). - Resource action — appears when a user selects a single item in the widget; the flow receives a single, non-collection variable (
resource).
Use a resource action whenever your automation logic only makes sense against one file at a time — such as looking up a single file's metadata or, as in this tutorial, its sharing URL.
Pre-requisites
Before you start with the set up, please ensure these steps are completed.
Install CloudFiles in Salesforce
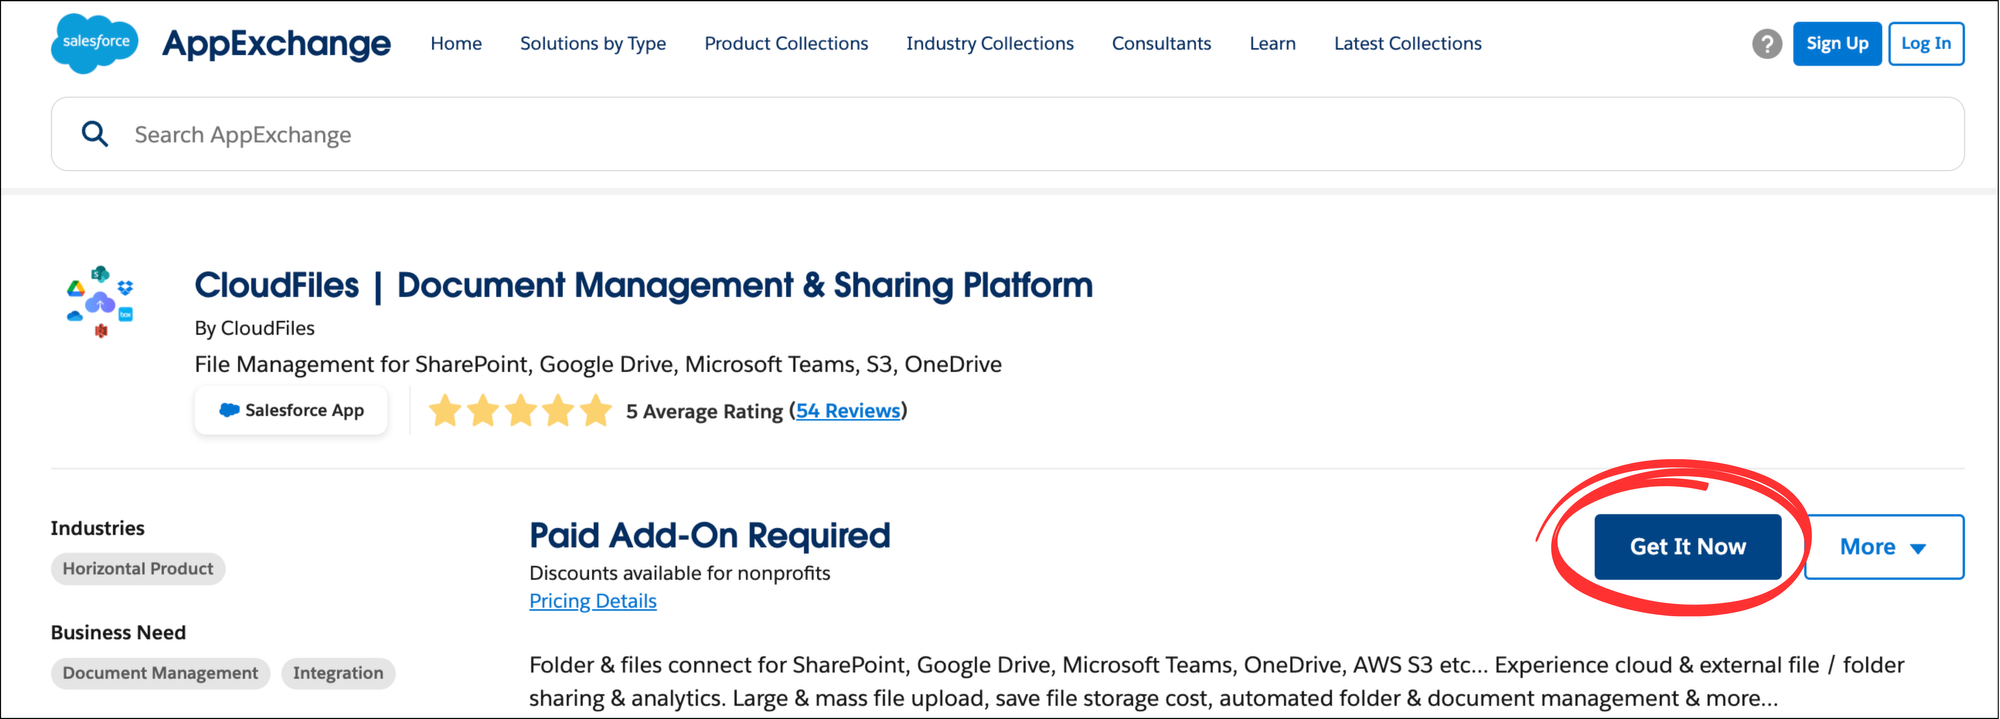
CloudFiles is available on the Salesforce AppExchange and can be installed using the standard app installation process. Check out Installation guide to know more.
Connect your Cloud Storage to Salesforce using CloudFiles
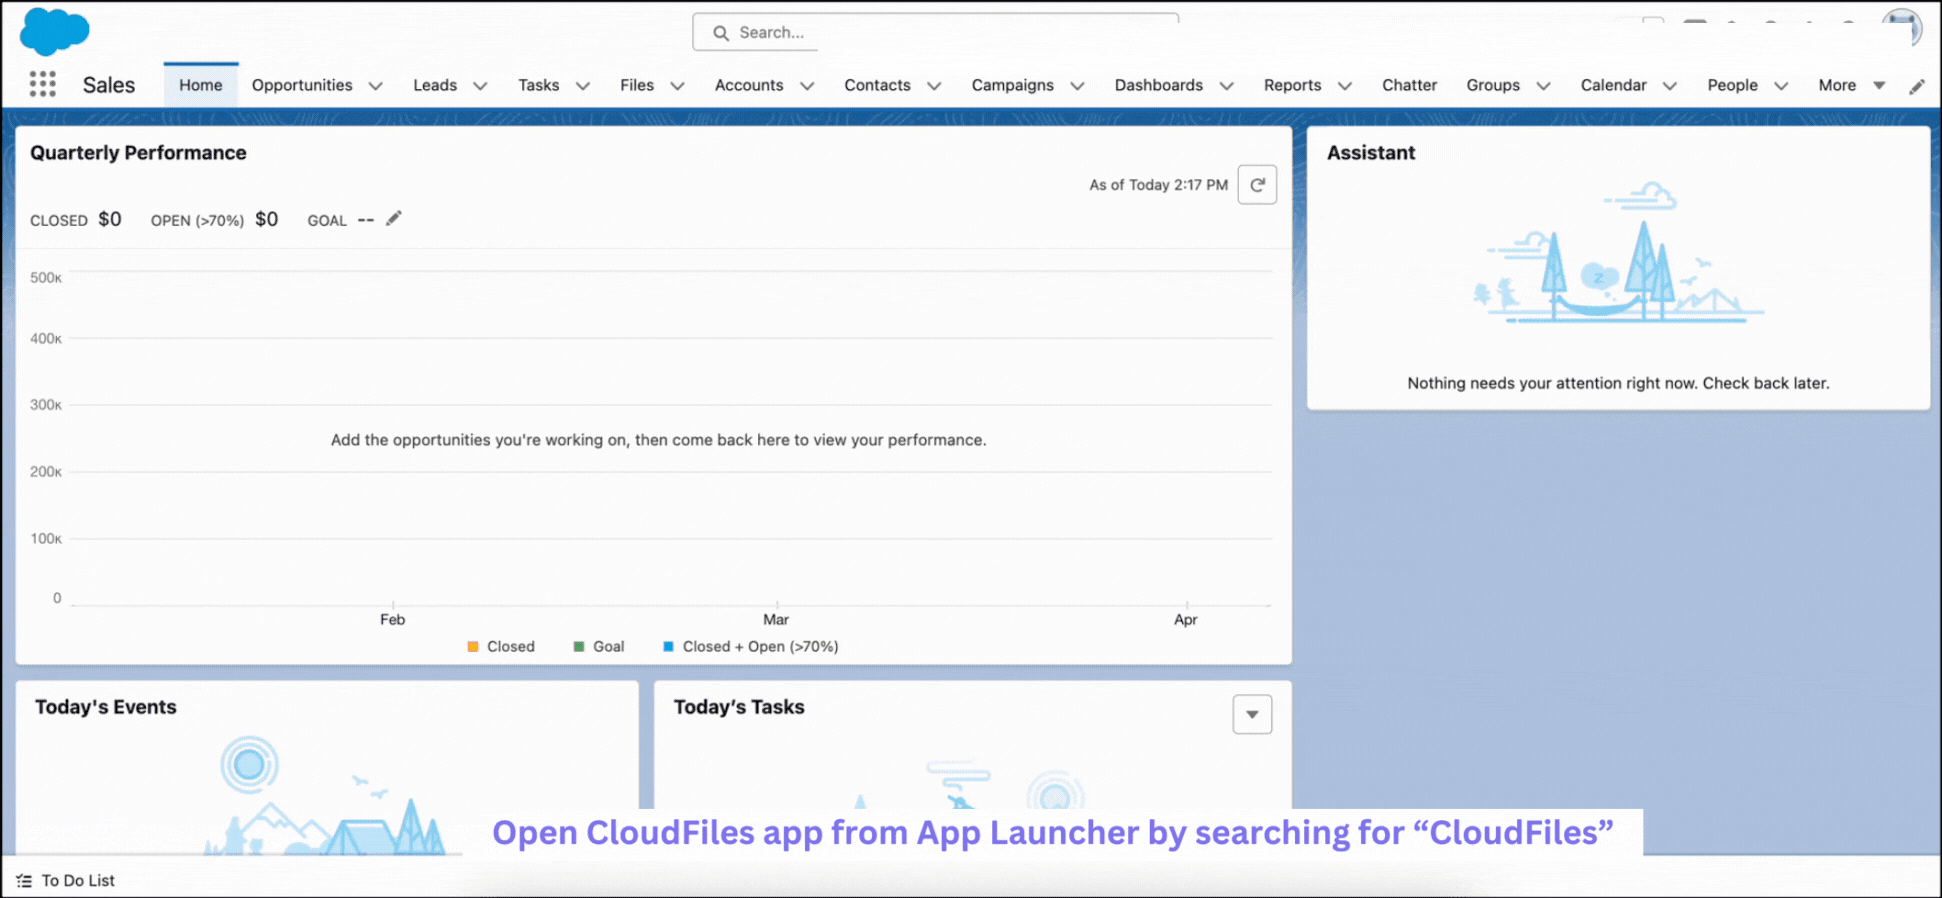
All automations in CloudFiles are activated through Salesforce Flow Builder, utilizing account-wide authentication for external storage libraries through a service (admin) user. To connect your service user, access the setup, click on the external storage of choice and log into your account. For detailed steps, refer to the GIF below for a clearer understanding.
Add CloudFiles Widget to Account record page
Add the CloudFiles widget to Account record page in order to view the files and folders within salesforce. Follow the steps below -
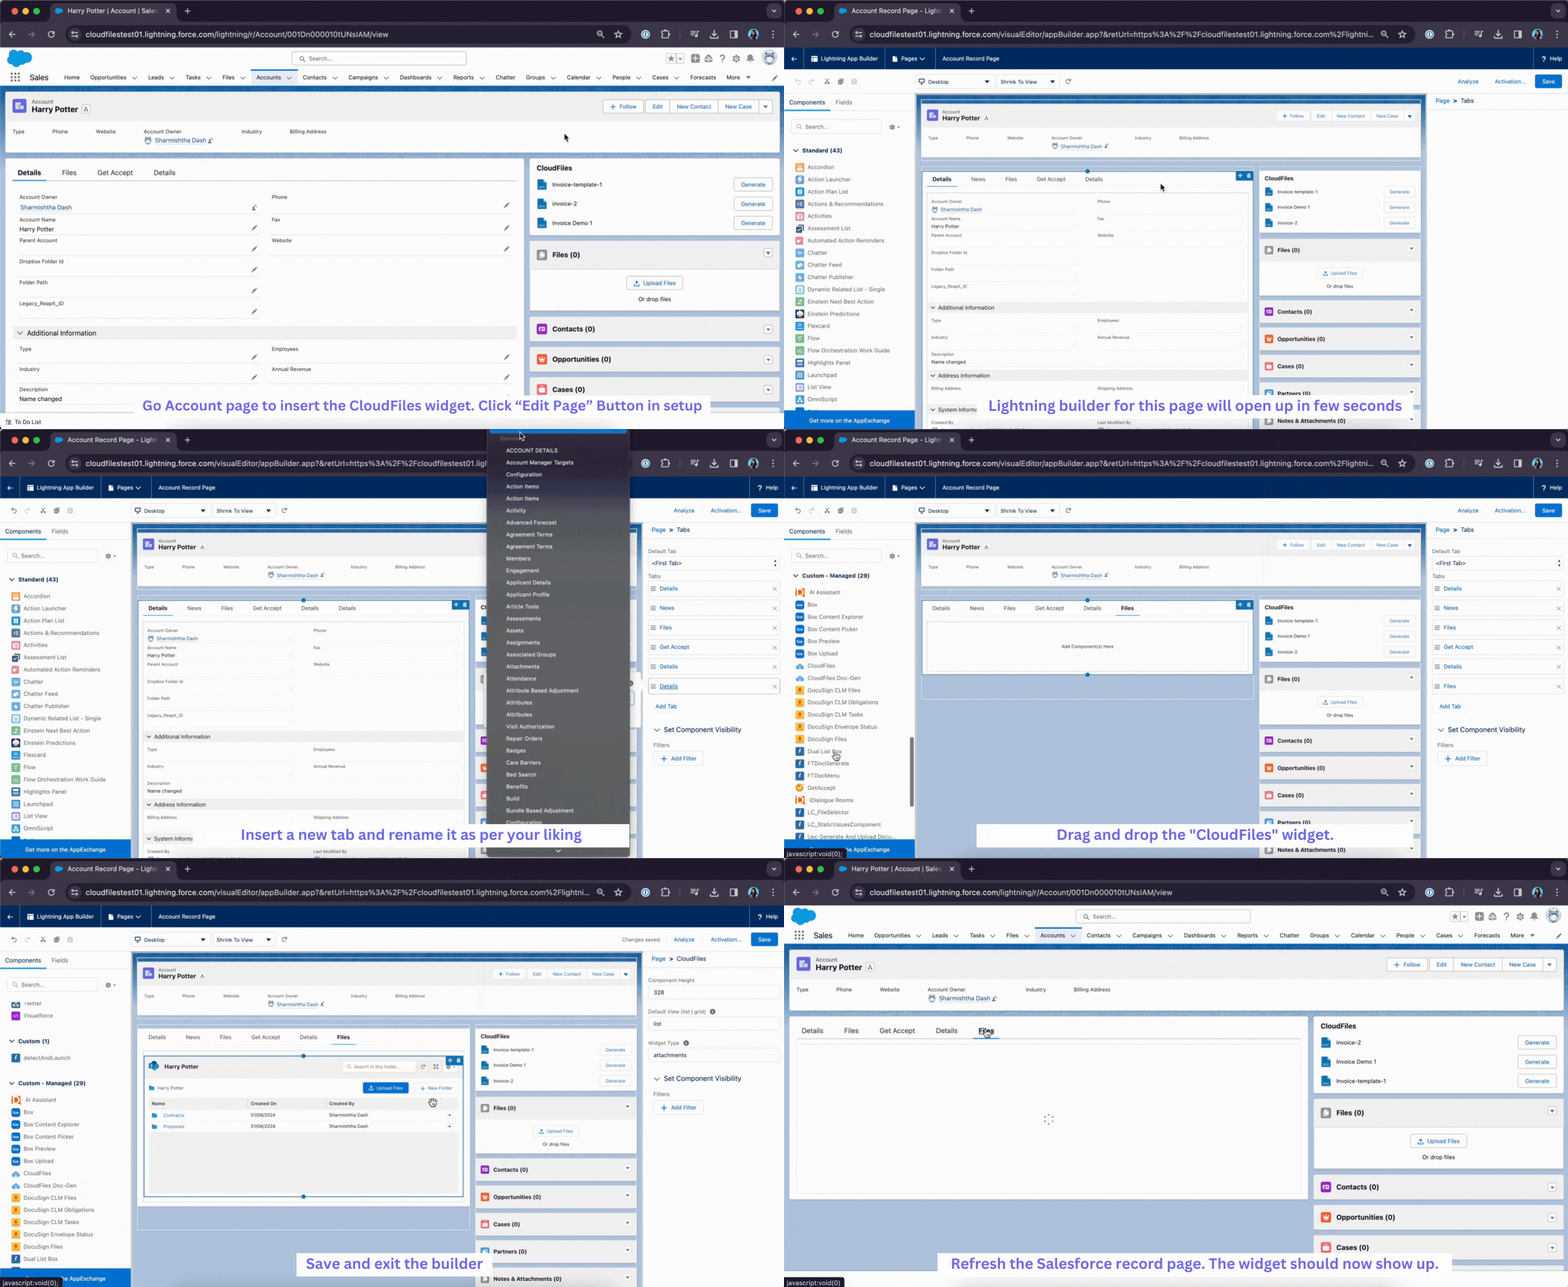
- Go to any Account record and click “Edit Page” Button.
- Lightning builder for this page will open. Insert a new tab and drag and drop the “CloudFiles” widget.
- Save and exit the builder. Refresh the Salesforce record page. The widget should now show up.
Refer to the GIF below to get a visual understanding of this step. The inserted widget may show a blank screen but you don't need to worry about it. Move on to the next step.
Automatic folder creation for Accounts
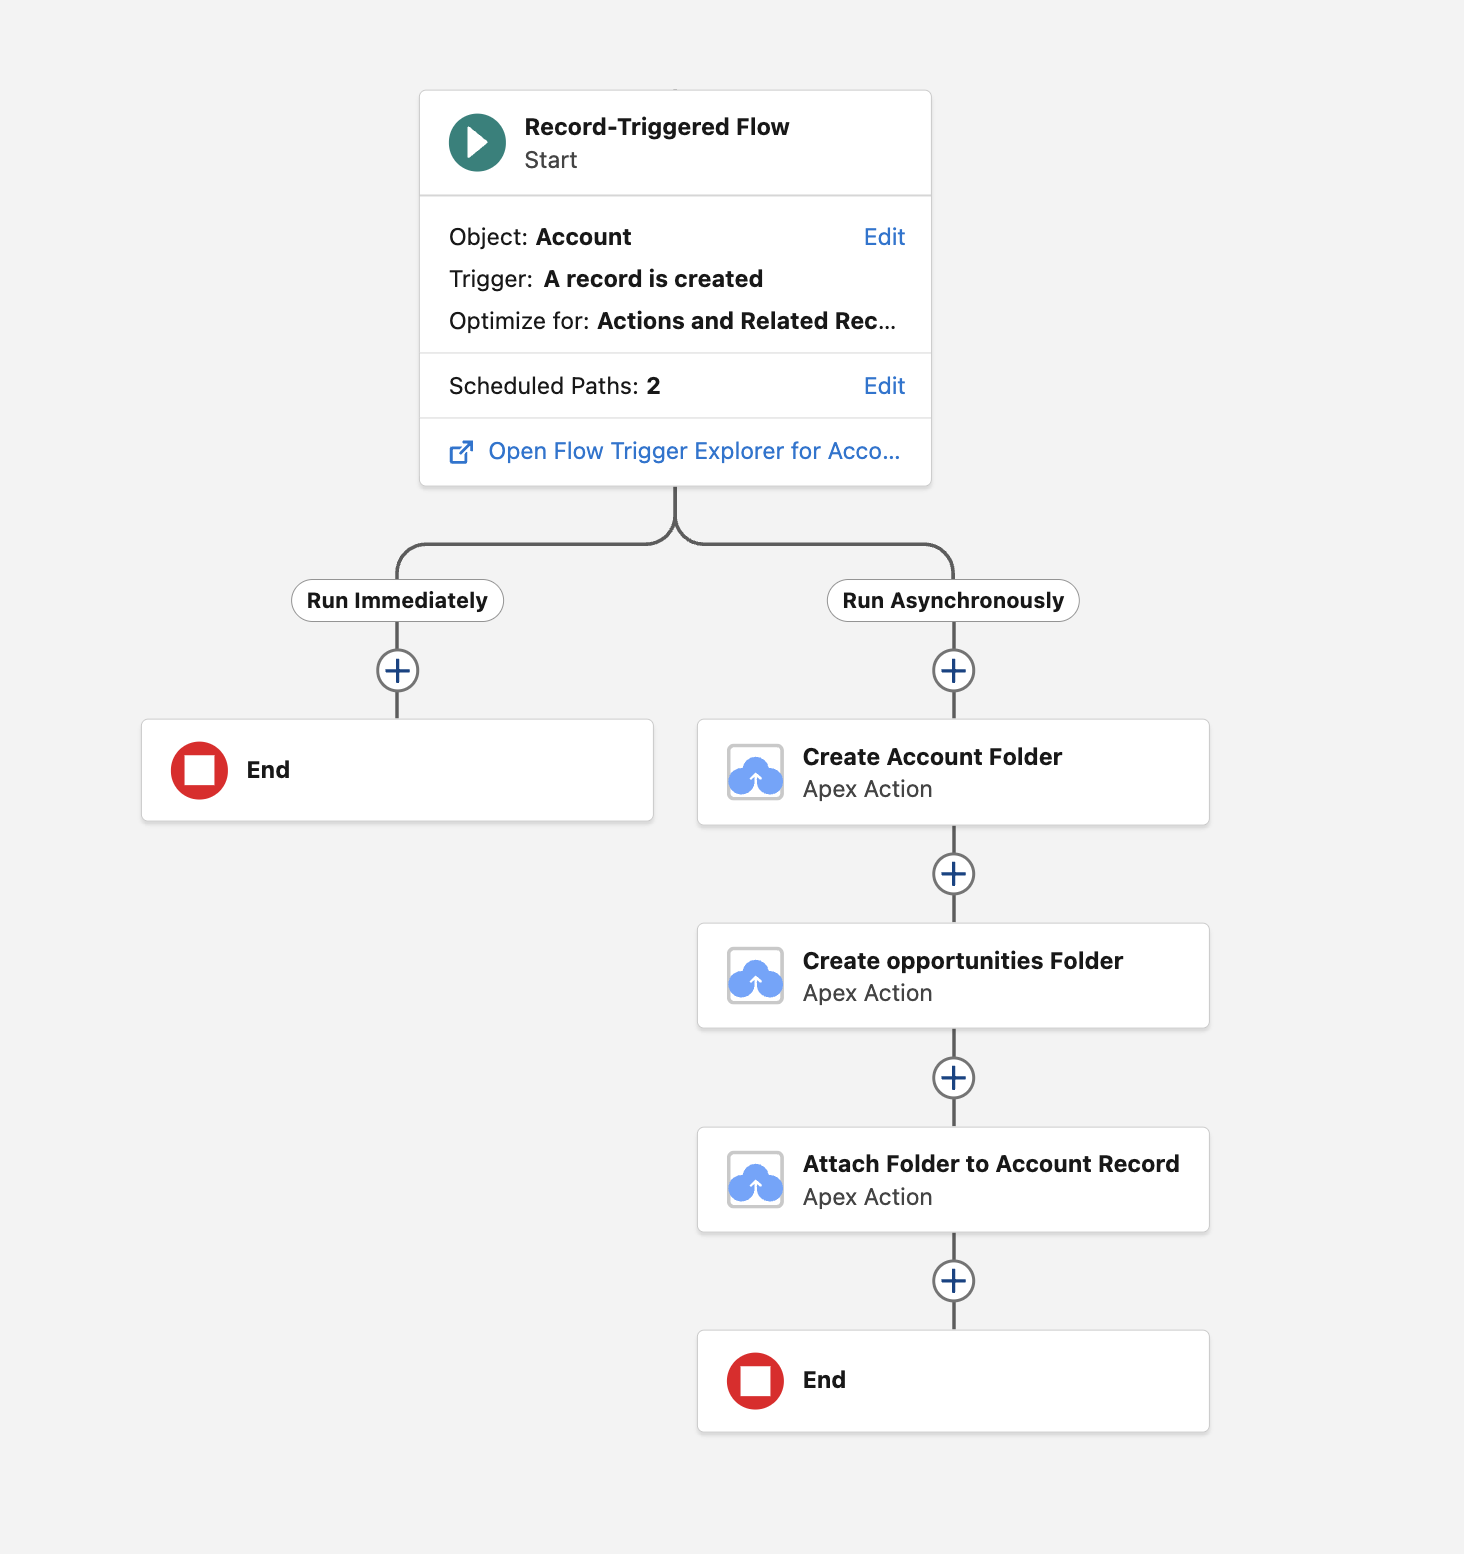
For this tutorial, We require automated folders to be created upon the creation of new Account. To accomplish this, we will create two distinct record-triggered flows using CloudFiles actions. For a comprehensive guide on the process of creating automated folders, please refer to our tutorial at Create Automated Folder Hierarchies for Managing External Files from Salesforce Objects
This is how the flow would look like -
Configure the CloudFiles Widget to Add a Custom Resource Action Button and Link It to the Flow
In this section, we'll walk through how to configure the CloudFiles widget to add a custom resource action button and link it to the flow we're going to build in the next step.
Step 1: Open Widget Configuration
Navigate to the CloudFiles Document Management app and open the “Widget Configuration” page.
Step 2: Locate the Resource Actions Section
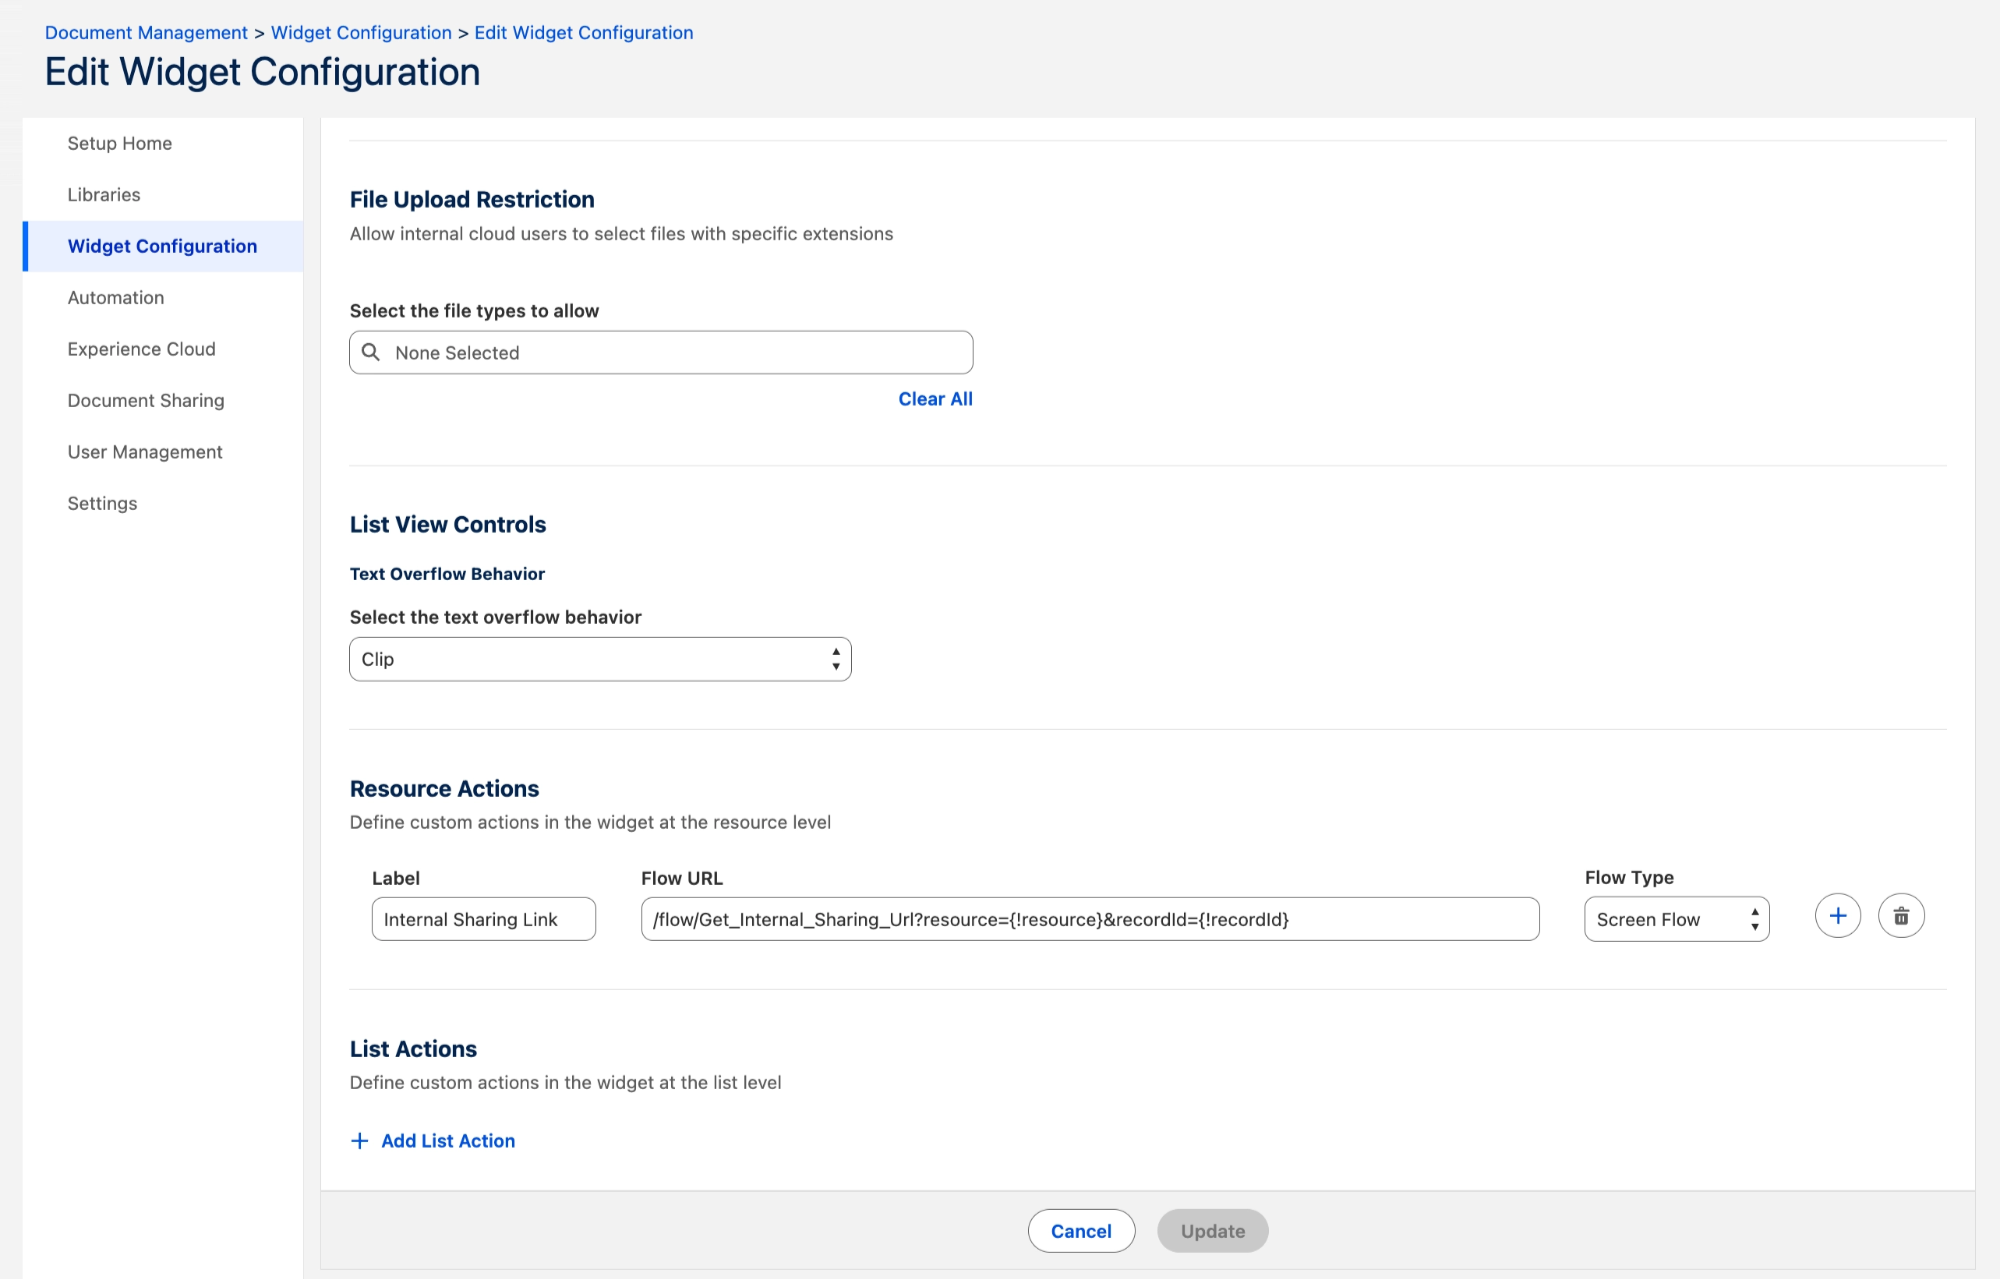
Scroll to the bottom of the page, past List View Controls, where you'll find the Resource Actions section (“Define custom actions in the widget at the resource level”), with List Actions just below it.
Step 3: Specify Attributes for the Action
For the resource action, provide the following details:
- Label — the name that will appear on the widget button. For this tutorial: Internal Sharing Link.
- Flow URL — the URL of the flow to trigger, including input variables.
- Flow Type — choose the type of flow from the dropdown. For this tutorial, select Screen Flow.
Flow URL used in this tutorial:
/flow/Get_Internal_Sharing_Url?resource={!resource}&recordId={!recordId}Note the singular {!resource} here — for a resource action this refers to the single file or folder selected by the user in the CloudFiles widget at the time of clicking the button. {!recordId} is the Salesforce record from which the action is being triggered. (You can name these input variables whatever you like — resource and recordId are just what this tutorial's flow uses.)
Step 4: Save and Link the Widget
- After entering all configuration values, click Save.
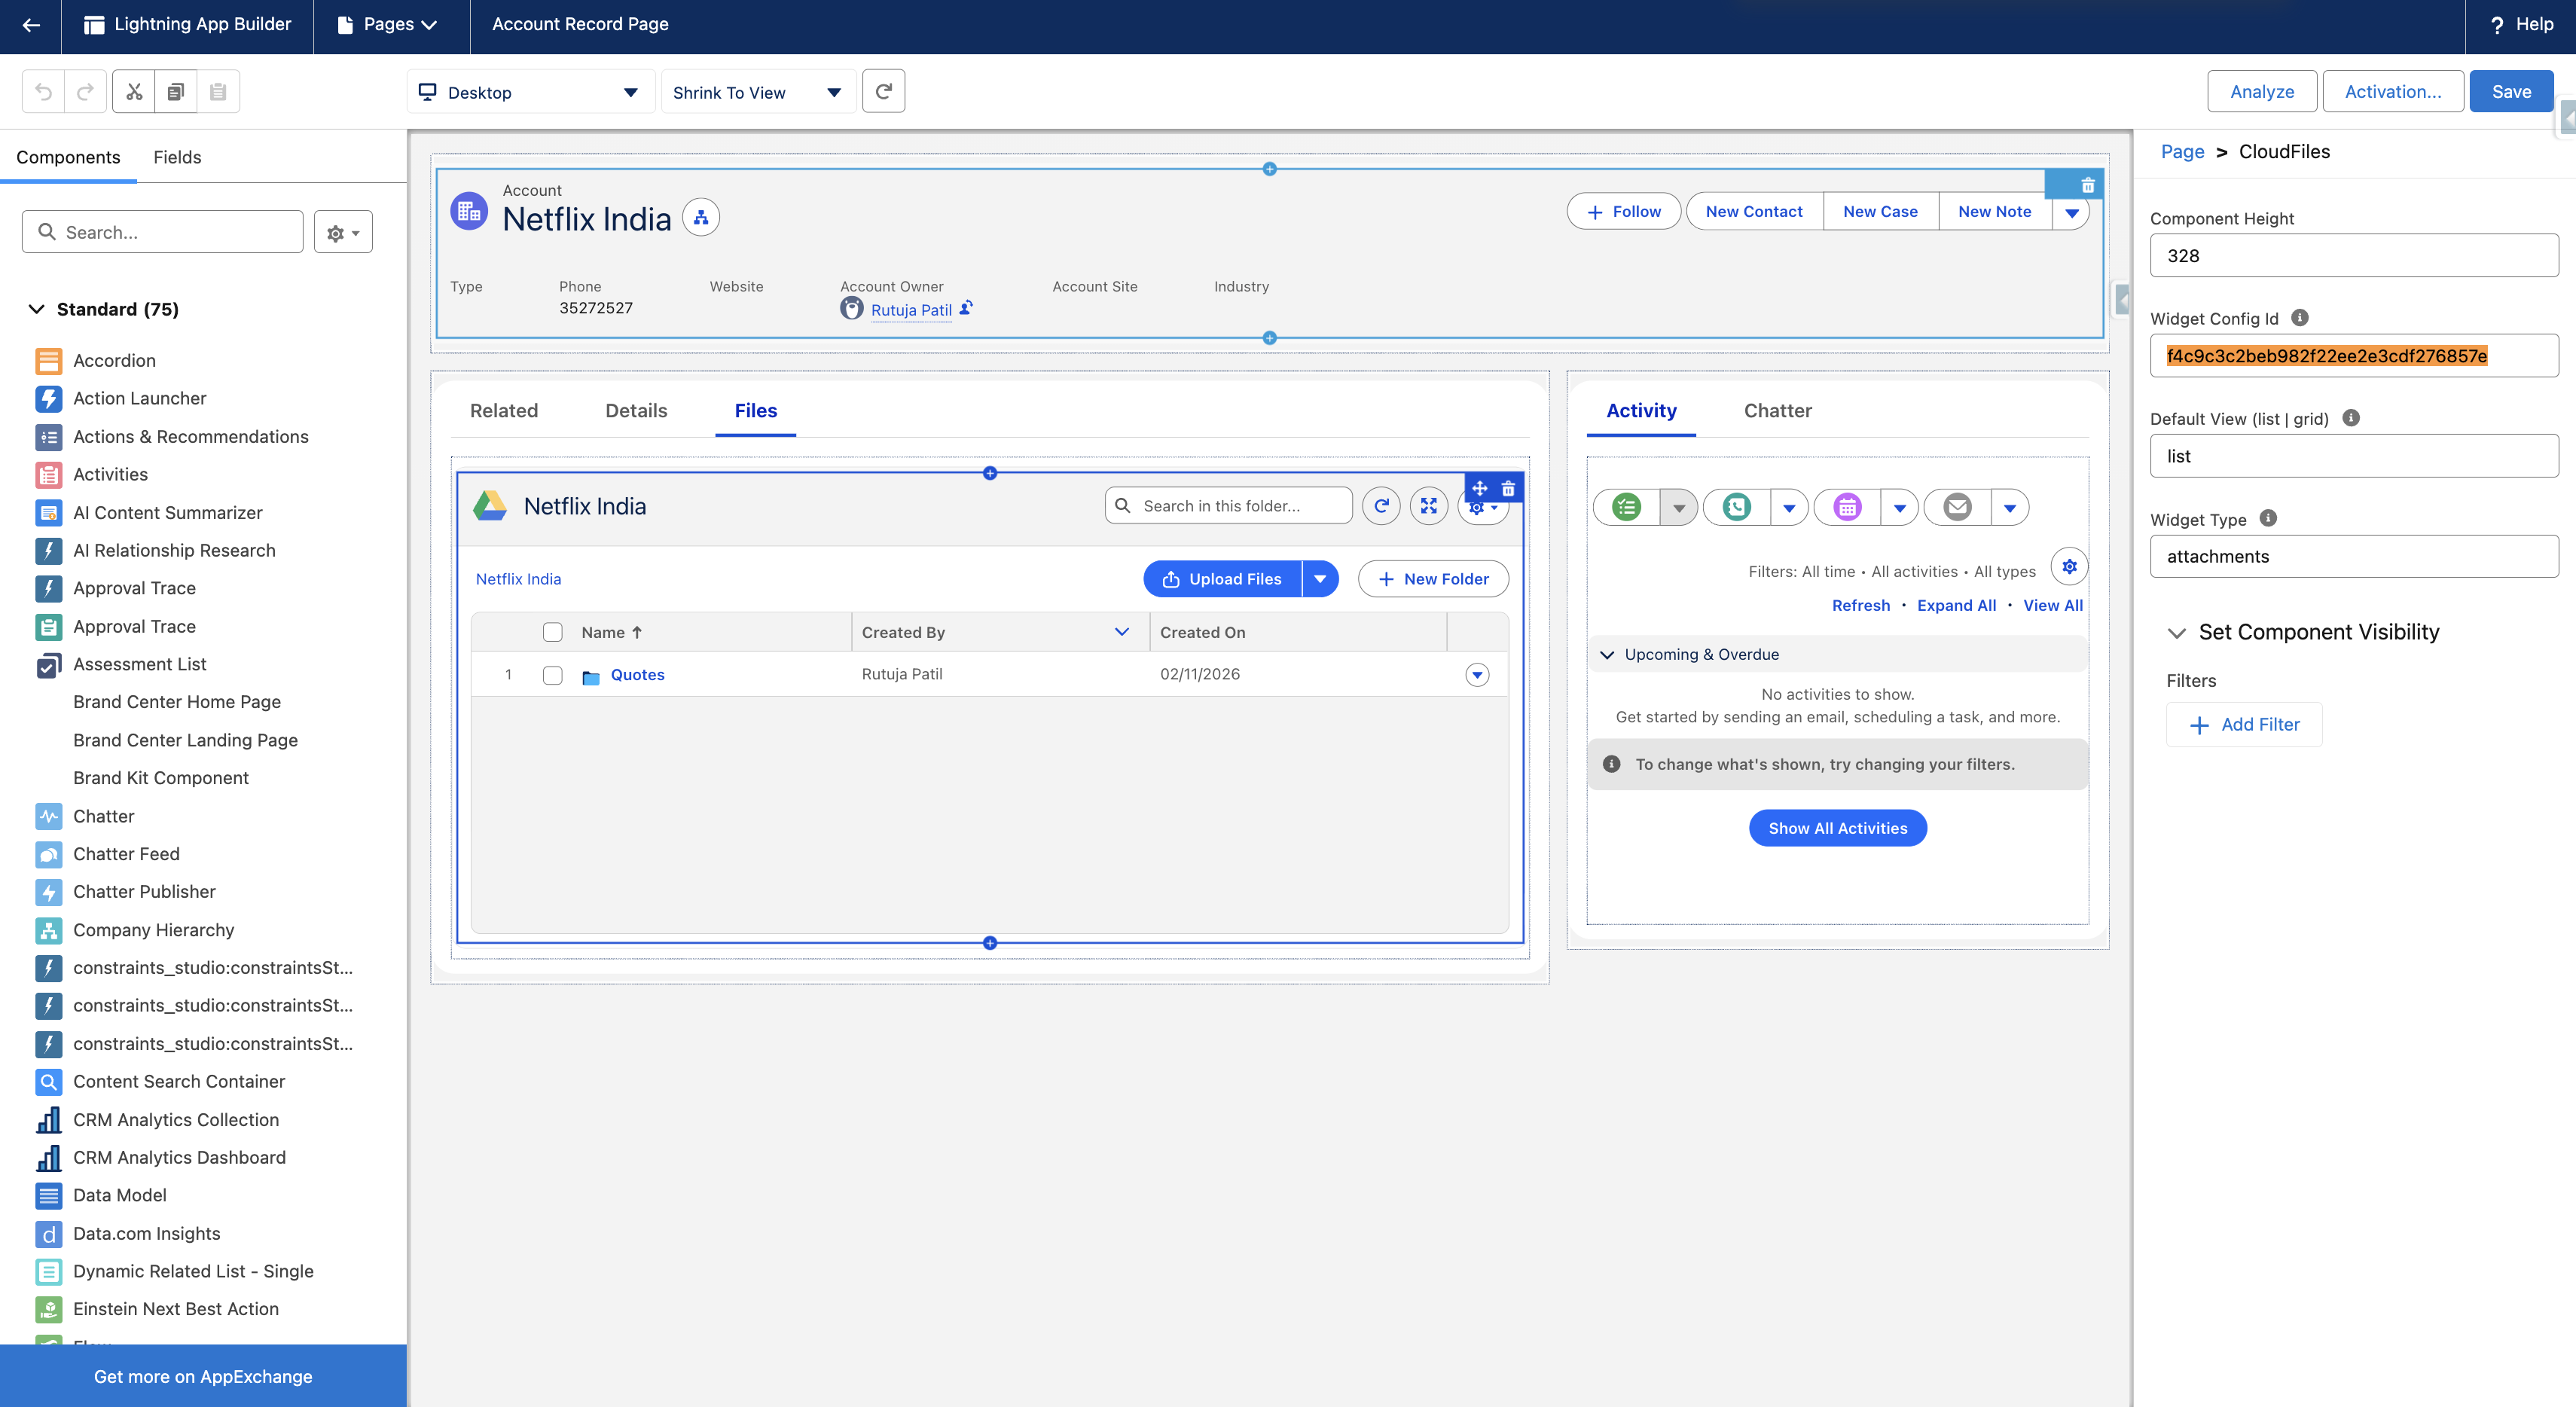
- Copy the generated Widget Configuration ID.
- Navigate to the Account record page in Salesforce and paste this ID into the CloudFiles widget configuration panel.
This step enables the Resource Action button to appear within the widget, allowing users to get the external URL of the selected file or folder with just a click.
Flow - Get Internal Sharing Url
In this section, we'll create a Custom Resource Action – driven Screen Flow to get the external URL for a file or folder from your connected external storage when triggered by the user. This is especially useful when the user wants to copy this link and send to colleagues via chat or email, without having to switch to the external storage.
We'll configure a Screen Flow that launches when the user clicks the Custom Resource Action button on a file/folder in the CloudFiles widget.
The Flow will:
- Get the external URL from your connected external storage (e.g., Google Drive).
- Immediately show a pop-up on the Salesforce record page displaying this link.
- Let you copy this link and share it with your team-members.
Once the Flow is activated, you can proceed to configure the widget and link the Custom Resource Action. This will allow users to access the Internal Sharing Link function directly from the CloudFiles widget on the Salesforce record page.
By using this button, users can copy the link and send it to their colleagues via chat or email, without having to switch to the external storage.
This is how the final flow looks like - a Screen Flow with three elements: Get the External URL for the Folder (Apex Action) followed by the Sharing Link screen.
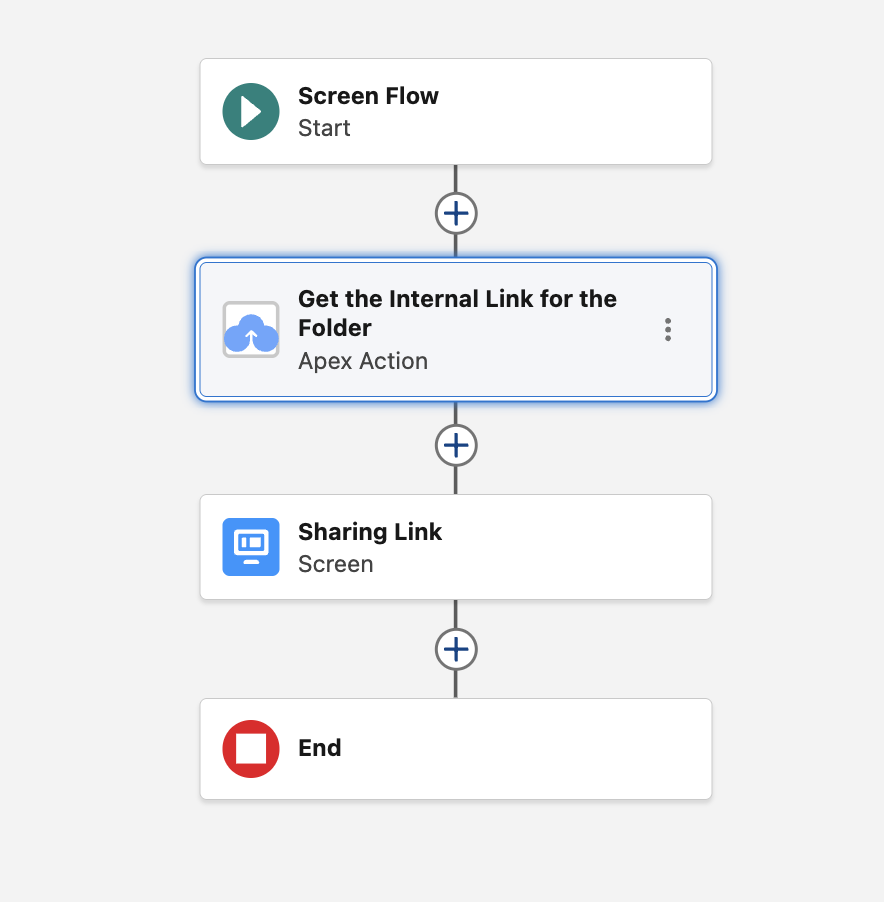
The details of each element are given below.
1. Configure a Screen Flow and Its Input Variables
We'll begin by creating a Screen Flow to handle the logic for getting the url of files/folders from your connected external storage. Follow the steps below to set up the required input parameters:
- Create a new Screen Flow in Salesforce to manage the logic of getting the external url.
- Add an input variable called recordId to capture the Salesforce record ID (e.g., Account ) from which the action is being triggered via the CloudFiles widget.
- Create another input variable called resource variable to get the selected resource from the CloudFiles Widget.
Create Flow Variables
To pass selected resource (file/folder) and the current record ID to the flow, create the following two variables -
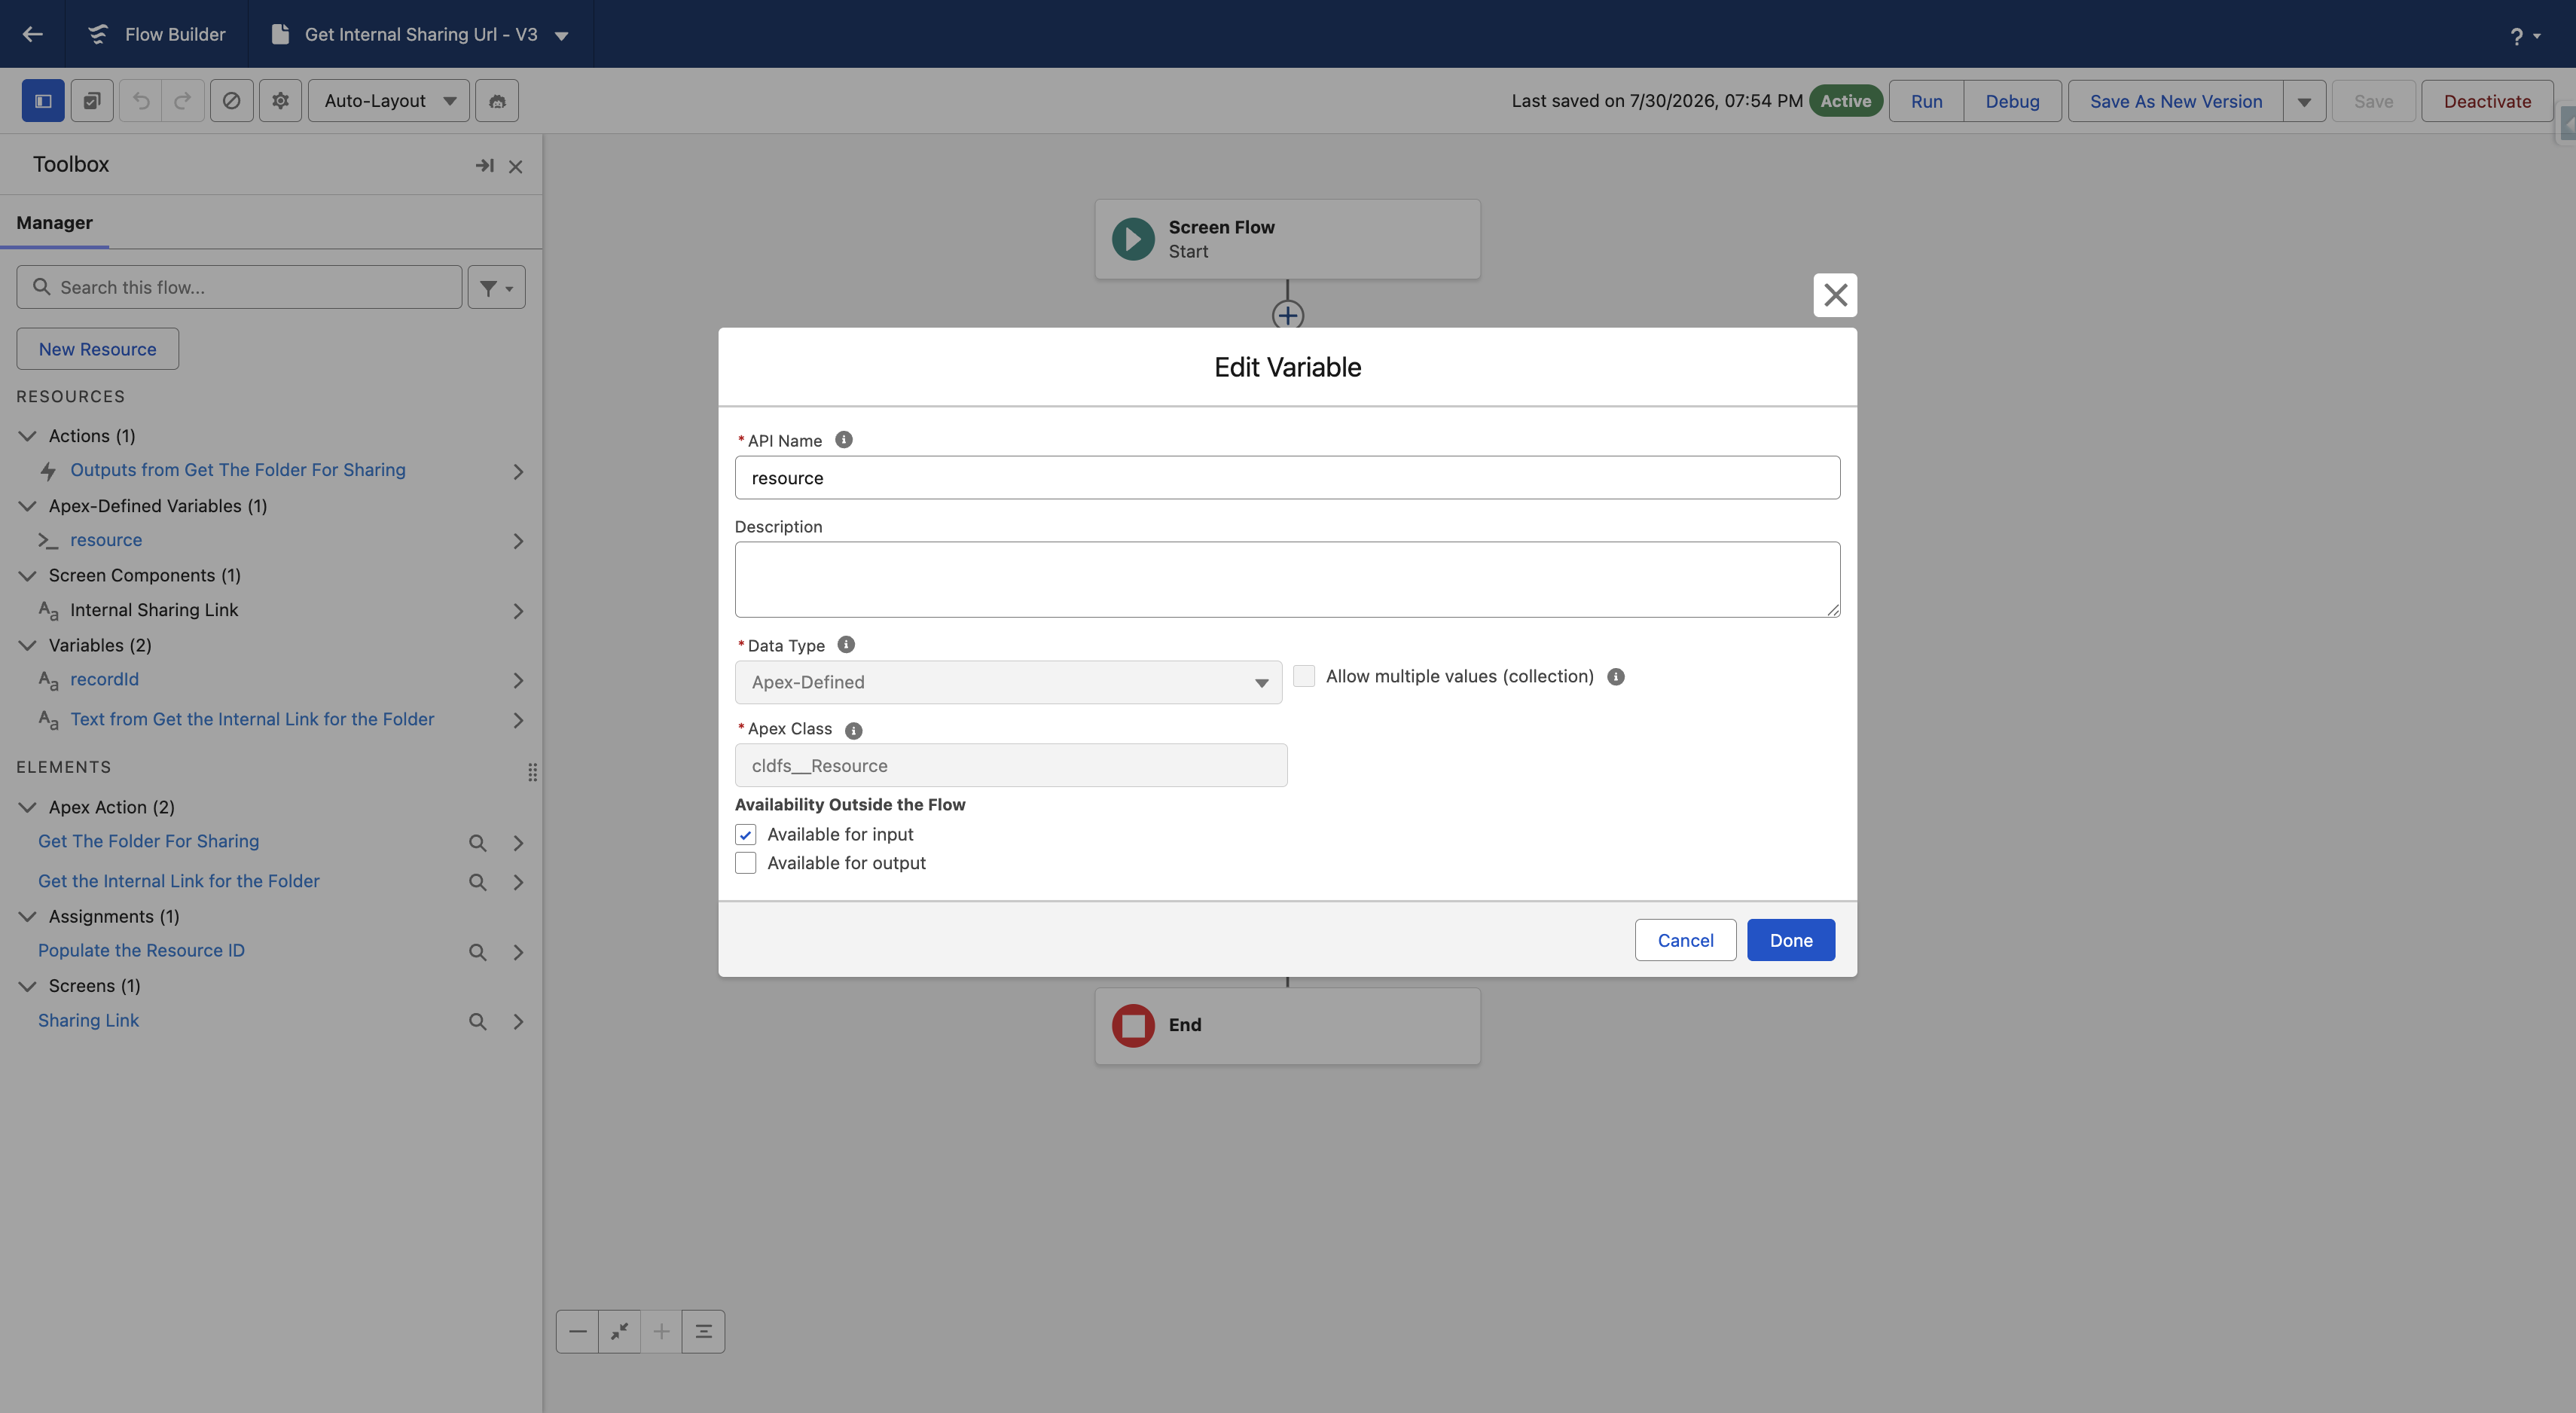
- resource:
- Type - Variable
- Data Type - Apex Defined
- Apex Class - clds__Resource
- Allow Multiple Values (Collection) - False
- Available for Input - True
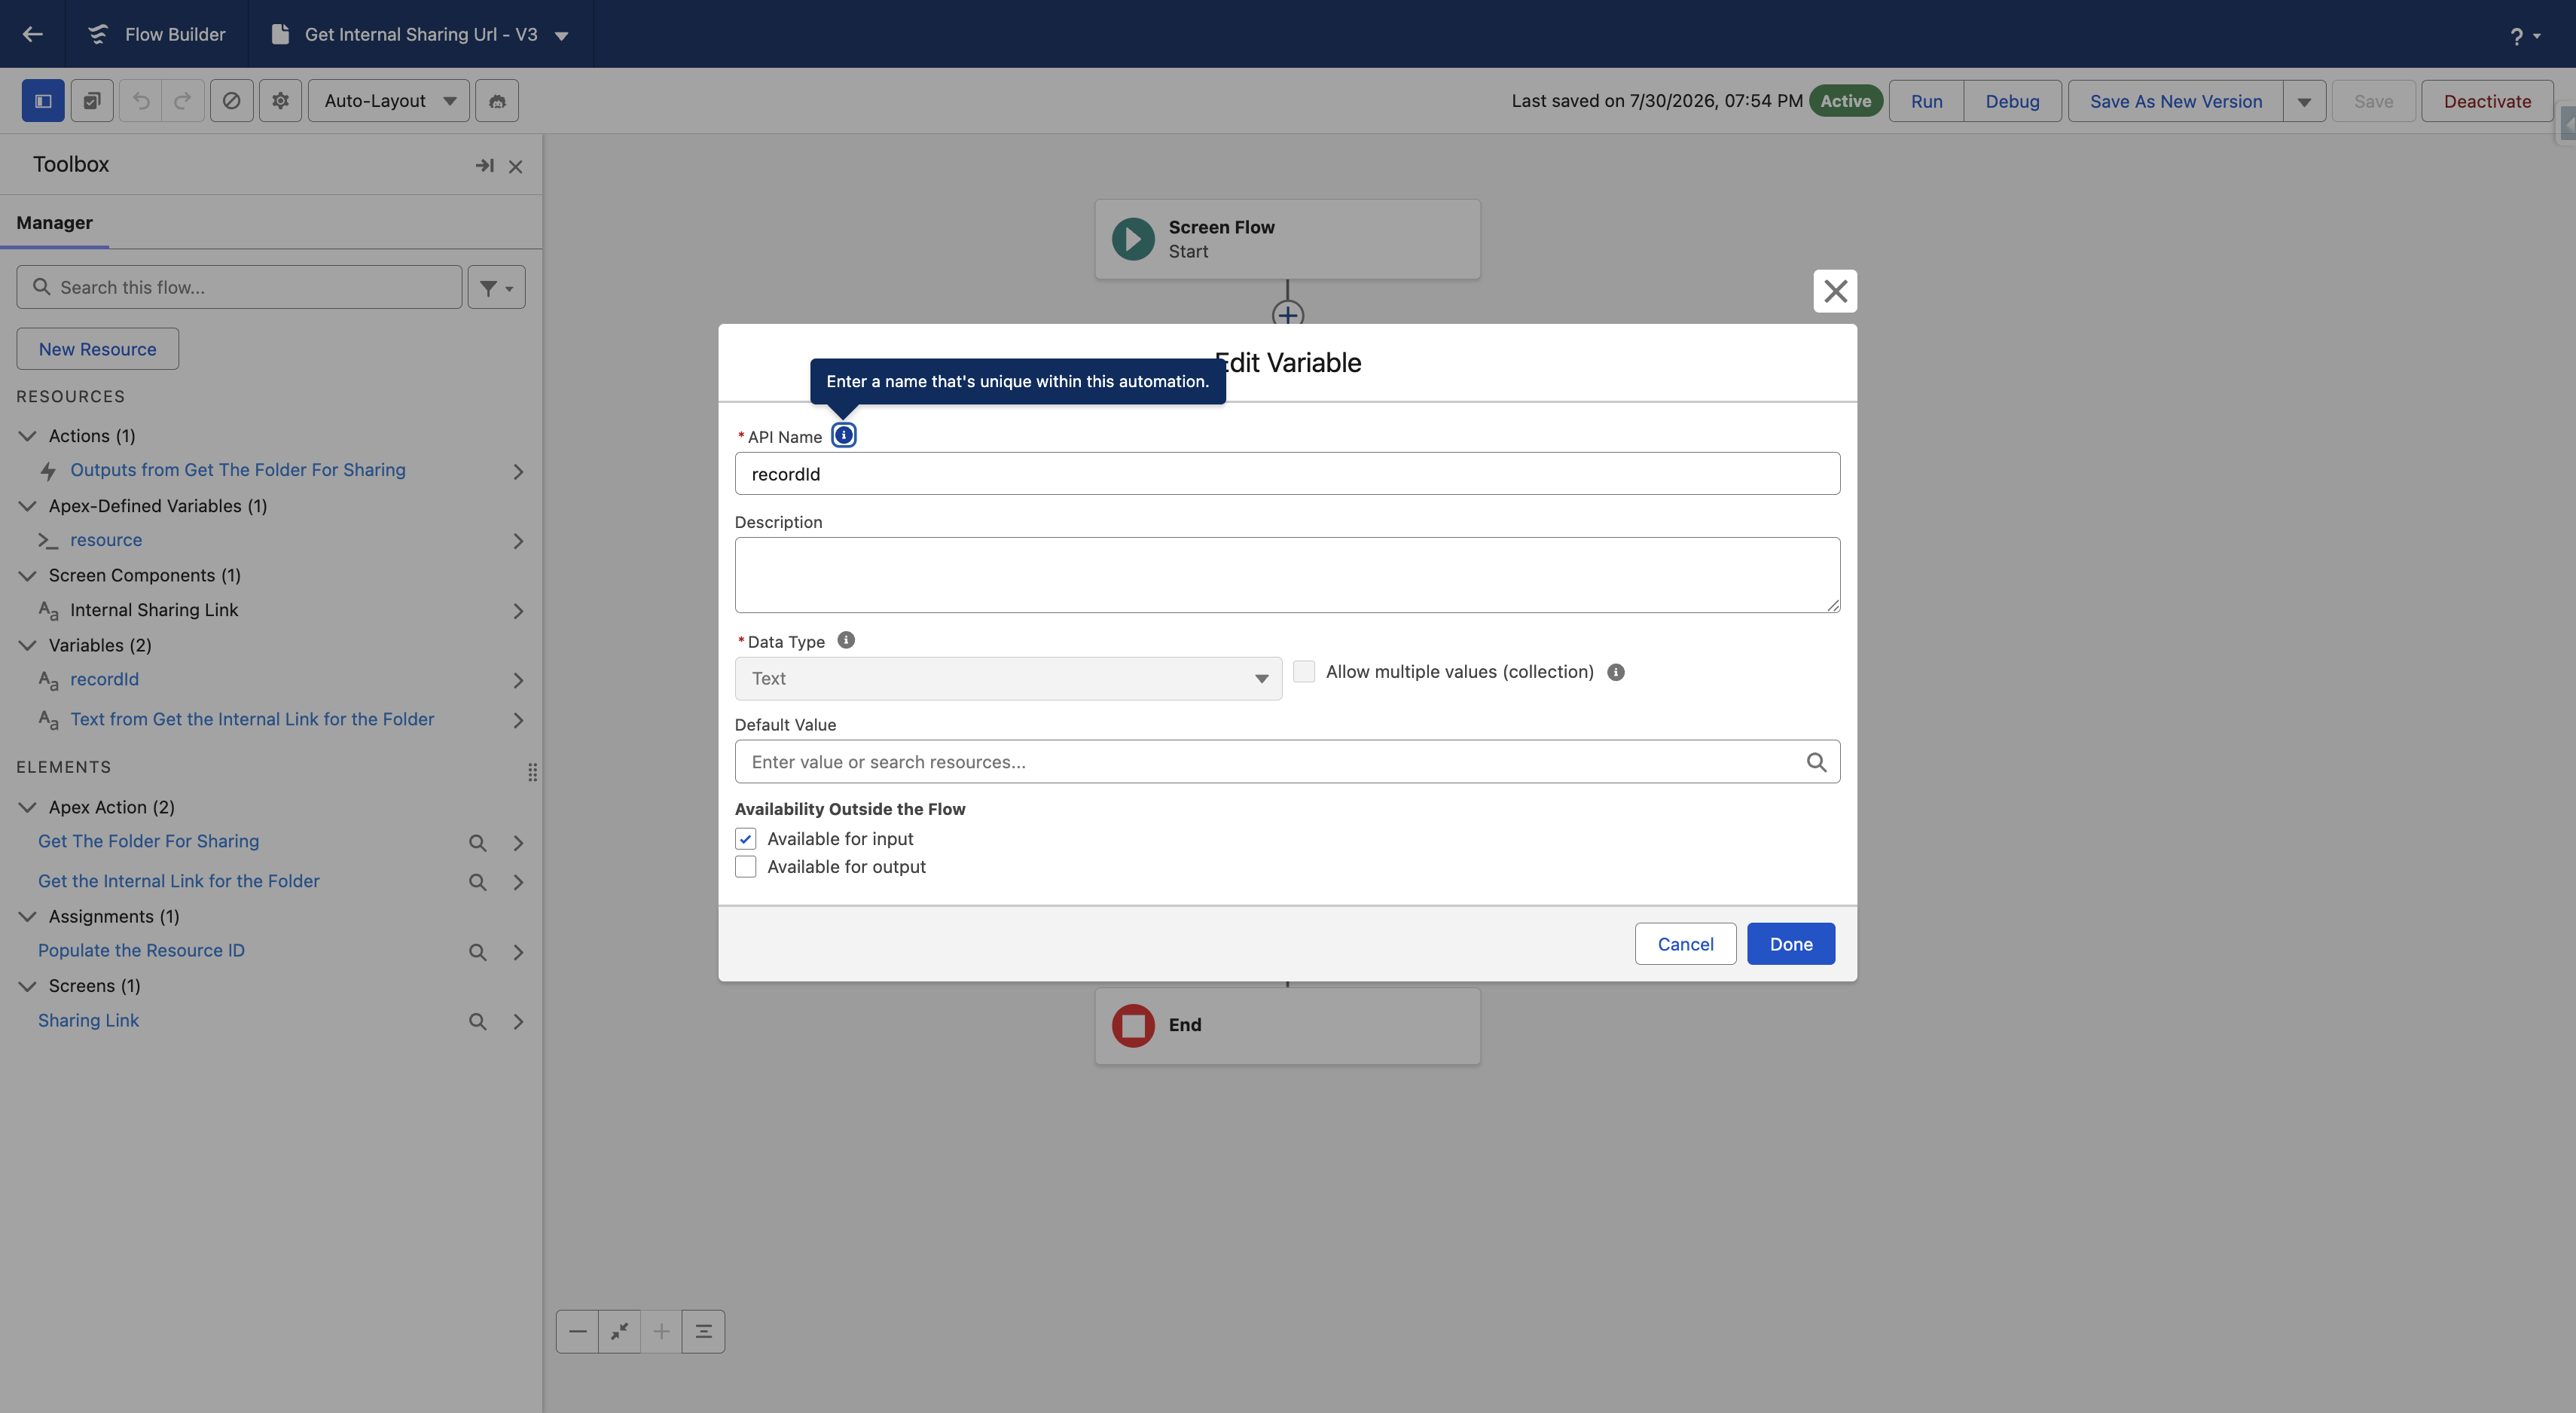
- recordId:
- Type - Variable
- Data Type - Text
- Allow Multiple Values (Collection) - False
- Available for Input - True
This is the key structural difference from a custom list action: resource is a single, non-collection variable (not a collection like resources), because a resource action only ever passes one selected item.
2. Get the External URL for the Folder
In this step, we'll add the apex action that fetches the resource's external URL — labeled Get the Internal Link for the Folder in this flow (feel free to name yours “Get the External URL for the Folder” instead). It uses the CloudFiles Get Resource Property flow action to fetch the selected resource's external URL (externalUrl), by passing the required input values.
Get Resource Property – Apex Action Configuration
Property Name
This is the API name of the property whose value you want to fetch. Since we want the resource's external URL, we use the standard property name externalUrl — this returns the cloud drive URL of the resource, i.e., its Google Drive (or SharePoint) sharing link.
The externalUrl property is only returned for Google Drive and SharePoint connected storage. It is not available for Azure Blob Storage or Amazon S3 storages, so this resource action won't return an external URL for files or folders stored there.
Resource
This is the file or folder whose property you want to fetch. In our case, we can dynamically pass in the resource selected by the user in the widget using {!resource} — this is the single item the user picked in the CloudFiles widget, passed straight into the flow.
Type (Optional)
We can skip this field. It's only needed if you want to explicitly specify the resource's type; since we're passing the resource variable directly, CloudFiles already knows what it's working with.
Once these fields are filled in correctly, the action will fetch the resource's external URL and make it available as a text output — named after the action's label, Text from Get the Internal Link for the Folder — ready to be displayed to the user in the next step.
3. Display the Link on Screen
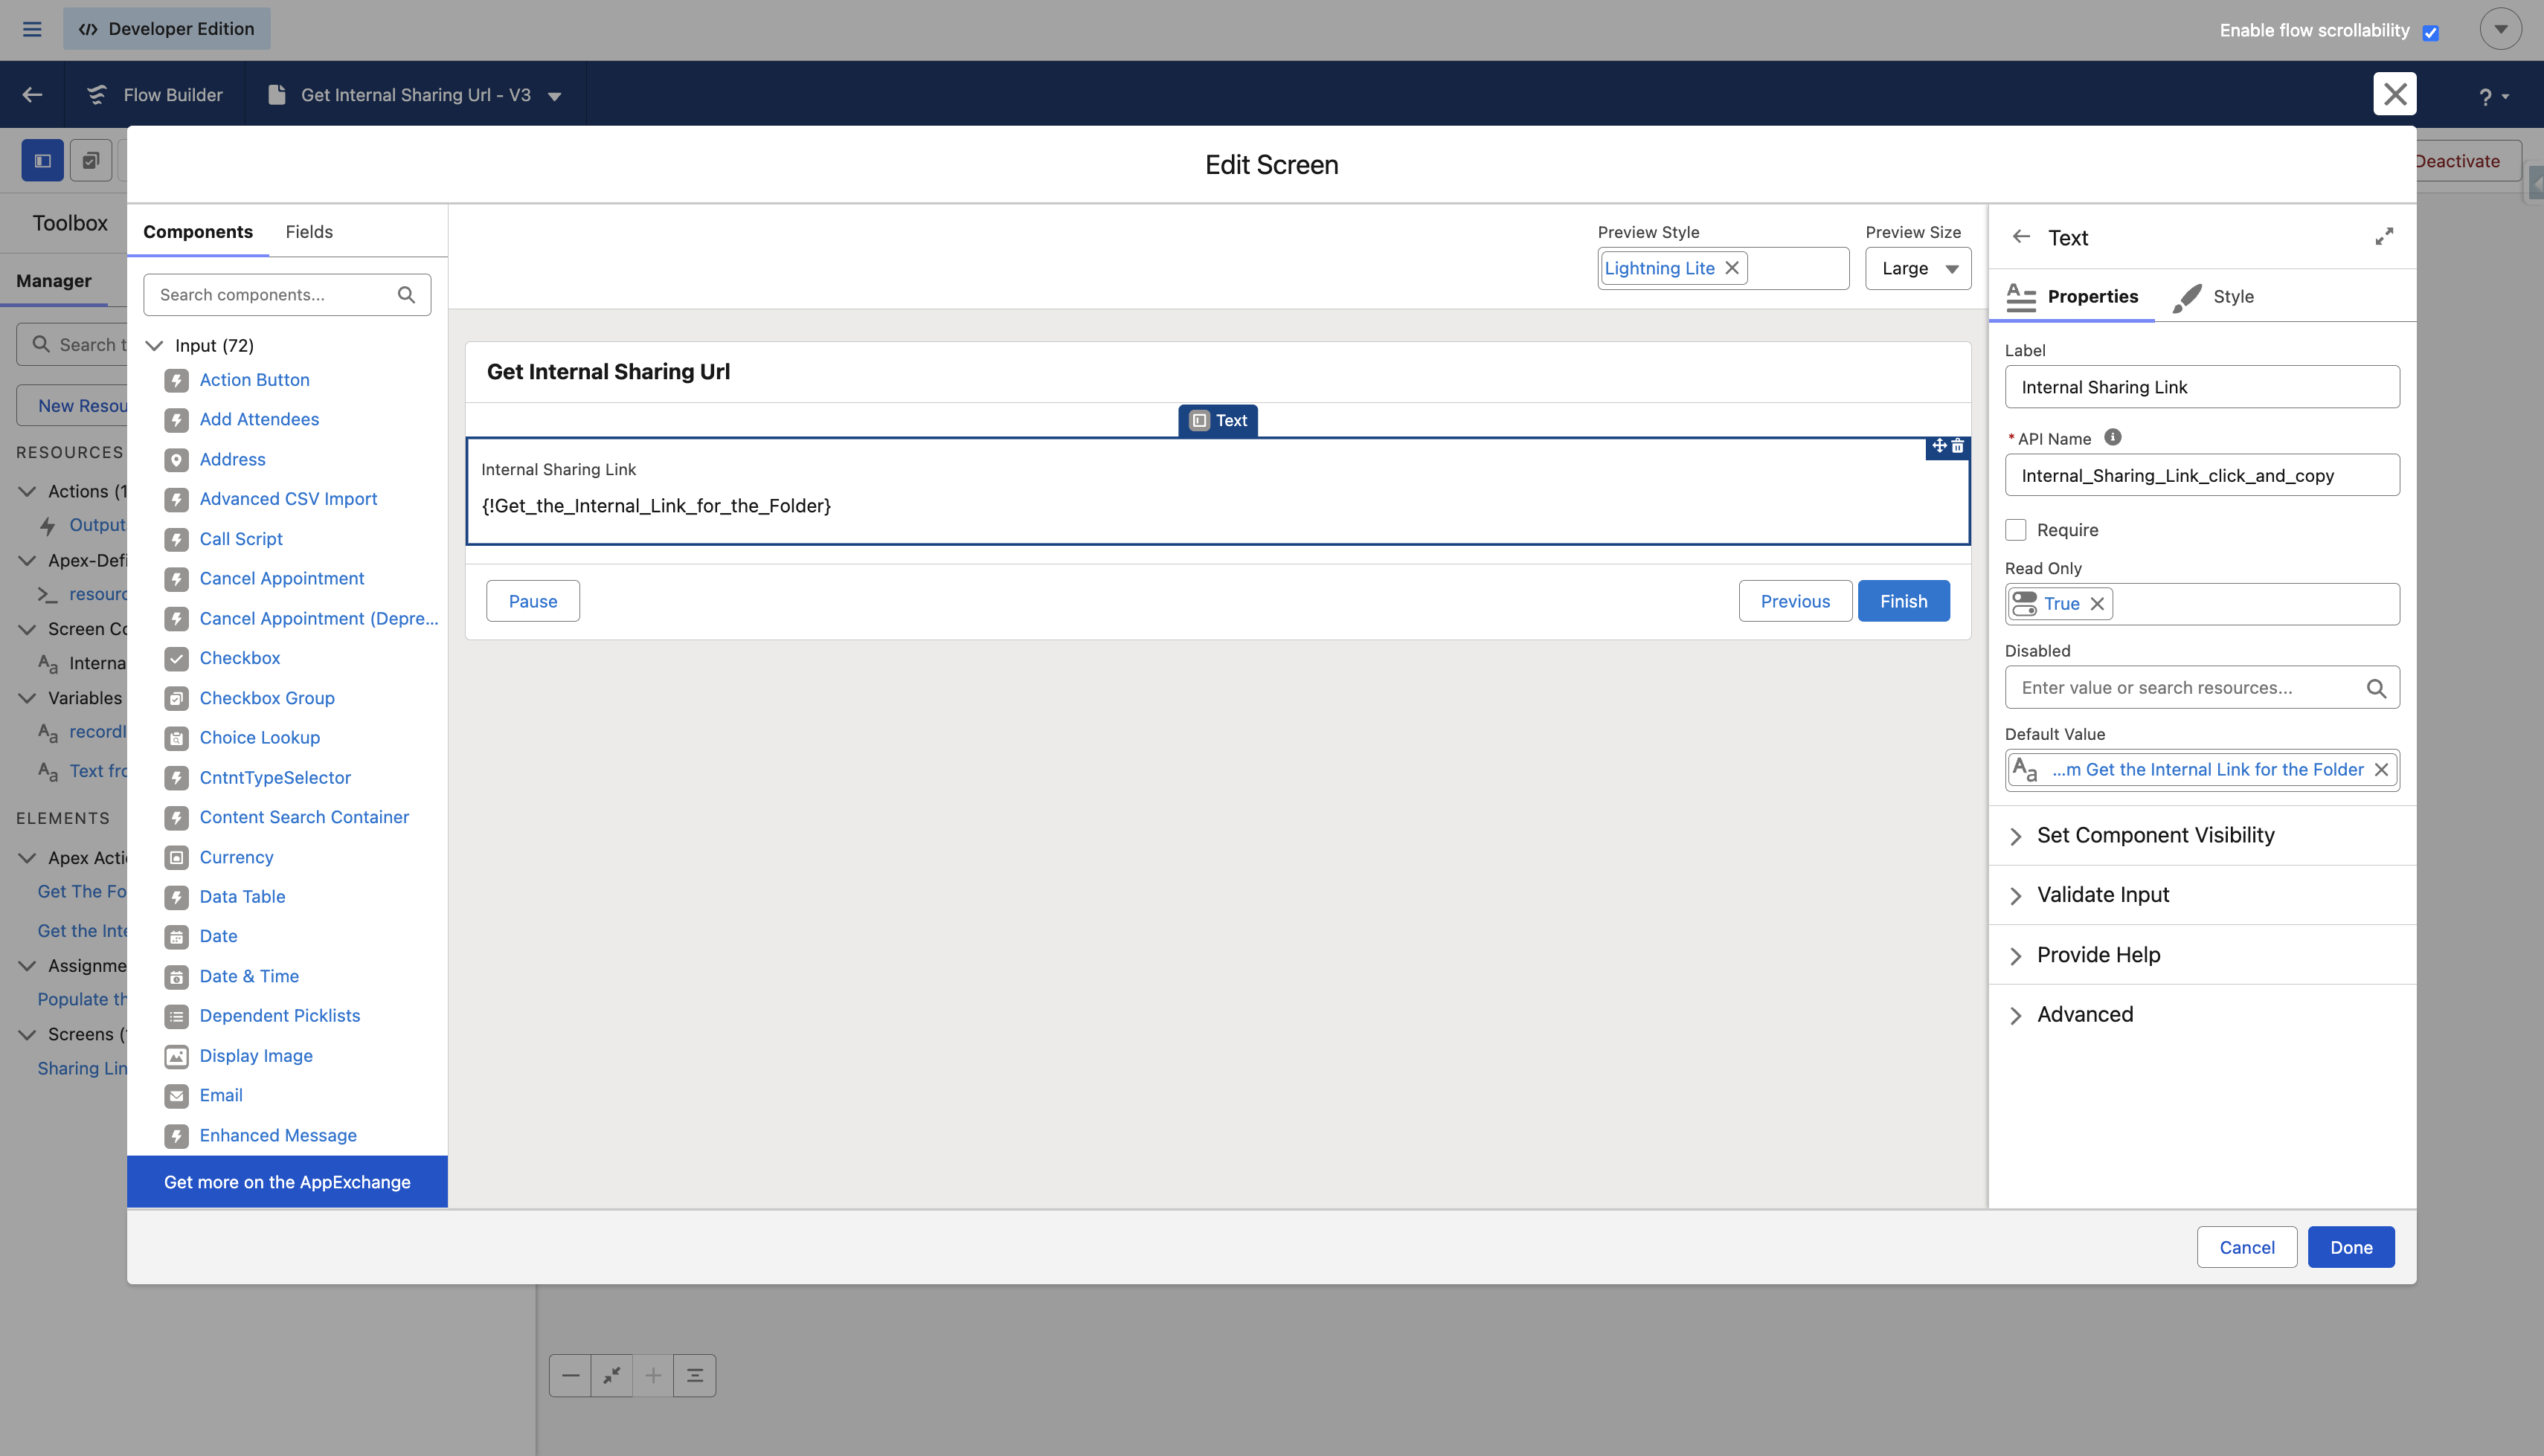
Add a Screen element called Sharing Link. On this screen, add a Display Text (or similar) component labeled Internal Sharing Link, and set its value to the output from the previous step:
{!Get_the_Internal_Link_for_the_Folder}This surfaces the sharing URL directly inside the widget's flow screen, so users can copy it and send it to a colleague via chat or email — without ever needing to open Google Drive themselves.
4. Save and Activate the Flow
Once you've finished configuring all elements, save your flow and then activate it. After activation, the flow can be triggered directly from the custom resource action button in the CloudFiles widget. This button was configured earlier in the CloudFiles widget configuration, and its configuration ID was added to the record page in Edit mode.
When a user selects a single file or folder and clicks this button, the flow will run and display that item's external URL right there in the widget — ready to copy and share with a colleague.
Test It in Action
To verify that everything is working as expected, follow these steps:
- Create a New Account Once the Account is created, the folder structure will be automatically generated by the pre-configured flow responsible for Account folder creation.
- Upload Files to the Account Folder Using the CloudFiles widget on the Account record page, upload some test files and folders into the newly created Account folder.
- Select a file or folder you'd like to share the link for.
- Click the custom resource action button (Internal Sharing Link) you configured earlier.
- Verify the link appears — a screen will pop up showing the file or folder's external URL (its Google Drive sharing link).
- Copy the link and paste it into an email or Teams message, then confirm it opens the correct file or folder directly in Google Drive for a colleague who already has permission to access it.
Flow execution and folder lookups may take a few seconds. If you don't see the link appear right away, try refreshing the CloudFiles widget a couple of times.
Congratulations! You've successfully set up a custom resource action button in the CloudFiles widget, allowing users to grab a file or folder's external URL directly from Salesforce. You've also configured the supporting screen flow to handle the lookup — fetching the external URL for exactly the resource selected in the widget, and surfacing it on screen — saving your users a full context switch every time they need to share a file with a colleague. This setup keeps sharing quick and consistent, without exposing any files publicly or requiring anyone to leave Salesforce to go find a link.