Before you start, confirm your org has a completed CloudFiles connection for Document AI, and that you hold the CloudFiles Standard User or CloudFiles Admin User permission set — either grants the Document AI tab, and there's no separate permission for Workflows, so anyone who can open Document AI can create, publish, run, and approve or reject a workflow.
Create the Workflow
- Open the CloudFiles app, click the Document AI tab, and choose Workflows from the left navigation.
- Click New workflow. This creates an empty workflow and drops you directly into the builder — a canvas on the left for your settings and step list, and an inspector on the right that appears once you select a step.
- Under Name, give the workflow a short, clear name — up to 80 characters, shown with a live counter. Leaving it blank shows Give this workflow a name and blocks both Publish and Test run later on.
- Optionally, fill in What this workflow does with a sentence or two (up to 400 characters) so teammates know what it's for. This field is for humans only and has no effect on how the workflow runs.
- Choose a Review policy. This controls whether the run stops for a person to approve before it writes to Salesforce, and how often.
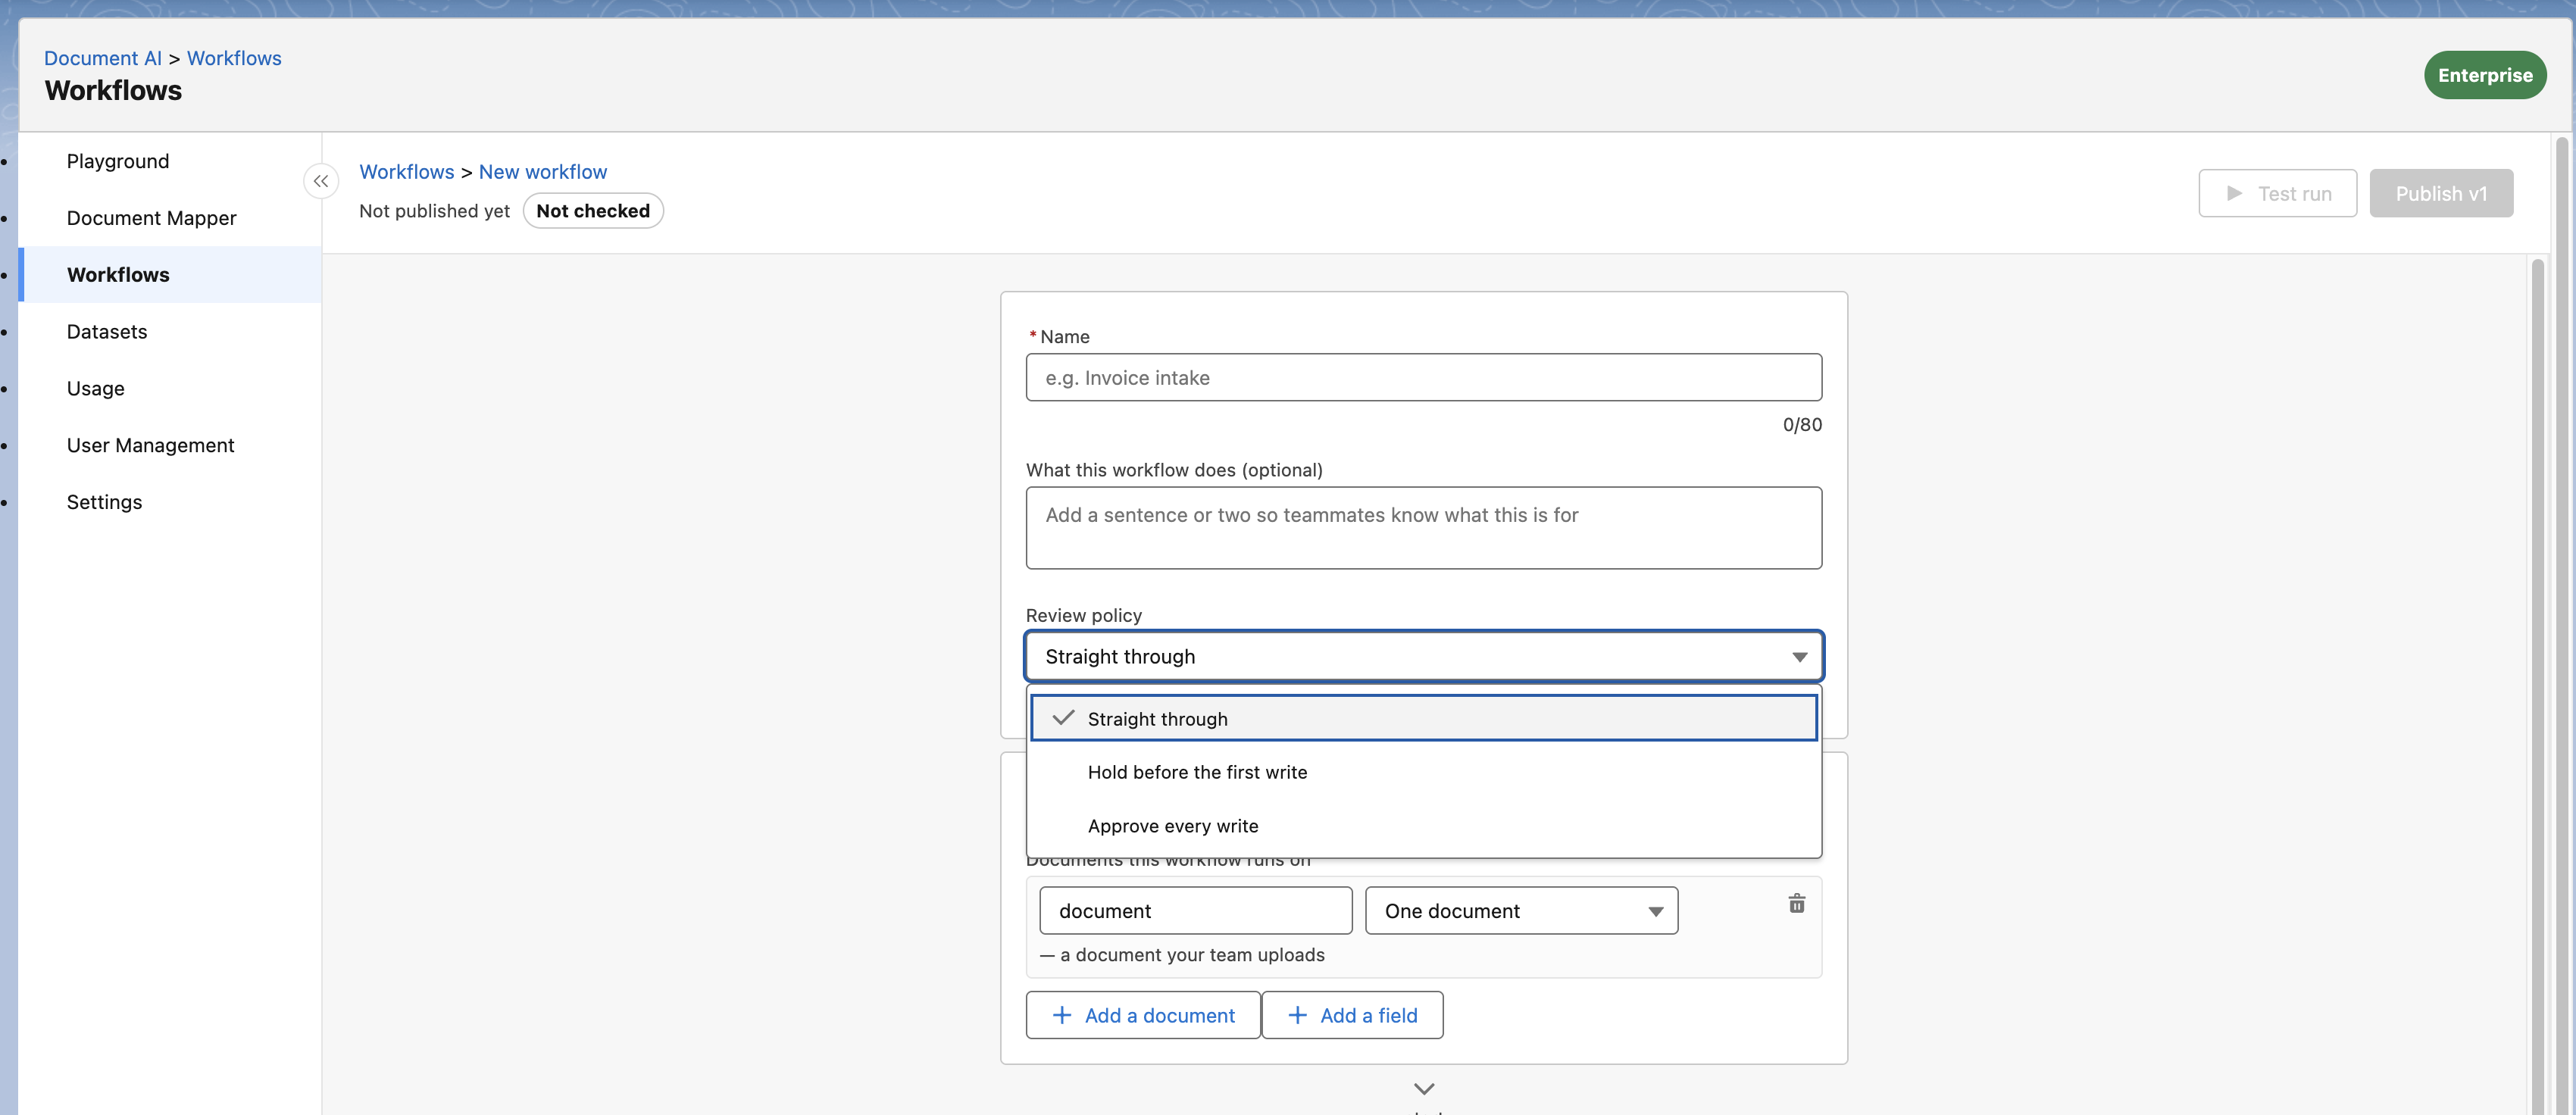
| Policy | What happens | When to use it |
|---|---|---|
| Straight through | Runs end to end with no human stop; every write fires automatically. This is the default for a new workflow. | A process you already trust — strict lookups, tolerant data, low blast radius if something's off. |
| Hold before the first write | Pauses before the first Salesforce write and waits for someone to approve. When looping over several items, it holds once per item — approving item 1 never releases item 2 onward unreviewed. | The common middle ground. |
| Approve every write | Pauses before every single Salesforce write, each approved or rejected individually. | High-value or hard-to-undo records, or building confidence in a new workflow. |
A short explanation of whichever option you've picked appears under the selector. You can also force a hold on one specific write later, using Require approval for this write on that step — see Salesforce. That setting can only add a hold; it can never remove one the policy already requires.
Everything you enter from here saves itself into a draft automatically — there's no Save button. Nothing runs a draft except Test run, so you're free to build without it going live by accident.
The Launch Form
The launch form is what your team fills in — or what a Flow supplies — to start a run, under the heading When this runs, it starts with. It's built from two kinds of input.
Documents this workflow runs on
Each row is one document slot.
- Click to add a slot.
- Give it a Document name — letters, digits, and underscores only; spaces and dots are stripped as you type. Left blank, slots auto-name themselves
document,document_2, and so on. This name is how later steps refer to it. - Choose How many: One document for a single file, or Several documents (a collection) for related files uploaded together — a collection is what you loop over with a For each step later. A collection slot holds 1–50 files.
- Repeat for each document the workflow needs to read. Use Remove document to delete a slot.
Inline validation catches a blank name (Name this document), an invalid character (Letters, digits, underscore — no spaces or dots), and a name already used by another slot or field.
A workflow doesn't have to read any documents. With zero slots declared, the card reads: "This workflow doesn't read any documents — it runs on the values below. Add a document only if a run needs one."
Extra values the run needs
Each row is one typed launch-form field.
- Click to add a field.
- Give it a Field name — same character rules as document names; auto-named
field_1,field_2if left blank. - Set its Type: Text, Number, Date, or Checkbox.
- Toggle Required / Optional. Required means the run cannot start without it. A checkbox is always optional, since it defaults to unchecked.
- Optionally set a Label shown at launch — a friendlier name for the launch screen. Left blank, the field name is auto-formatted for display (
orderAmountbecomes Order amount).
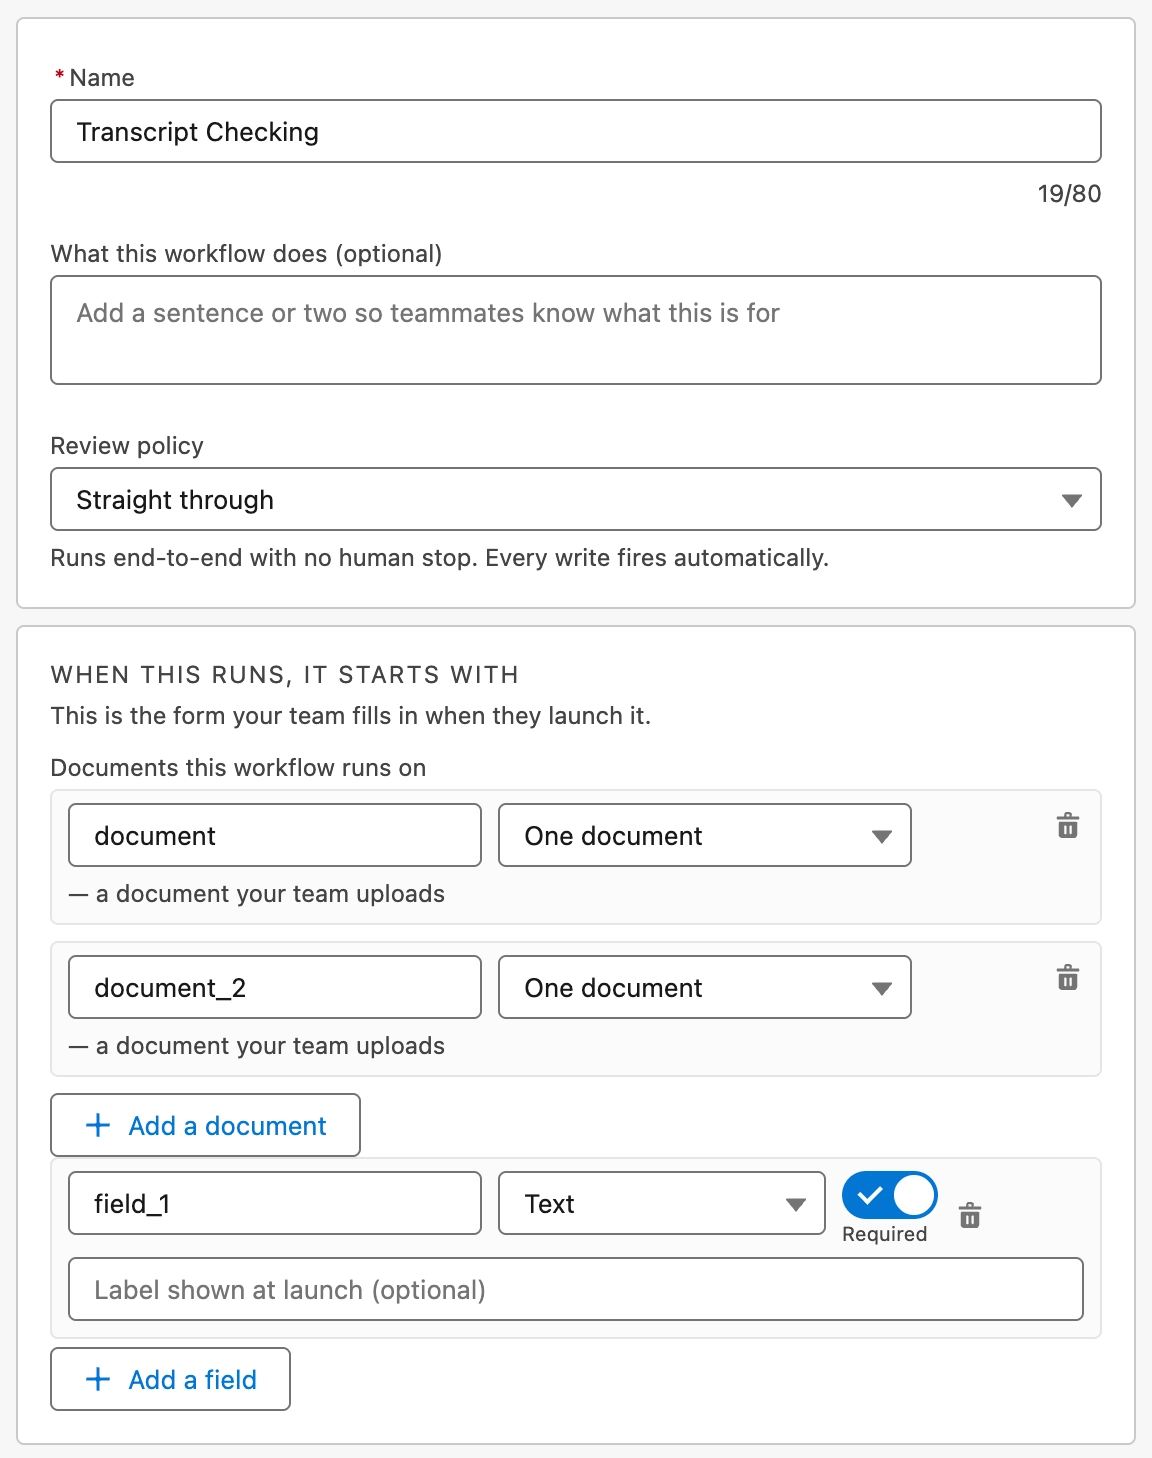
A typical document-review launch form is one slot plus one field: a document slot set to One document, and a Text field marked Required carrying the Id of the Salesforce record the document belongs to. The document is what the AI steps read; the field is what the first lookup step queries on, which is what ties the uploaded file to the record it's checked against.
If you delete a document slot or a field that a step still refers to, a red panel appears: Remove or repoint these before publishing:, listing each one — for example, "Find the account" still uses the removed field "vendor_name". Publish is blocked until you either restore the field or repoint the step that used it.
When a workflow is launched from a Salesforce record — for example, from a Flow — that record's Id is automatically available to every step as Record Id. You can't declare a field or document slot with that name yourself.
The Step Builder
With the launch form in place, add the steps that do the work.
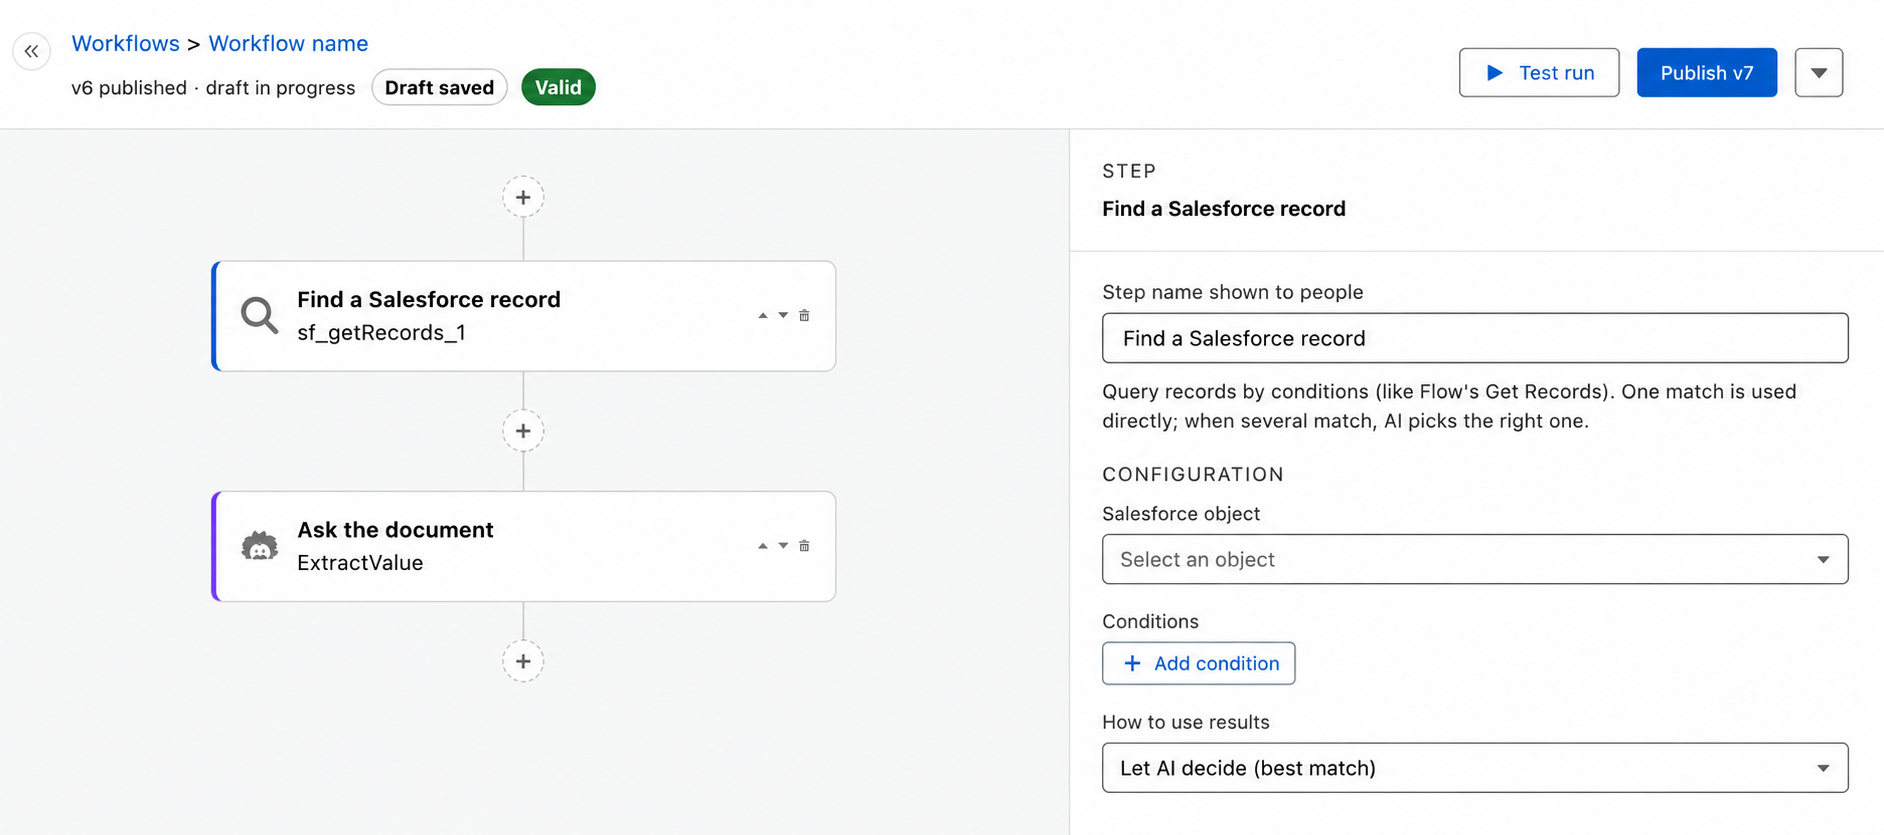
- With no steps yet, click Add the first step. With steps present, click Add step at the bottom to append one, or the bare + between any two existing steps to insert one there.
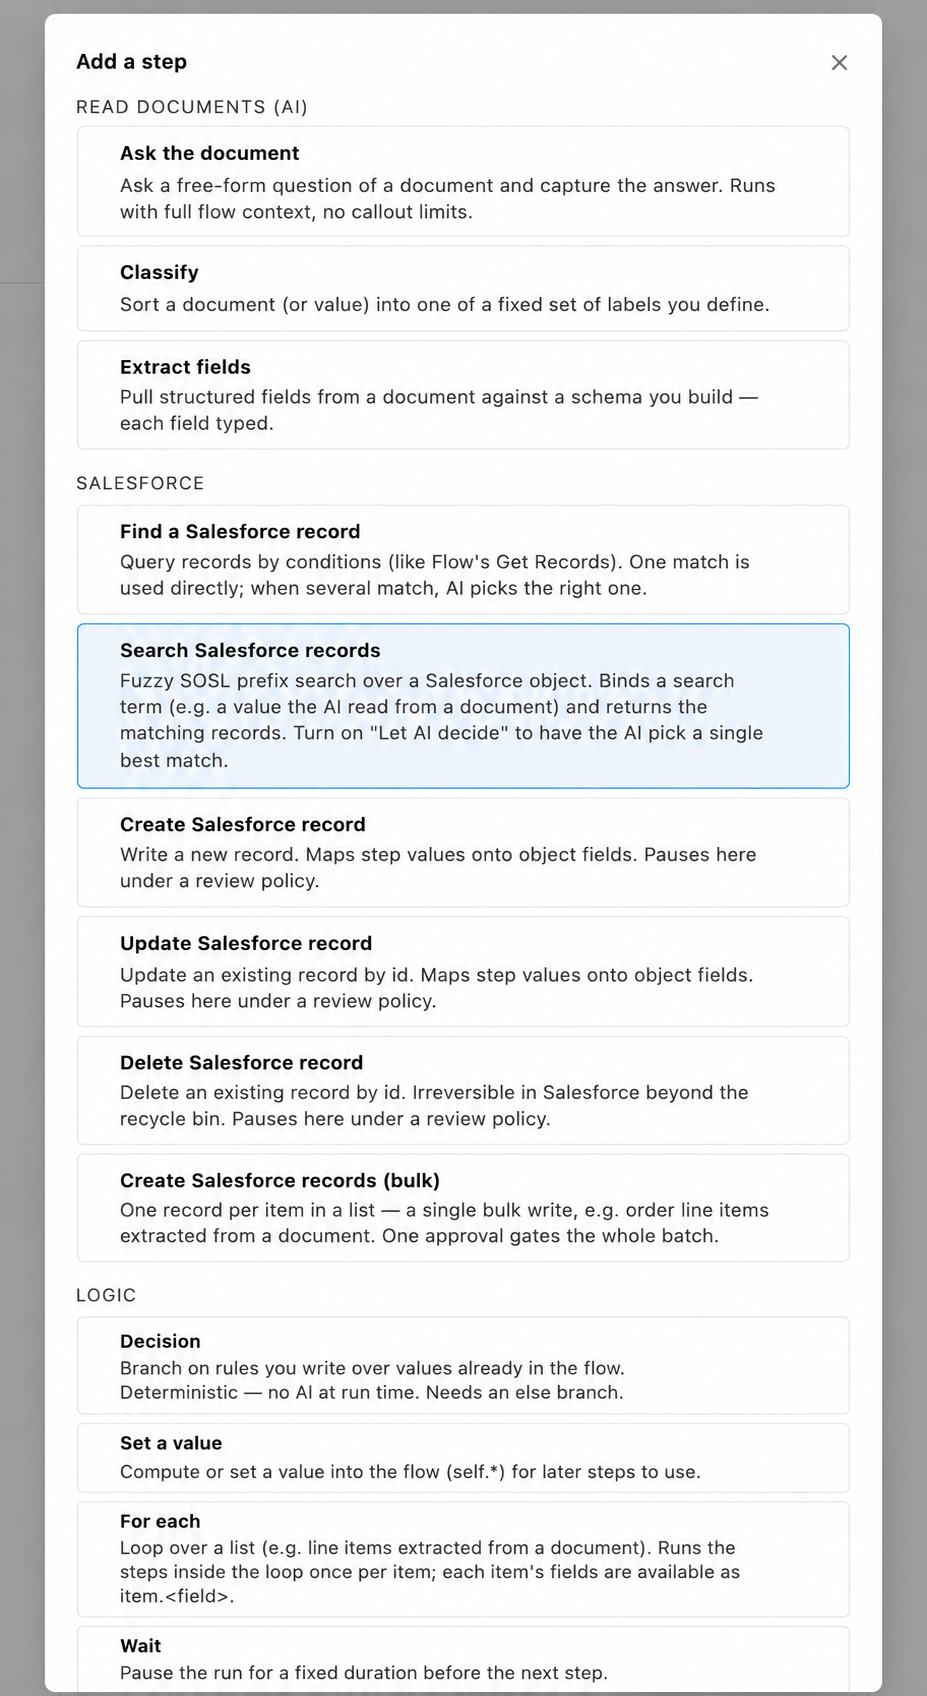
- In the Add a step picker, choose from three groups — Read documents (AI), Salesforce, and Logic. The Three Kinds of Step below summarizes what's in each.
- Select the new step's card to configure it in the inspector on the right.
Each card shows the step's display name and, underneath in monospace, its reference name — this is how other steps read its results. Cards also carry:
- Move up, Move down, and Delete step controls on the right.
- A colour bar by category: purple for AI steps, red for Salesforce writes, blue for Salesforce reads, grey for logic.
- A Requires approval badge if that step is set to hold for approval on its own.
- On a Decision step, its route chips — for example
branch_1 → sf_update_1andelse → End run.
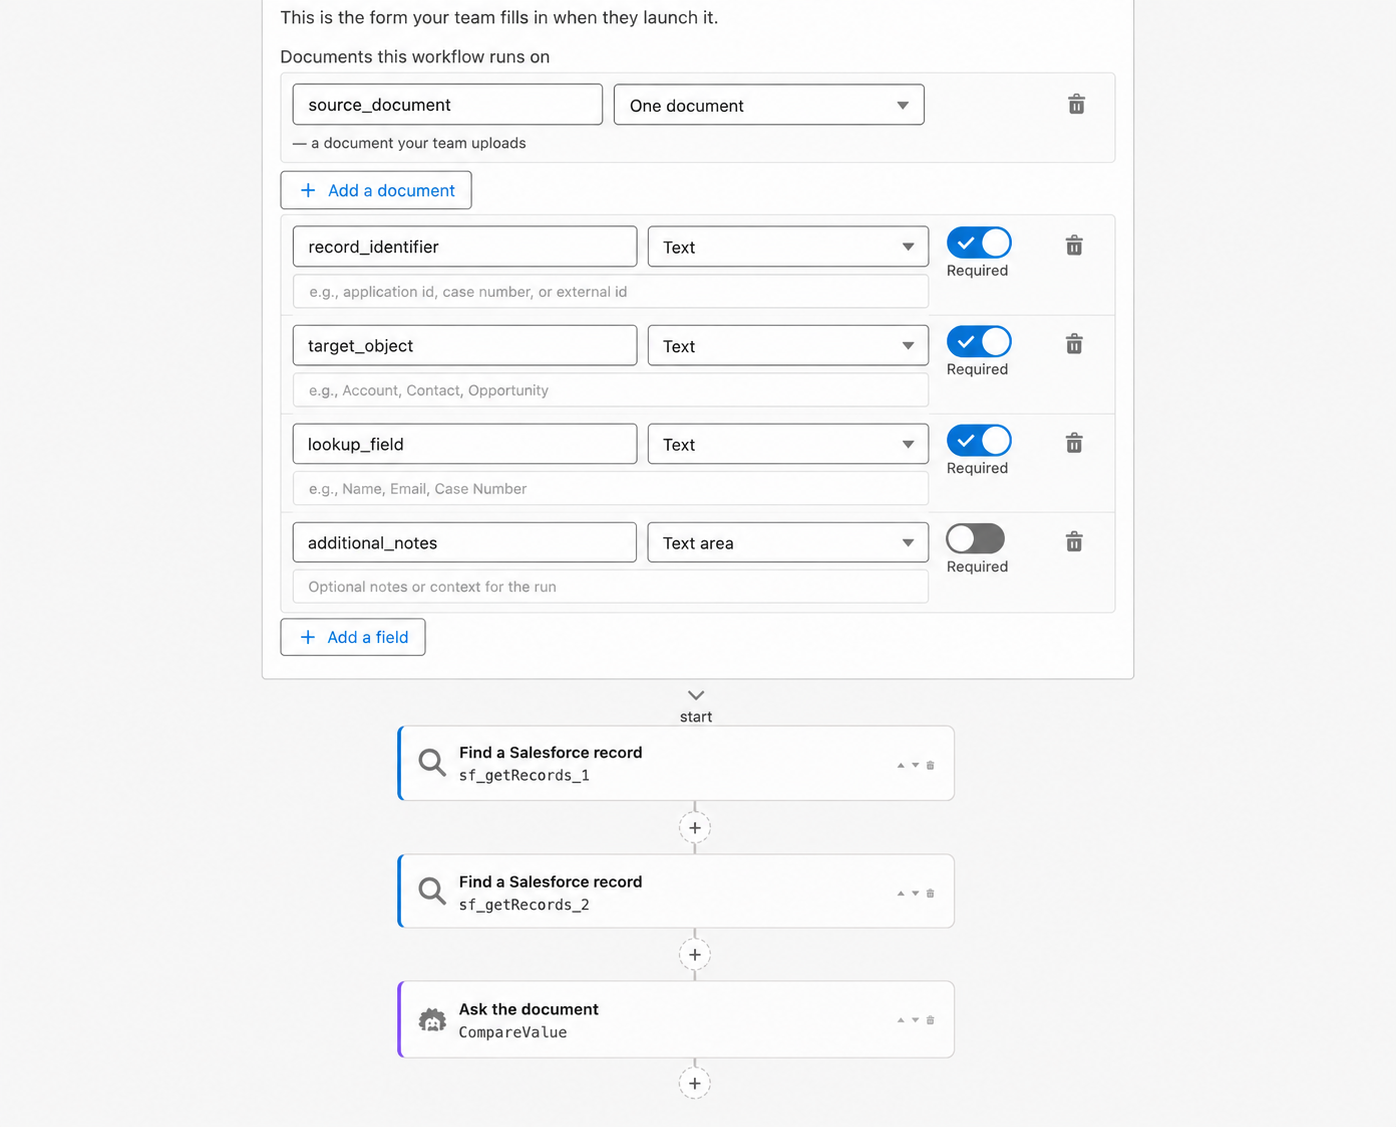
A step can only read values produced by steps above it, so the sequence on the canvas is also the sequence of dependencies. If a step needs a value nothing above it produces, the fix is usually to move the step that produces it higher — not to rewrite the step that needs it.
What every step's inspector has in common
- An eyebrow reading Step followed by the step's type name, plus a Writes to Salesforce badge where relevant.
- A Step name shown to people field, which relabels the card and its appearance in run history.
- A step-specific Configuration section — this is the part that differs, and it's what each companion article documents.
- An After this step choice: Continue to the next step, End the run, or, inside a loop, Next item (back to loop).
- The Values you can use here reference picker — see Wire Steps Together with References below.
- At the bottom, a red Fix before publishing panel listing anything wrong with that step.
Two settings recur across most steps:
- Value or ref — most fields accept either a fixed value or a reference to an earlier step's output. Insert references by clicking a chip in the reference picker rather than typing them.
- Documents in scope — every AI reading step lets you choose which document slots it reads. Leave everything unchecked to read every document in the run.
The Three Kinds of Step
The picker groups every step into three categories, and the grouping is how a workflow is built rather than just a menu: AI steps read the document, Salesforce steps read and write your records, and Logic steps decide and repeat.
Most document-review workflows chain all three in the same order — look up the record the document should match, compare the document against it with one AI step per check, decide the single outcome in a Decision step, then write that outcome back. Which is also why step order matters: each stage consumes what the stage above it produced.
Read documents (AI)
Three steps that look at an uploaded document and turn what's on the page into a value the rest of the workflow can use. All three take a Documents in scope setting, all three report a confidence score, and none of them touch Salesforce.
| Step | What it does |
|---|---|
| Ask the document | Asks a free-form question of a document and captures the answer. |
| Classify | Sorts a document into one of a fixed set of labels you define. |
| Extract fields | Pulls structured, typed fields from a document against a schema you build. |
Reach for Ask the document for a single fact or a verdict, Classify to route on a document's type, and Extract fields for a structured record — including a list of line items to loop over or bulk-create.
Full settings, and the pattern for comparing a document against a Salesforce record, are in Read documents (AI).
Salesforce
Seven steps: two that find records, four that change them, and one that hands the run over to a Flow of your own. Every write honours the workflow's review policy, with the option to force an extra hold on one specific step.
| Step | What it does |
|---|---|
| Find a Salesforce record | Queries records by conditions, like Flow's Get Records. |
| Search Salesforce records | Fuzzy prefix search over an object, tolerant of near-misses in a name. Optionally lets AI pick the best match. |
| Create Salesforce record | Writes a new record, mapping step values onto object fields. |
| Update Salesforce record | Updates an existing record by id. |
| Delete Salesforce record | Deletes an existing record by id. |
| Create Salesforce records (bulk) | One record per item in a list, as a single bulk write. One approval covers the batch. |
| Run a Salesforce Flow | Invokes an active autolaunched Flow in your org, binding a value into each of its input variables and handing its output variables to later steps. |
The setting that matters most on a lookup is Return fields: it decides which of the matched record's fields later steps can see at all, so it's effectively the list of things your workflow is able to check.
Full settings, the three matching strategies, and how to handle no match or several matches are in Salesforce.
Logic
Four steps that shape the run itself: which path it takes, what it remembers, and how many times it repeats.
| Step | What it does |
|---|---|
| Decision | Branches on rules you write over values already in the run. No AI at run time. |
| Set a value | Computes or sets a value in the run for later steps to use. |
| For each | Loops over a list, running the steps inside it once per item. |
| Wait | Pauses the run for a fixed duration. |
Decision is the one nearly every workflow needs — it's how separate AI answers become a single outcome. Set a value is for accumulating or normalizing, especially across a loop. For each turns an extracted list into repeated work.
It fails at the start of the run. See Logic for the detail.
Full settings for all four are in Logic.
Wire Steps Together with References
Every step's inspector ends with the Values you can use here panel — everything the workflow produced before this step, and how you connect steps without hand-typing reference names.
- Click into the field you want to fill — it gets a highlighted border to show it's focused.
- Click a chip in the panel to insert its reference. With nothing focused, clicking a chip copies the reference to your clipboard instead.
- Use Filter values… to narrow a long list.
Chips are grouped in run order, each group header showing a count badge:
| Group | What's in it |
|---|---|
| Global values | Today, Now, True, False. Today and Now resolve when the step runs, in your org's time zone. |
| Trigger | Every launch-form field (as trigger.field_name), every document slot, and the Record Id the run was launched from, if any. |
| Variables | Anything a Set a value step wrote. |
| Loop item | Shown only inside a loop: the current item, its position in the list, and each of its fields. |
| One group per earlier step | Headed by that step's display name and reference name — for example Ask the document ai_query_1. Each row is the full dotted path you'd insert: ai_query_1.answer, ai_query_1.confidence, sf_getRecords_1.record.<FieldName>. An Extract fields step shows one row per field; a lookup shows one row per Return field you requested. |
Two chip tags matter: list (something you can loop over or feed into a bulk create) and confidence (a score between 0 and 1). A chip that can't be inserted where you've clicked explains why in place.
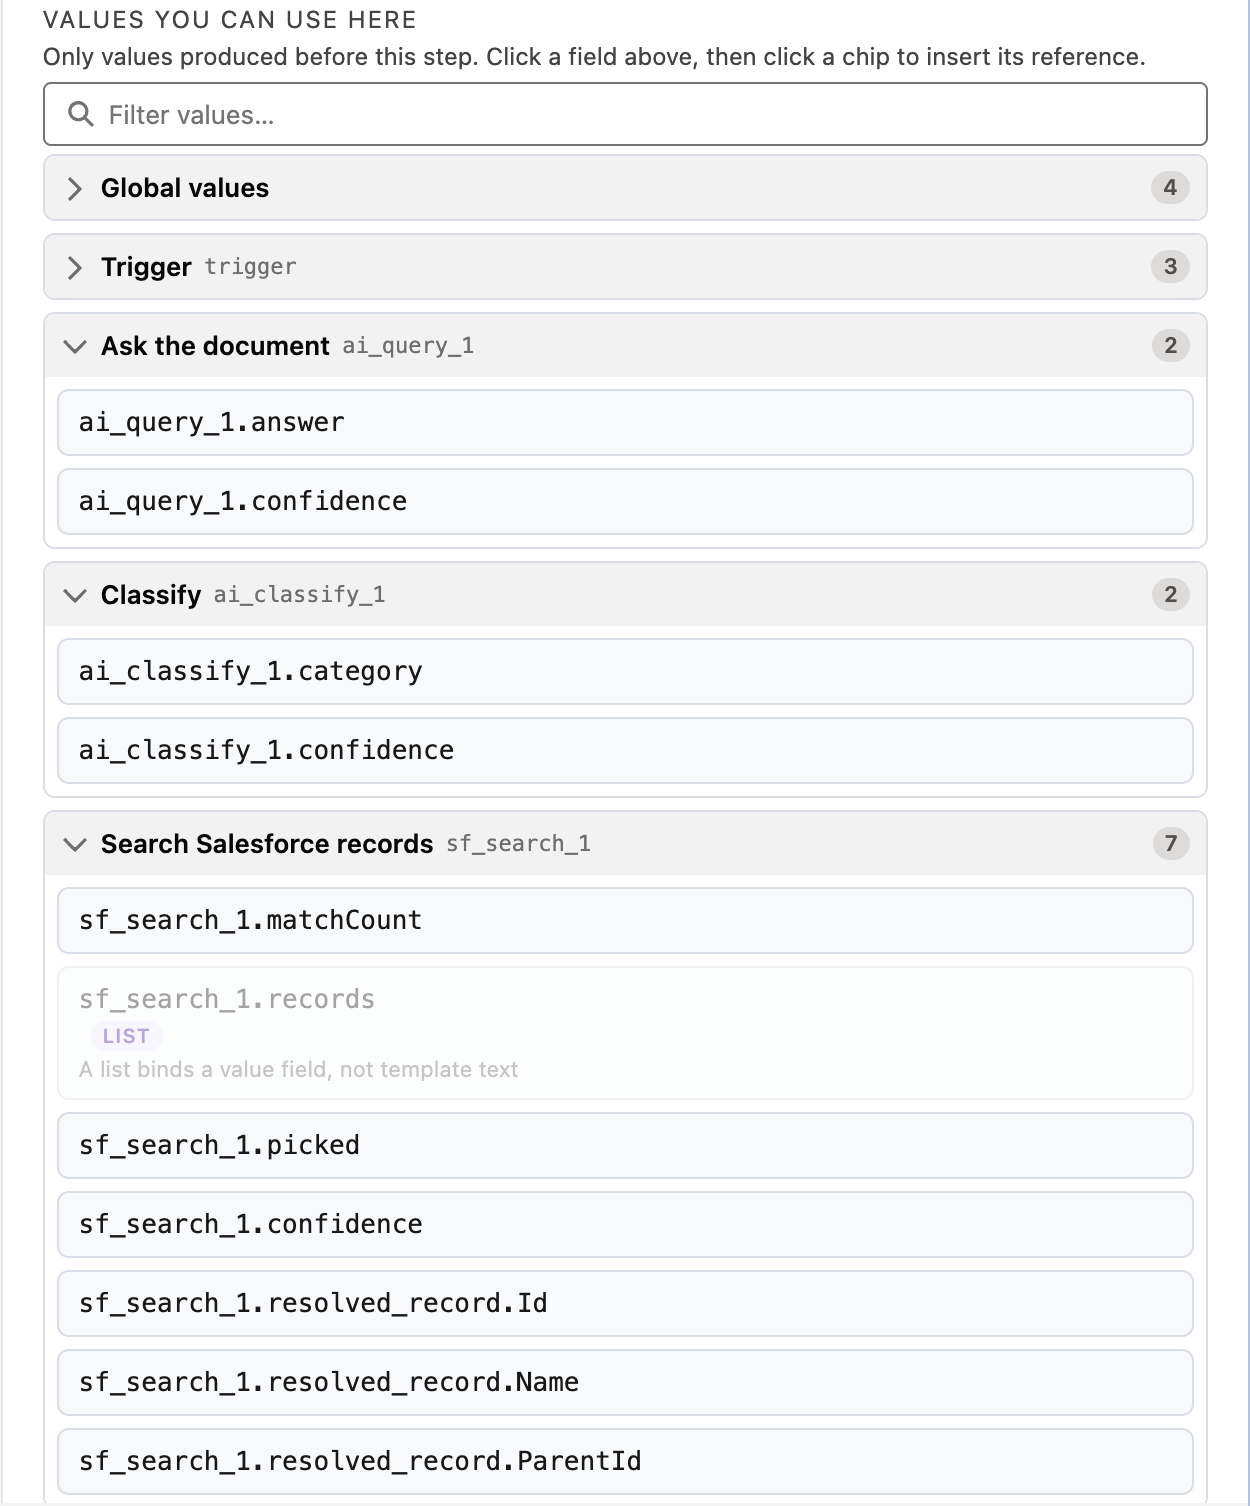
Because the panel only lists what's already been produced, it doubles as a check on your step order: if the chip you want isn't there, the step that produces it is below where you're standing.
A hand-typed reference with a typo is stored as literal text instead of a real reference. The step then looks for that literal text, finds nothing, and succeeds — indistinguishable from "there was genuinely no match."
Validating and Publishing
The workflow re-checks itself as you type, and the header's validation badge shows the result: Checking…, Valid, Has problems, or Not checked.
- If the badge reads Has problems, click it to open Problems to fix, which lists every issue in plain text at once.
- Work through each item until the badge reads Valid.
Before a version can publish, the workflow needs:
- A name.
- A unique reference name on every step, with every route pointing at a real step.
- No step the run could never reach.
- Every Decision to have at least one branch and a no-match route.
- Every reference a step reads to be guaranteed to exist by the time that step runs, on every path that can reach it. A reference produced only on one Decision branch is rejected if a later step could be reached without taking that branch.
- Every document slot and field a step refers to to still exist.
- Every write step to have something to write, and every lookup to have something to look up.
Test the Workflow
- In the builder header, click Test run. If it's disabled, a tooltip explains why: Name the workflow first → Checking… → Fix the problems first → Save the draft first.
- Provide the documents and values the launch form asks for, exactly as you would for a real run.
- Click Start run and step through the result.
A test run shows the run resolving one step at a time — what each lookup returned, what each AI step answered, which branch matched, and which write fired. When an outcome is wrong, that history is what tells you which step to fix.
It reads real documents, it writes real records to Salesforce, and the review gate fires exactly as it will in production. It is labelled Test run · draft of v1 everywhere it appears, but it is not a simulation. If you do not want records created, point the workflow at a sandbox or a throwaway record first.
A handful of deeper configuration checks run only when a run first starts, so a workflow can publish and then fail at the very start of its first run with workflow definition failed run-start validation. A Test run before you publish catches this, because it puts the draft through the same run-start checks.
Publish the Workflow
Once the validation badge reads Valid, click Publish — the button names the version it will create, for example Publish v2. If the draft is identical to what's live, it reads No changes since v1 and is disabled.
The published version is frozen from that point on: publishing v2 never changes v1, and a run already in progress finishes on the version it started on. Publishing consumes the draft — editing again starts a fresh draft on top of the published version, and the workflow list shows an Edited badge until you publish again. Every Flow that calls this workflow automatically picks up the newest published version.
Your next publish is refused with Someone else edited this workflow. Your edits aren't lost, but they aren't sitting on top of the newest version — reopen the workflow, re-apply your changes, then publish.
To review or roll back to an earlier version:
- Click More actions → History to see every published version, newest first, with its publish date and run count.
- Click View on any row to open a read-only summary of that version and its full step list.
- Click Restore as draft to copy that version into your current draft to edit and republish. Restoring doesn't itself change what's live.
To discard unpublished work, click More actions → Discard draft. On a workflow that's already published, this reverts to the published version. On a workflow that's never been published, this removes the workflow entirely.
There is no Activate, Deactivate, Clone, or Delete on a published workflow — publishing a new version is how a change goes live, and discarding a draft is the only destructive action.
Next steps
- Read documents (AI) — Ask the document, Classify, Extract fields.
- Salesforce — finding and matching records, and the five write steps.
- Logic — Decision, Set a value, For each, Wait.