This tutorial adds a permission layer on top of the flow: each template is registered as a Salesforce record, optionally tagged with a Custom Permission, and the flow filters the list against the running user's permissions before the screen is ever rendered.
What to Expect
By the end of this tutorial you will know how to:
- Register your CloudFiles DocGen templates in Salesforce so a flow can read them.
- Gate an individual template behind a Custom Permission.
- Grant that permission to a specific group of users with a Permission Set.
- Show only the permitted templates in a screen flow, and generate the selected documents onto the record.
Tutorial Video
Refer to the video below for a visual walkthrough of this tutorial. Read on if you prefer the written steps.
Video will be added soon
Prerequisites
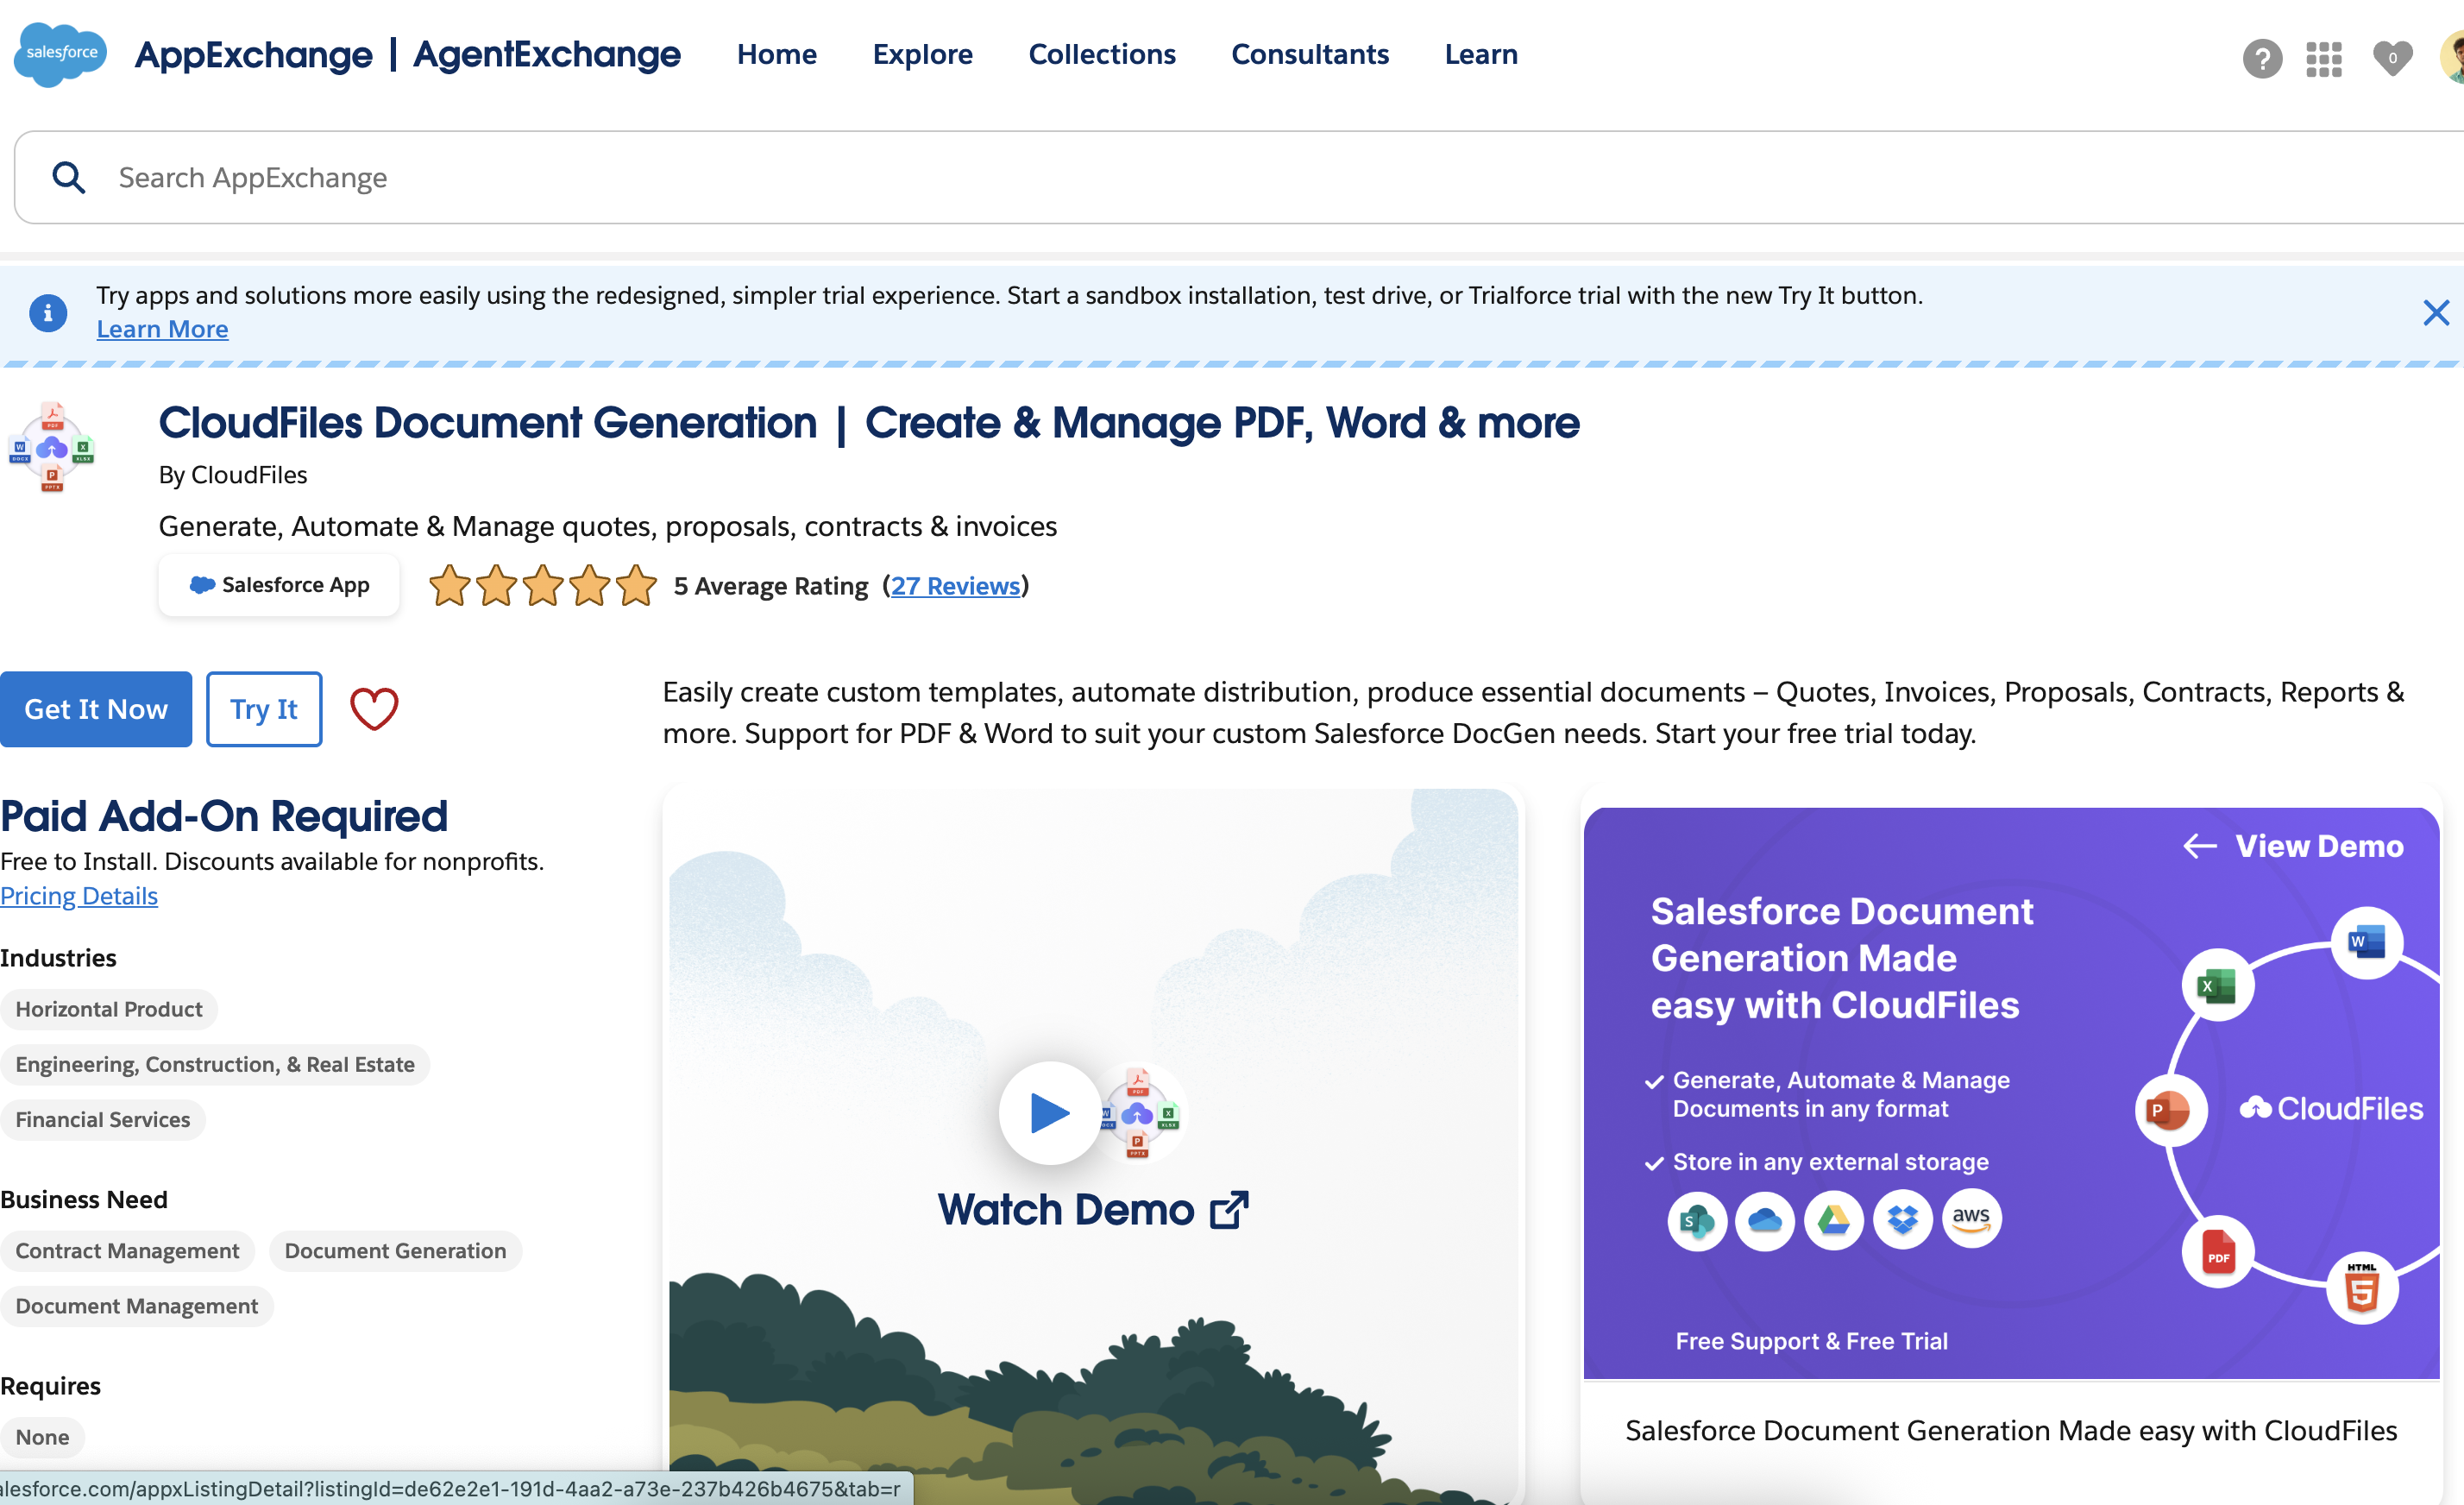
Install CloudFiles in Salesforce
CloudFiles is available on the Salesforce AppExchange and can be installed using the standard app installation process. Check out Installation and Configuration guides to set up your account and user access.
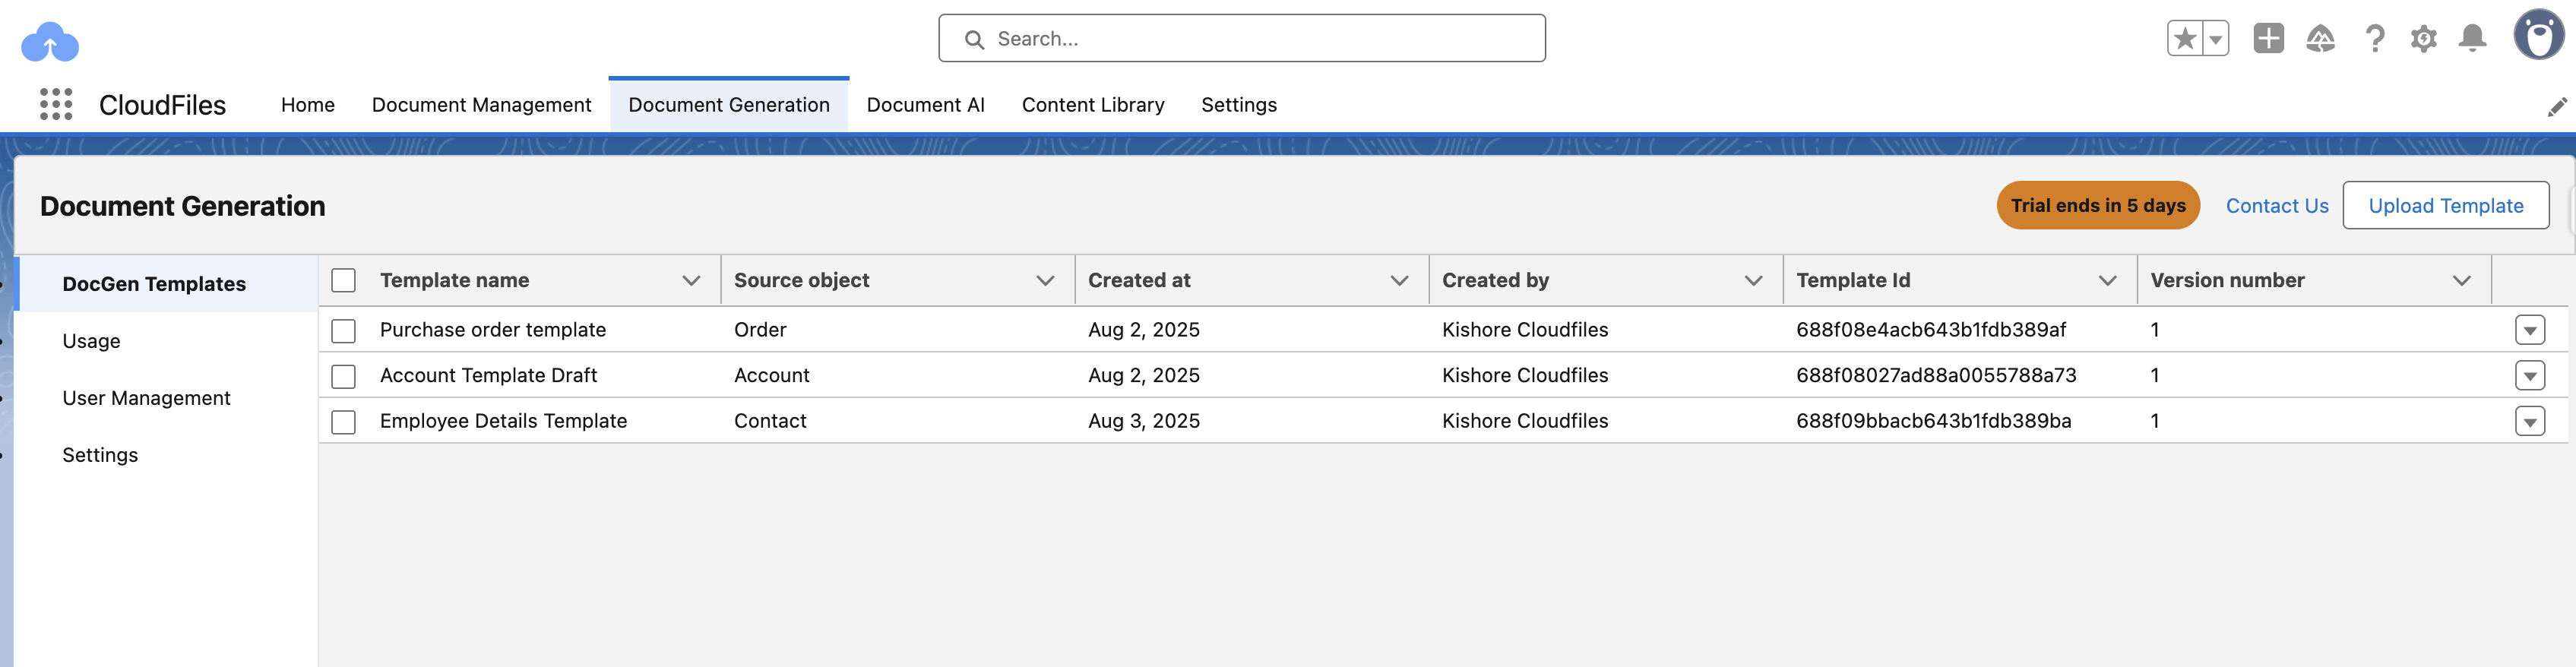
Doc-Gen Templates
Ensure that at least two published templates for the same object are listed under the Document Generation tab → DocGen Templates — this tutorial needs two so it can demonstrate hiding one template behind permissions while showing the other. Locate the Template Id for each template and note it down, as you’ll need it when registering templates in Step 5.
You should also be comfortable working with Salesforce Flow Builder, Custom Permissions, and Permission Sets, since this tutorial builds directly on all three, and have System Administrator (or equivalent) access to create custom objects, custom permissions, and permission sets in your org.
How the Permissioning Works
There are three moving parts, and it helps to understand them before you start clicking:
- A custom object called DocGen Template Access acts as a template registry. One record = one template. A text field on that record, Required Custom Permission, holds the API name of the permission a user must have to see it. Leave it blank and the template is public to everyone.
- A Custom Permission (in this example See Order Templates) is the switch itself. It carries no access on its own; it is just a flag that the flow can test.
- A Permission Set enables that custom permission and is assigned to the users who are allowed to see the restricted templates.
At runtime the flow reads all templates for the object, loops over them, and keeps a template only if it is public, or if the running user holds the permission the template asks for. Everything that fails the test is dropped before the screen is built, so a non-permissioned user does not get an error - the row simply is not there.
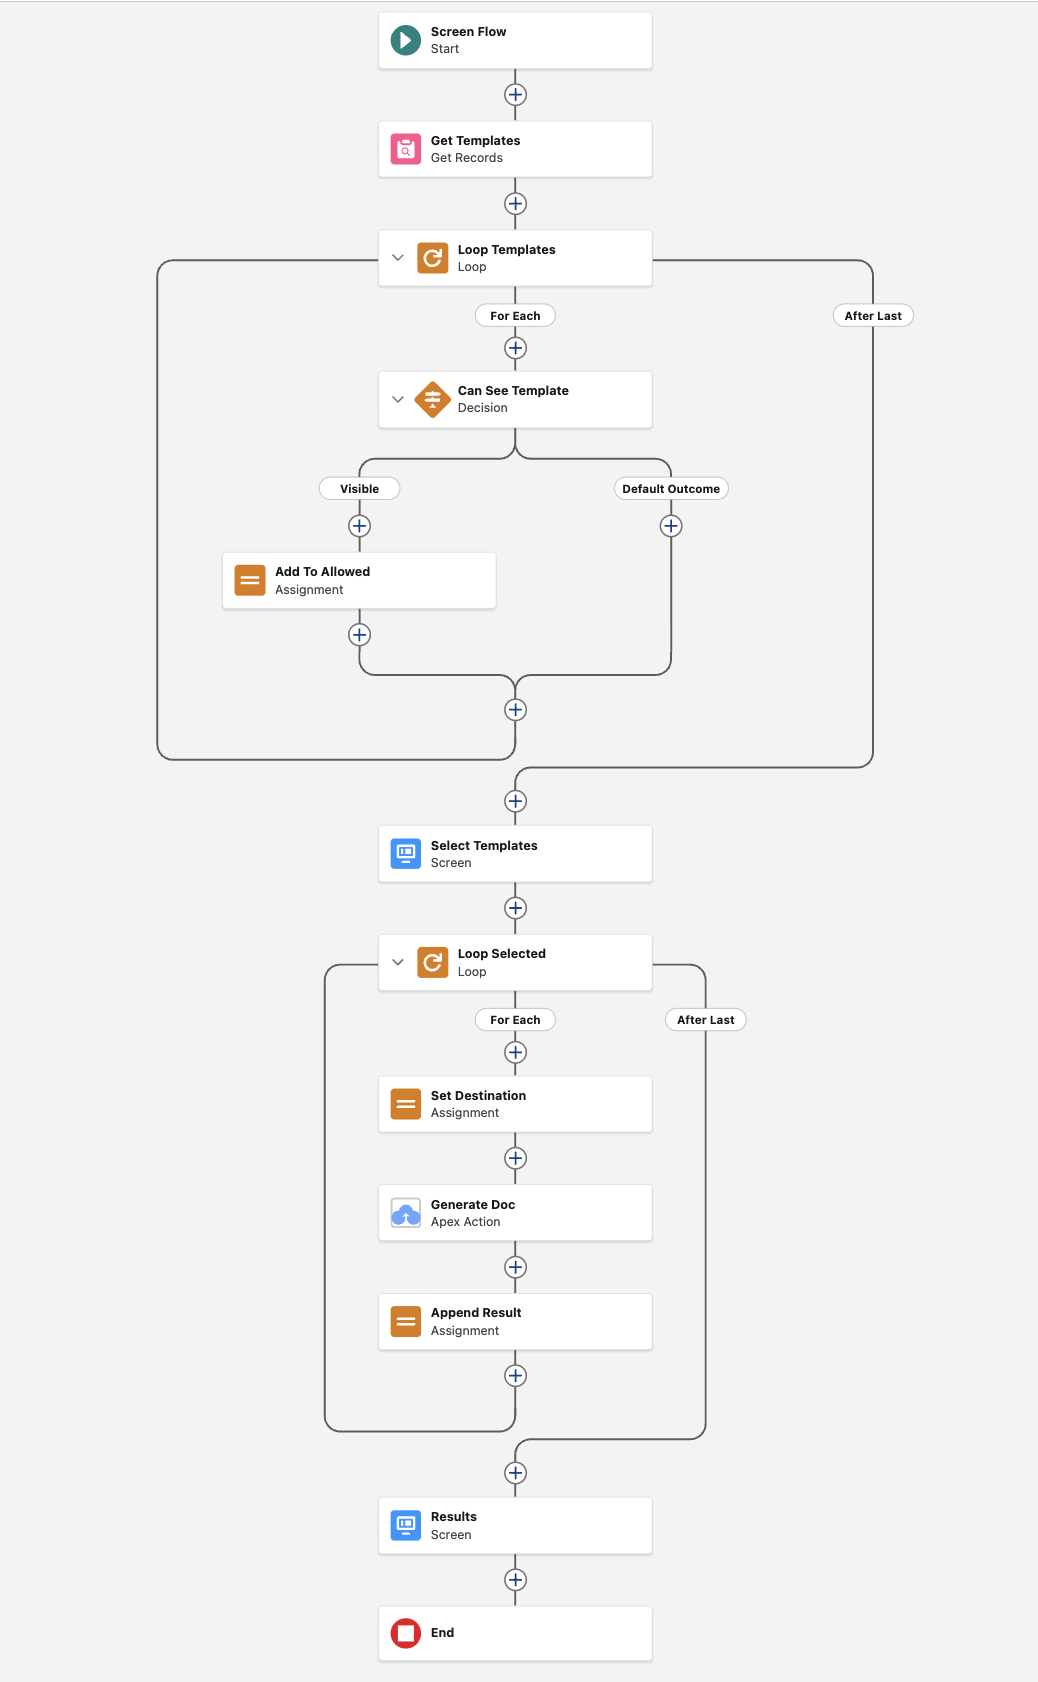
The permission gate is the Can See Template decision inside the first loop, and the generation logic for each selected template runs right after it. You will see the complete flow diagrammed as you build it in Step 6 - Build the Screen Flow below.
Step 1 - Create the DocGen Template Access Custom Object
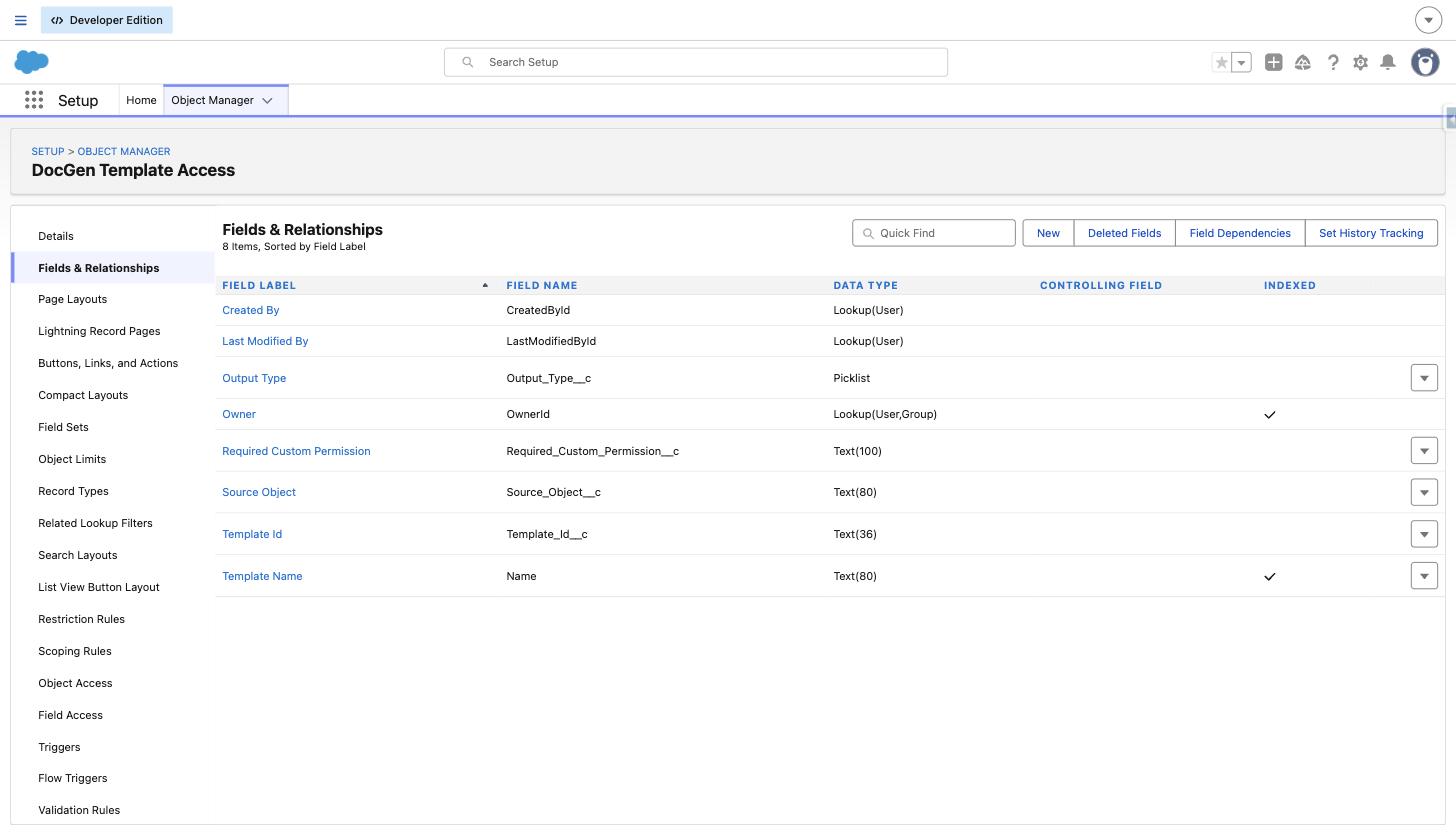
This object is the template registry the flow reads from. Go to Setup - Object Manager - Create - Custom Object and create an object with the label DocGen Template Access (API name DocGen_Template_Access__c). Keep the standard Name field but relabel it to Template Name, and allow reports so the registry can be audited later.
Then add the following custom fields:
- Template Name (Name, Text 80) - the friendly label the user sees in the flow's data table.
- Template Id (Template_Id__c, Text 36) - the CloudFiles template id that is passed into the Generate Document action.
- Source Object (Source_Object__c, Text 80) - which object the template belongs to, for example Order. The flow filters on this so a user is never offered an Account template on an Order.
- Output Type (Output_Type__c, Picklist) - pdf, docx, xlsx, pptx. This is passed to the action as the Document Type.
- Required Custom Permission (Required_Custom_Permission__c, Text 100) - the API name of the custom permission a user must hold to see this template. Leave it empty to make the template visible to everyone.
A custom object is used here rather than Custom Metadata Types on purpose. Records can be created and edited by an admin in the UI without a deployment, they can be reported on, and - most importantly for this tutorial - the registry itself can be secured with normal object and field permissions.
Step 2 - Configure the Page Layout
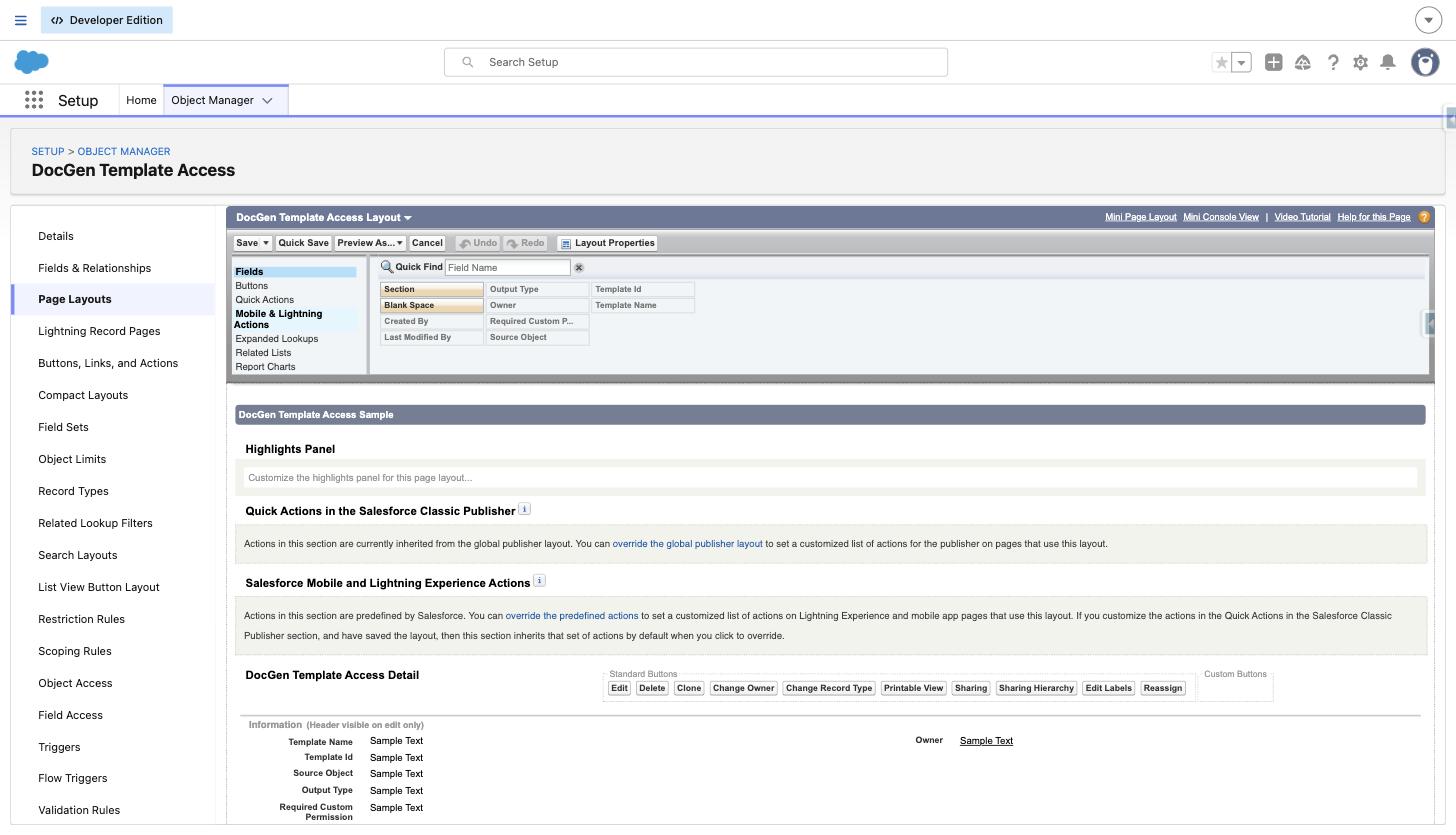
Whoever maintains the registry needs to see the permission field right next to the template id, otherwise it is very easy to add a restricted template and forget to tag it. Open Setup - Object Manager - DocGen Template Access - Page Layouts - DocGen Template Access Layout and drag all five fields into the Information section in this order: Template Name, Template Id, Source Object, Output Type, Required Custom Permission, with Owner on the right.
Step 3 - Create the Custom Permission
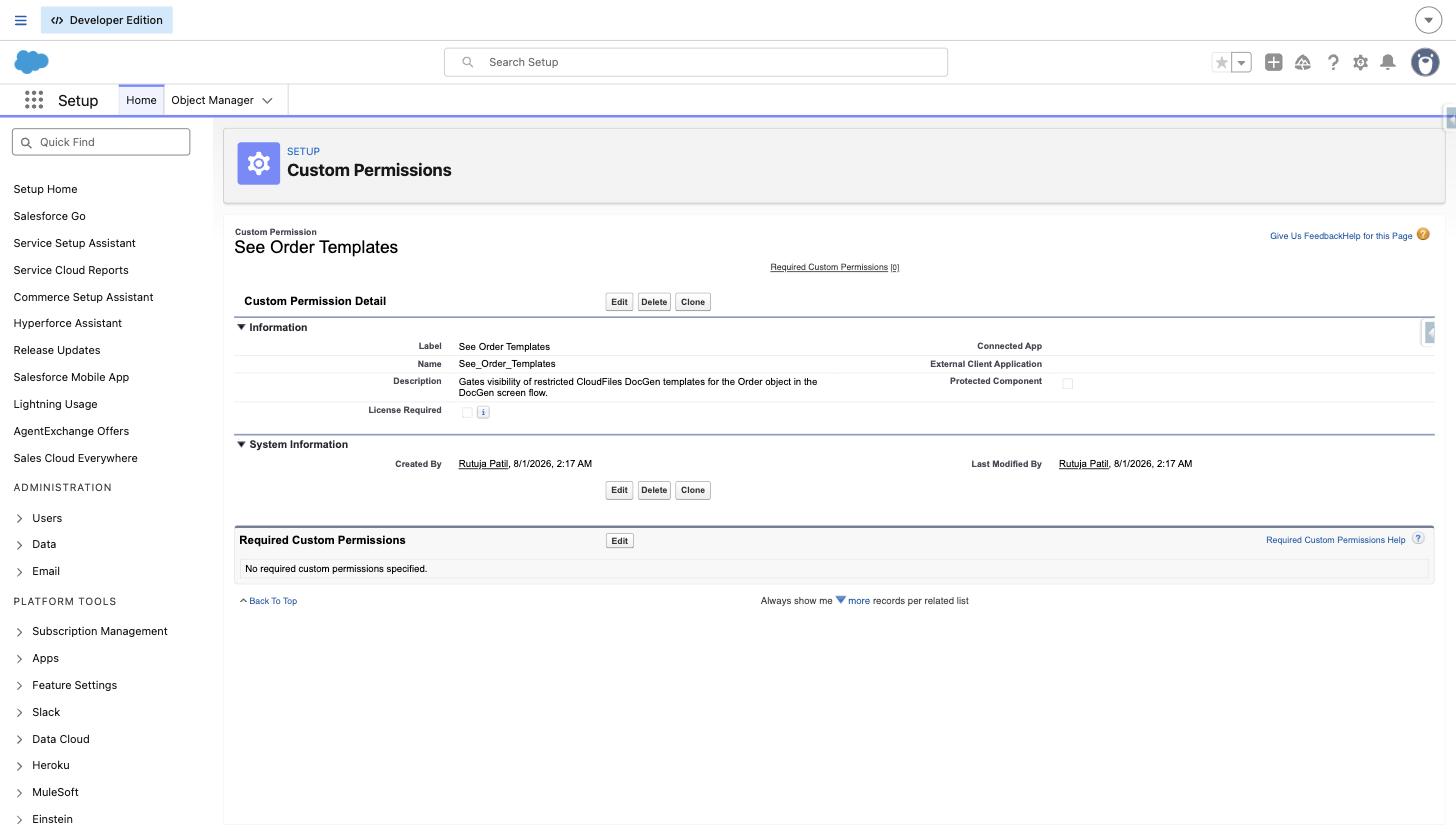
The custom permission is the switch the flow tests. Go to Setup - Custom Permissions - New and create:
- Label: See Order Templates
- Name: See_Order_Templates
- Description: Gates visibility of restricted CloudFiles DocGen templates for the Order object in the DocGen screen flow.
The Name is the value you will type into Required Custom Permission on a template record, and it is also the value the flow compares against. The two must match exactly, including underscores and capitalisation. Create one custom permission per group of templates you want to control - for example See_Order_Templates for order paperwork and See_Legal_Templates for legal riders.
Step 4 - Create the Permission Set and Assign It
A custom permission does nothing until it is granted. Go to Setup - Permission Sets - New and create a permission set, for example DocGen - Restricted Order Templates, with no license. Then:
- Open the permission set and choose Custom Permissions - Edit.
- Move See Order Templates from Available Custom Permissions to Enabled Custom Permissions and Save.
- Still inside the permission set, open Object Settings - DocGen Template Access and give Read access to the object and to all five fields. Without this the flow's Get Records returns nothing and every template disappears, permissioned or not.
- Go back to the permission set and choose Manage Assignments - Add Assignment, then tick only the users who are allowed to see the restricted templates.
Anyone you do not assign keeps working exactly as before; they just never see the restricted rows. This is the whole point of the design - visibility is controlled by assignment, not by editing the flow.
Step 5 - Register Your Templates
Create one DocGen Template Access record per template. Copy the Template Id from the CloudFiles app under Document Generation - DocGen Templates. A typical Order setup looks like this:
- Orders Template - Source Object Order, Output Type pdf, Required Custom Permission left blank. Everybody who can open an Order sees this one.
- Order Discount Addendum - Source Object Order, Output Type pdf, Required Custom Permission See_Order_Templates. Only users assigned the permission set see this one.
Leave Required Custom Permission blank whenever a template is safe for everyone. Filling it in is what makes a template private, so the default behaviour is always the permissive one.
Step 6 - Build the Screen Flow
Go to Setup - Flows - New Flow and choose Screen Flow. The example flow in this tutorial is called CloudFiles DocGen - Permissioned Templates.
Here is what the finished flow looks like end-to-end - refer back to this diagram as you build each element below:
6.1 Create the recordId Input Variable
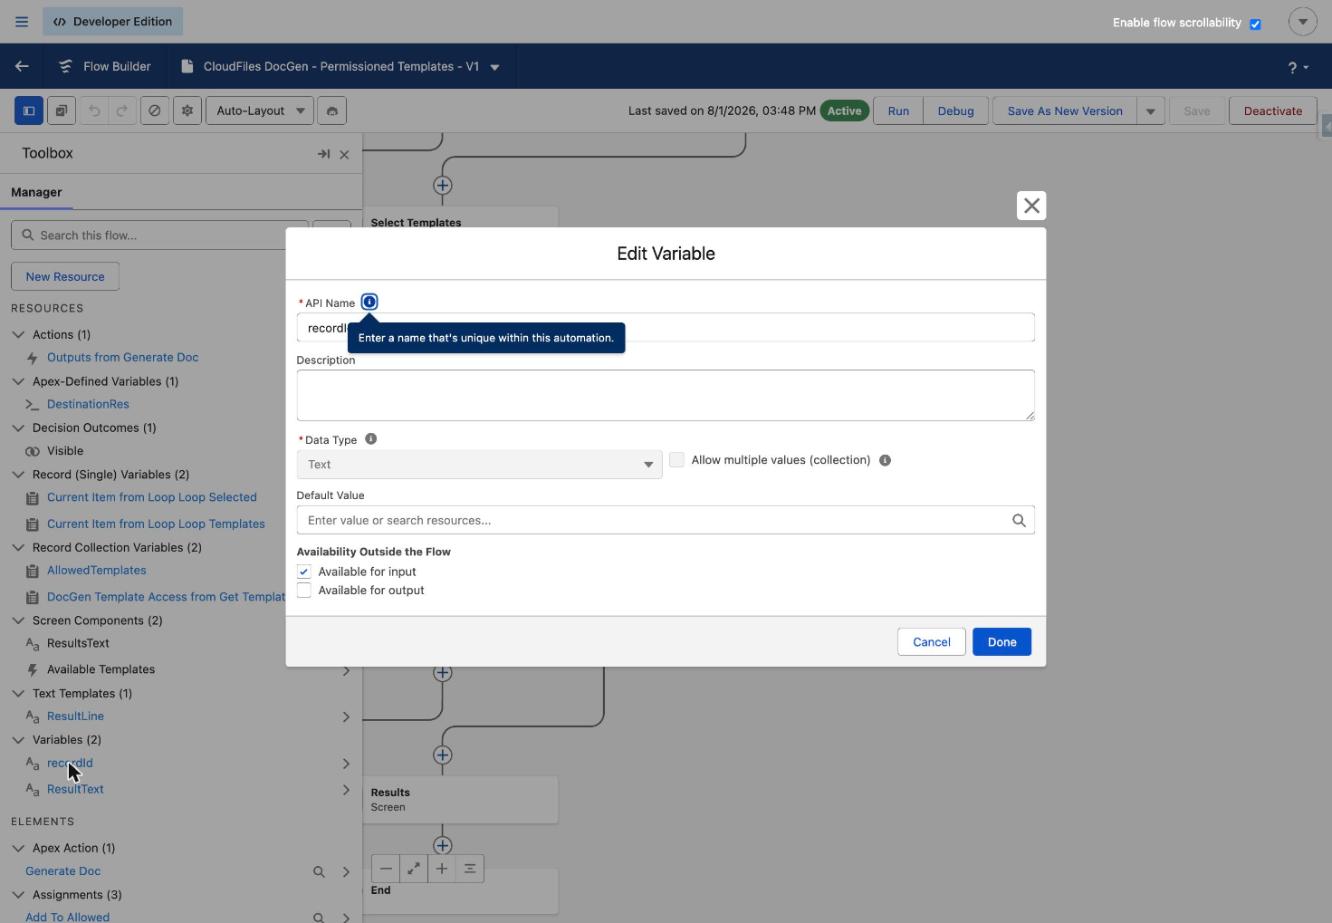
Create a Text variable named recordId and tick Available for input. The record page will pass the Id of the record the flow was launched from into this variable.
6.2 Create the Supporting Resources
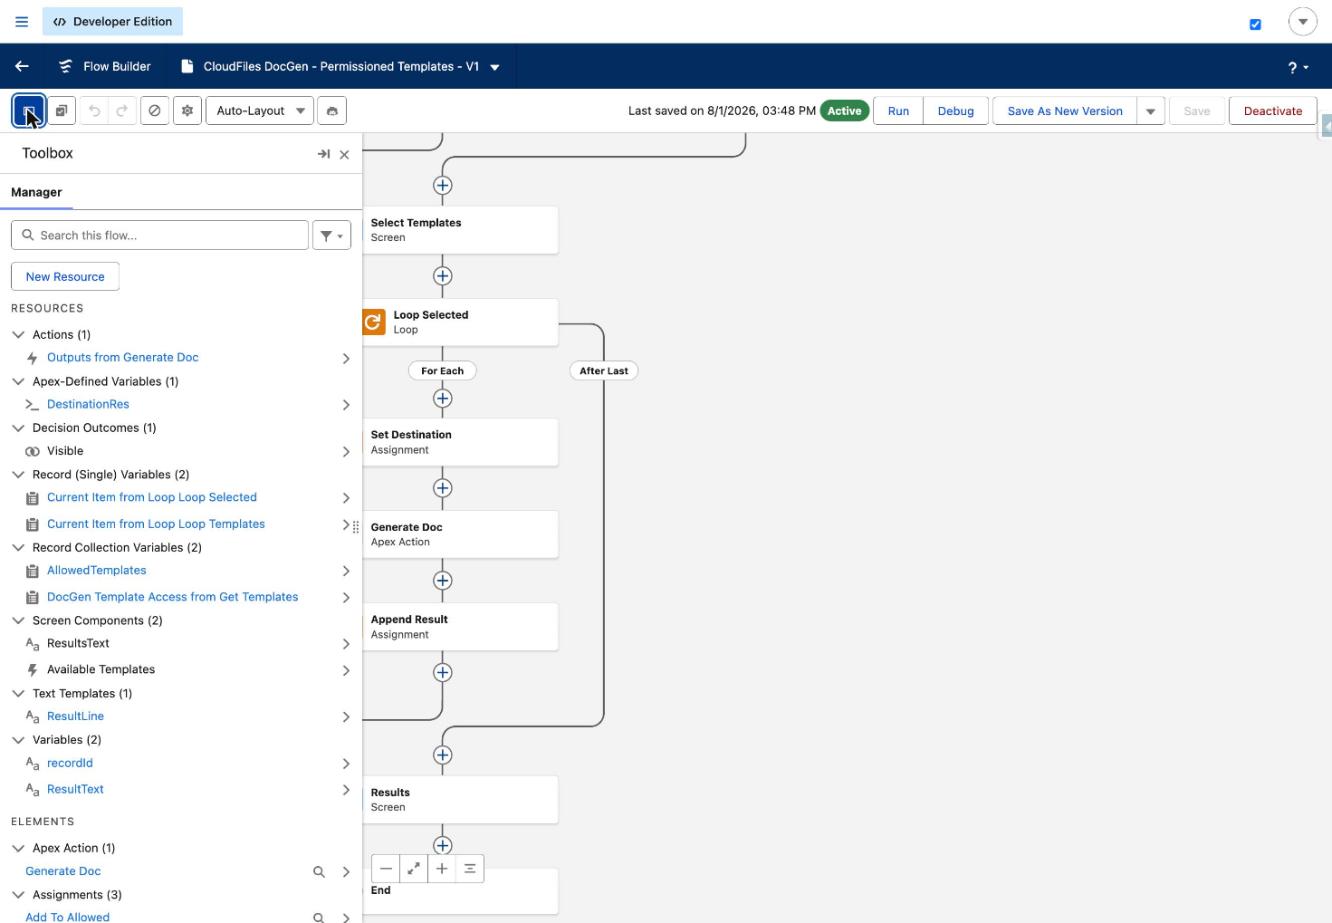
Add these resources from the Toolbox before you start wiring elements together:
- AllowedTemplates - a Record collection variable on DocGen Template Access. This is the filtered list that survives the permission check and is the only thing the user ever sees.
- DestinationRes - an Apex-Defined variable of class cldfs__Resource. It tells CloudFiles where to put the generated file.
- ResultText - a Text variable that collects a line per generated document.
- ResultLine - a Text Template used to build each of those lines.
6.3 Get Templates (Get Records)
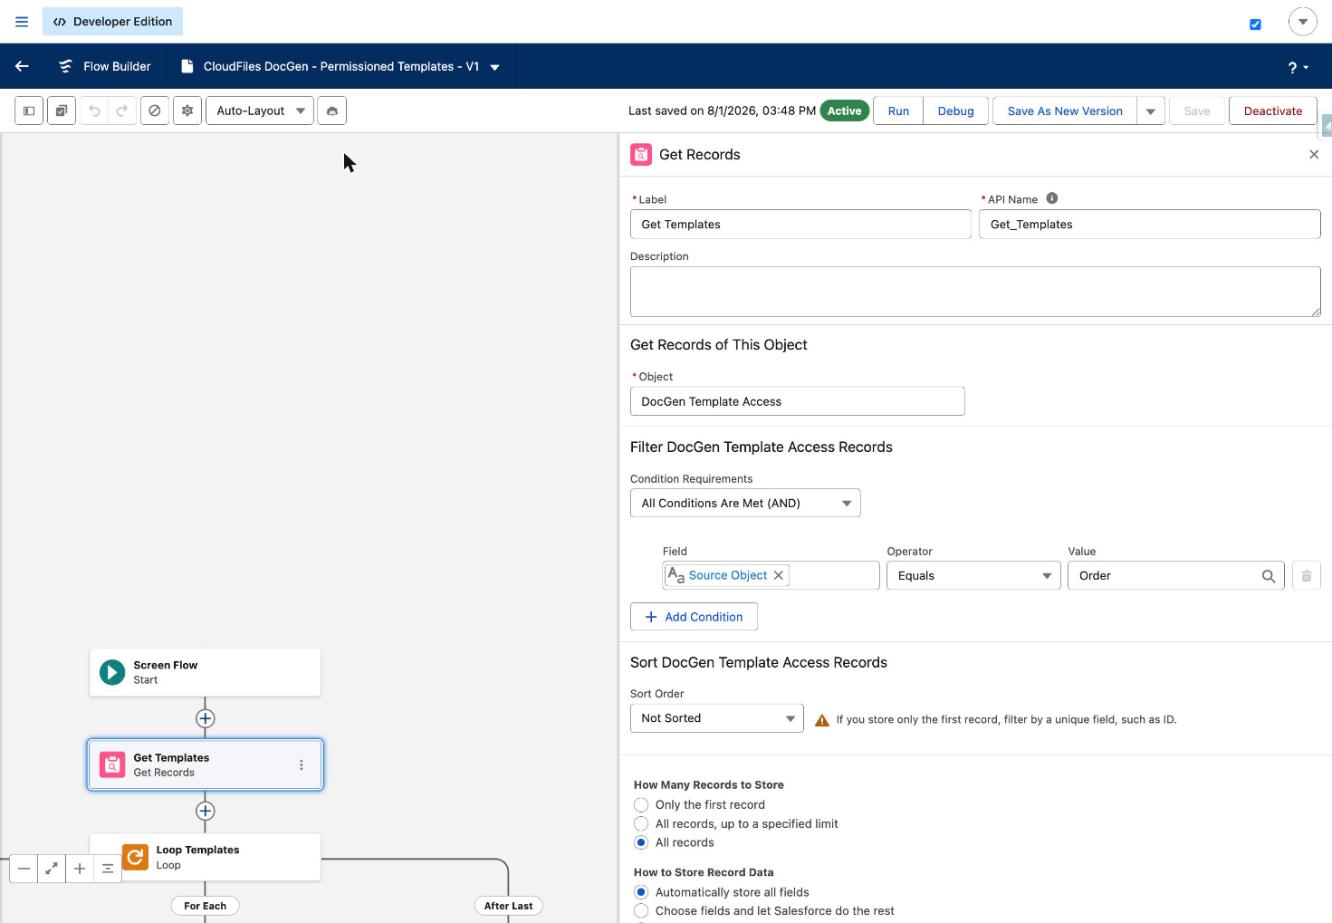
Add a Get Records element named Get Templates on the DocGen Template Access object. Filter where Source Object equals Order, store All records, and let Salesforce automatically store all fields. This is the unfiltered list - it still contains the restricted templates, which is exactly why the next three elements exist.
6.4 Loop Templates (Loop)
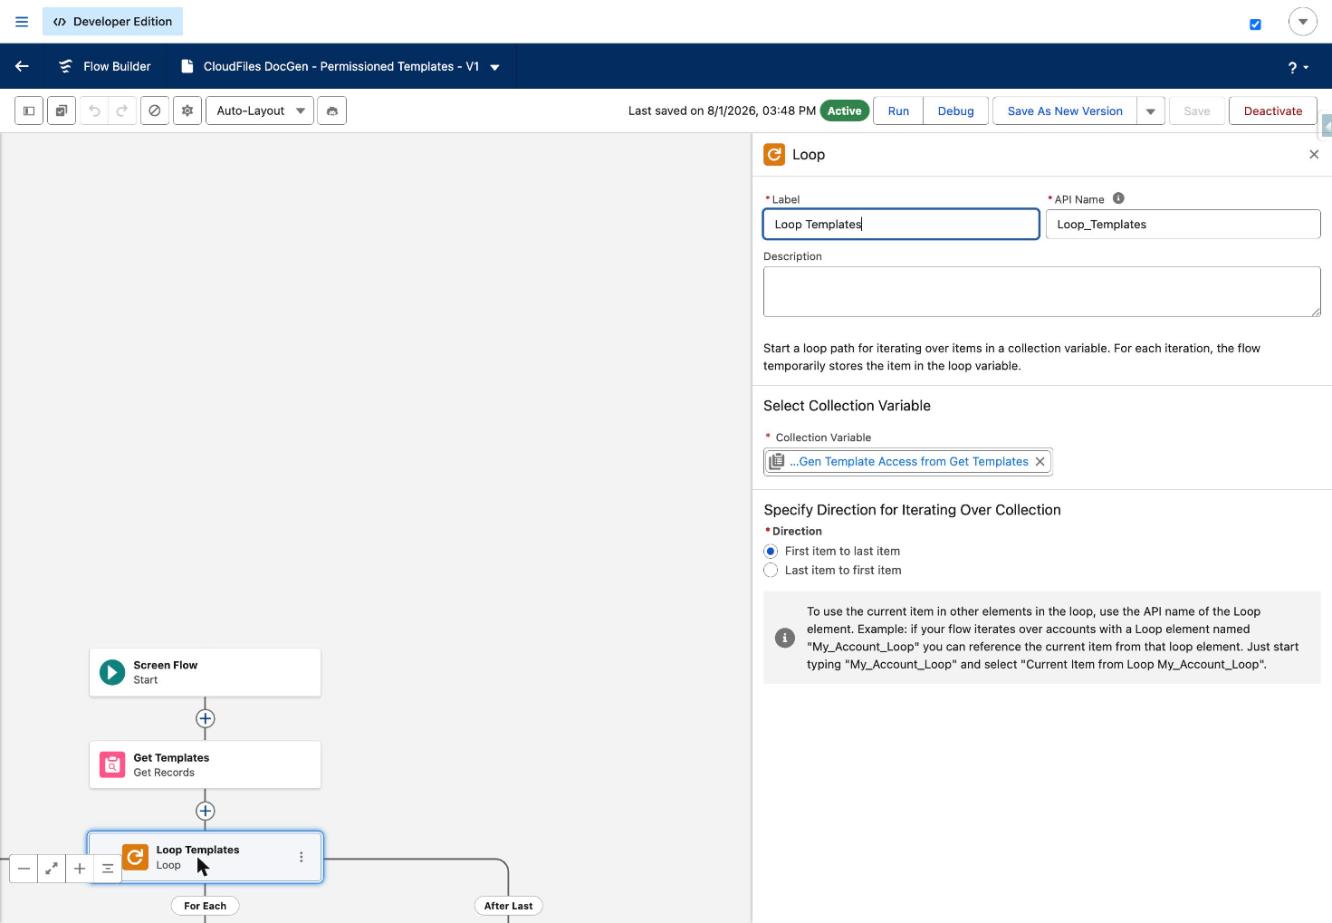
Add a Loop element named Loop Templates and point its Collection Variable at the output of Get Templates. Direction: first item to last item. The loop lets you evaluate the permission requirement of each template one at a time.
6.5 Can See Template (Decision) - the Permission Gate
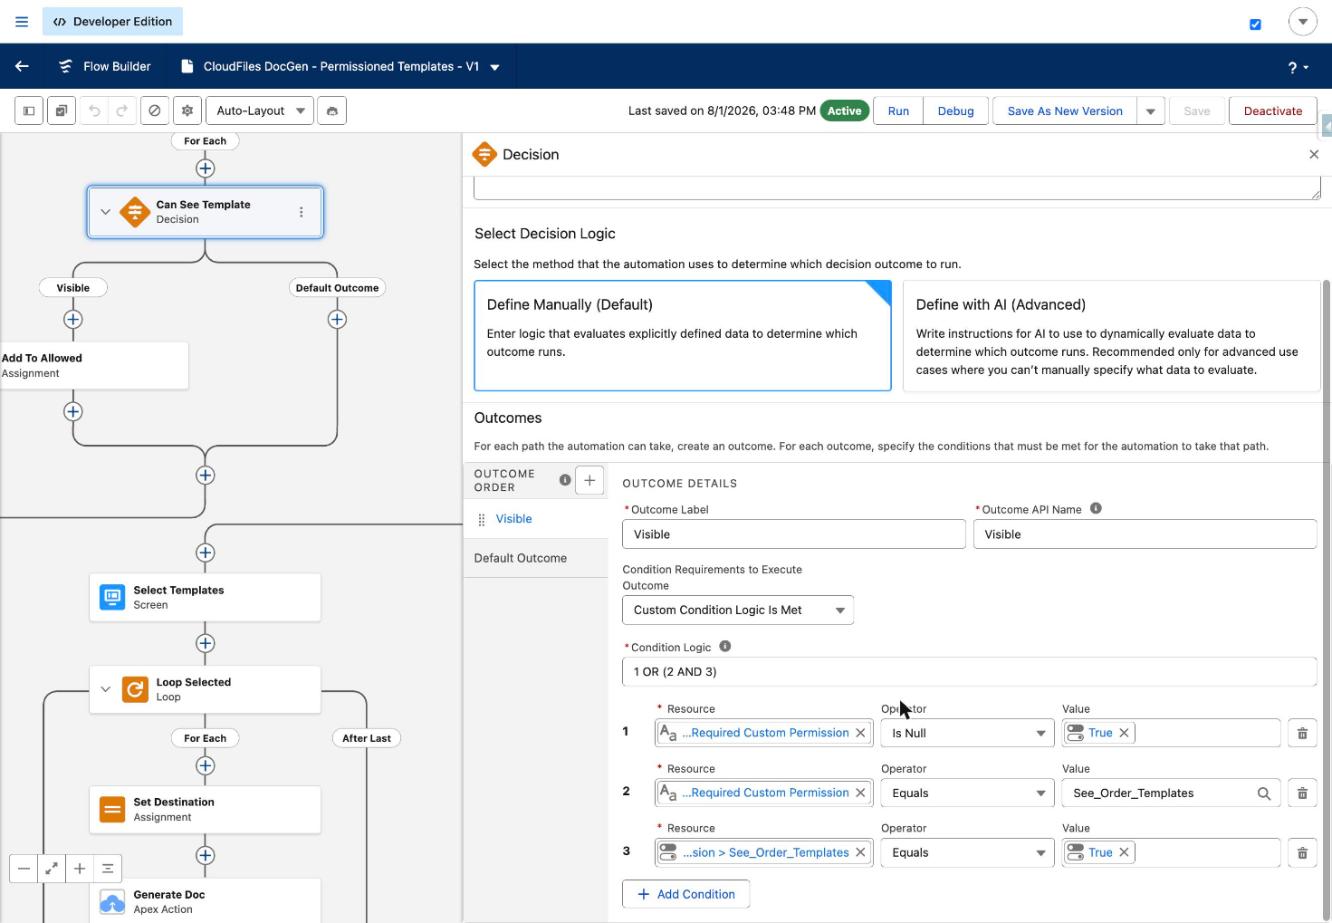
This is the element that does the actual permissioning. Inside the loop, add a Decision named Can See Template with one outcome called Visible, set Condition Requirements to Custom Condition Logic Is Met, and enter the logic 1 OR (2 AND 3) with these three conditions:
- Current Item from Loop Loop Templates > Required Custom Permission - Is Null - True. The template is public, so everyone keeps it.
- Current Item from Loop Loop Templates > Required Custom Permission - Equals - See_Order_Templates. The template asks for this specific permission.
- Running User's Permission > See_Order_Templates - Equals - True. The person running the flow actually holds it.
Read as a sentence: keep this template if it is public, or if it requires See_Order_Templates and the running user has See_Order_Templates. The Running User's Permission resource is the $Permission global in Flow, and it is evaluated per user at run time, which is why the same active flow behaves differently for two different people. The Default Outcome path is deliberately left empty - a template that fails the test is simply never added to the visible list.
If you add a second custom permission later, add a second outcome to this decision with the same 2 AND 3 shape, or extend the logic to 1 OR (2 AND 3) OR (4 AND 5).
6.6 Add To Allowed (Assignment)
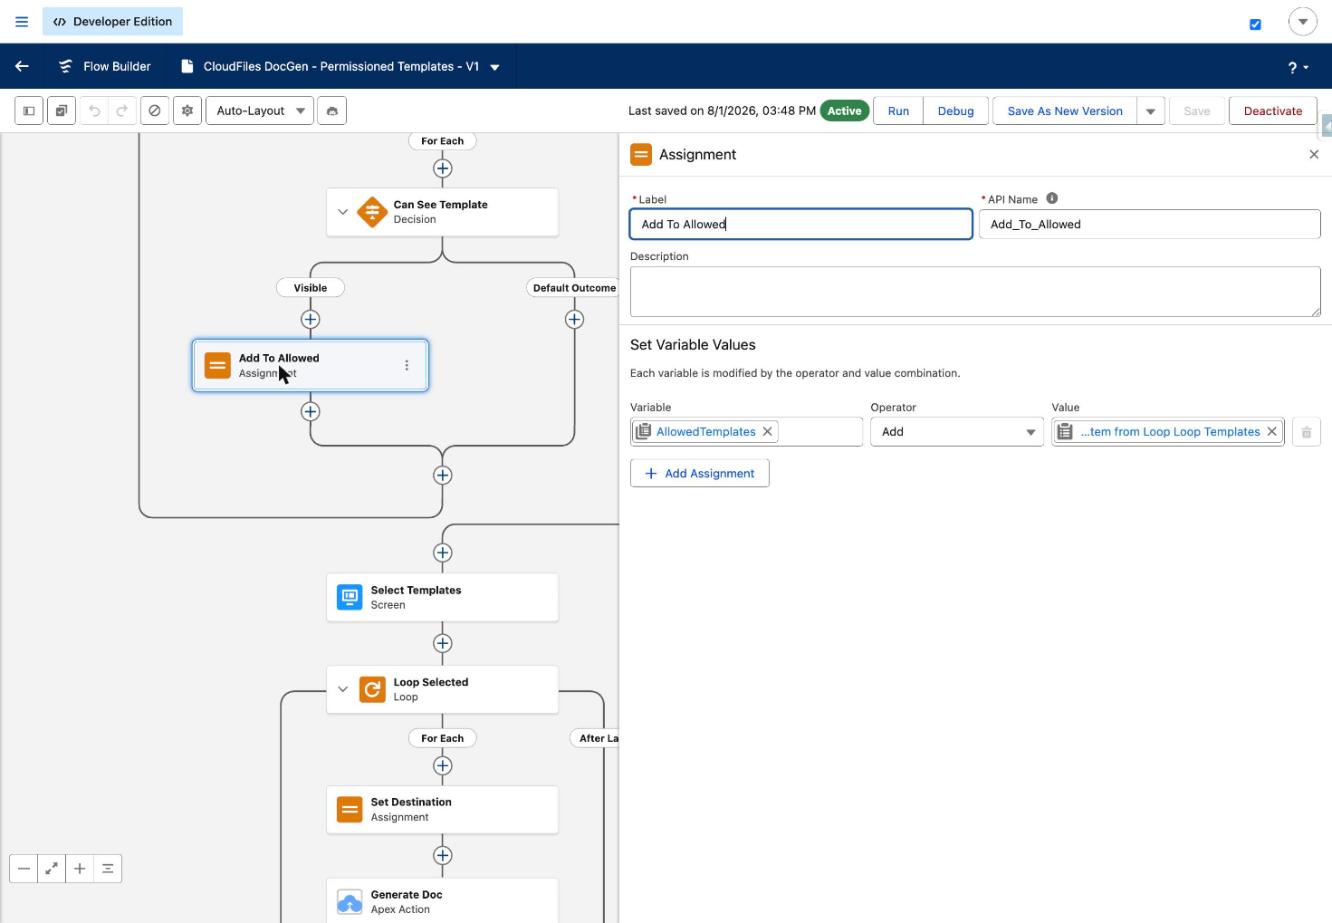
On the Visible outcome only, add an Assignment named Add To Allowed that does AllowedTemplates Add Current Item from Loop Loop Templates. When the loop finishes, AllowedTemplates holds exactly the templates this user is entitled to.
6.7 Select Templates (Screen with a Data Table)
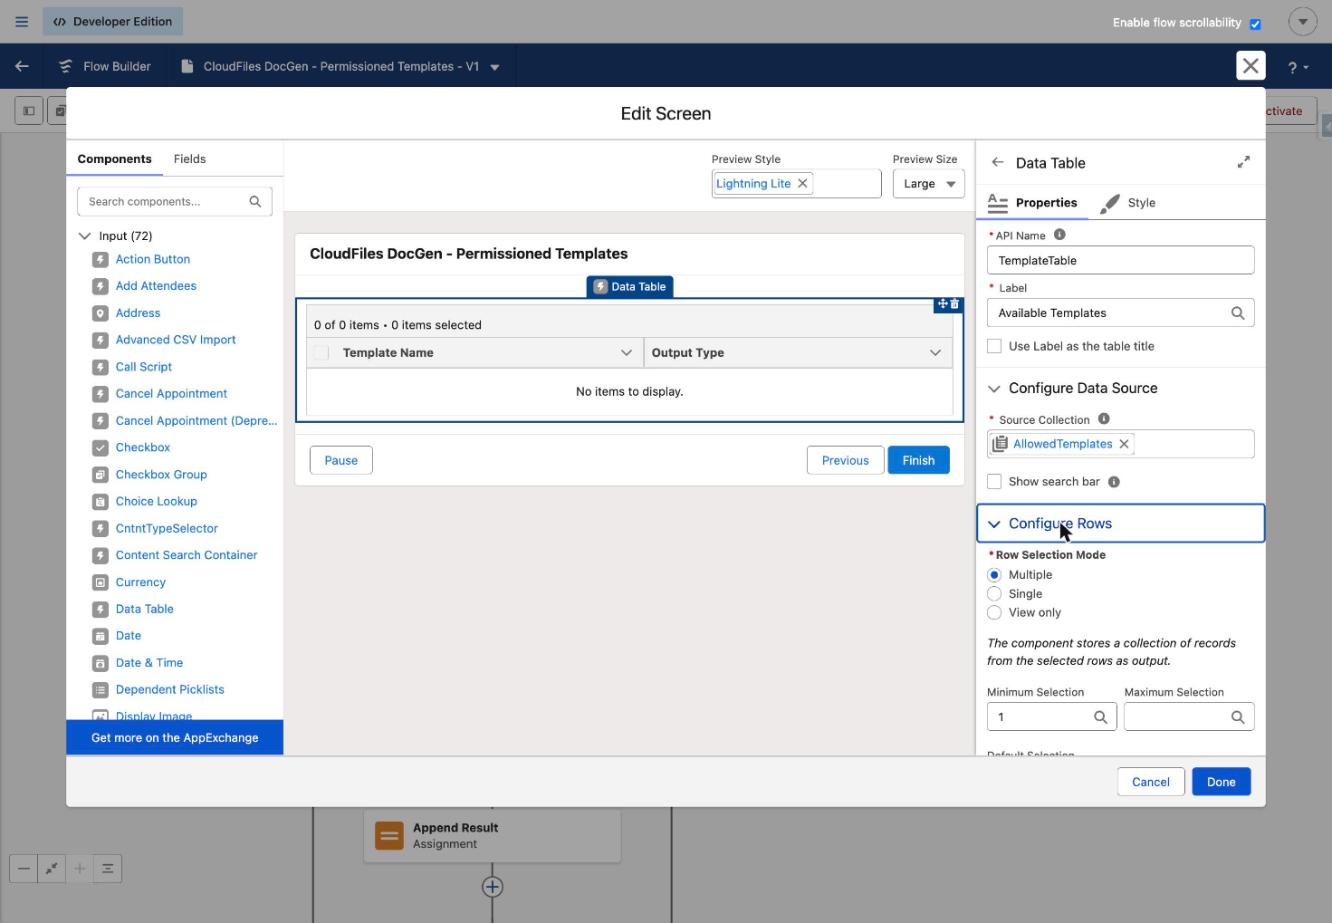
After the loop, add a Screen named Select Templates and drop a Data Table component on it. Configure it as follows:
- API Name TemplateTable, Label Available Templates.
- Source Collection: AllowedTemplates - not the Get Templates output. This single setting is what makes the screen show the filtered list.
- Columns: Template Name and Output Type.
- Row Selection Mode: Multiple, with Minimum Selection 1 so the user cannot click Next without picking something.
6.8 Loop Selected
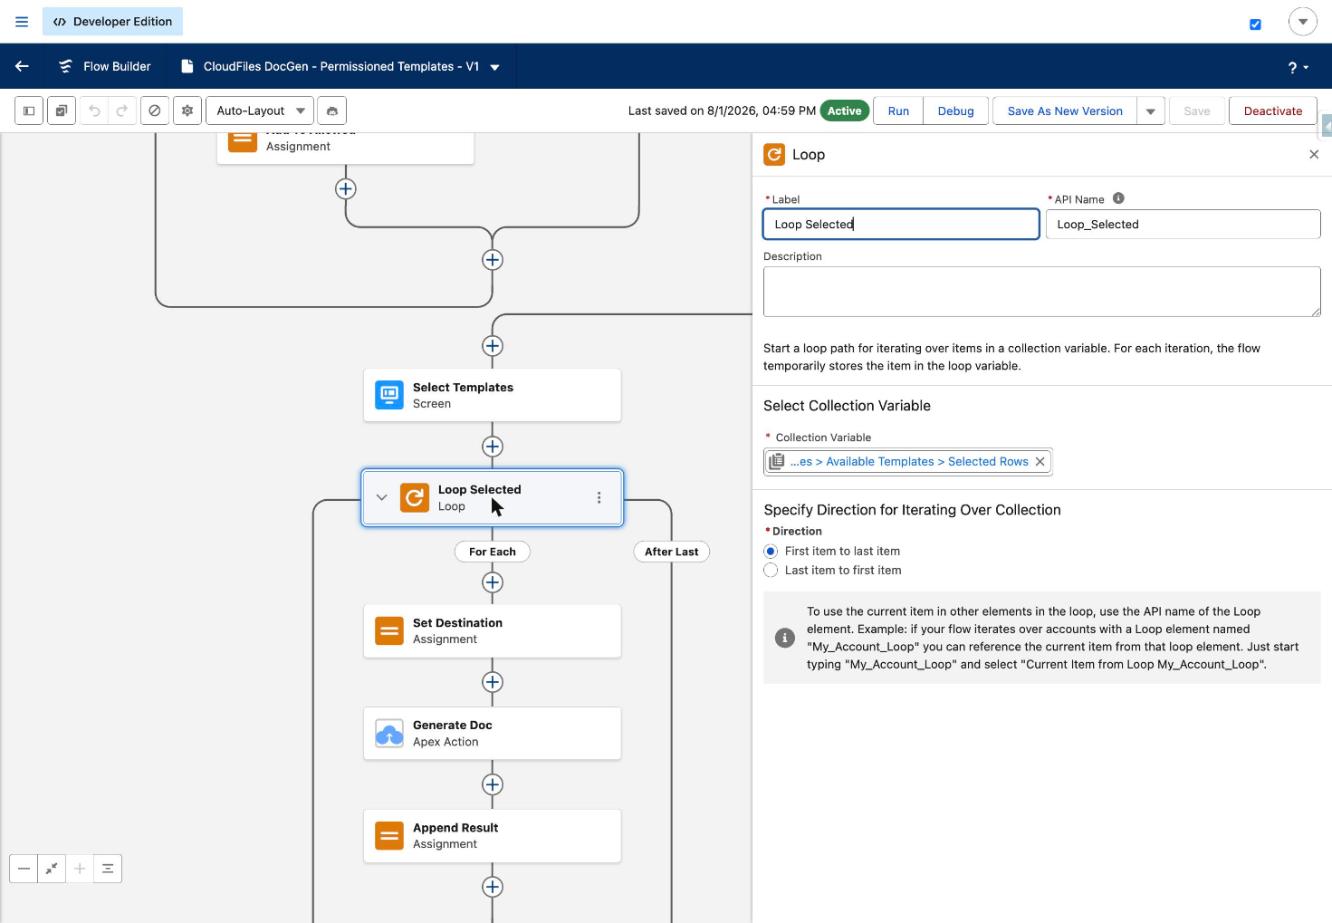
Everything up to this point was about deciding what the user is allowed to see. From here on the flow simply acts on what they actually chose. Add a second Loop element named Loop Selected and point its Collection Variable at Select_Templates > Available Templates > Selected Rows, iterating first item to last item. Because the Data Table could only ever offer the templates in AllowedTemplates, this loop can never process a template the running user was not entitled to.
6.9 Set Destination
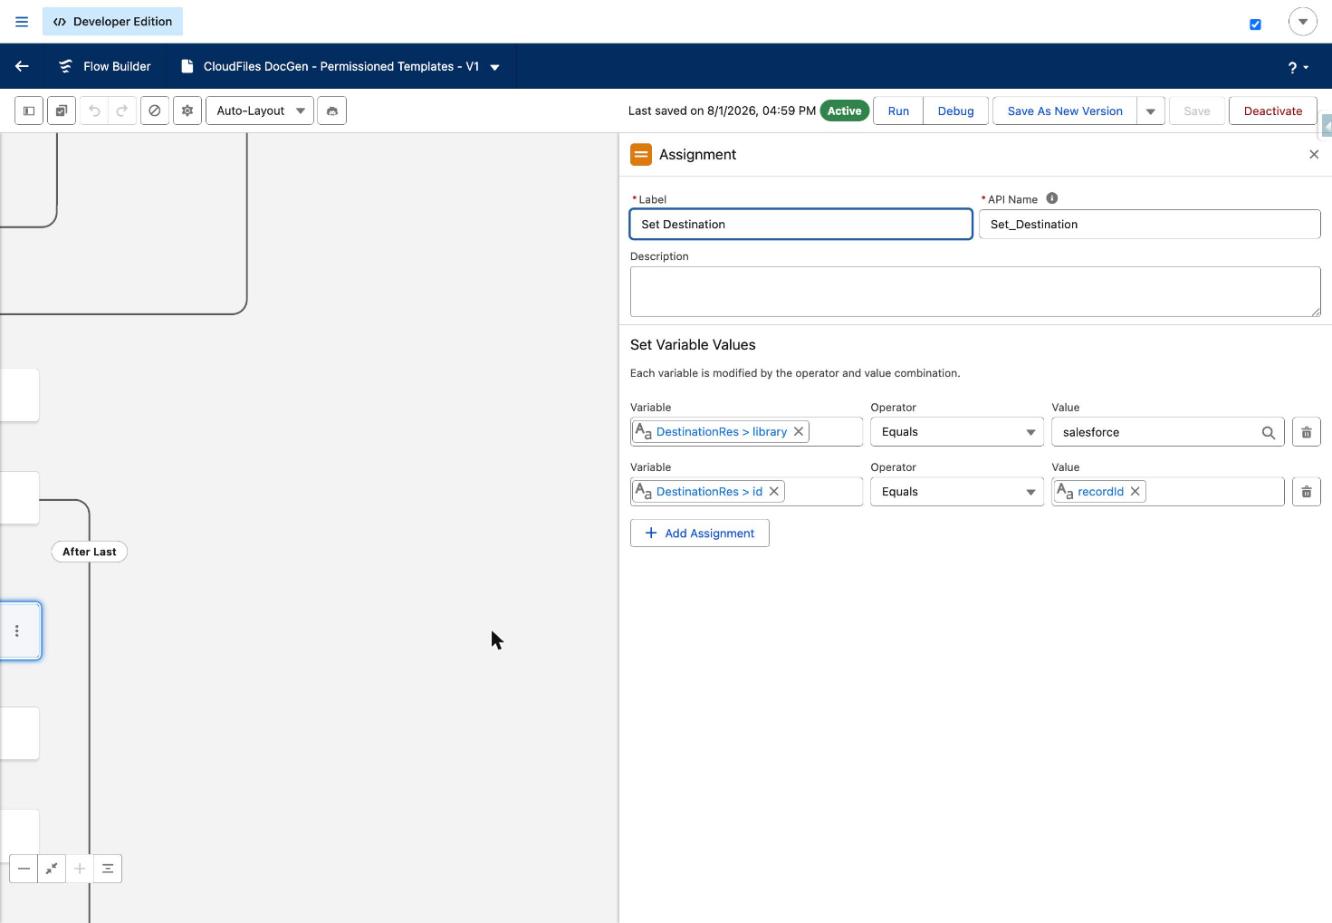
Inside the loop, the first thing to do is tell CloudFiles where the finished document should land. Create an Apex-Defined variable called DestinationRes of type cldfs__Resource, then add an Assignment named Set Destination with two lines: DestinationRes > library Equals salesforce, and DestinationRes > id Equals recordId. That combination means "attach the generated file to the Salesforce record the flow was launched from". If you would rather push documents to SharePoint, Google Drive, Box or Dropbox, this is the only element you need to change - set library to that provider and id to the target folder.
6.10 Generate Doc (CloudFiles Apex Action)
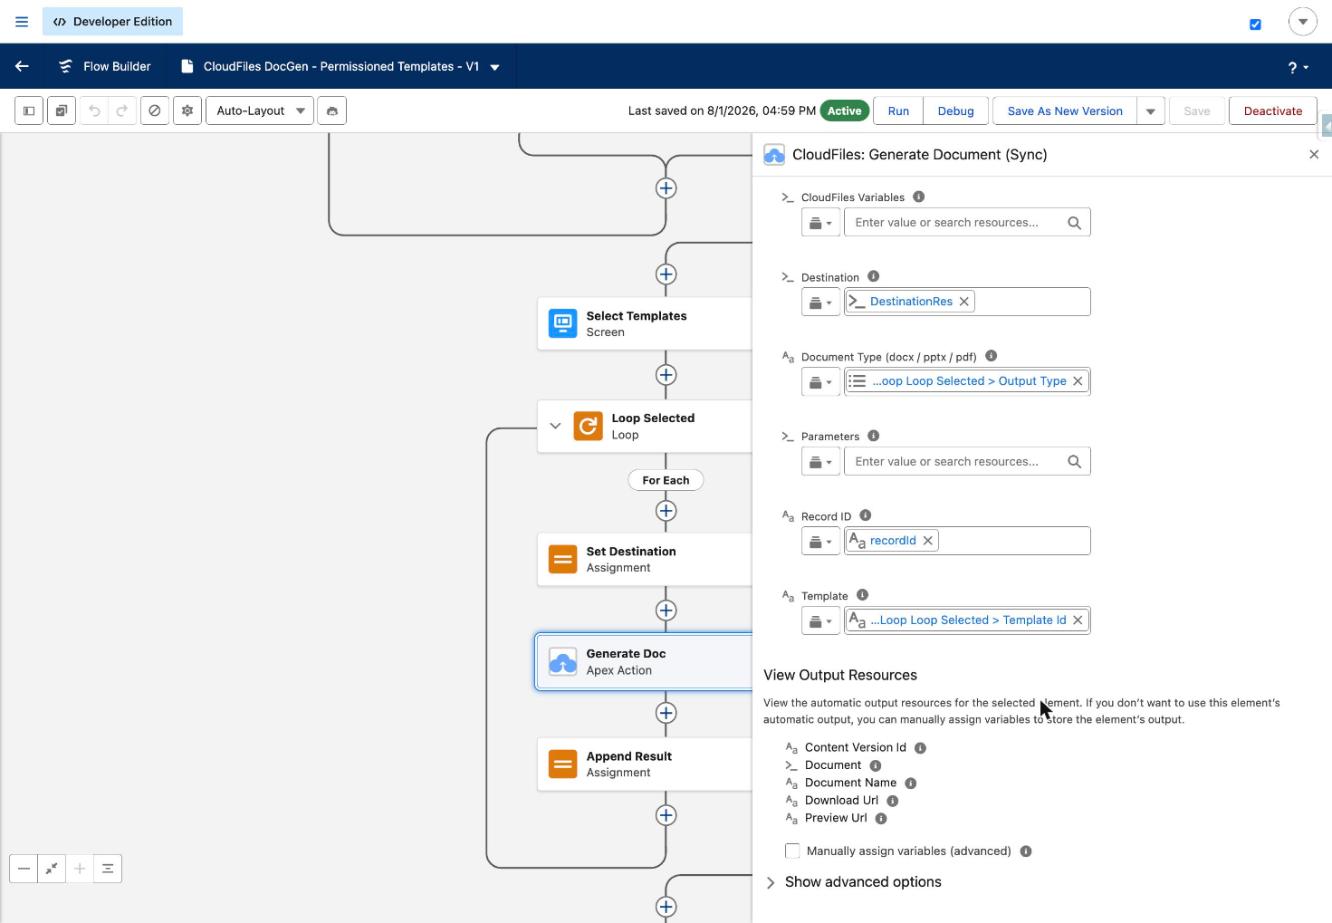
Still inside Loop Selected, add an Action element and search for CloudFiles: Generate Document (Sync). Name it Generate Doc. The synchronous version is the right choice here because the flow needs the result back before it can show the confirmation screen. Set the inputs like this:
- Destination: DestinationRes, the Apex-defined variable you just populated.
- Document Type (docx / pptx / pdf): Loop Selected > Output Type, so each template renders in whatever format was registered against it.
- Record ID: recordId, the record supplying the merge data.
- Template: Loop Selected > Template Id, the CloudFiles template ID stored on the registry record.
Leave CloudFiles Variables and Parameters empty unless your template needs extra merge inputs. Under View Output Resources you get Content Version Id, Document, Document Name, Download Url and Preview Url back automatically - the tutorial uses Preview Url on the final screen, but Download Url and Content Version Id are equally useful if you want to email the file or link to it elsewhere. See Generate Document (Sync) for the full parameter reference.
6.11 Append Result and the ResultLine Text Template
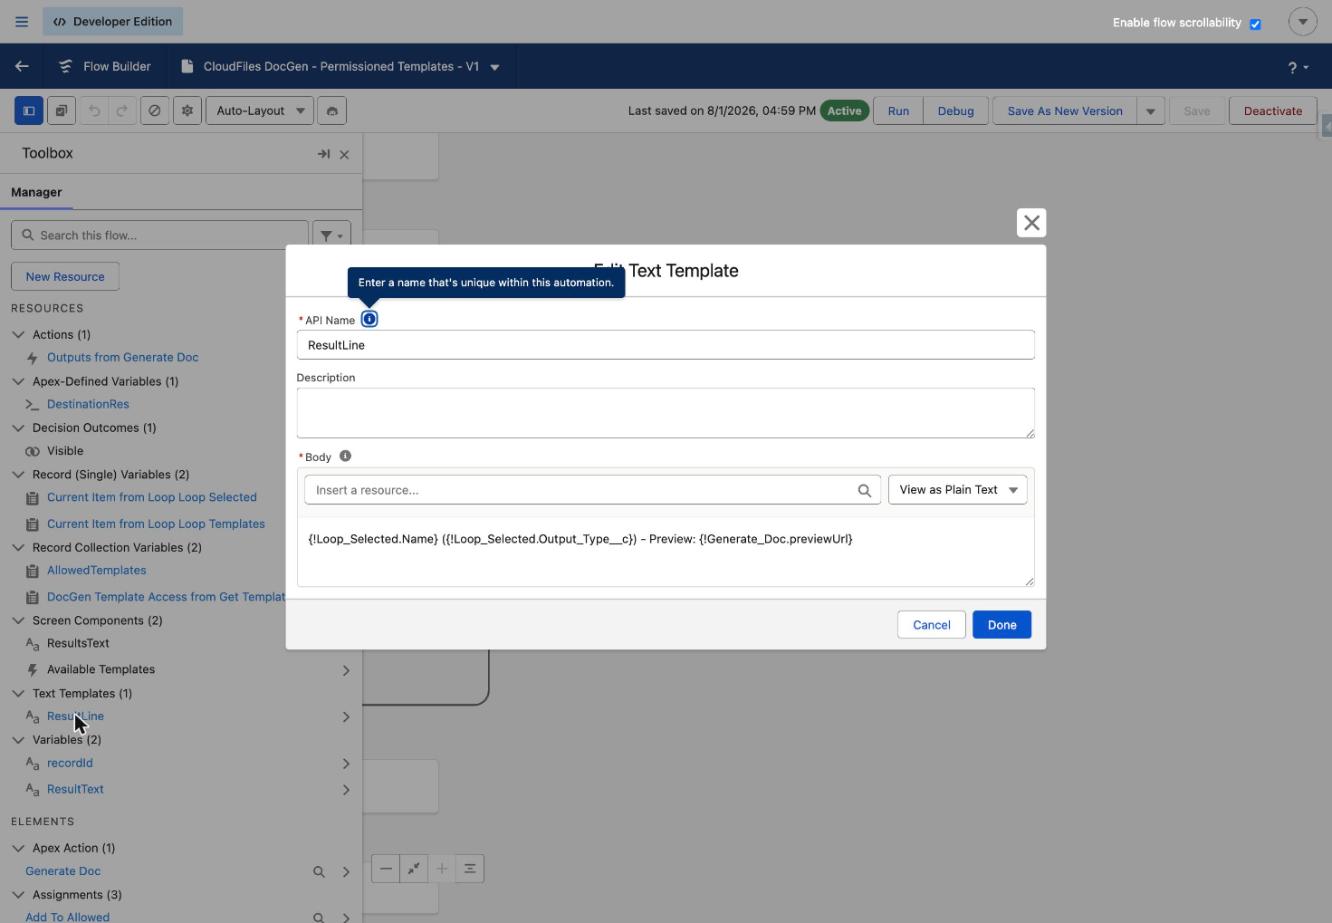
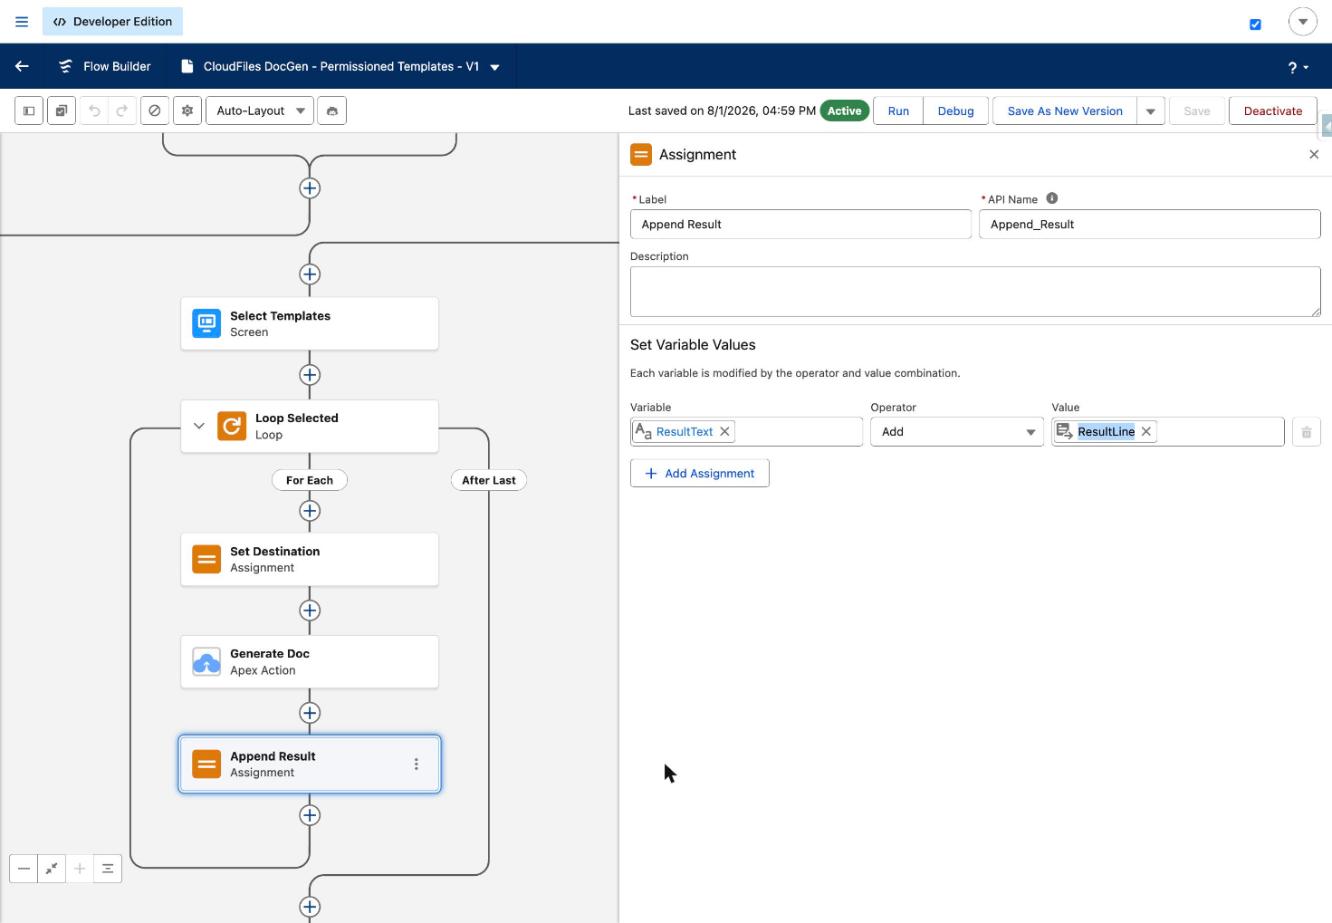
The last element inside the loop builds up a human-readable summary. First create a Text Template resource named ResultLine whose body reads: {!Loop_Selected.Name} ({!Loop_Selected.Output_Type__c}) - Preview: {!Generate_Doc.previewUrl}. Then add an Assignment named Append Result that does ResultText Add ResultLine. Because ResultText is a plain Text variable and the operator is Add rather than Equals, each pass of the loop appends one more line instead of overwriting the previous one.
And the Append Result assignment itself:
6.12 Results Screen
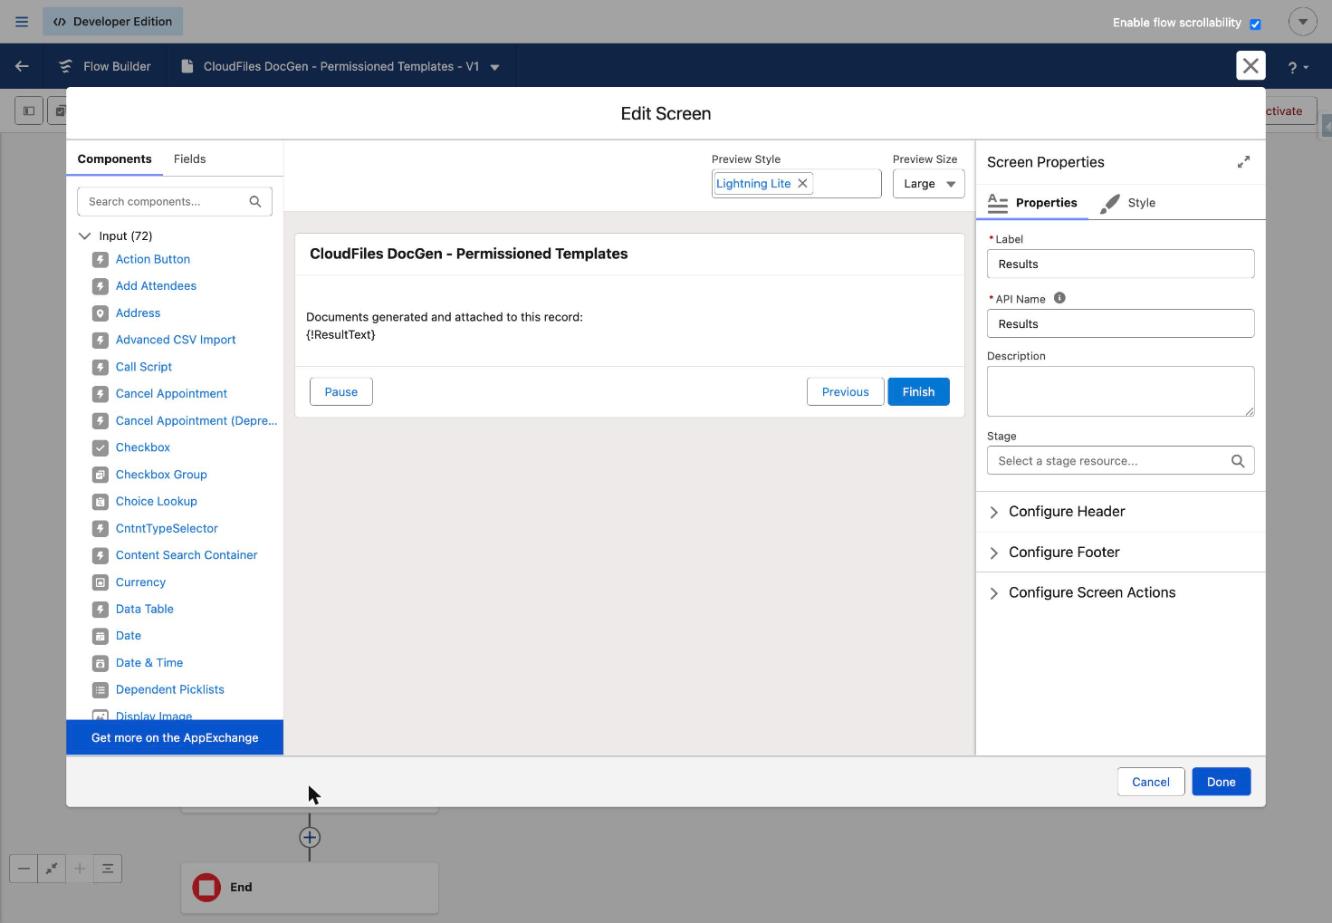
On the After Last path of Loop Selected, add a final Screen named Results with a single Display Text component. Its body is simply: Documents generated and attached to this record: {!ResultText}. The user gets one line per document with a clickable preview link, and the files are already sitting on the record. Connect this screen to the End element and the flow is complete.
6.13 Save and Activate
Save the flow, give it a meaningful label such as CloudFiles DocGen - Permissioned Templates, and click Activate. A flow that is only saved as a draft will not appear on a record page, so activation is required before the next step will work.
Step 7 - Add the Flow to the Order Record Page
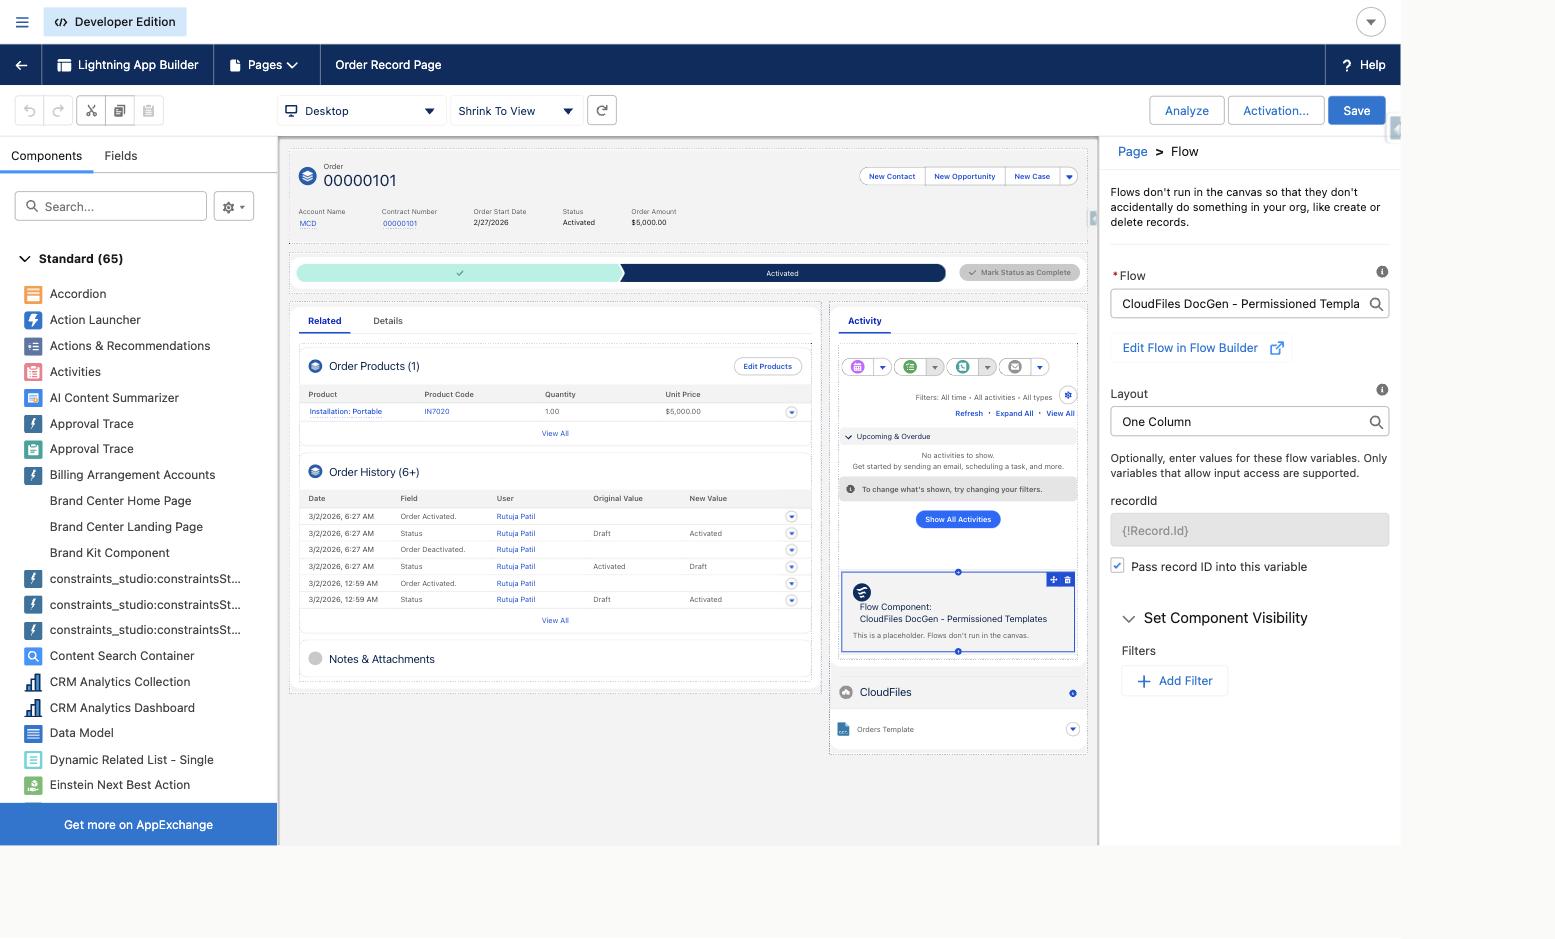
Go to Setup > Object Manager > Order > Lightning Record Pages, open your Order Record Page and click Edit. Drag a Flow component onto the region where you want the launcher to sit - in this build it lives in the right-hand sidebar under Activity. Then set its properties:
- Flow: CloudFiles DocGen - Permissioned Templates
- Layout: One Column
- Pass record ID into this variable: tick this box next to recordId so the field shows {!Record.Id}
That checkbox is what feeds the current Order into the flow's recordId variable, which in turn drives both the merge data and the attachment destination. Save the page and activate it as the org default (or as an app/profile-specific assignment) if it is not already.
Step 8 - Test the Setup
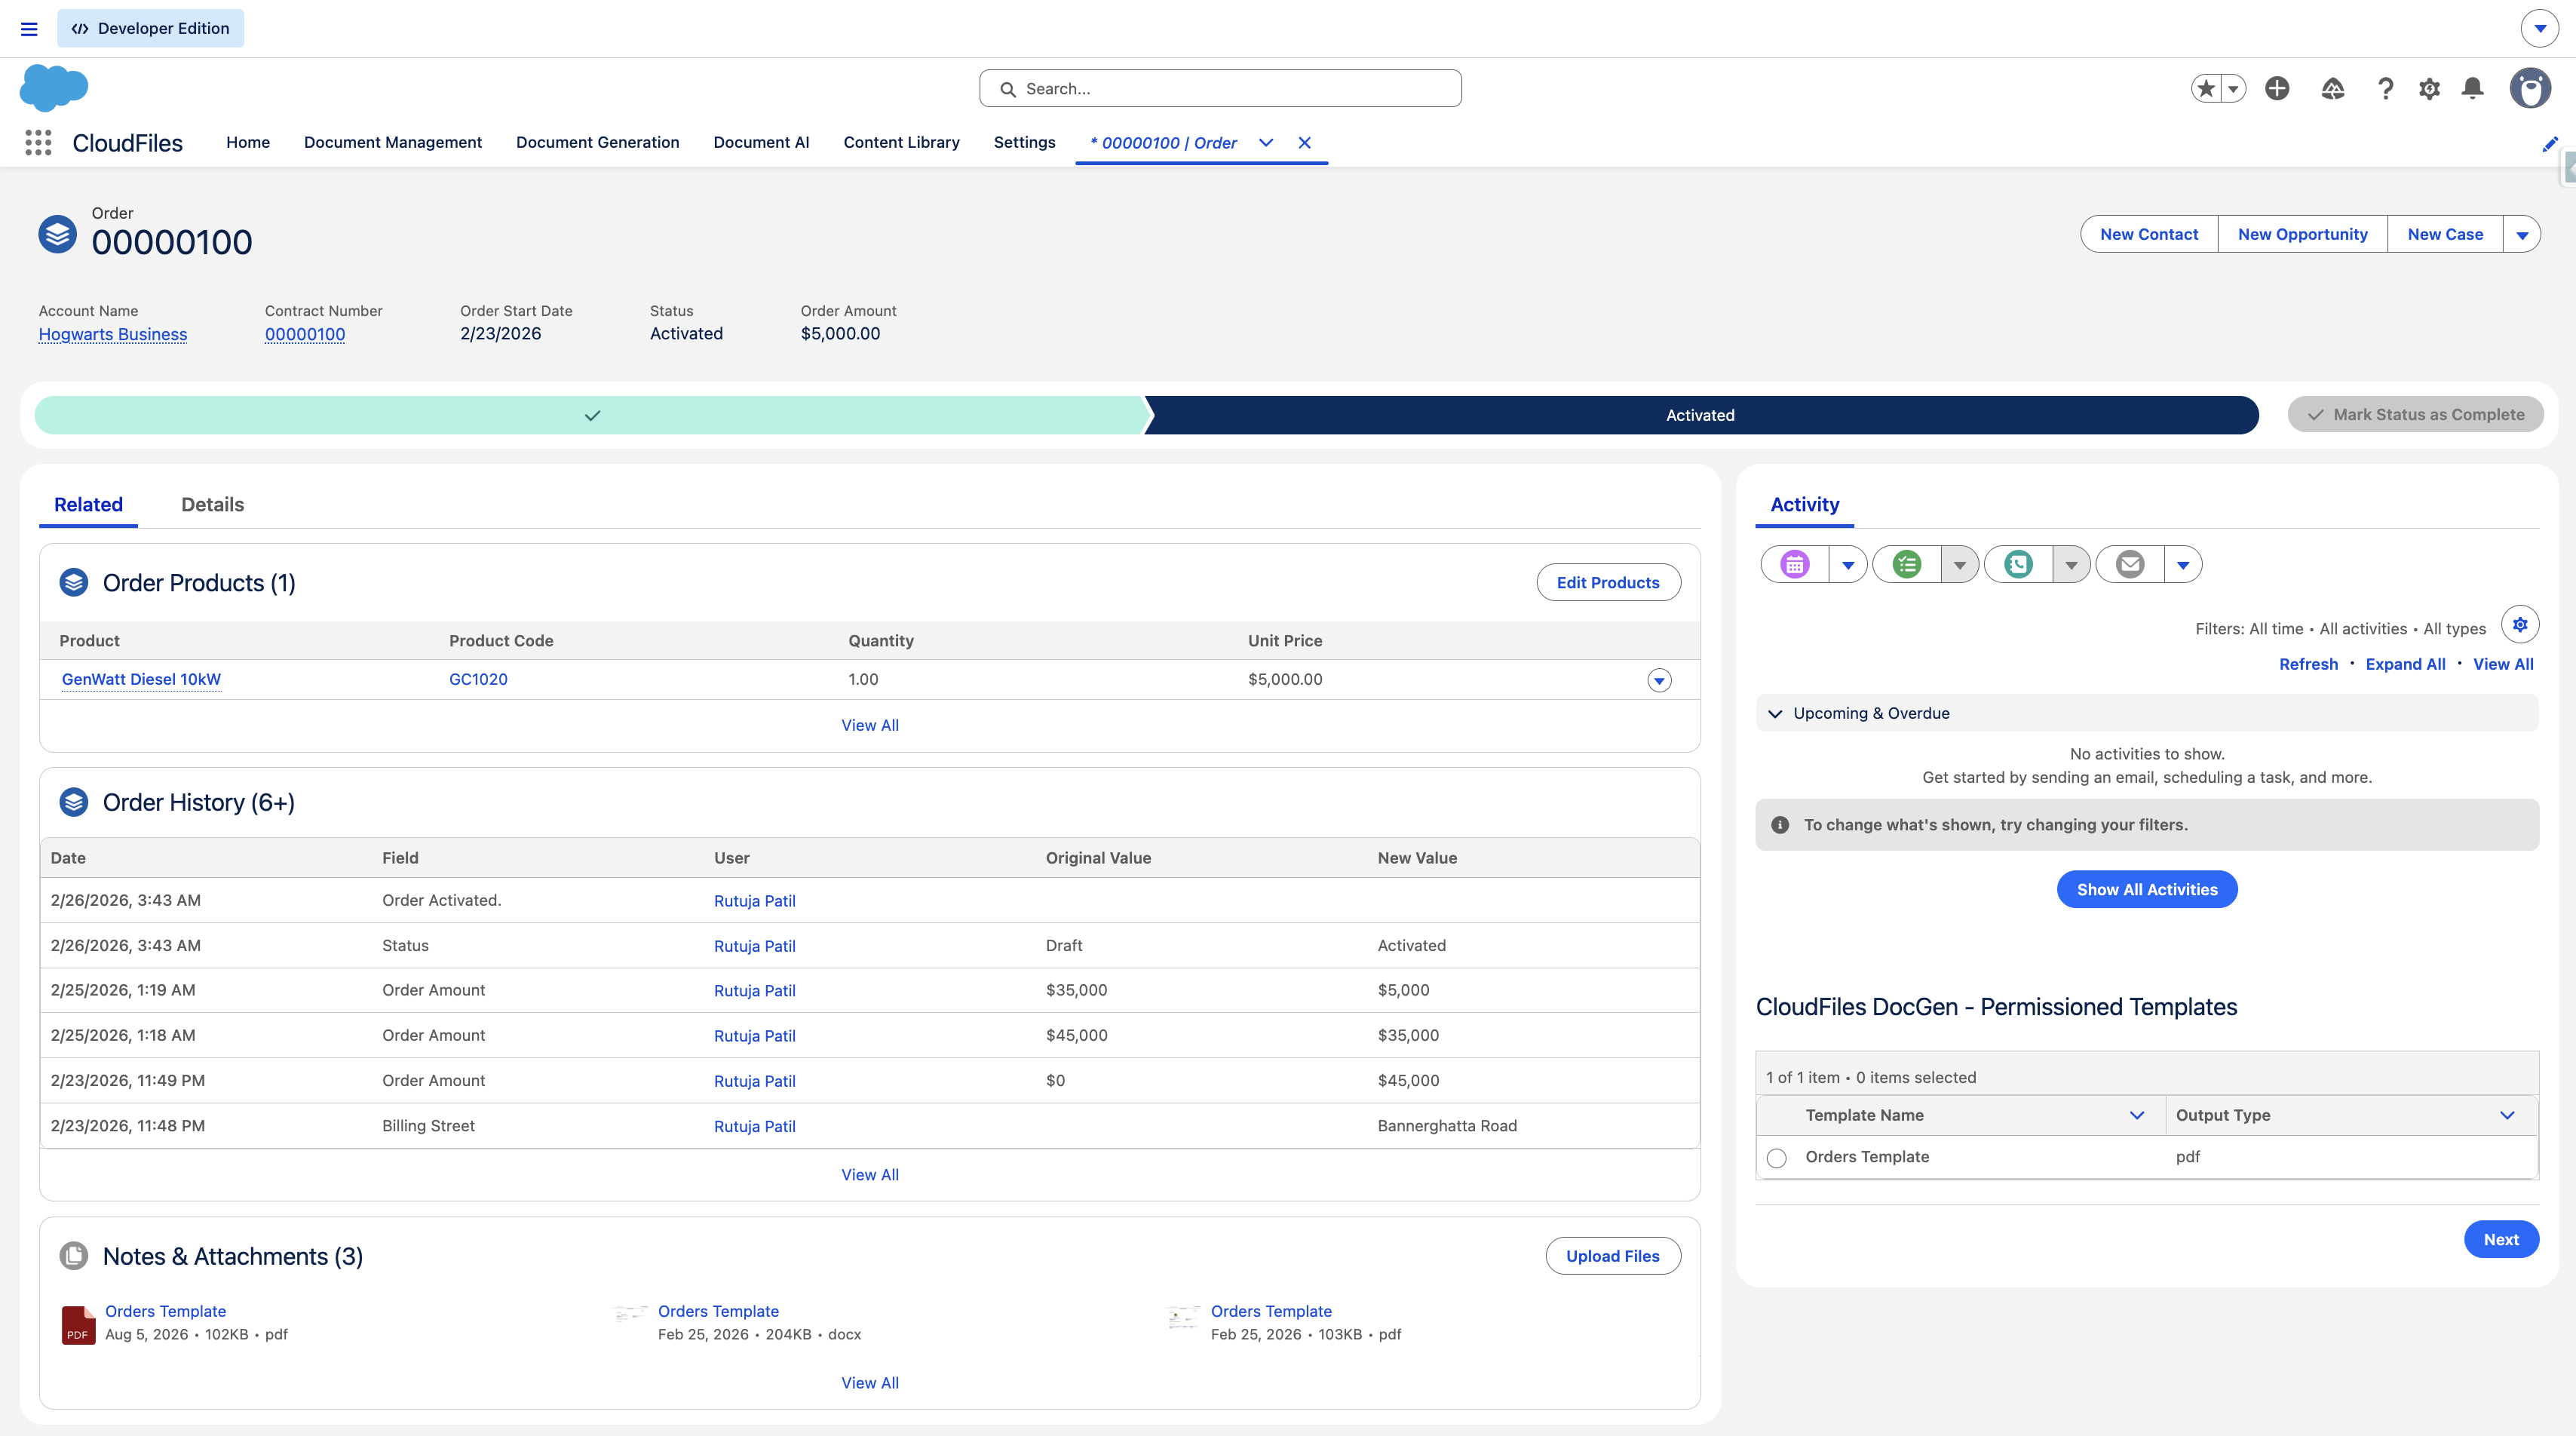
Open any Order record and scroll to the flow component. What you should see is a table listing only the templates that are open to everyone plus any restricted templates your custom permission unlocks. Pick one or more, click Next, and the flow generates each document and attaches it to the record - you will see it appear under Notes & Attachments and in the CloudFiles component.
The real test, though, is the negative one. Log in as (or use Flow Debug's "Run automation as another user" option for) a user who does not have the permission set. Open the same Order and the restricted template should simply not be in the list. There is no greyed-out row, no error message and no "you don't have access" toast - the template is invisible, which is exactly the behaviour we wanted. Then assign that user the permission set, refresh, and watch the extra row appear.
Output Parameters You Can Reuse
The Generate Doc action hands back five values per document, and any of them can be used later in the flow or passed out to another automation:
- Content Version Id - the Salesforce ContentVersion record for the generated file, handy if you want to relate it, share it or attach it to an email.
- Document - the full CloudFiles document object.
- Document Name - the resolved file name.
- Download Url - a direct download link.
- Preview Url - an in-browser preview link, which is what this tutorial surfaces on the Results screen.
Adapting the Flow for Other Objects
Nothing in this build is Order-specific except one filter. To reuse the same flow for Quotes, Contracts or a custom object, change the Get Templates filter from Source Object Equals Order to the API name of your object, add the record page component to that object's Lightning page, and register the relevant templates in DocGen Template Access with the matching Source Object value. The custom permission, the decision logic and the generation steps all stay exactly as they are. If you want a single flow to serve every object, you can even replace the hard-coded Order value with a second input variable and set it from the record page.