What to Expect
By the end of this tutorial, you will learn how to:
- Create a template that includes runtime variables.
- Configure a Screen Flow to capture user input for those variables.
- Pass the collected values into the document generation step.
- Generate a final Purchase Order document that merges record details with runtime inputs.
Tutorial Video
Refer to the quick video if you would like to have a visual guide for this tutorial. Read on if you prefer textual content.
Video will be added soon
Prerequisites
Install CloudFiles in Salesforce
CloudFiles is available on the Salesforce AppExchange and can be installed using the standard app installation process. Check out Installation and Configuration guides to set up your account and user access.
Template Setup
1 - Template with Runtime Variables
The Build a template (Word) tutorial, provides a sample template that uses the Order object along with related items from the OrderItem object.
In this tutorial, we’ll extend that concept by adding Runtime Variable. These variables allow you to capture user input at the time of flow execution and merge it into the document, alongside data coming from Order and OrderItem. This makes it possible to dynamically generate additional content based on values provided at runtime.
We will create runtime variables for the following data types:
- String – To set the Document Title Example: Purchase Order - September 2025
- Double – To pass decimal values such as Discount % Example: Discount: 7.5%
- Date – To pass important dates such as the Payment Due Date Example: Payment Due Date: 15-Sep-2025
- Boolean – To control conditional logic in the template by showing or hiding specific information. Example: Display the text “This is an Enterprise Purchase” only when the checkbox is selected.
- Rich Text Area – To pass formatted text such as Special Instructions Example: Note: Ensure purchase before quarter end.
Steps to Create a Runtime Variable in the Word Template
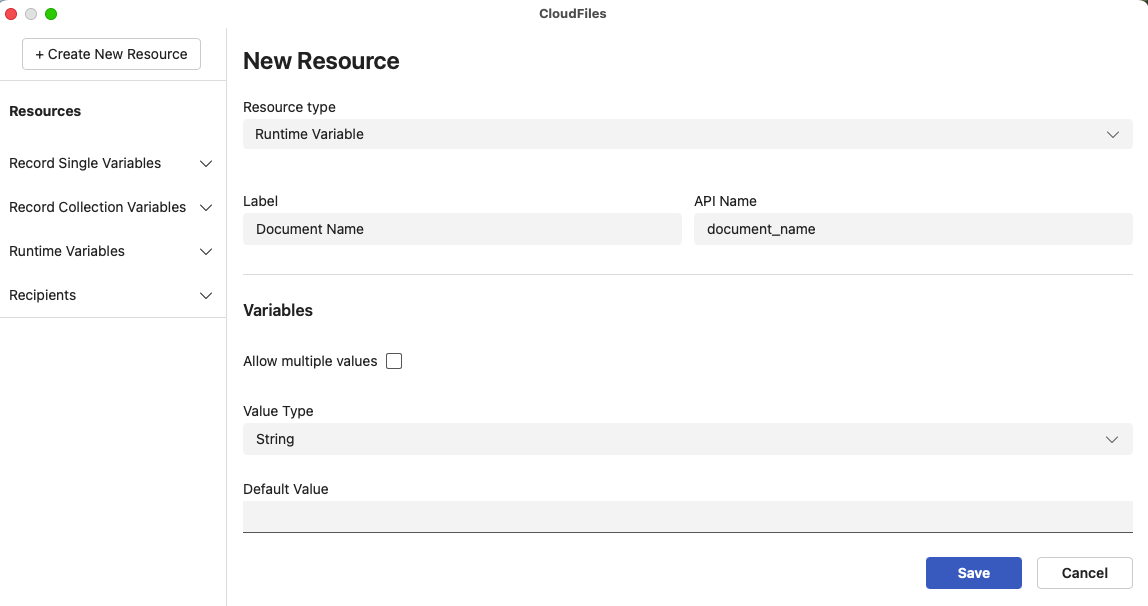
- Click 'Resources'; the Resource Manager opens up.
- In the 'New Resource' pane, select Resource type from the drop-down as 'Runtime Variable'.
- Enter a Label , and the API Name.
- Assign a Value Type based on your requirement.
1 - String
To pass the Document Name, create a runtime variable of type String.
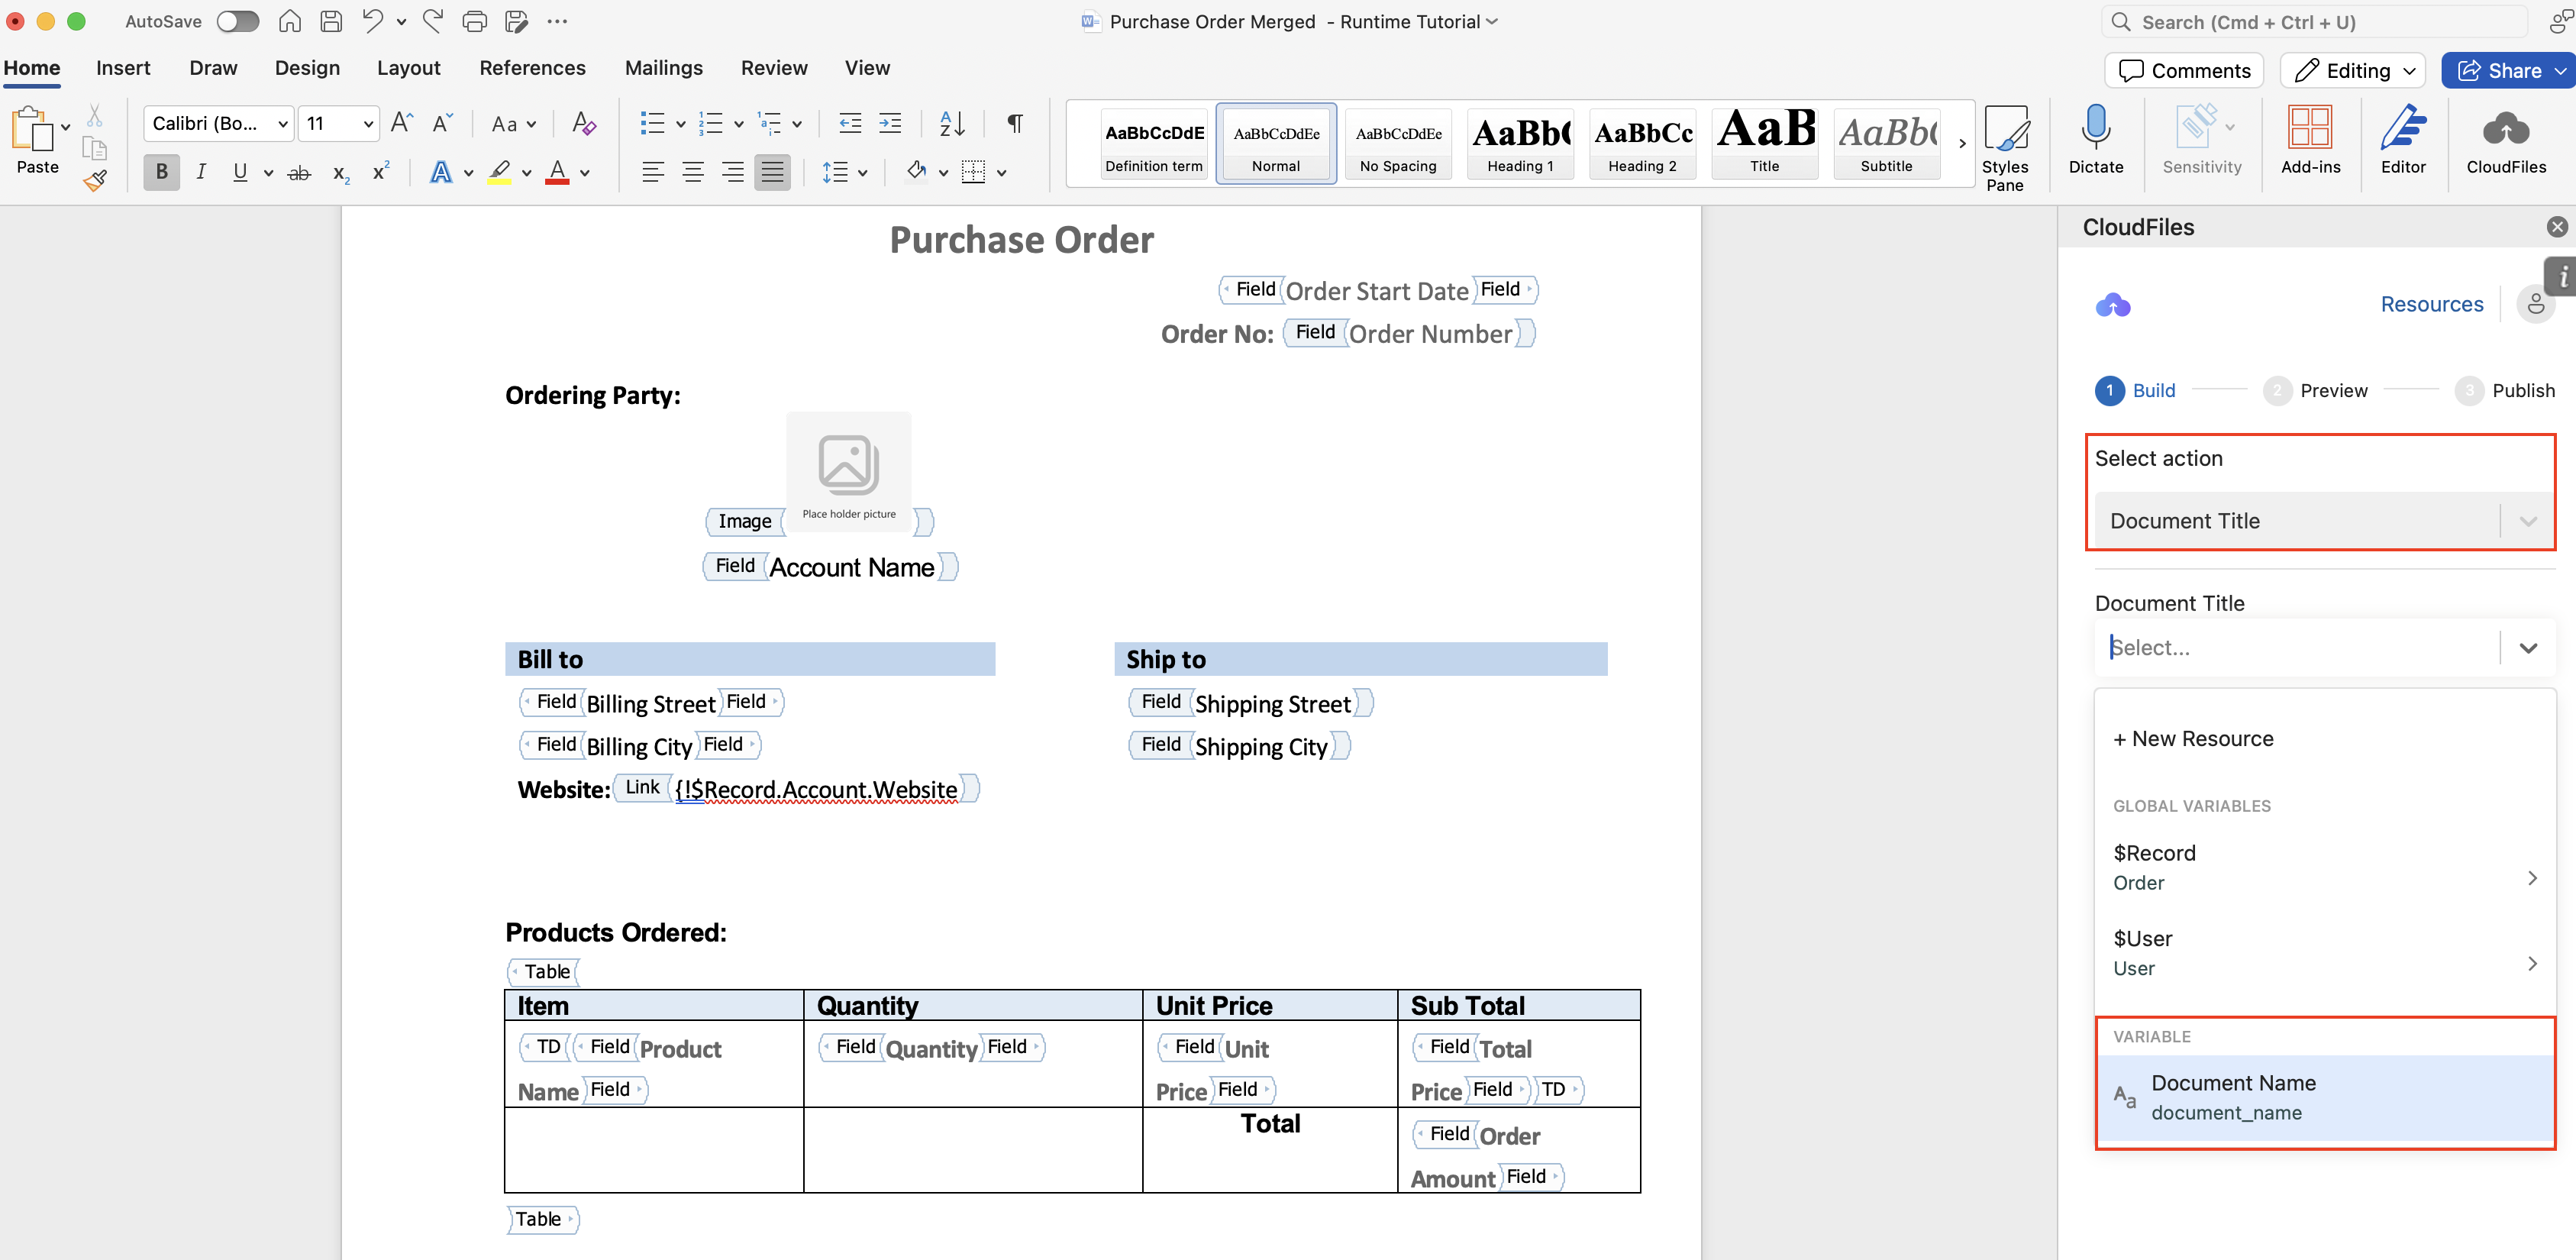
Add the document_name variable under the Document Title action. This ensures the document title is dynamically generated at runtime.
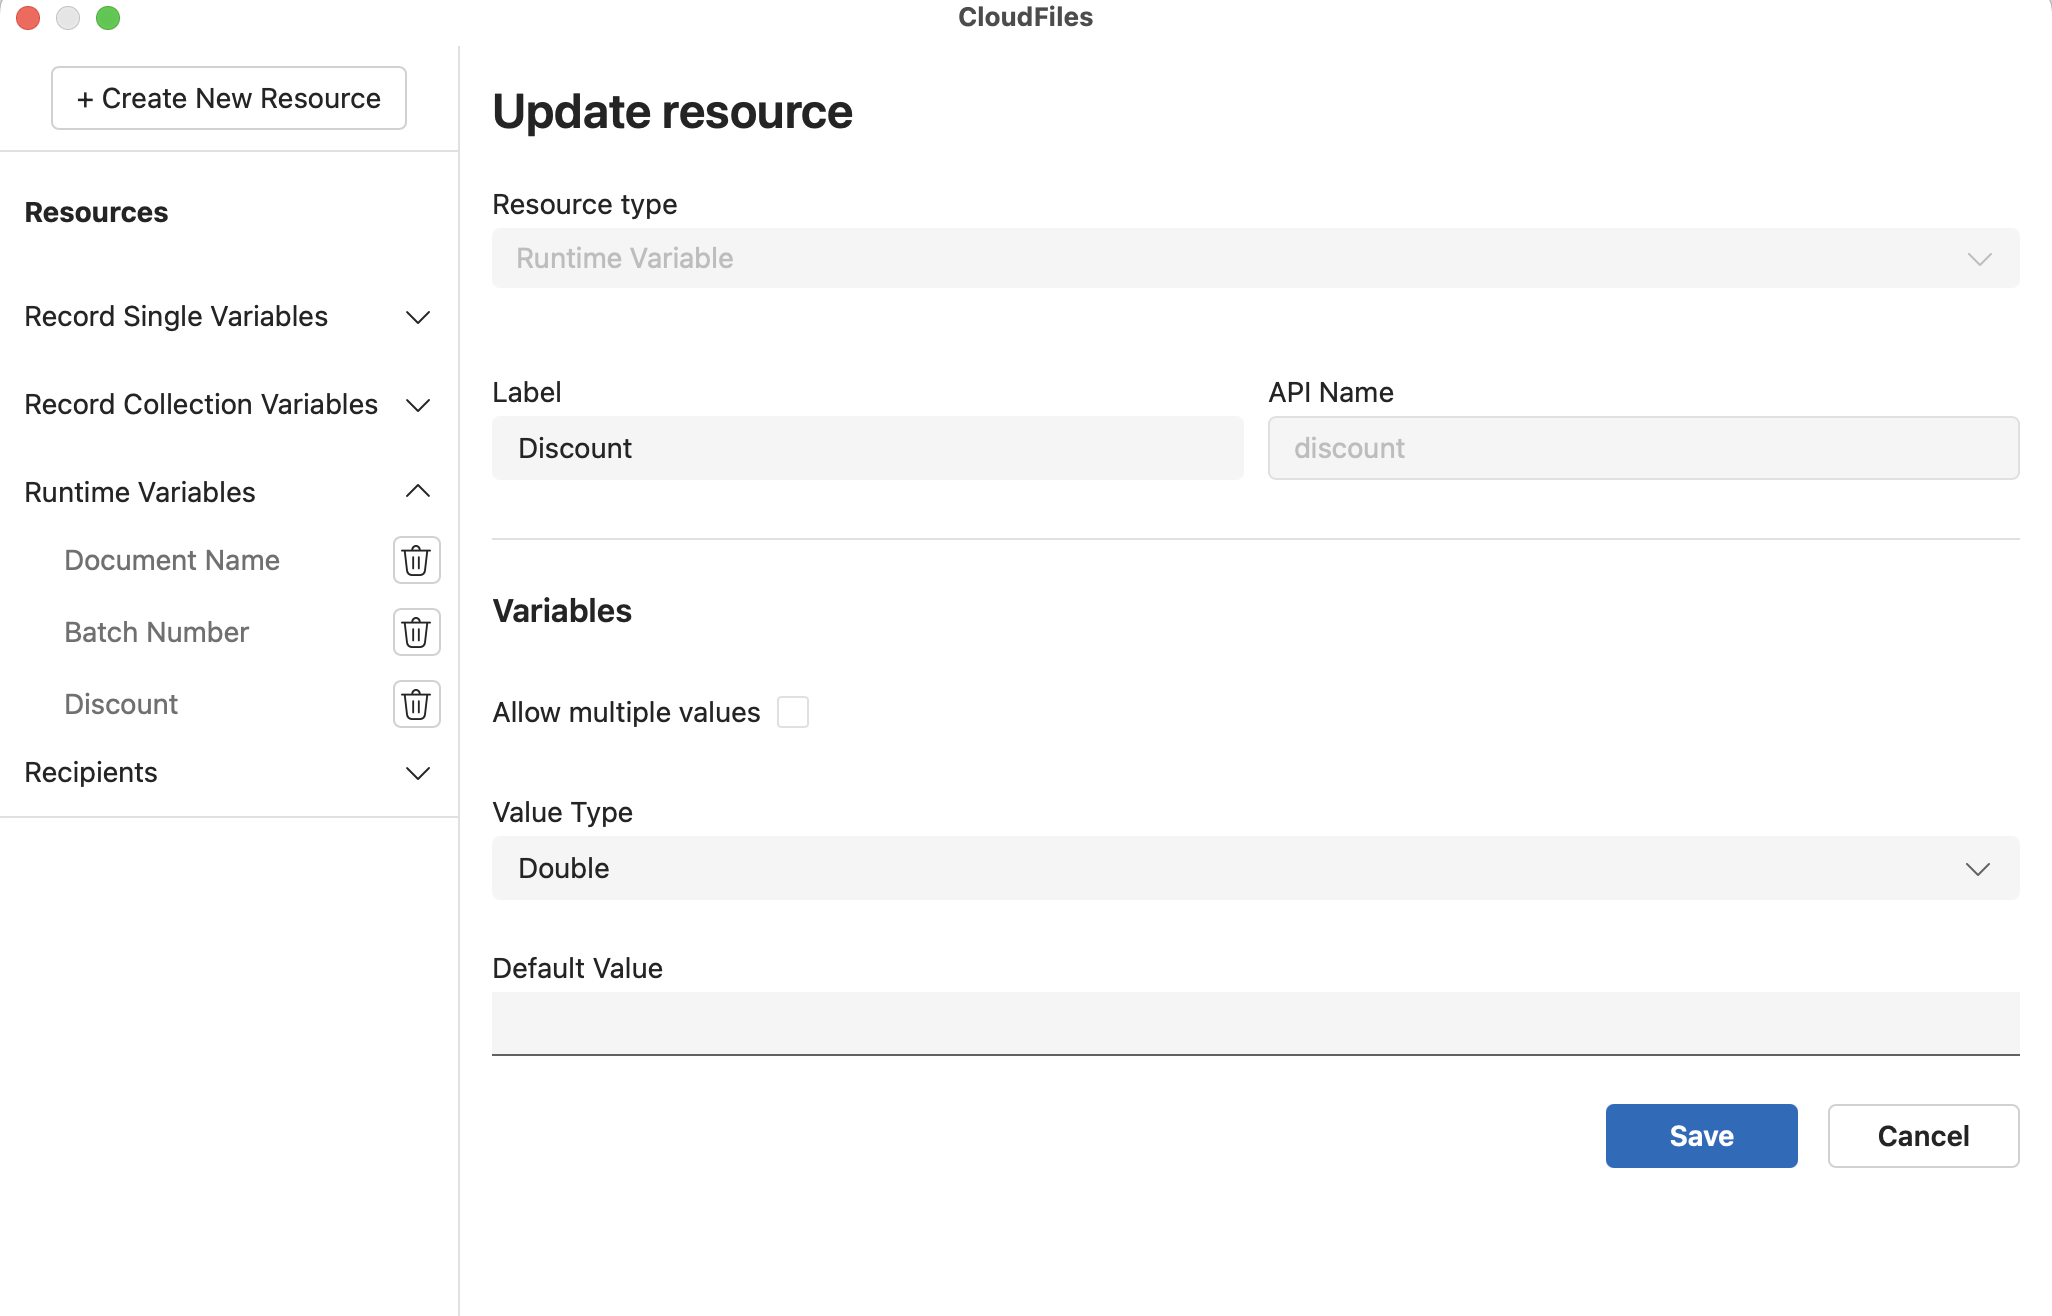
2 - Double
To pass the Discount %, create a runtime variable of type Double.
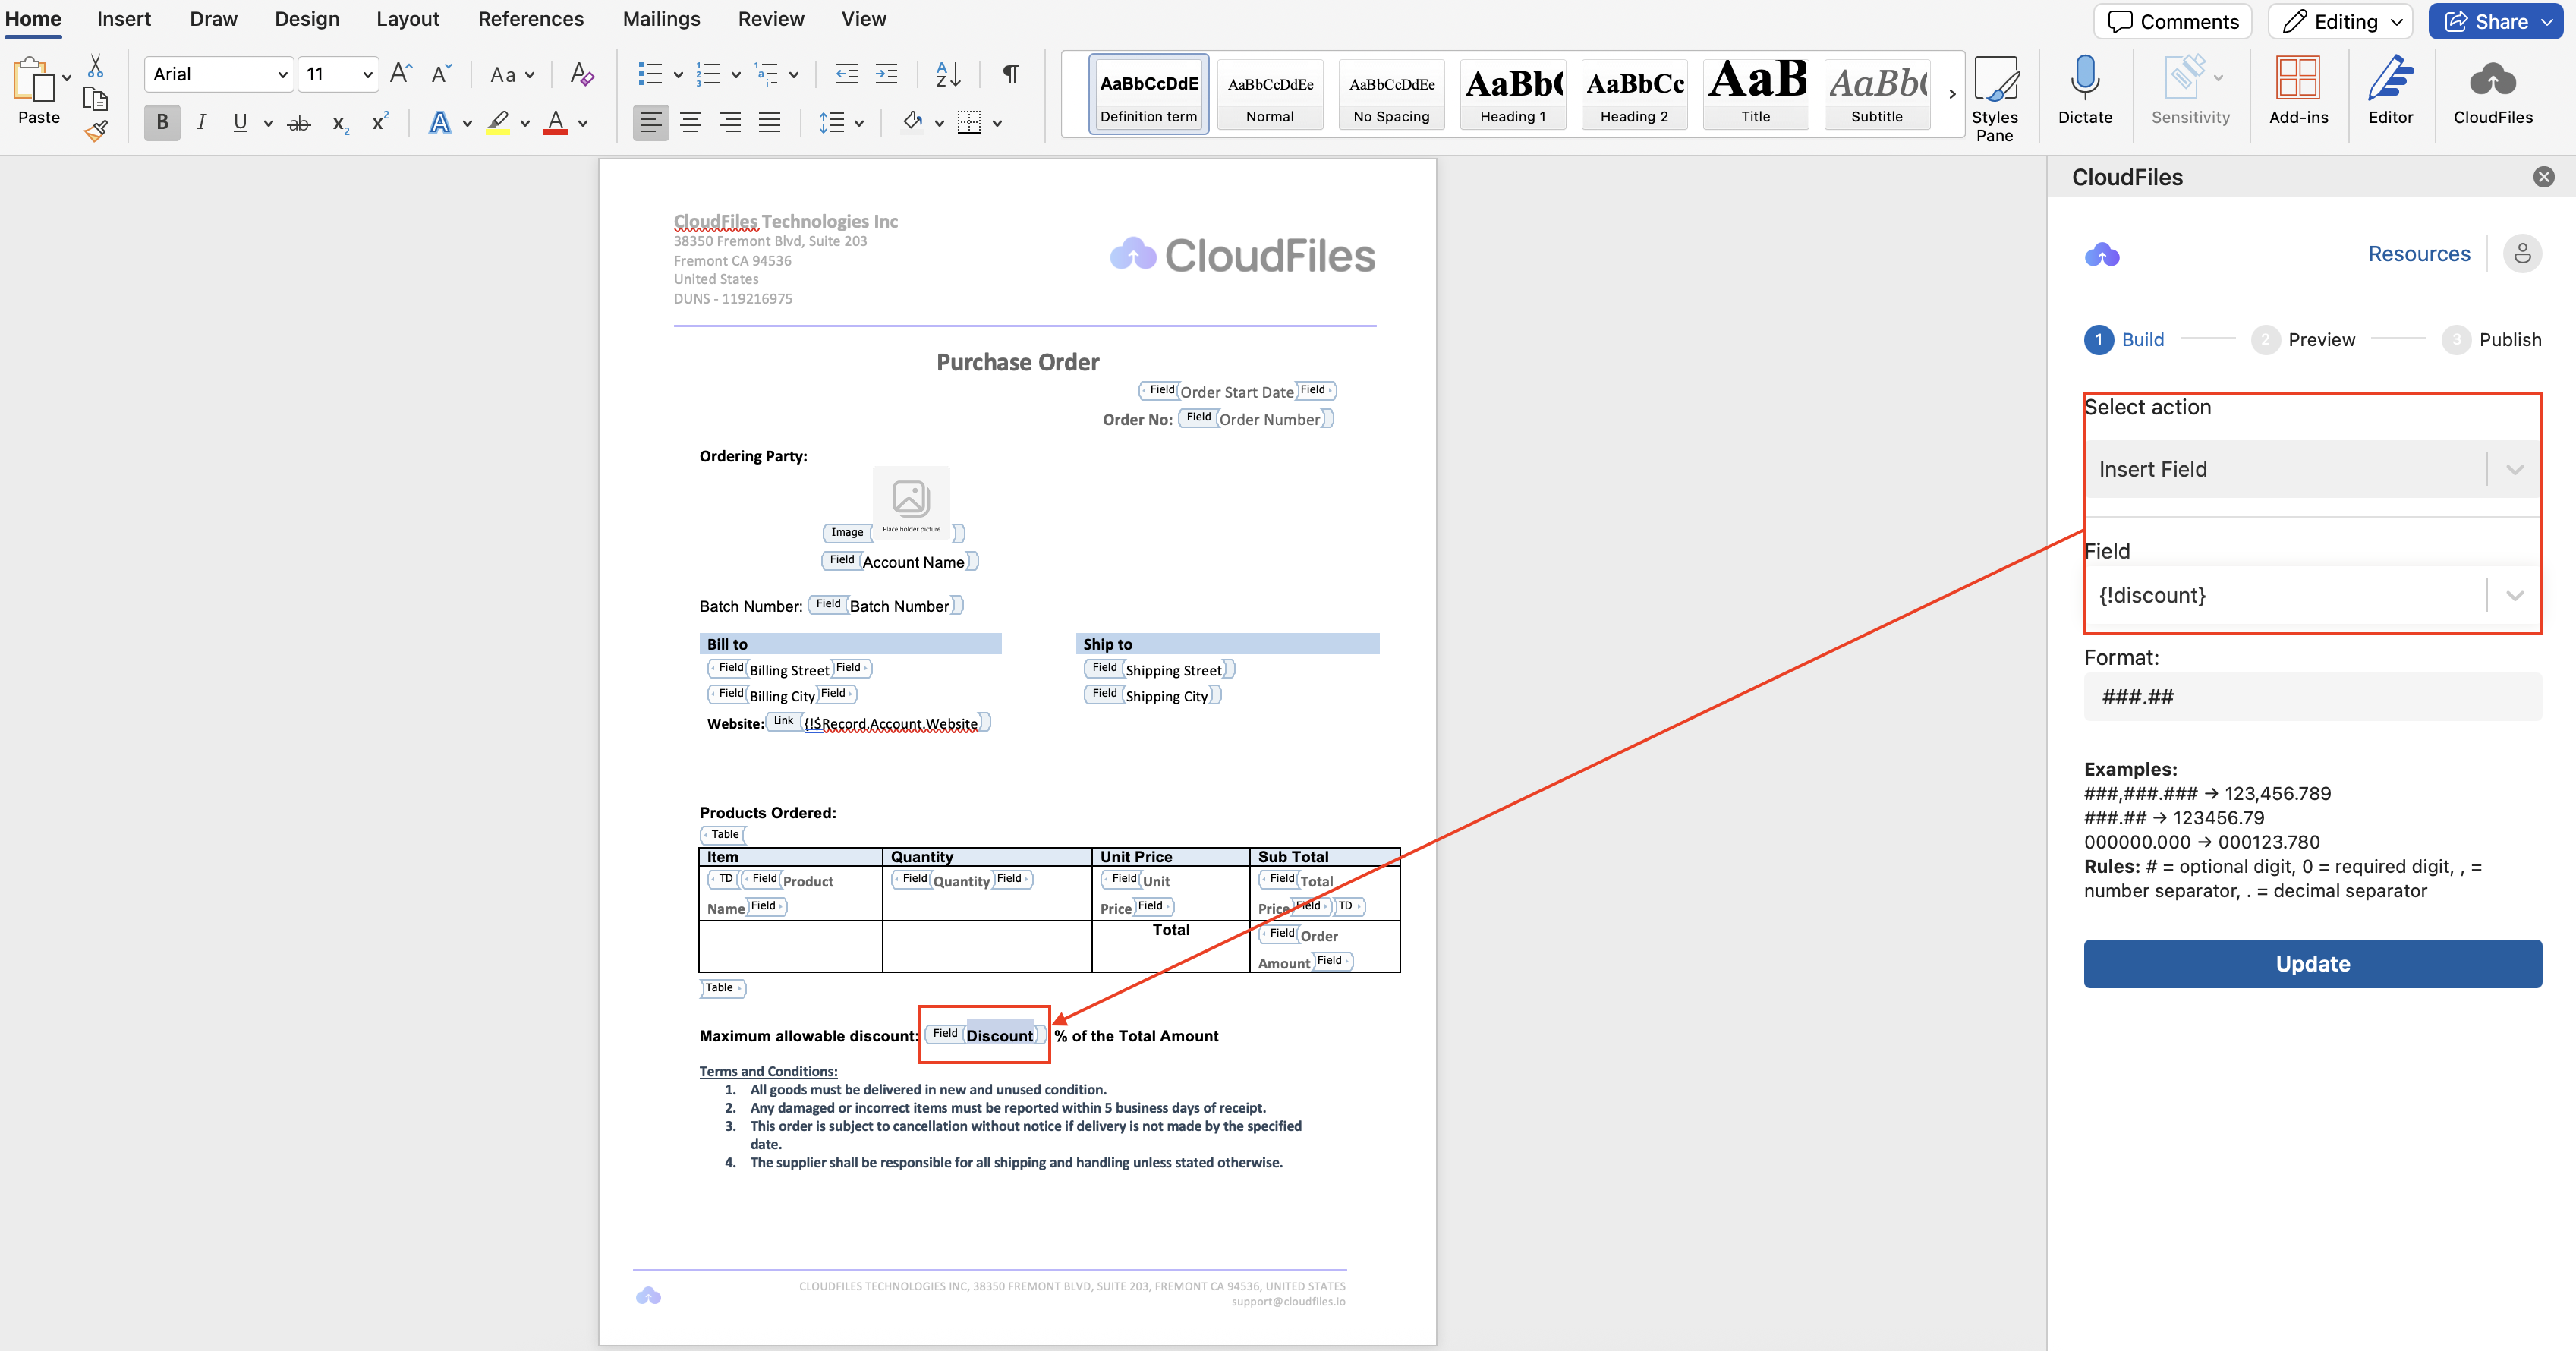
Add the discount into the template using Insert Field action.
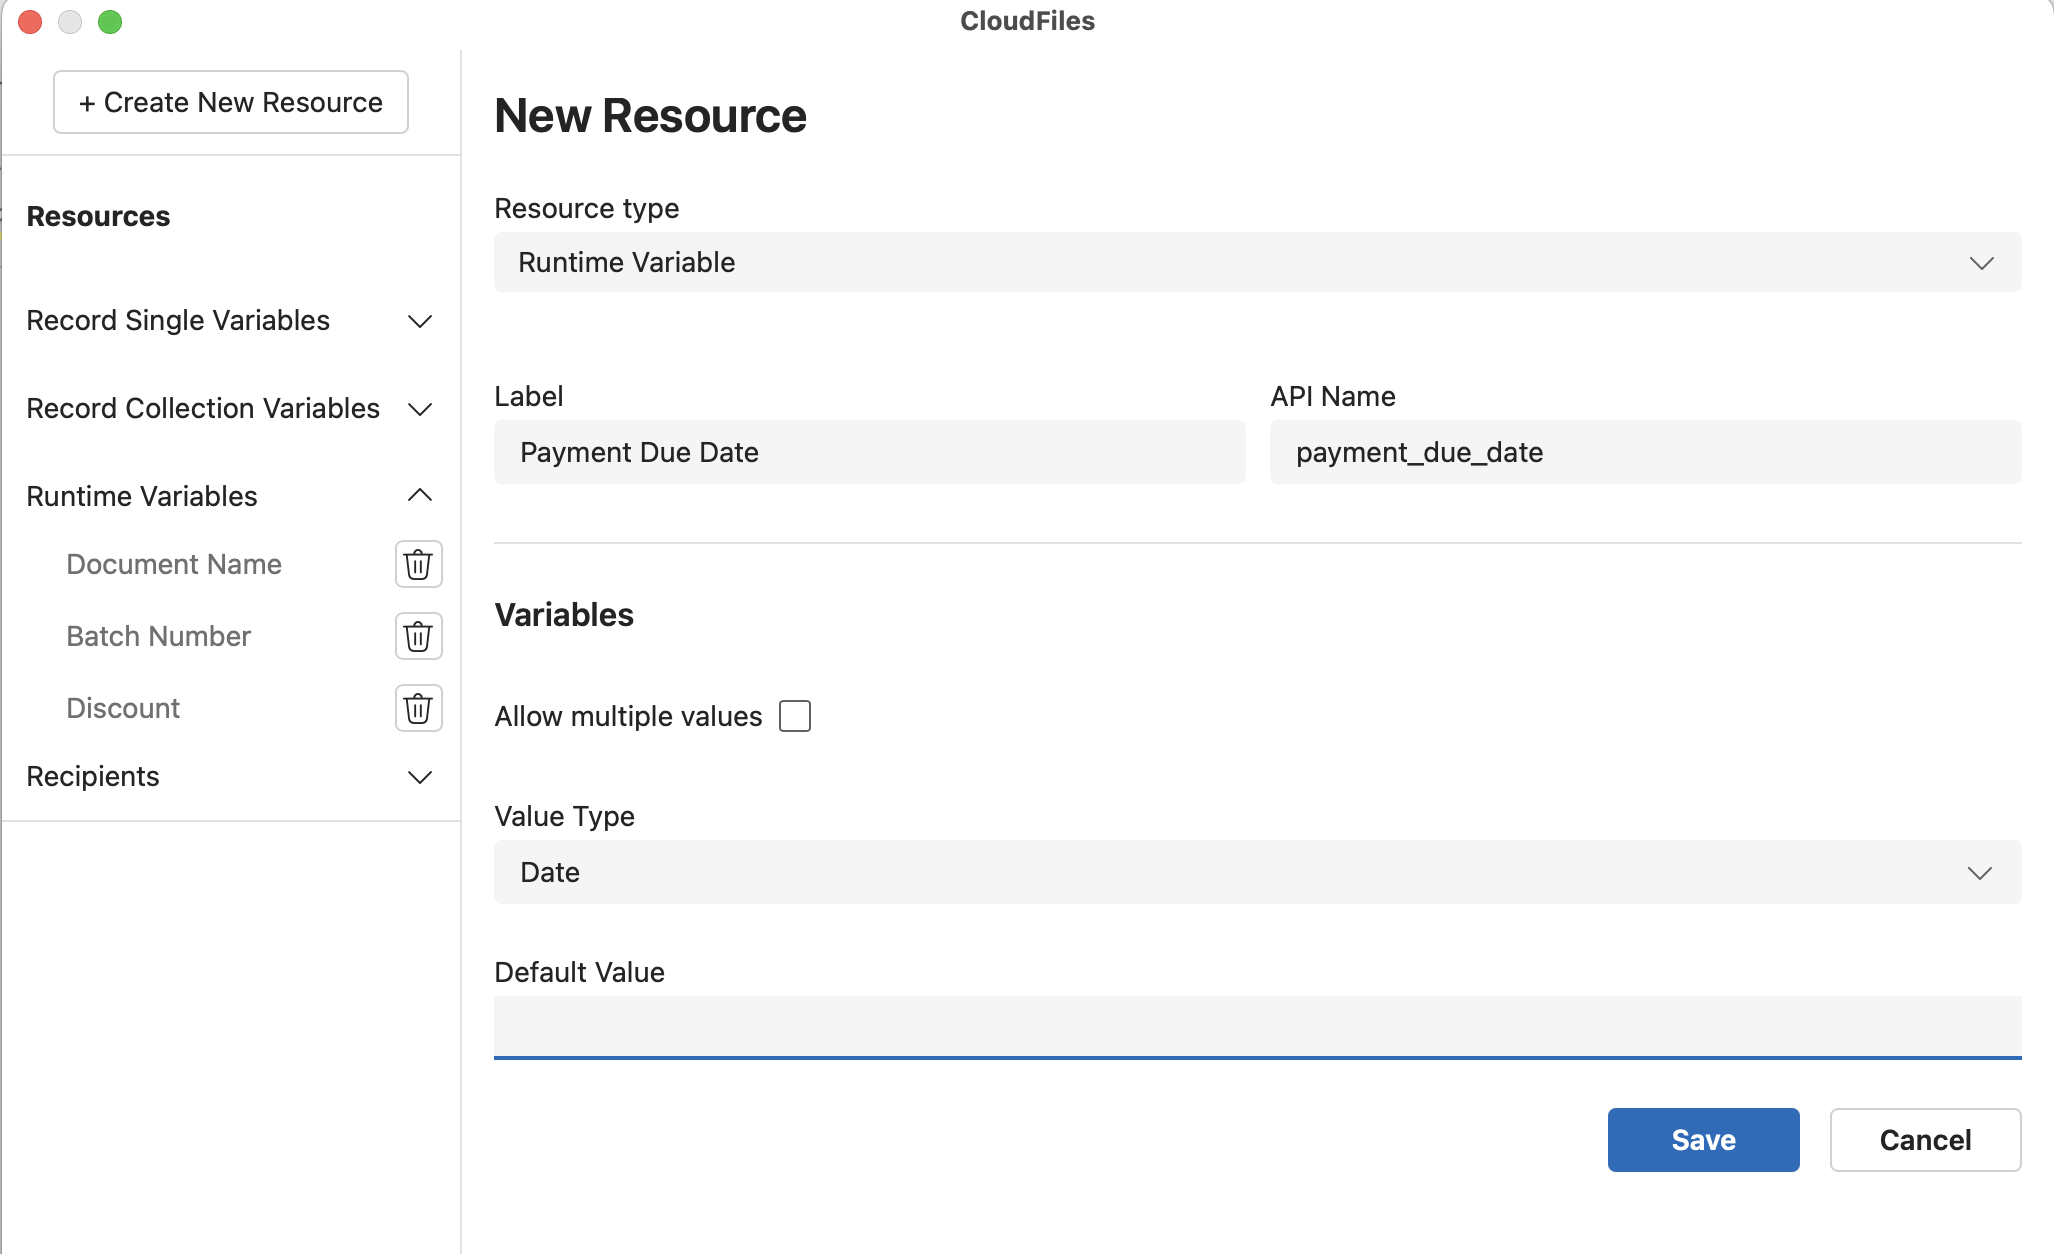
3 - Date
To pass the Payment Due Date, create a runtime variable of type Date.
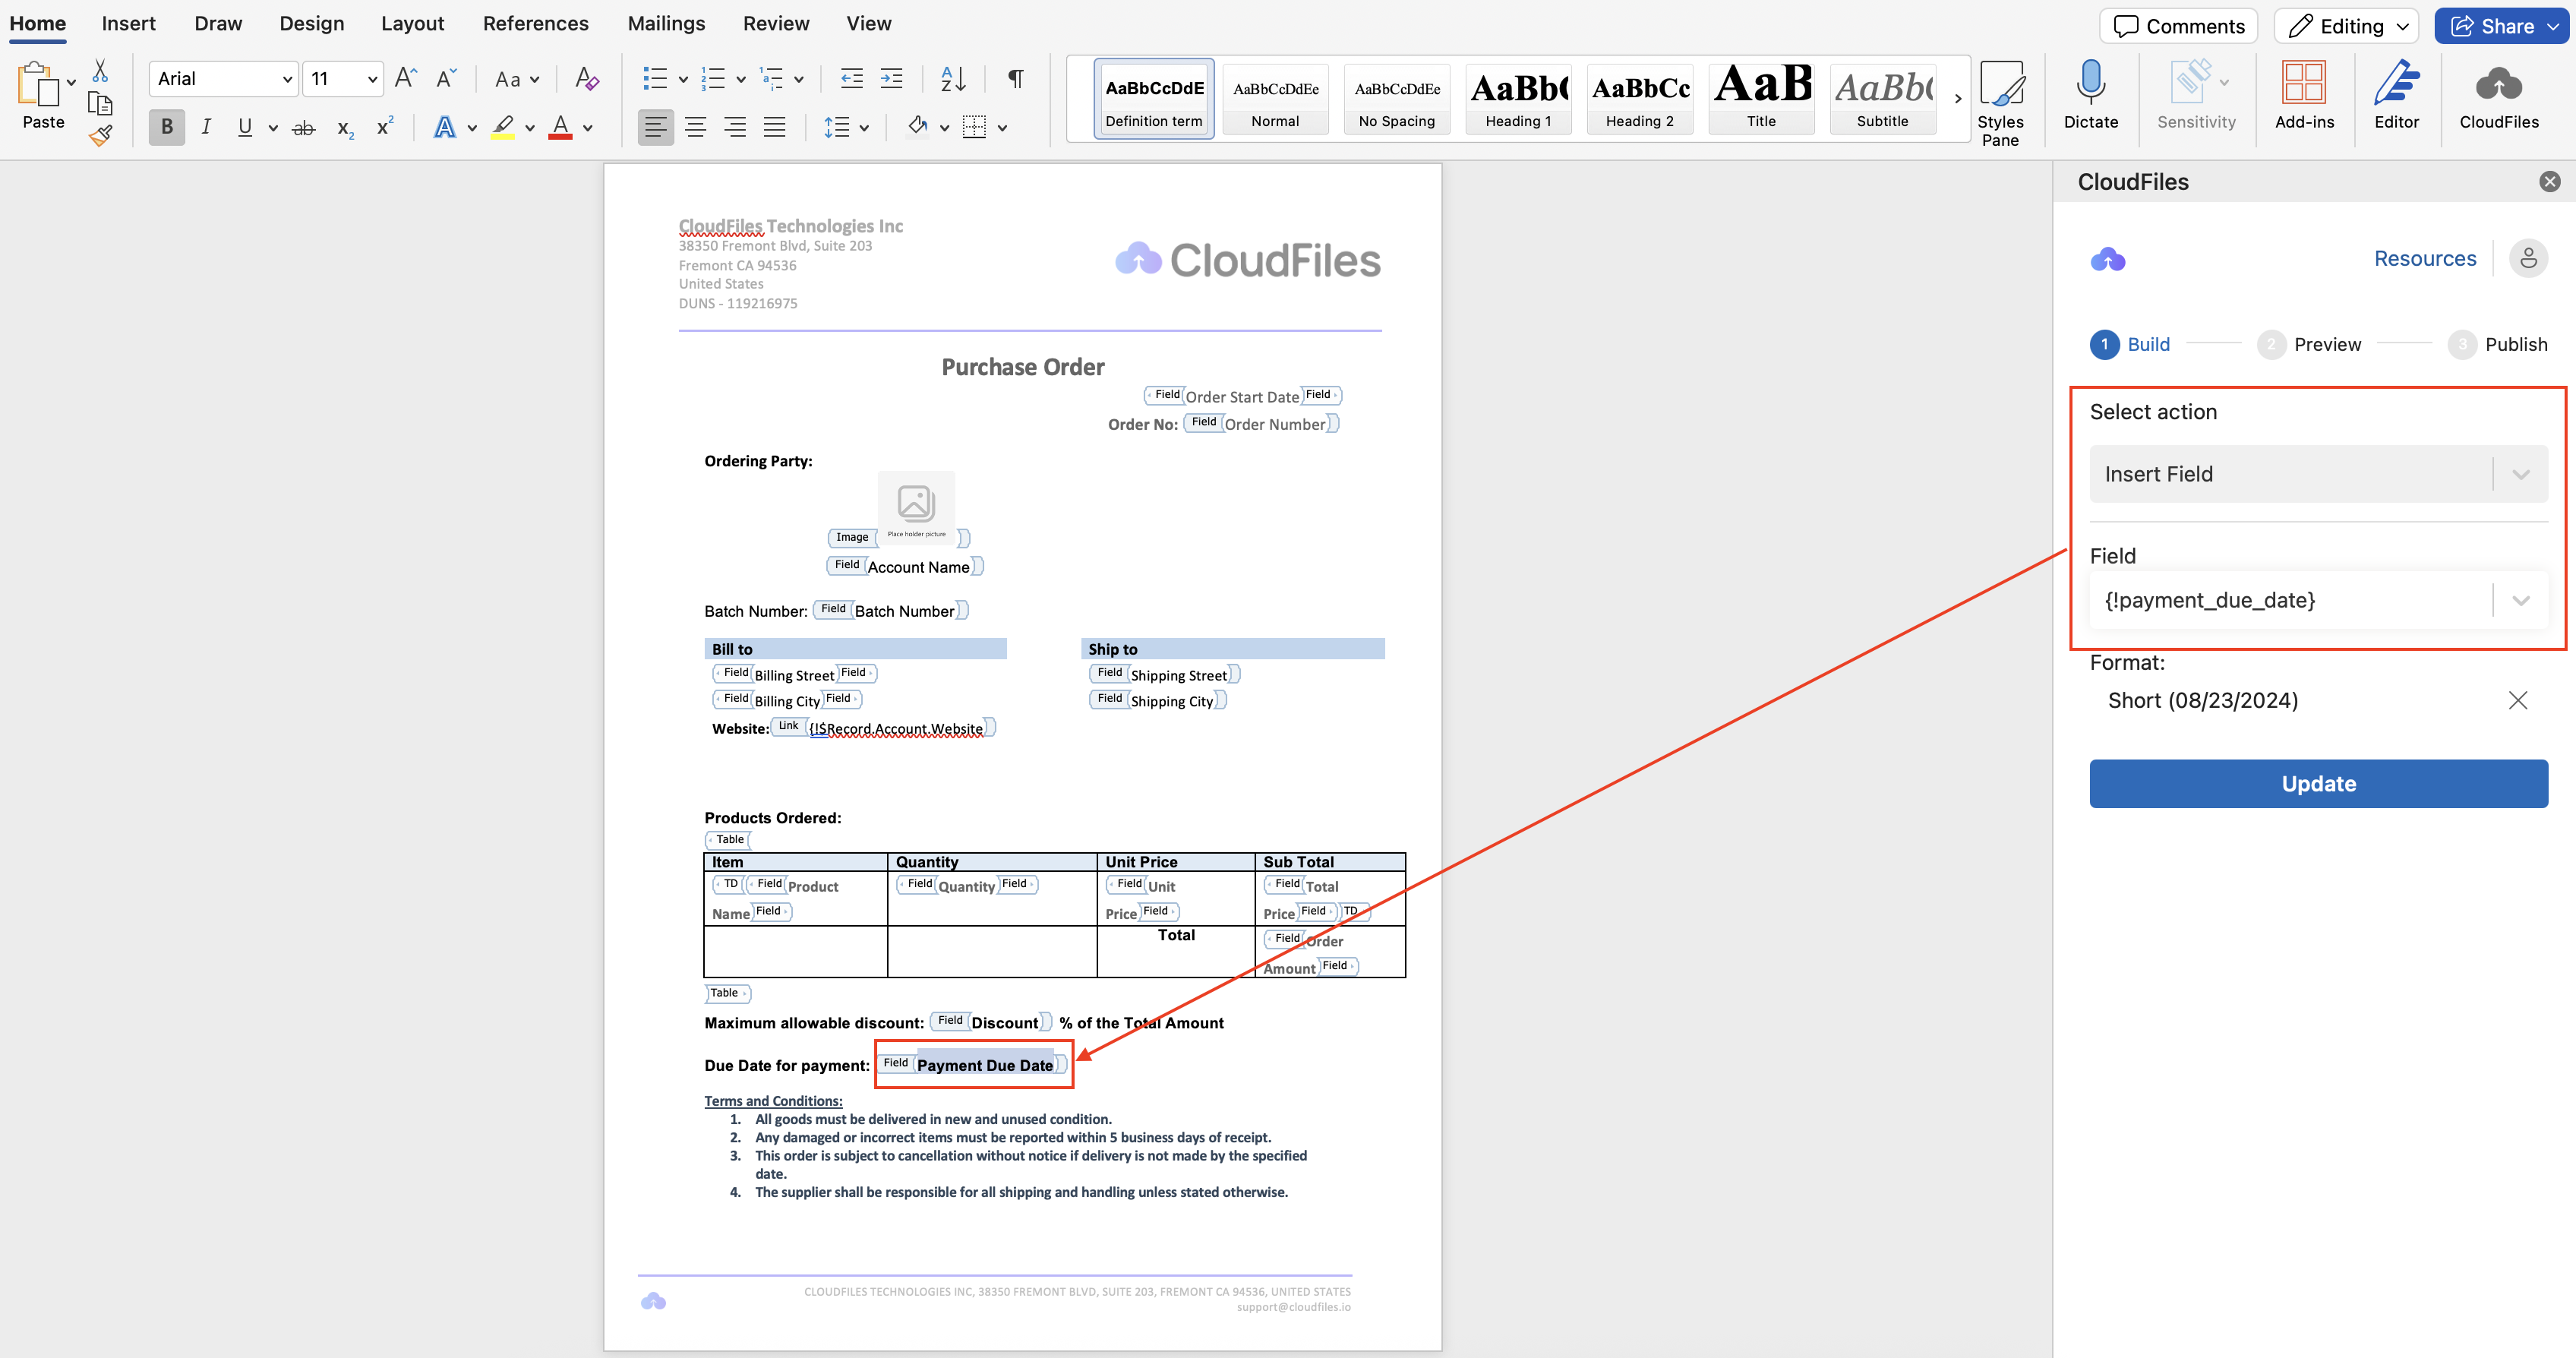
Add the payment_due_date into the template using 'Insert Field' action.
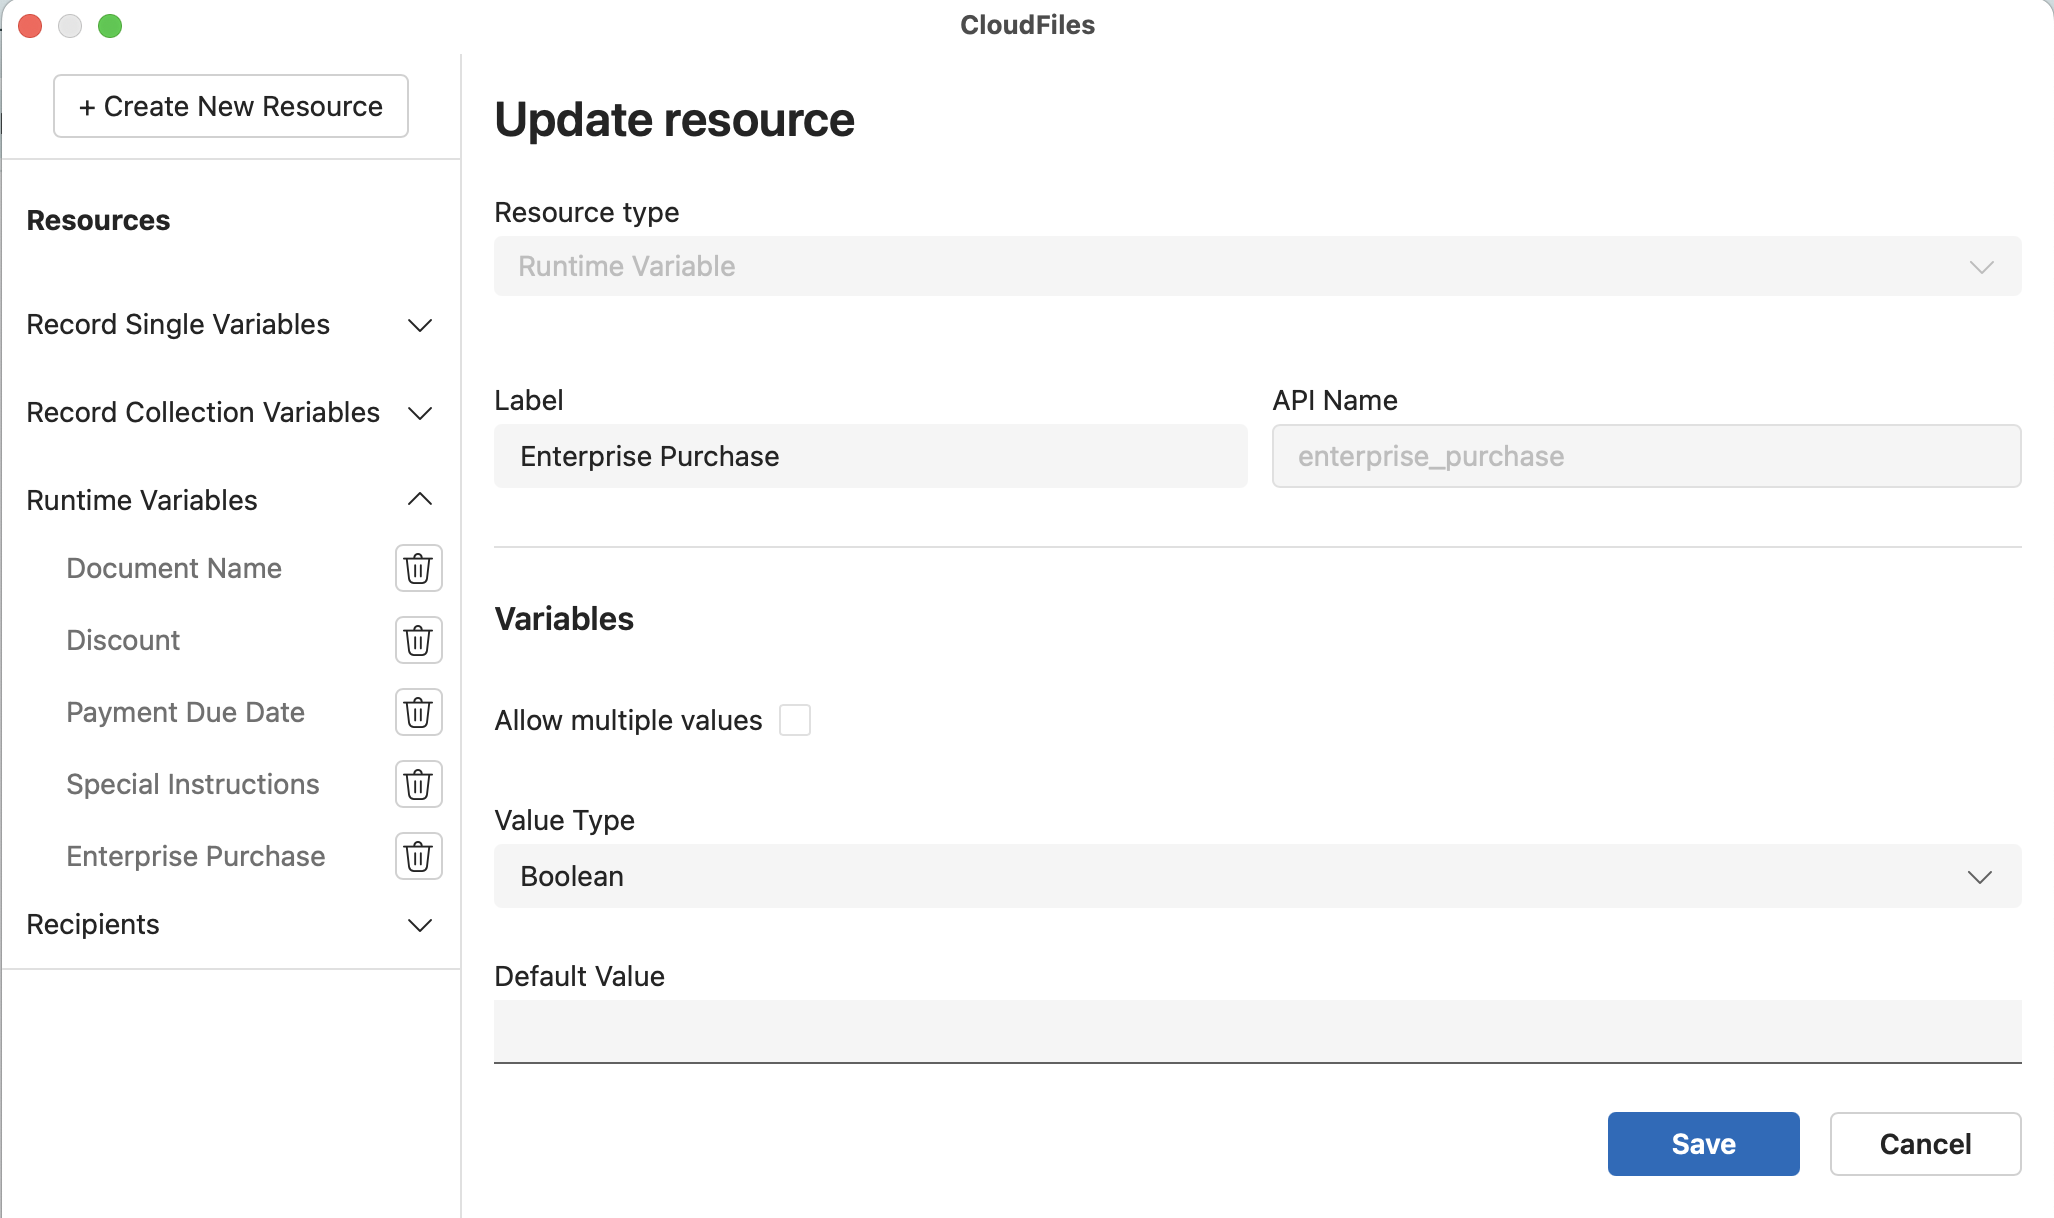
4 - Boolean
To control conditional logic in the template, create a runtime variable of type Boolean. This allows you to show or hide specific information based on a true/false value.
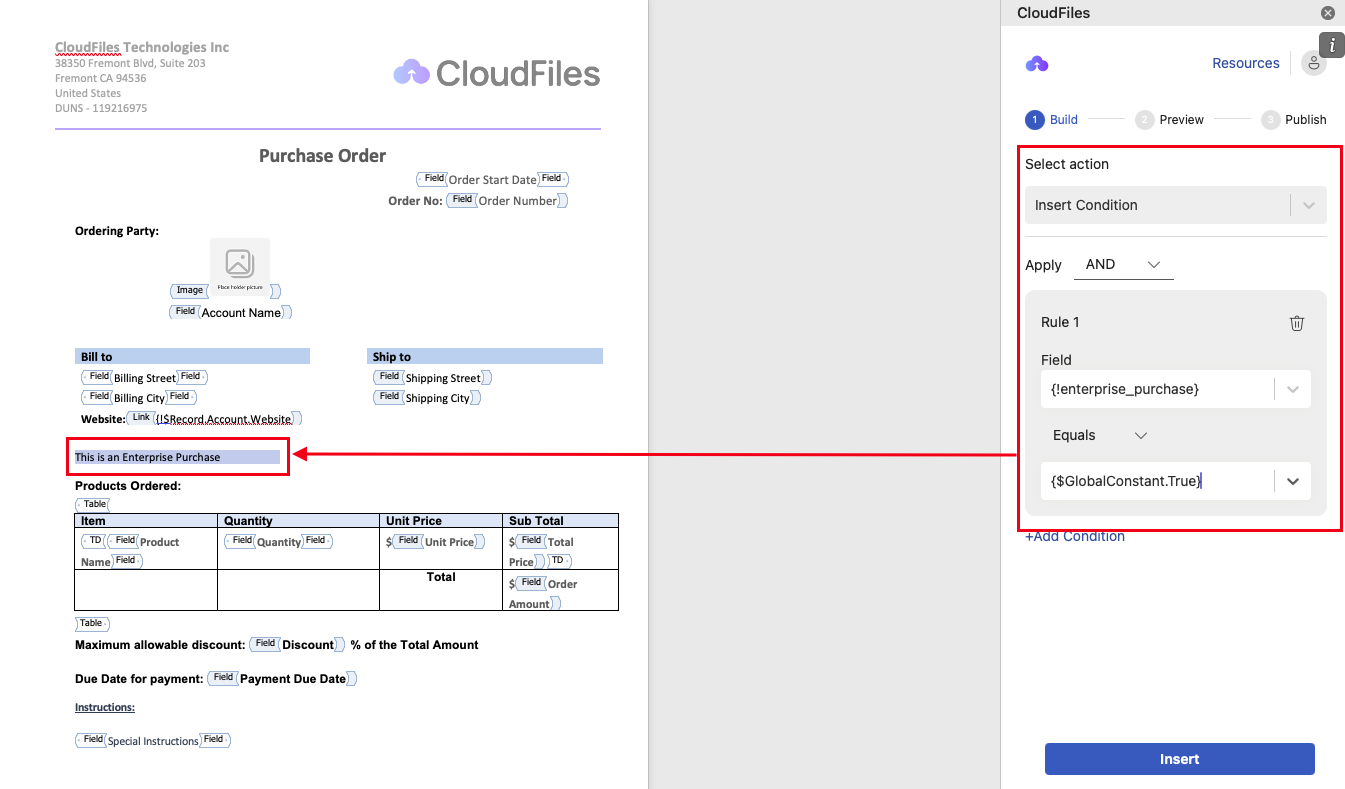
Conditional Display with Boolean Variable:
- Type the text in your template that you want to display conditionally, for example: “This is an Enterprise Purchase”.
- Select the text and choose Insert Condition from the right-hand panel.
- In the condition settings: Set Field → {!enterprise_purchase} Set Equals → {$GlobalConstant.True}
- Click Insert
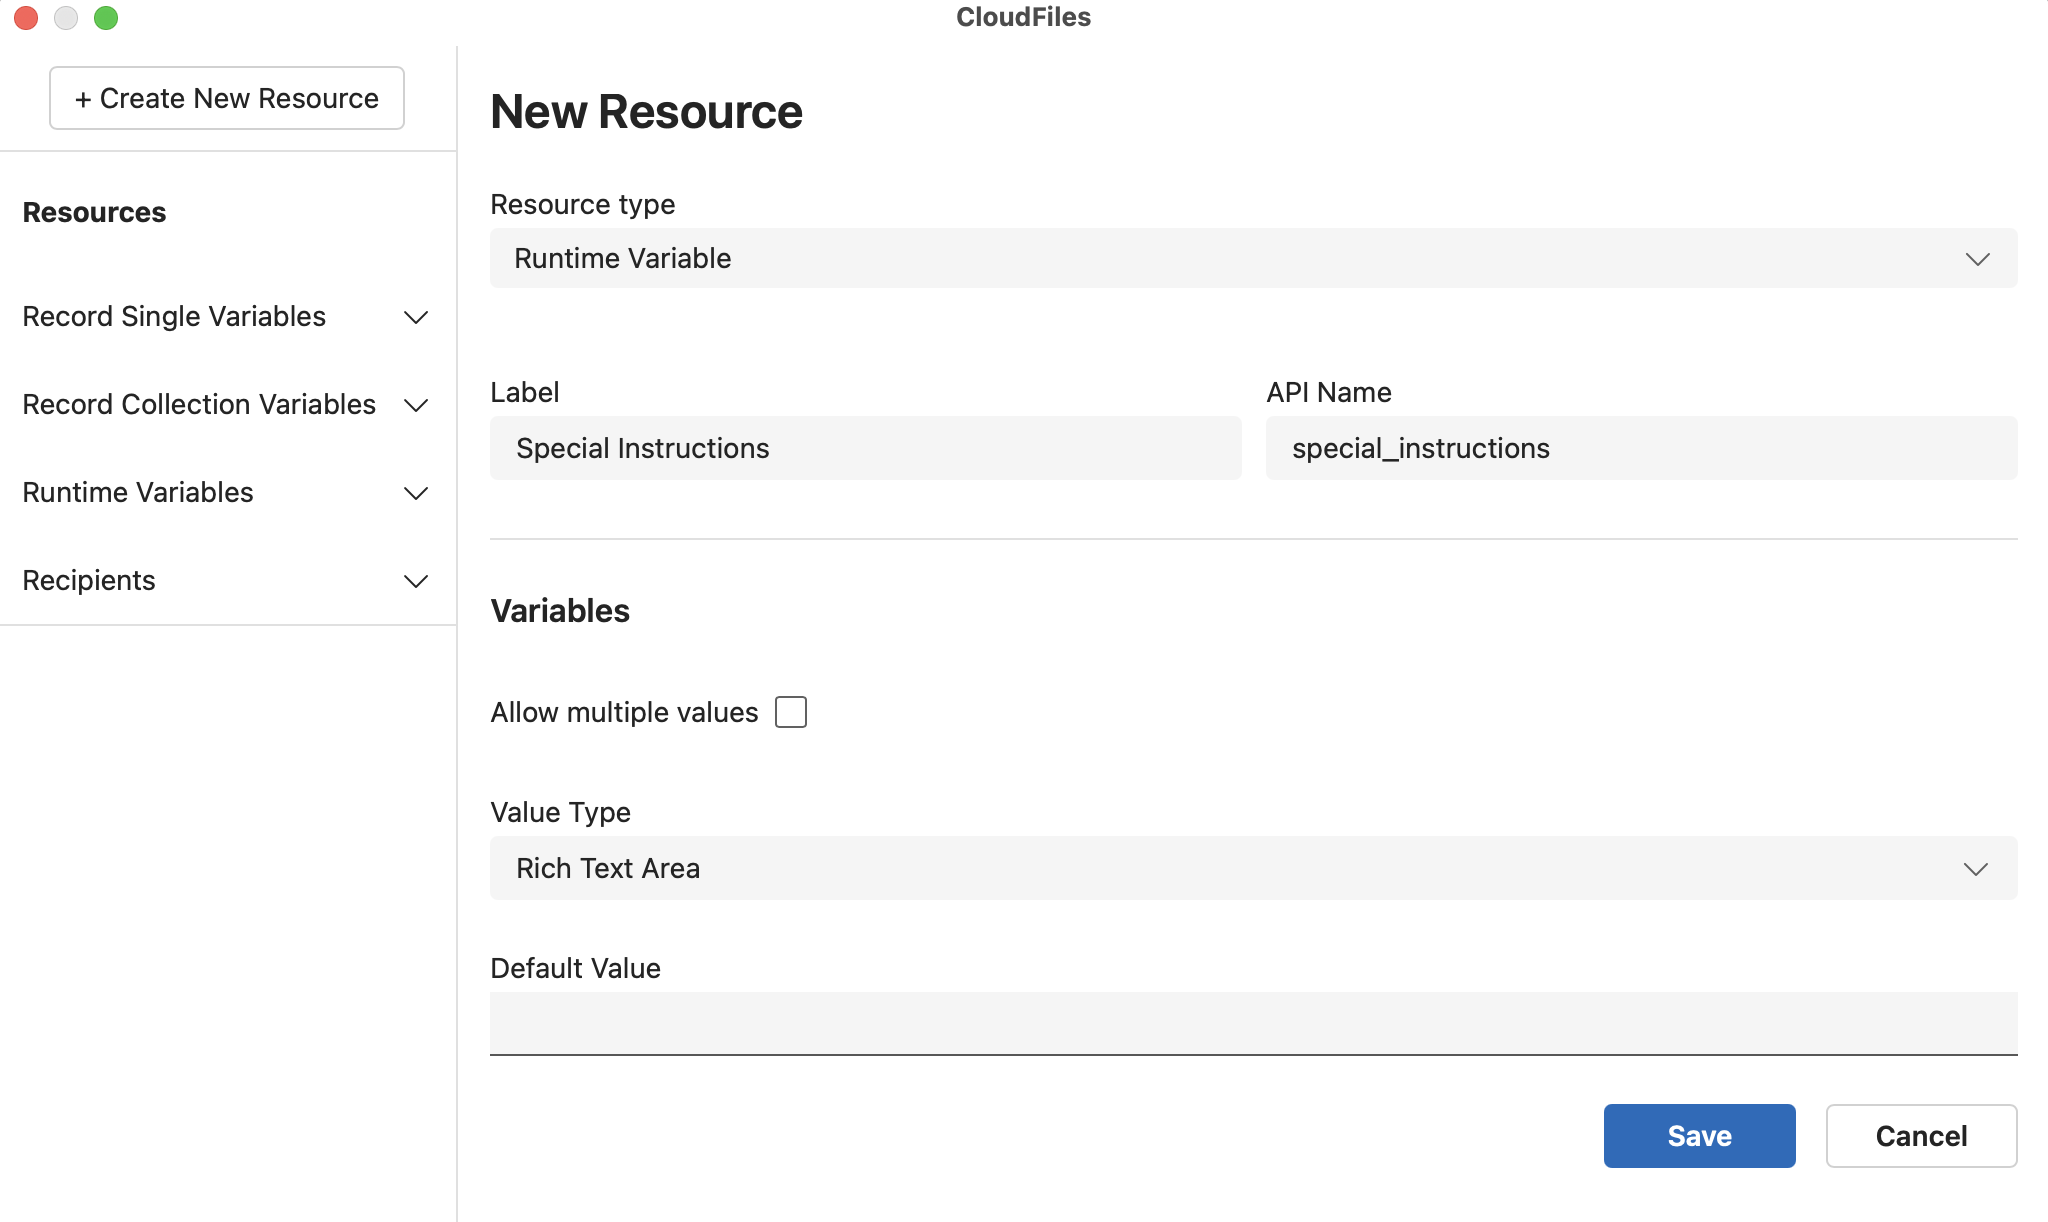
5 - Rich Text Area
To pass Special Instructions, create a runtime variable of type Rich Text Area. This allows you to include formatted content such as bold text, italic text, bullet points, or even hyperlinks in the generated document.
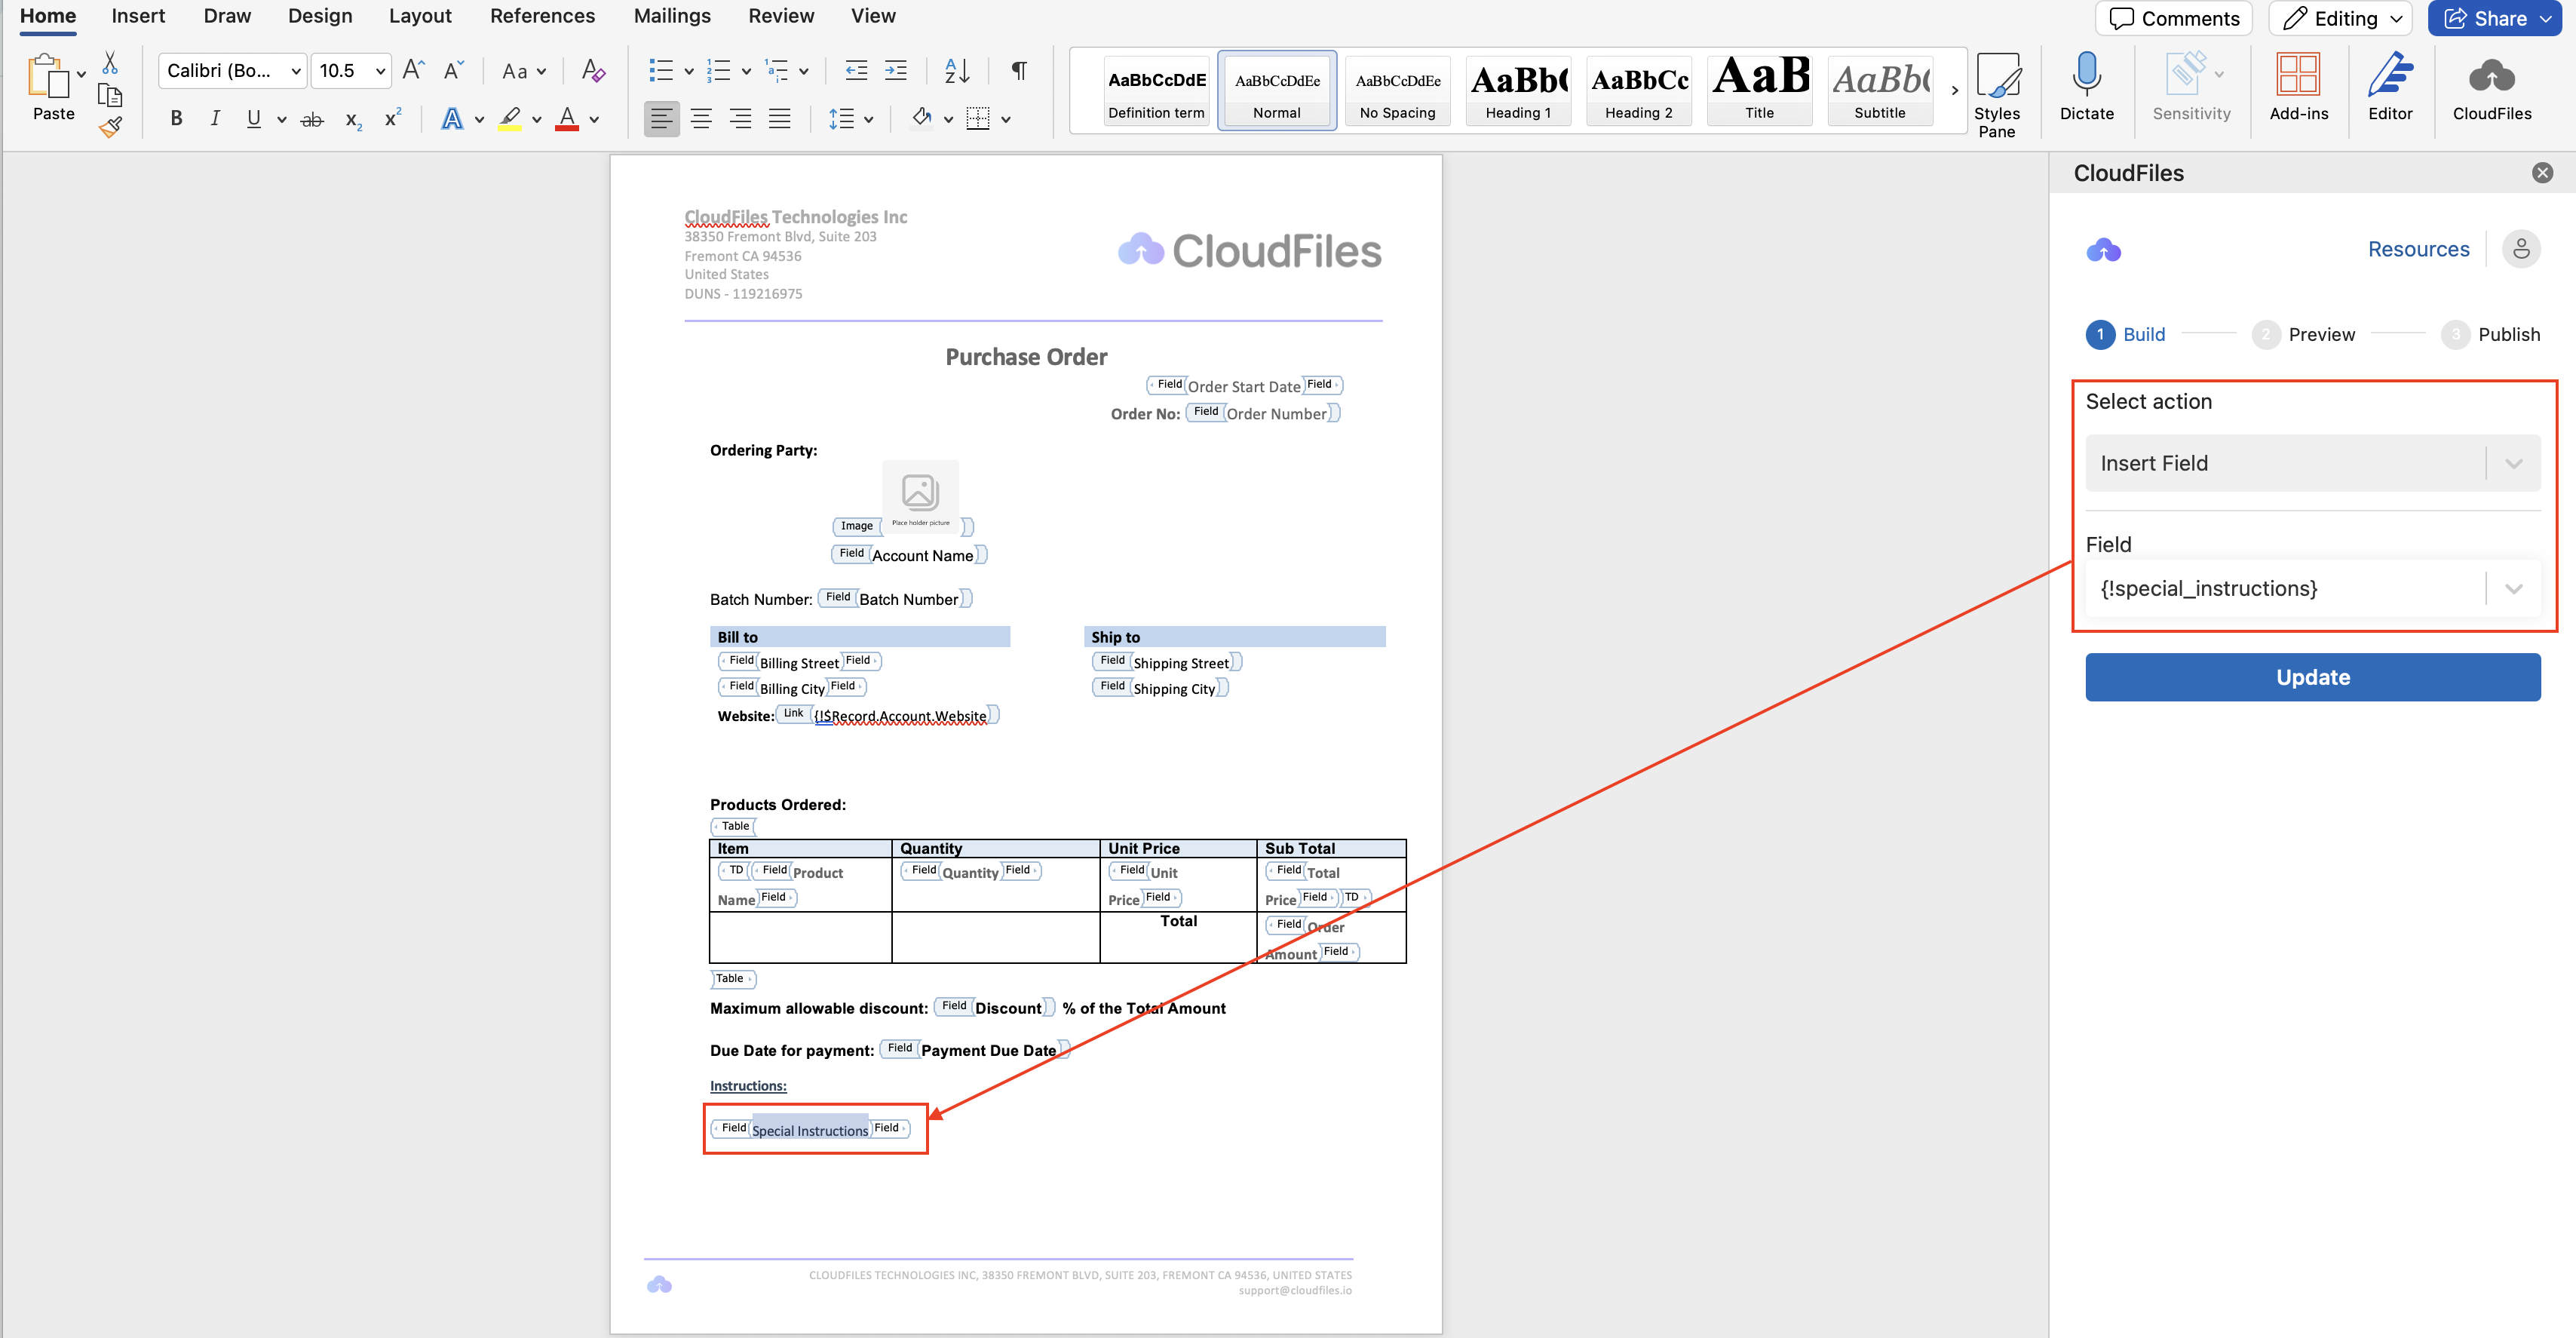
Add the special_instructions into the template using 'Insert Field' action.
2 - Publish Template
Once the template is updated with runtime variables, publish it so that it becomes available for use in document generation.
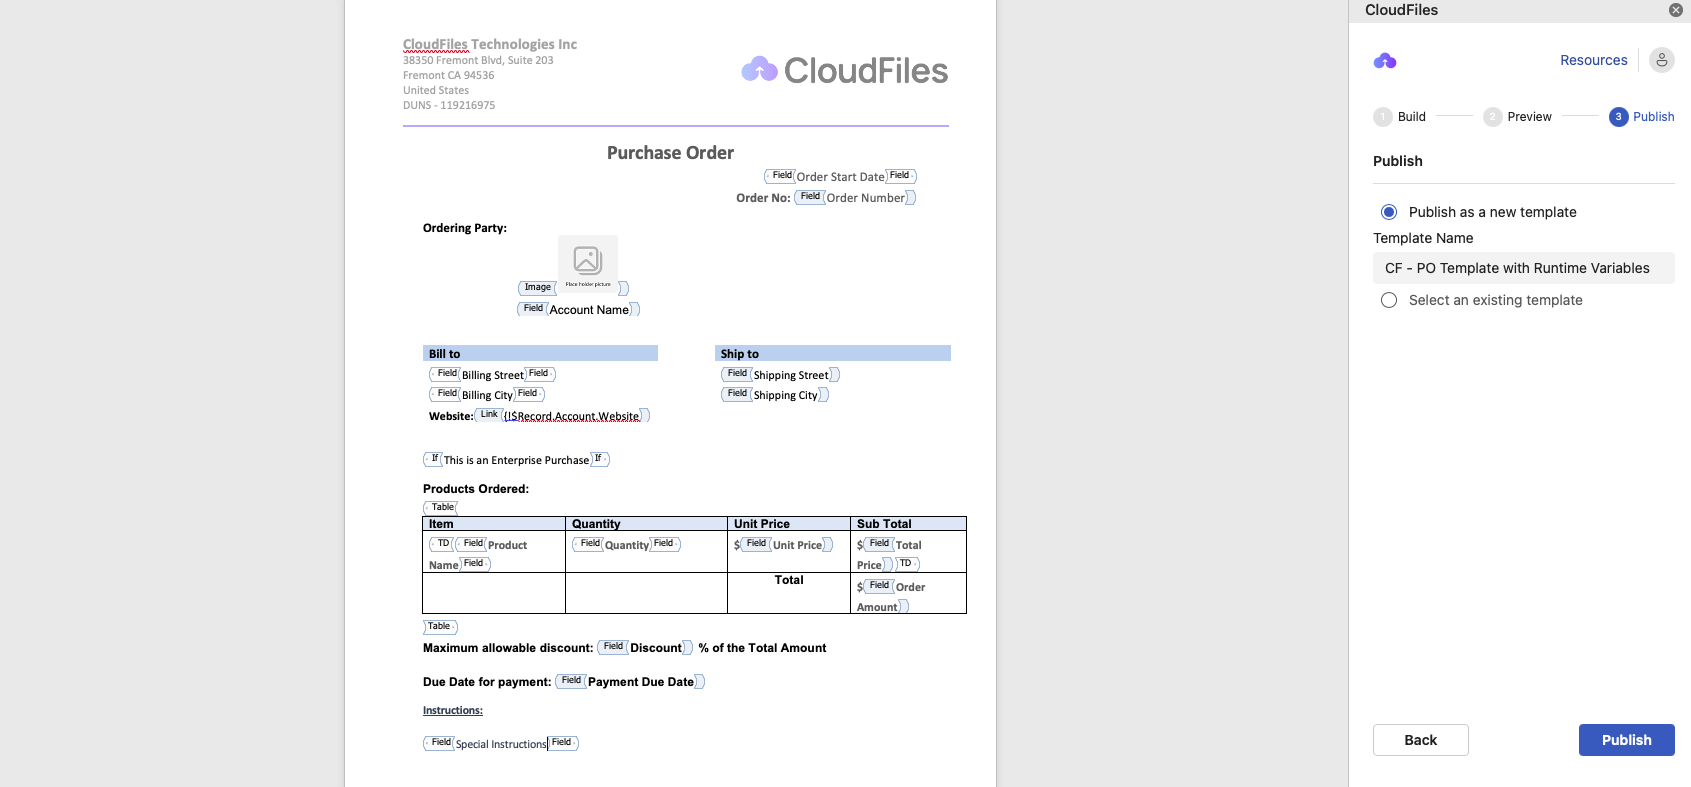
After publishing, the template will appear under the Document Generation → DocGen Templates tab. Make sure to note the Template Id, as you’ll need it later when configuring the Flow action.
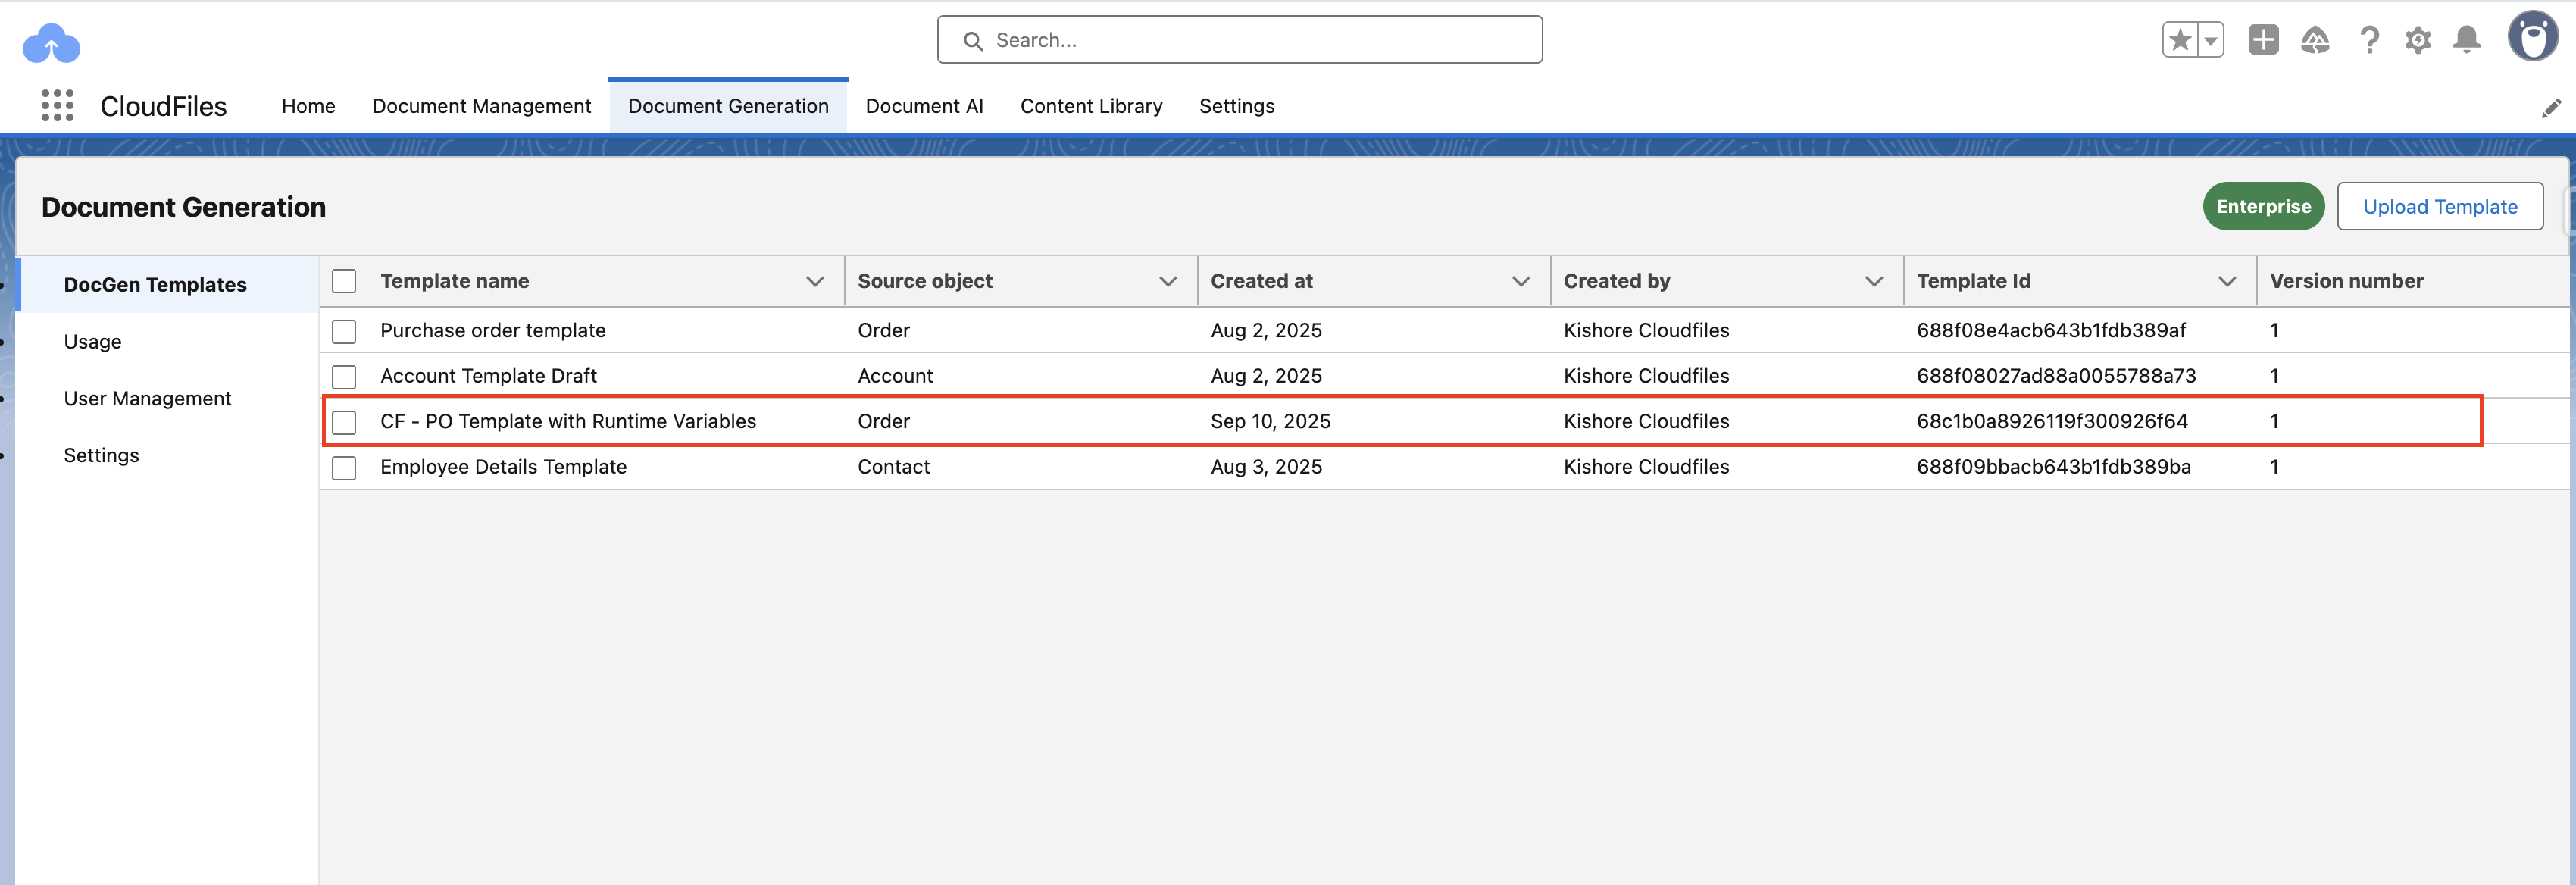
Runtime variable names (API Name) are case-sensitive and must match exactly when referenced in Screen Flow or CloudFiles assignments. In the upcoming sections, we will look at how to configure runtime variable reference in Flow.
Building the Flow
To generate documents dynamically, we use a Screen Flow in Salesforce. The flow serves as the bridge between user input and the CloudFiles template. By adding screen elements, we can collect runtime values (like batch number, discount, or payment due date) directly from users at the time the flow runs. These inputs are then mapped to the runtime variables in the template, allowing the generated document to include both Salesforce record data and the additional details provided during execution.
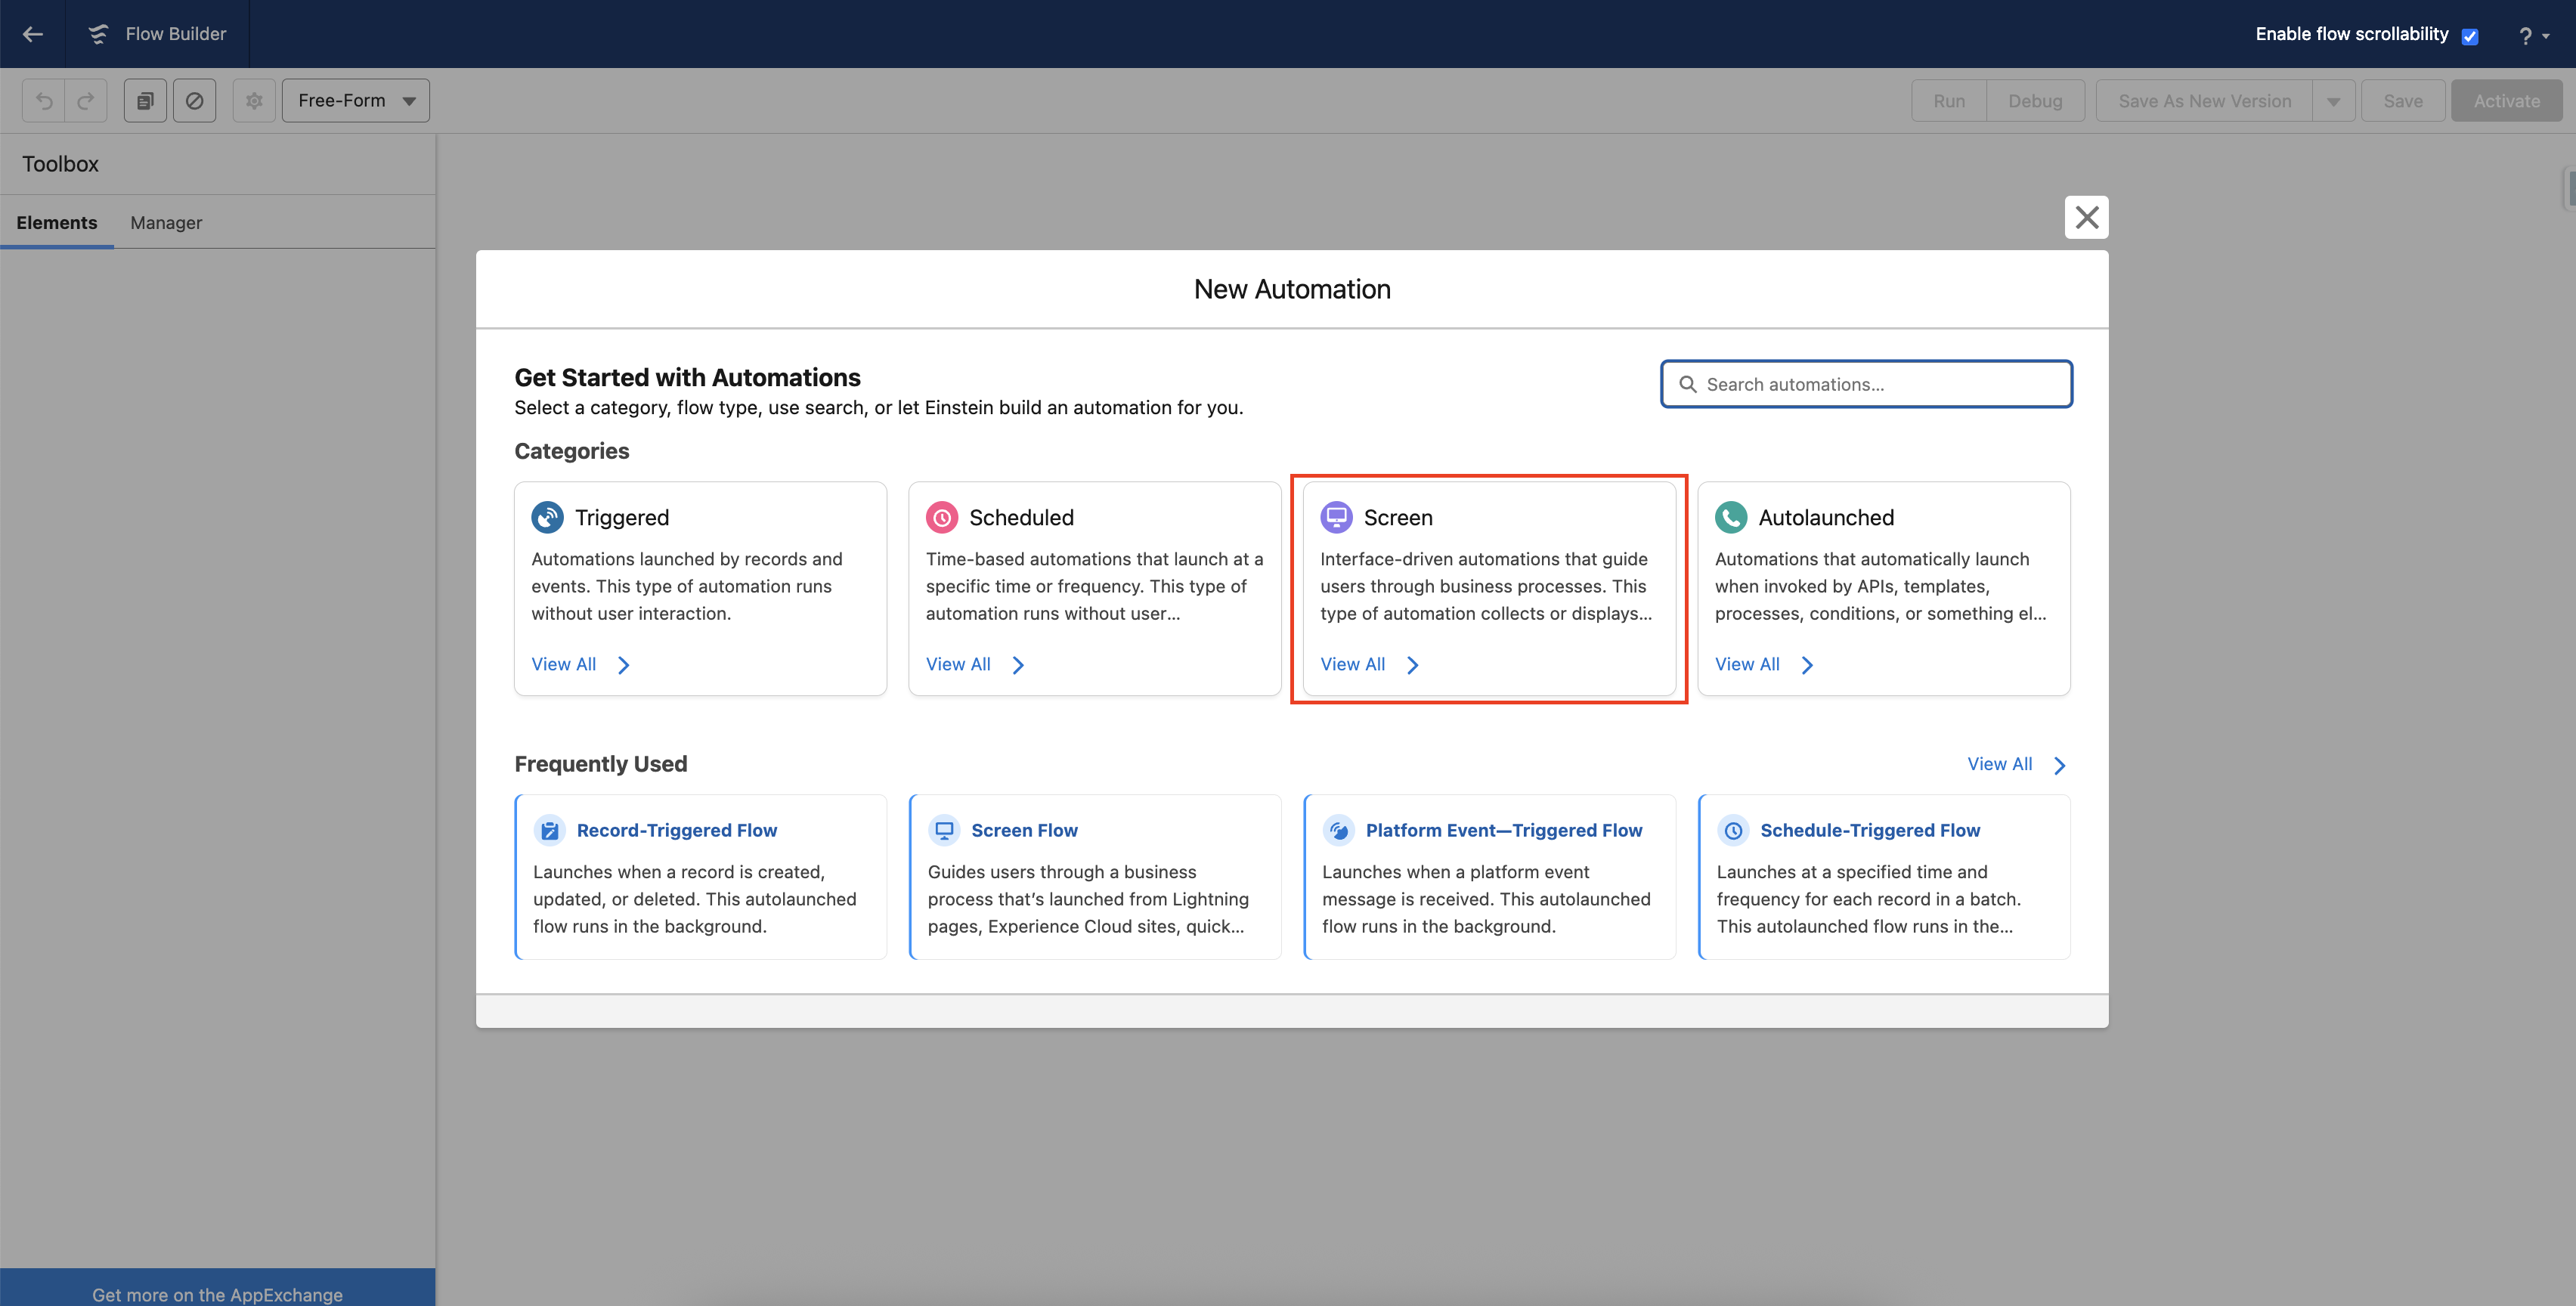
- Navigate to Setup → Flows → New Flow.
- Choose Screen Flow.
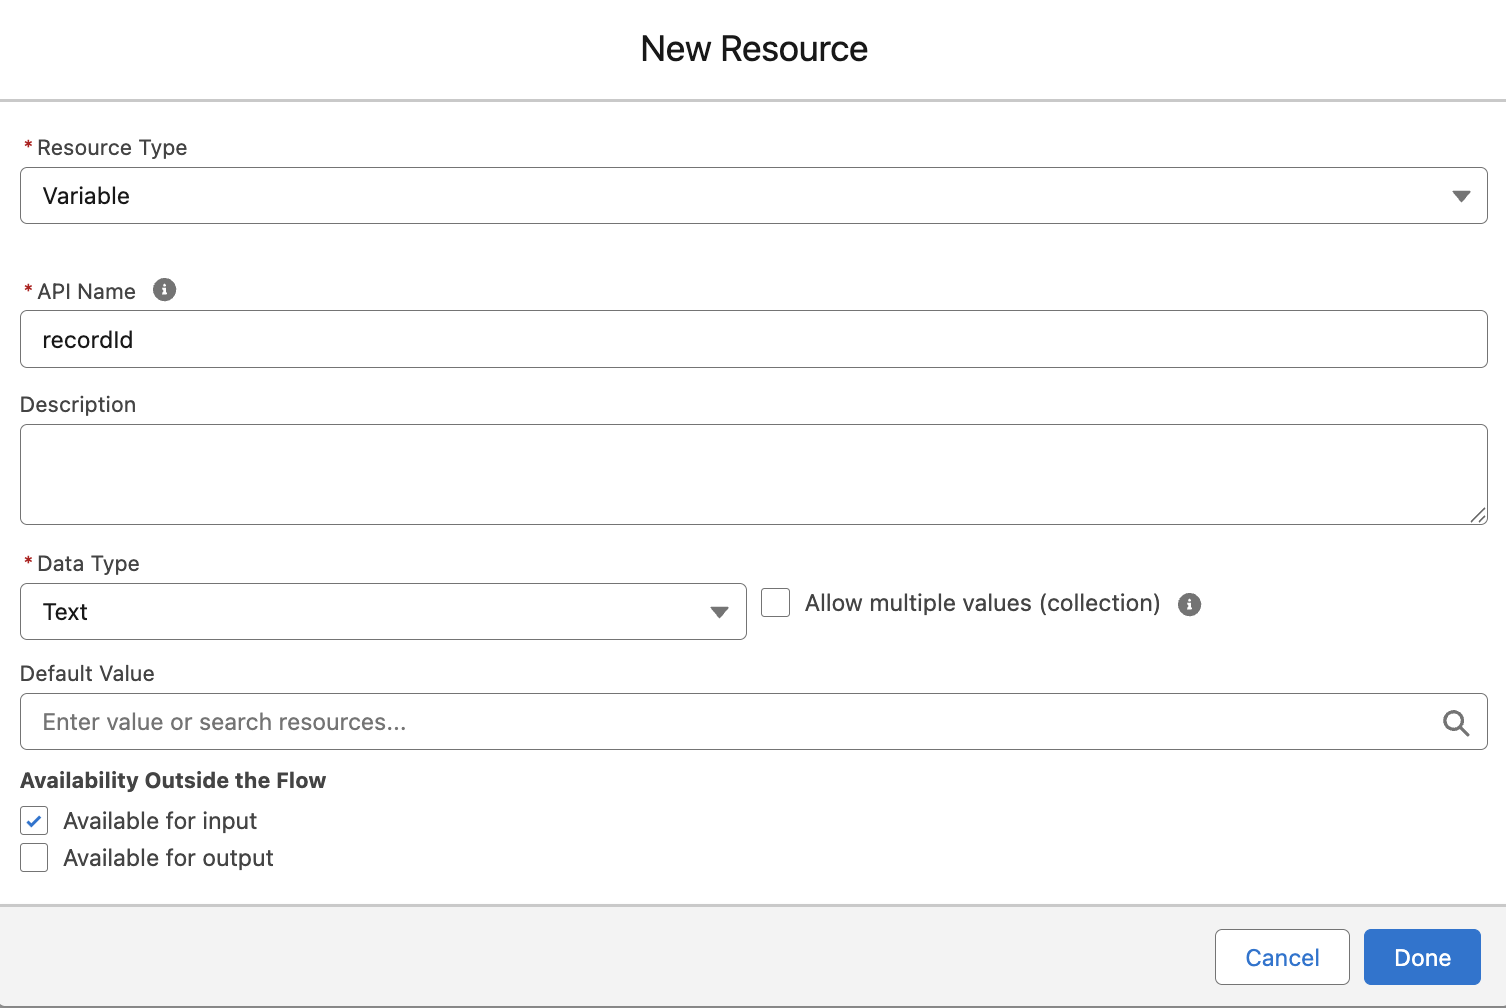
1 - Create a 'recordId' input
Create a recordId variable to capture the Salesforce record ID (Order record) from which the flow is launched. Set its data type to Text and mark it as Available for input so the record ID is automatically passed when the flow runs from a record page.
2 - Include a 'Screen'
Include a Screen element to get input for runtime variables.
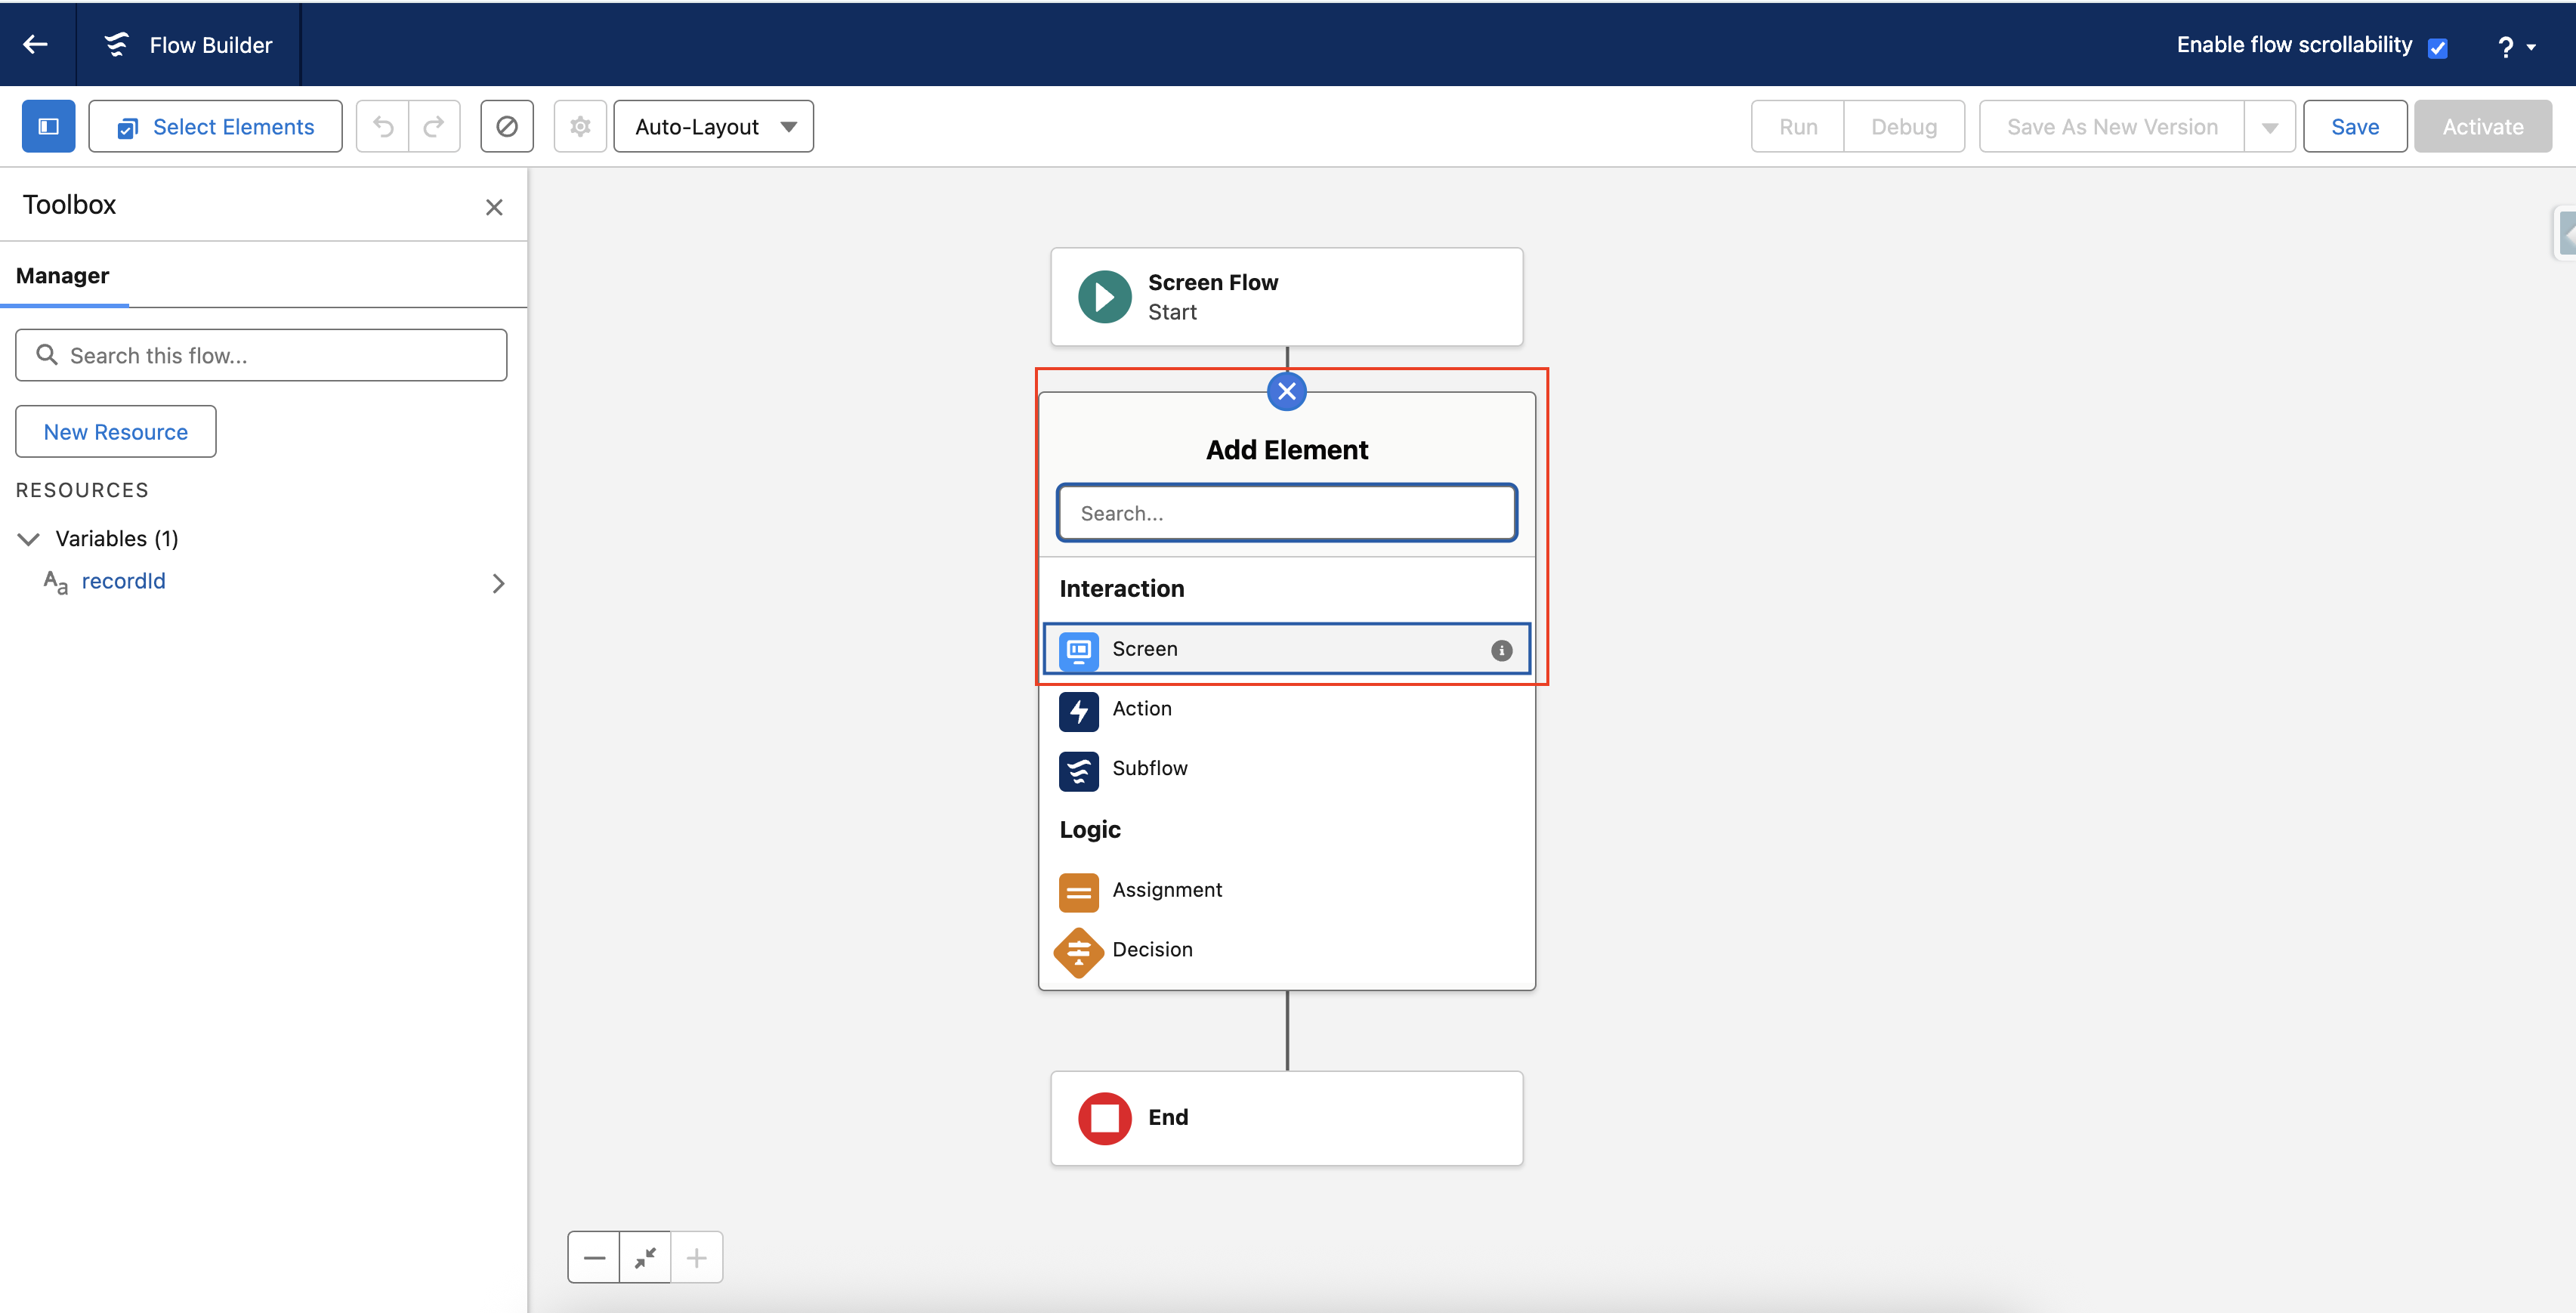
Add a 'Text' Input - String
Drag a Text input ito the screen and label it Document Name and set API as varDocumentName. This variable will capture the document name at runtime.
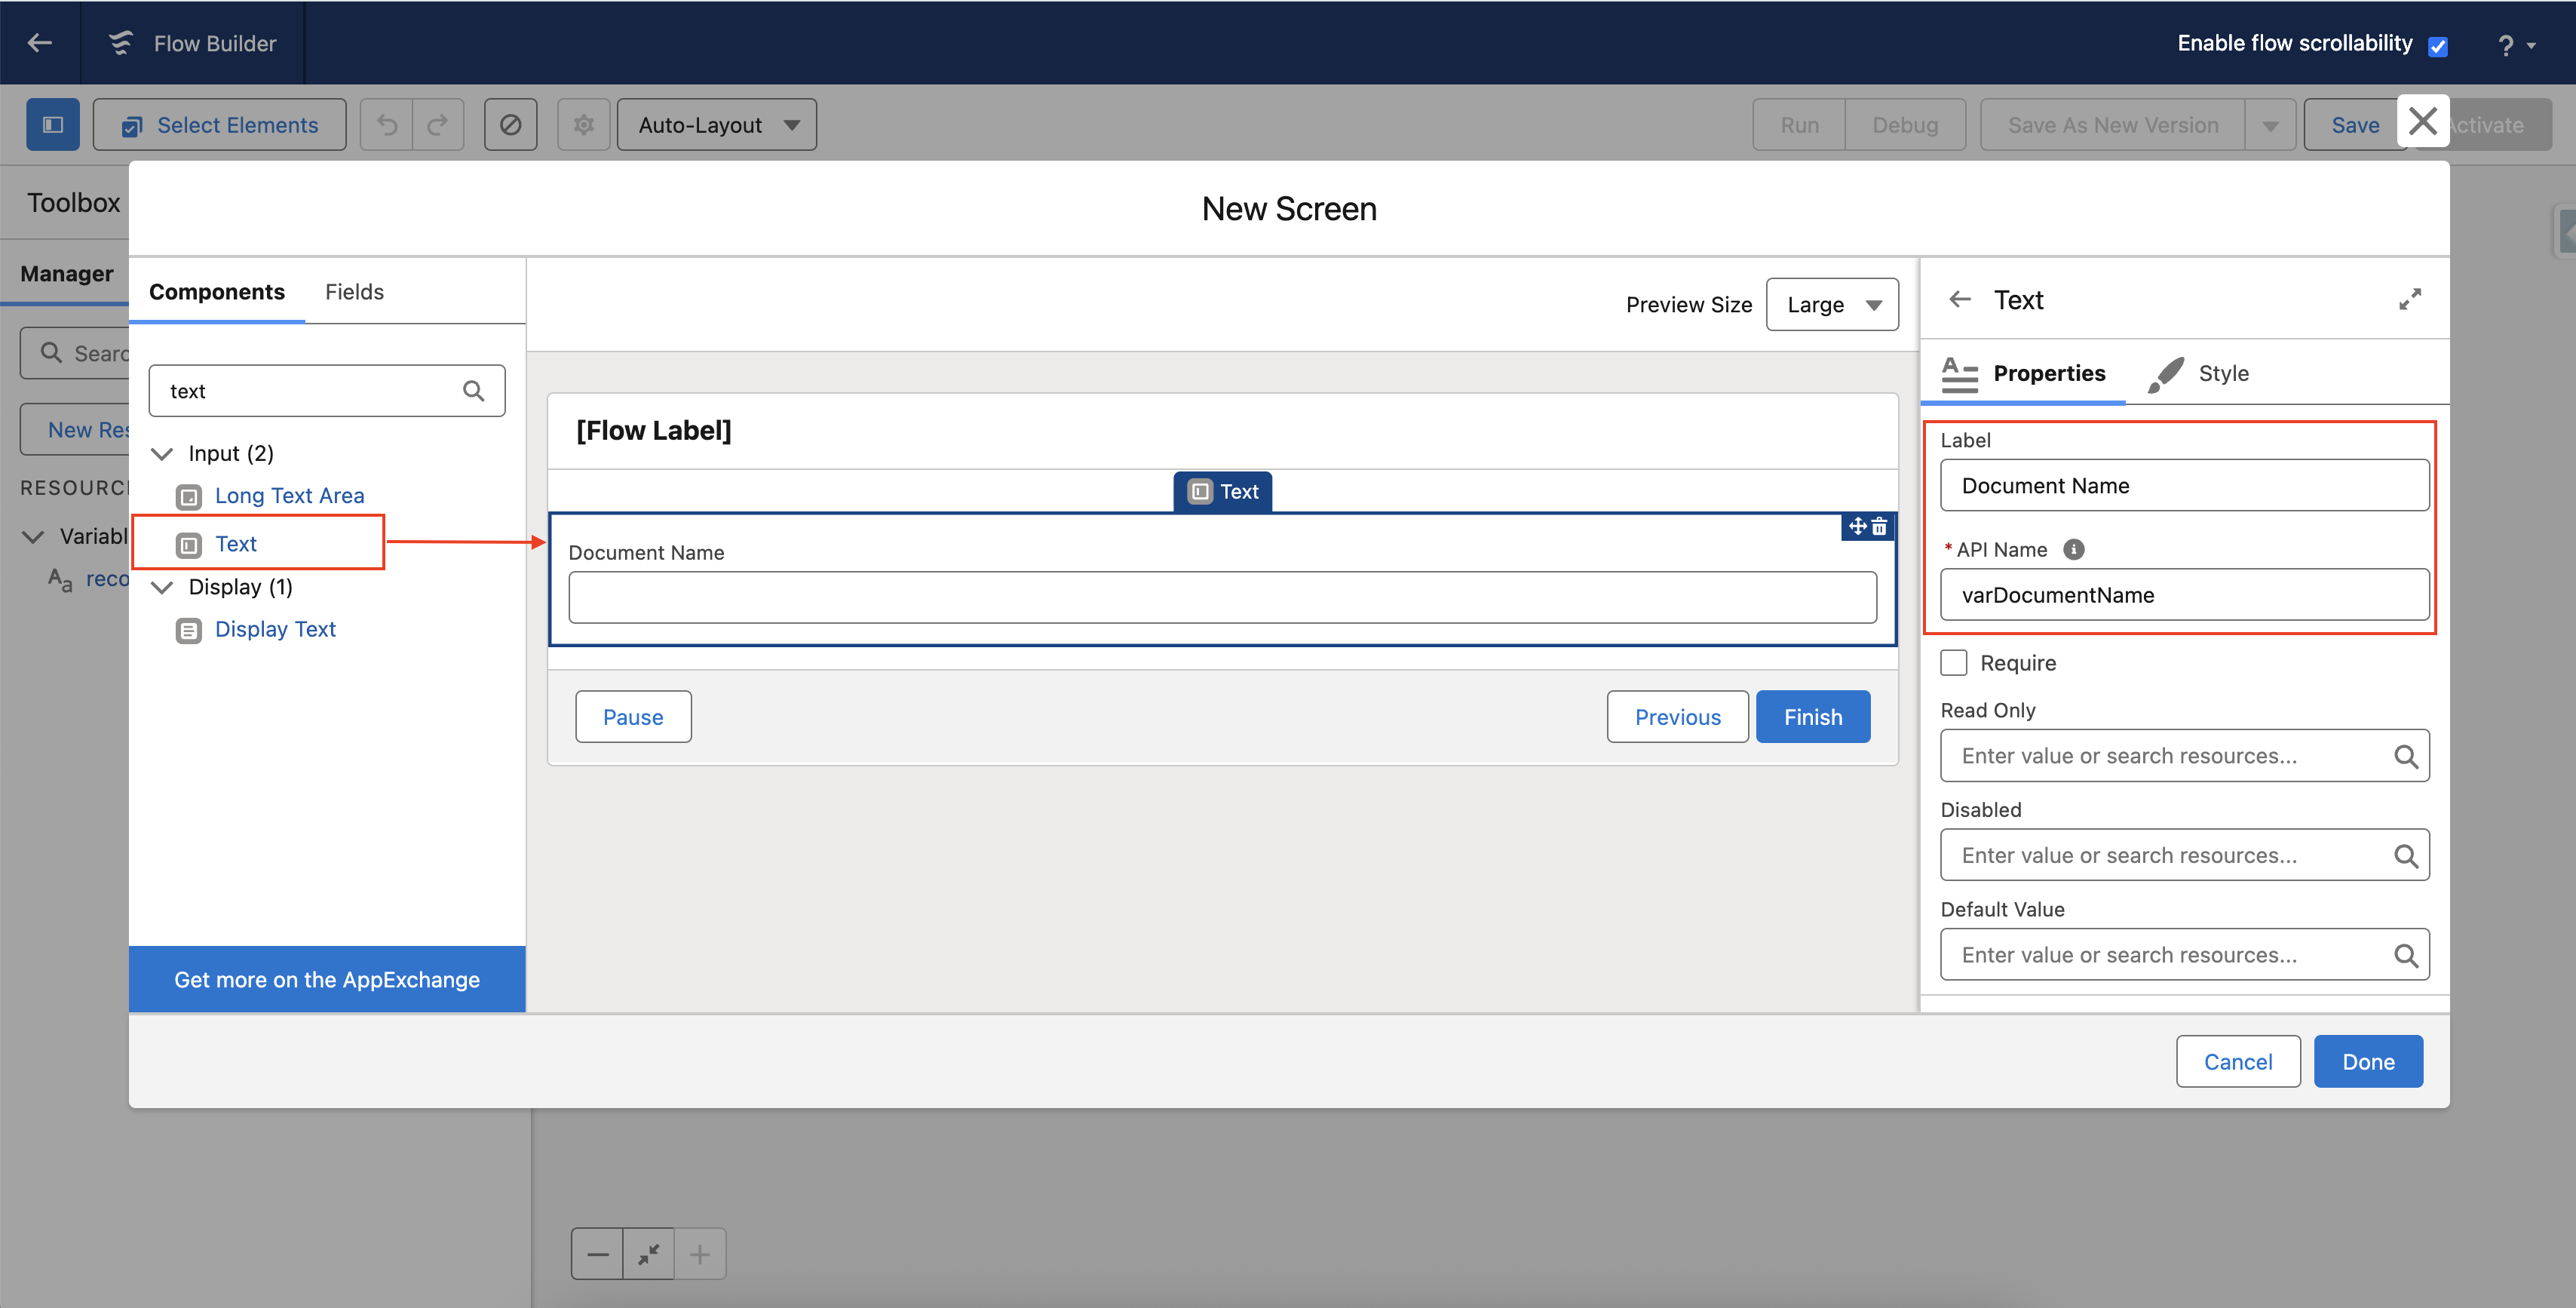
Add a 'Number' Input – Double
Drag a Number input component onto the screen and label it Discount %. Set the API Name as varDiscount. This variable will capture decimal values at runtime.
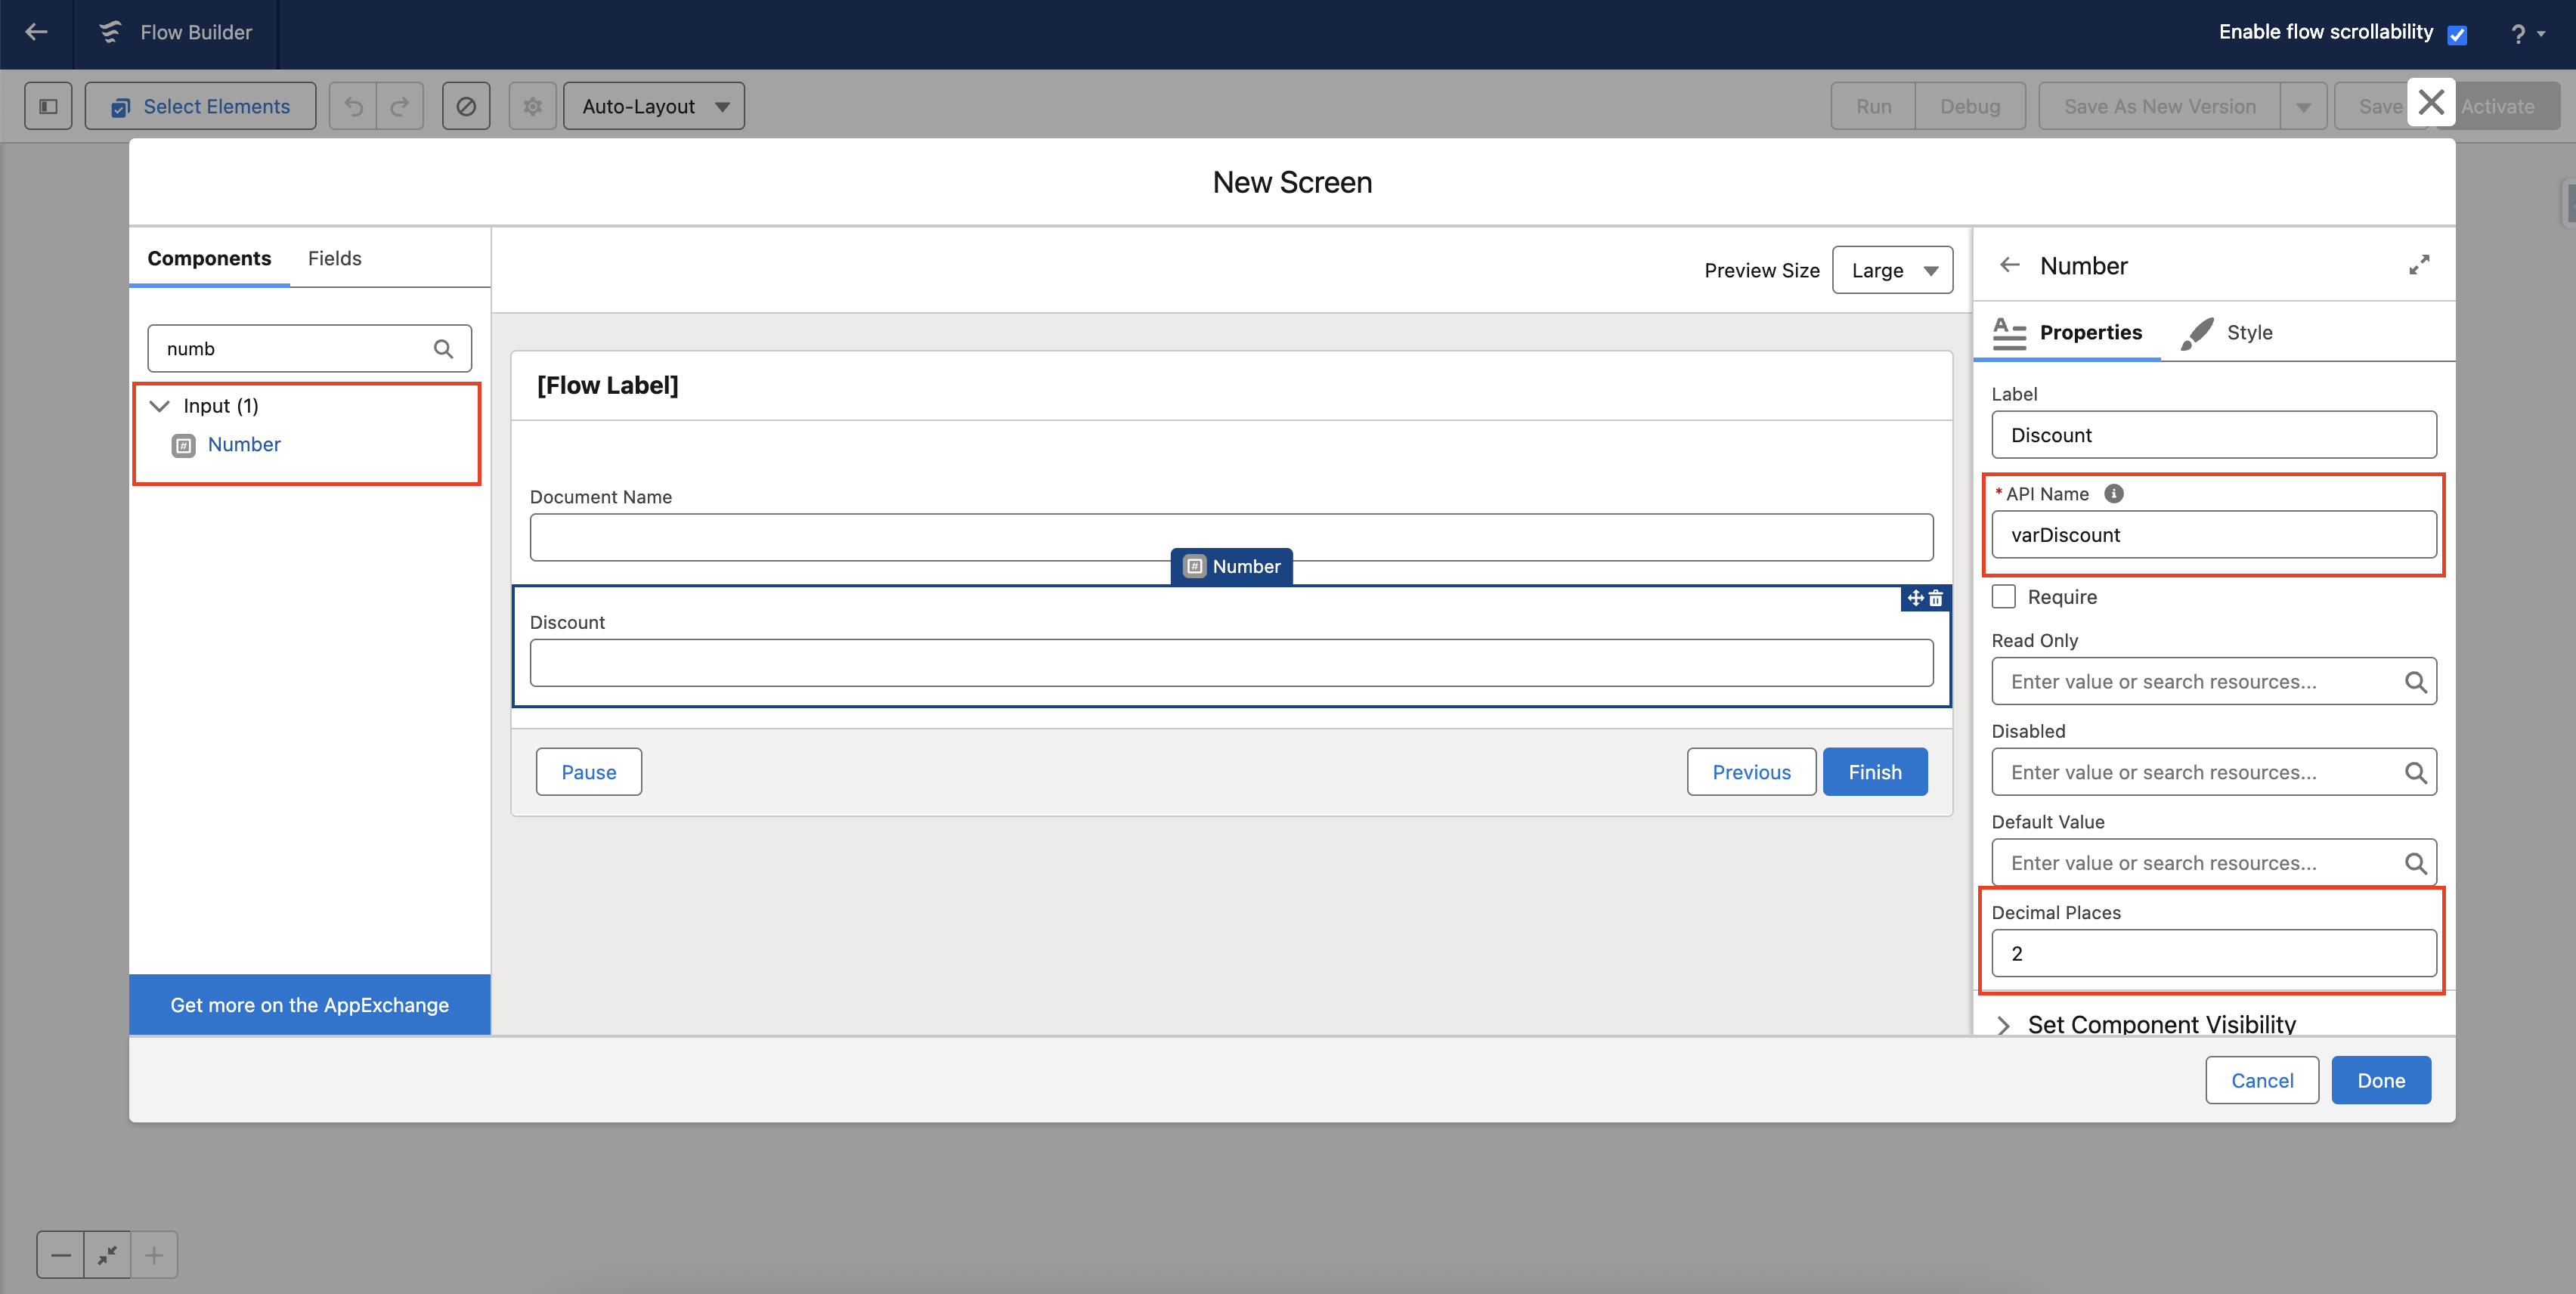
Add a 'Date' Input – Date
Drag a Date input component onto the screen and label it Payment Due Date. Set the API Name as varPaymentDueDate. This variable will capture date values at runtime.
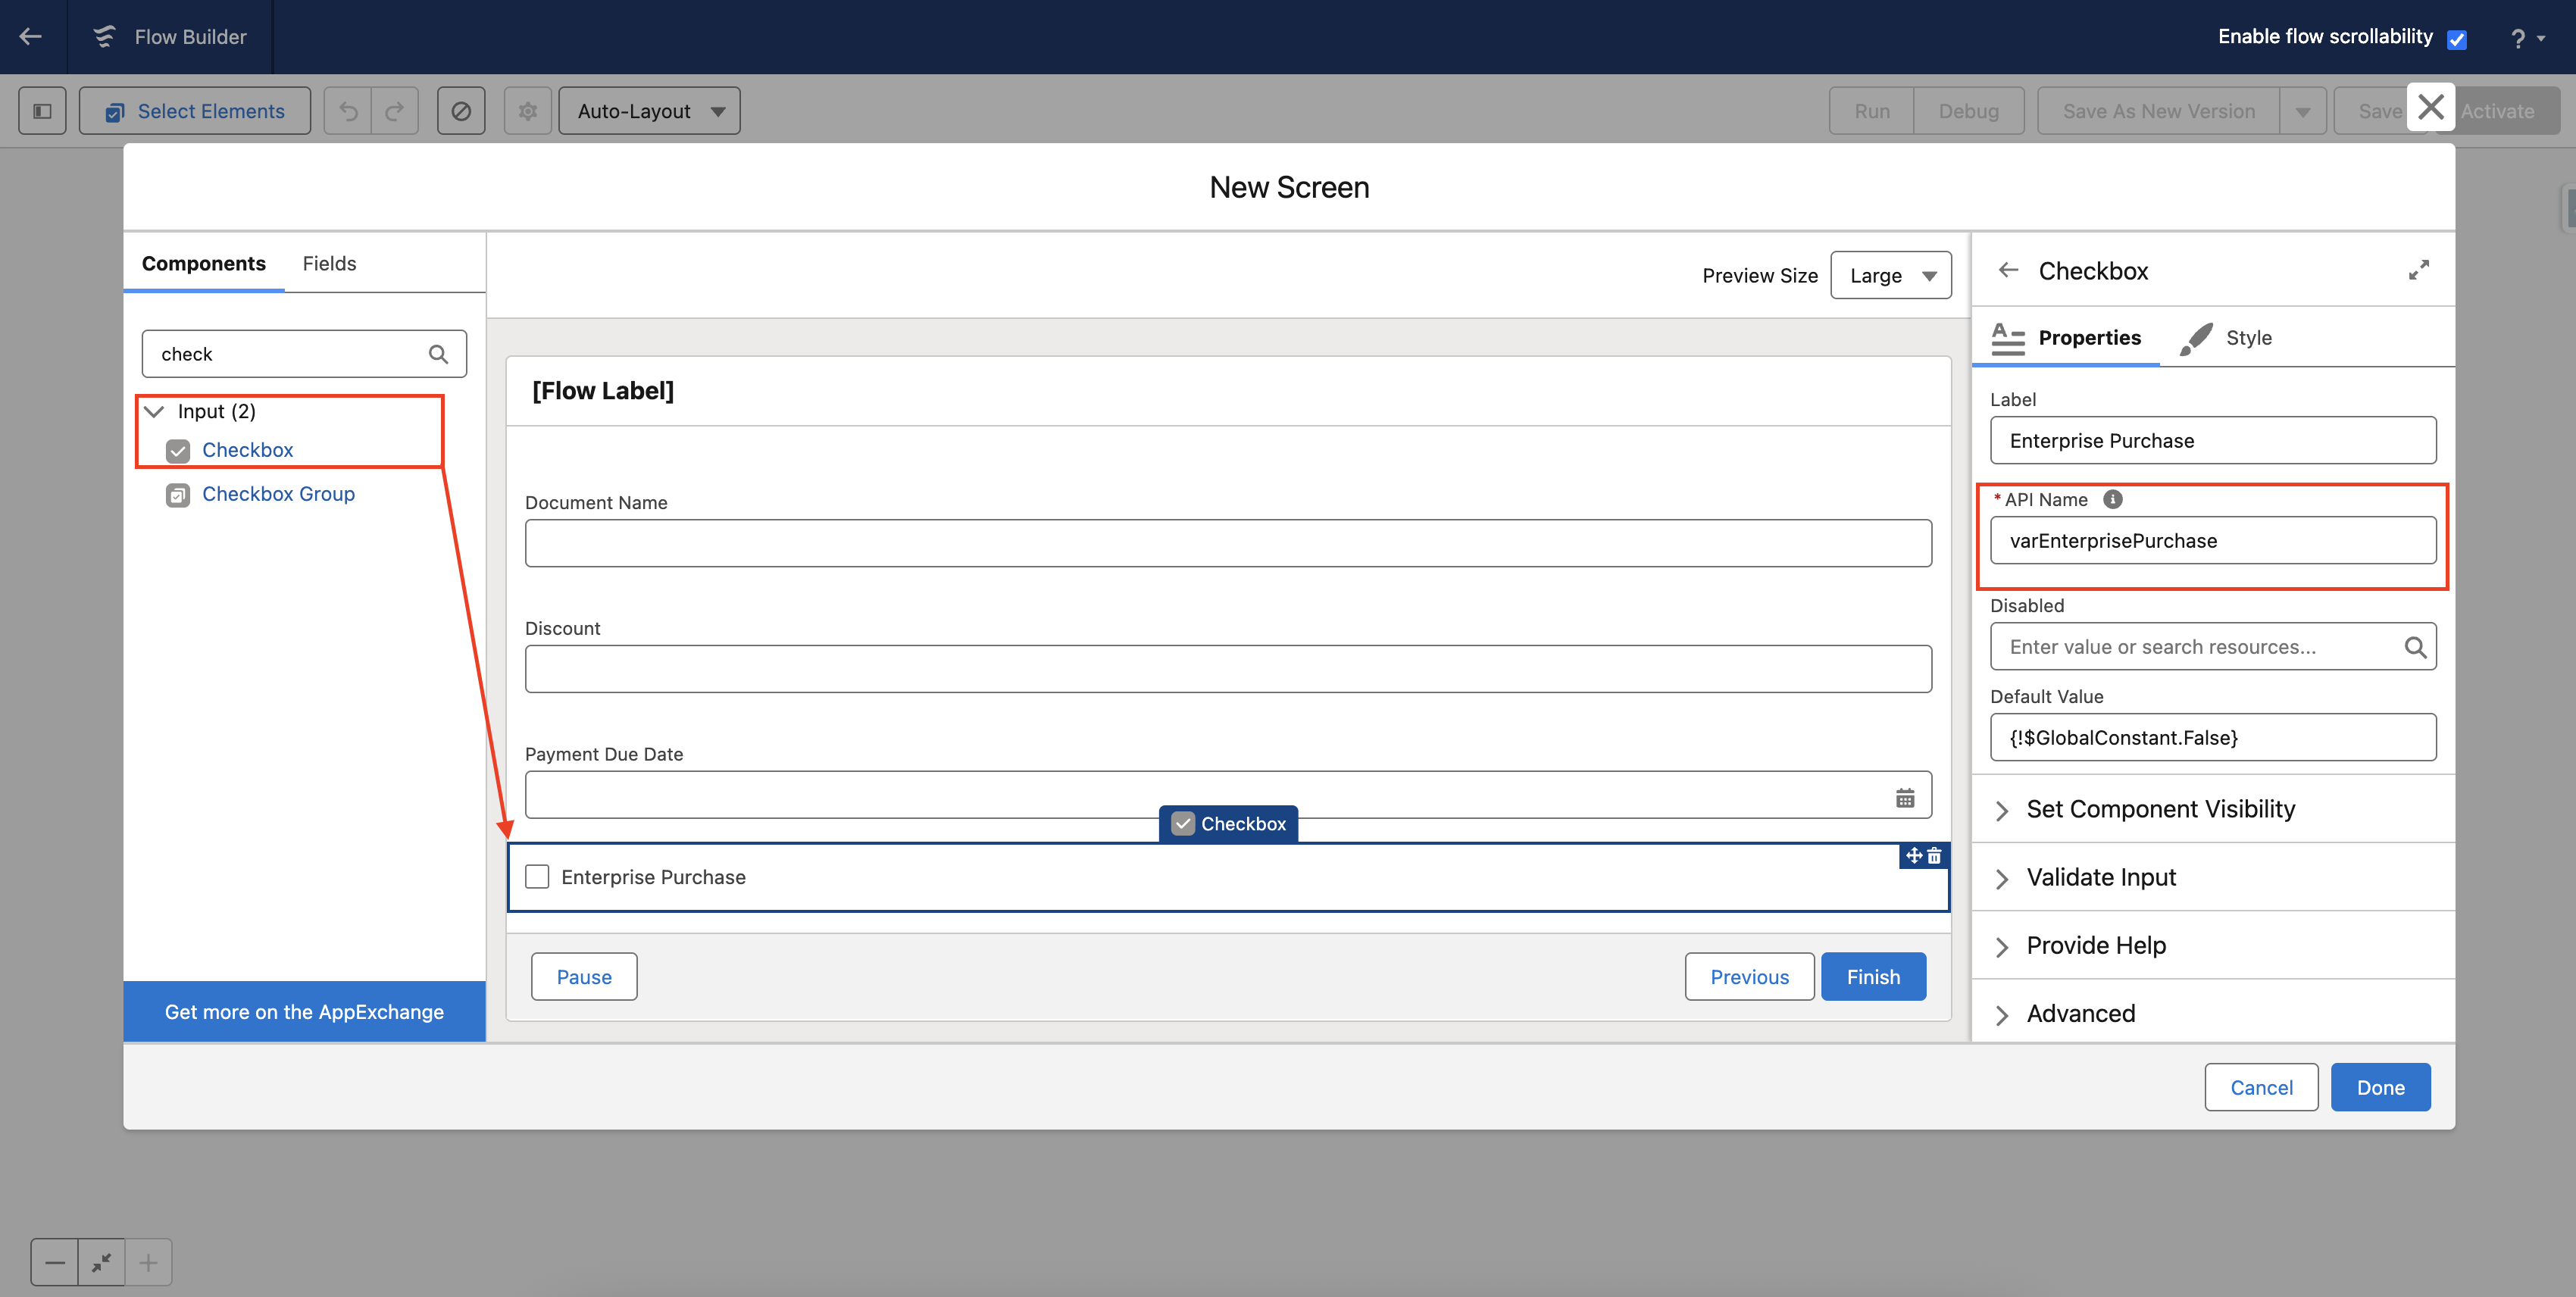
Add a 'Checkbox' - Boolean
Drag a Checkbox component onto the screen and label it Enterprise Purchase. Set the API Name as varEnterprisePurchase. This variable will capture a true/false value at runtime.
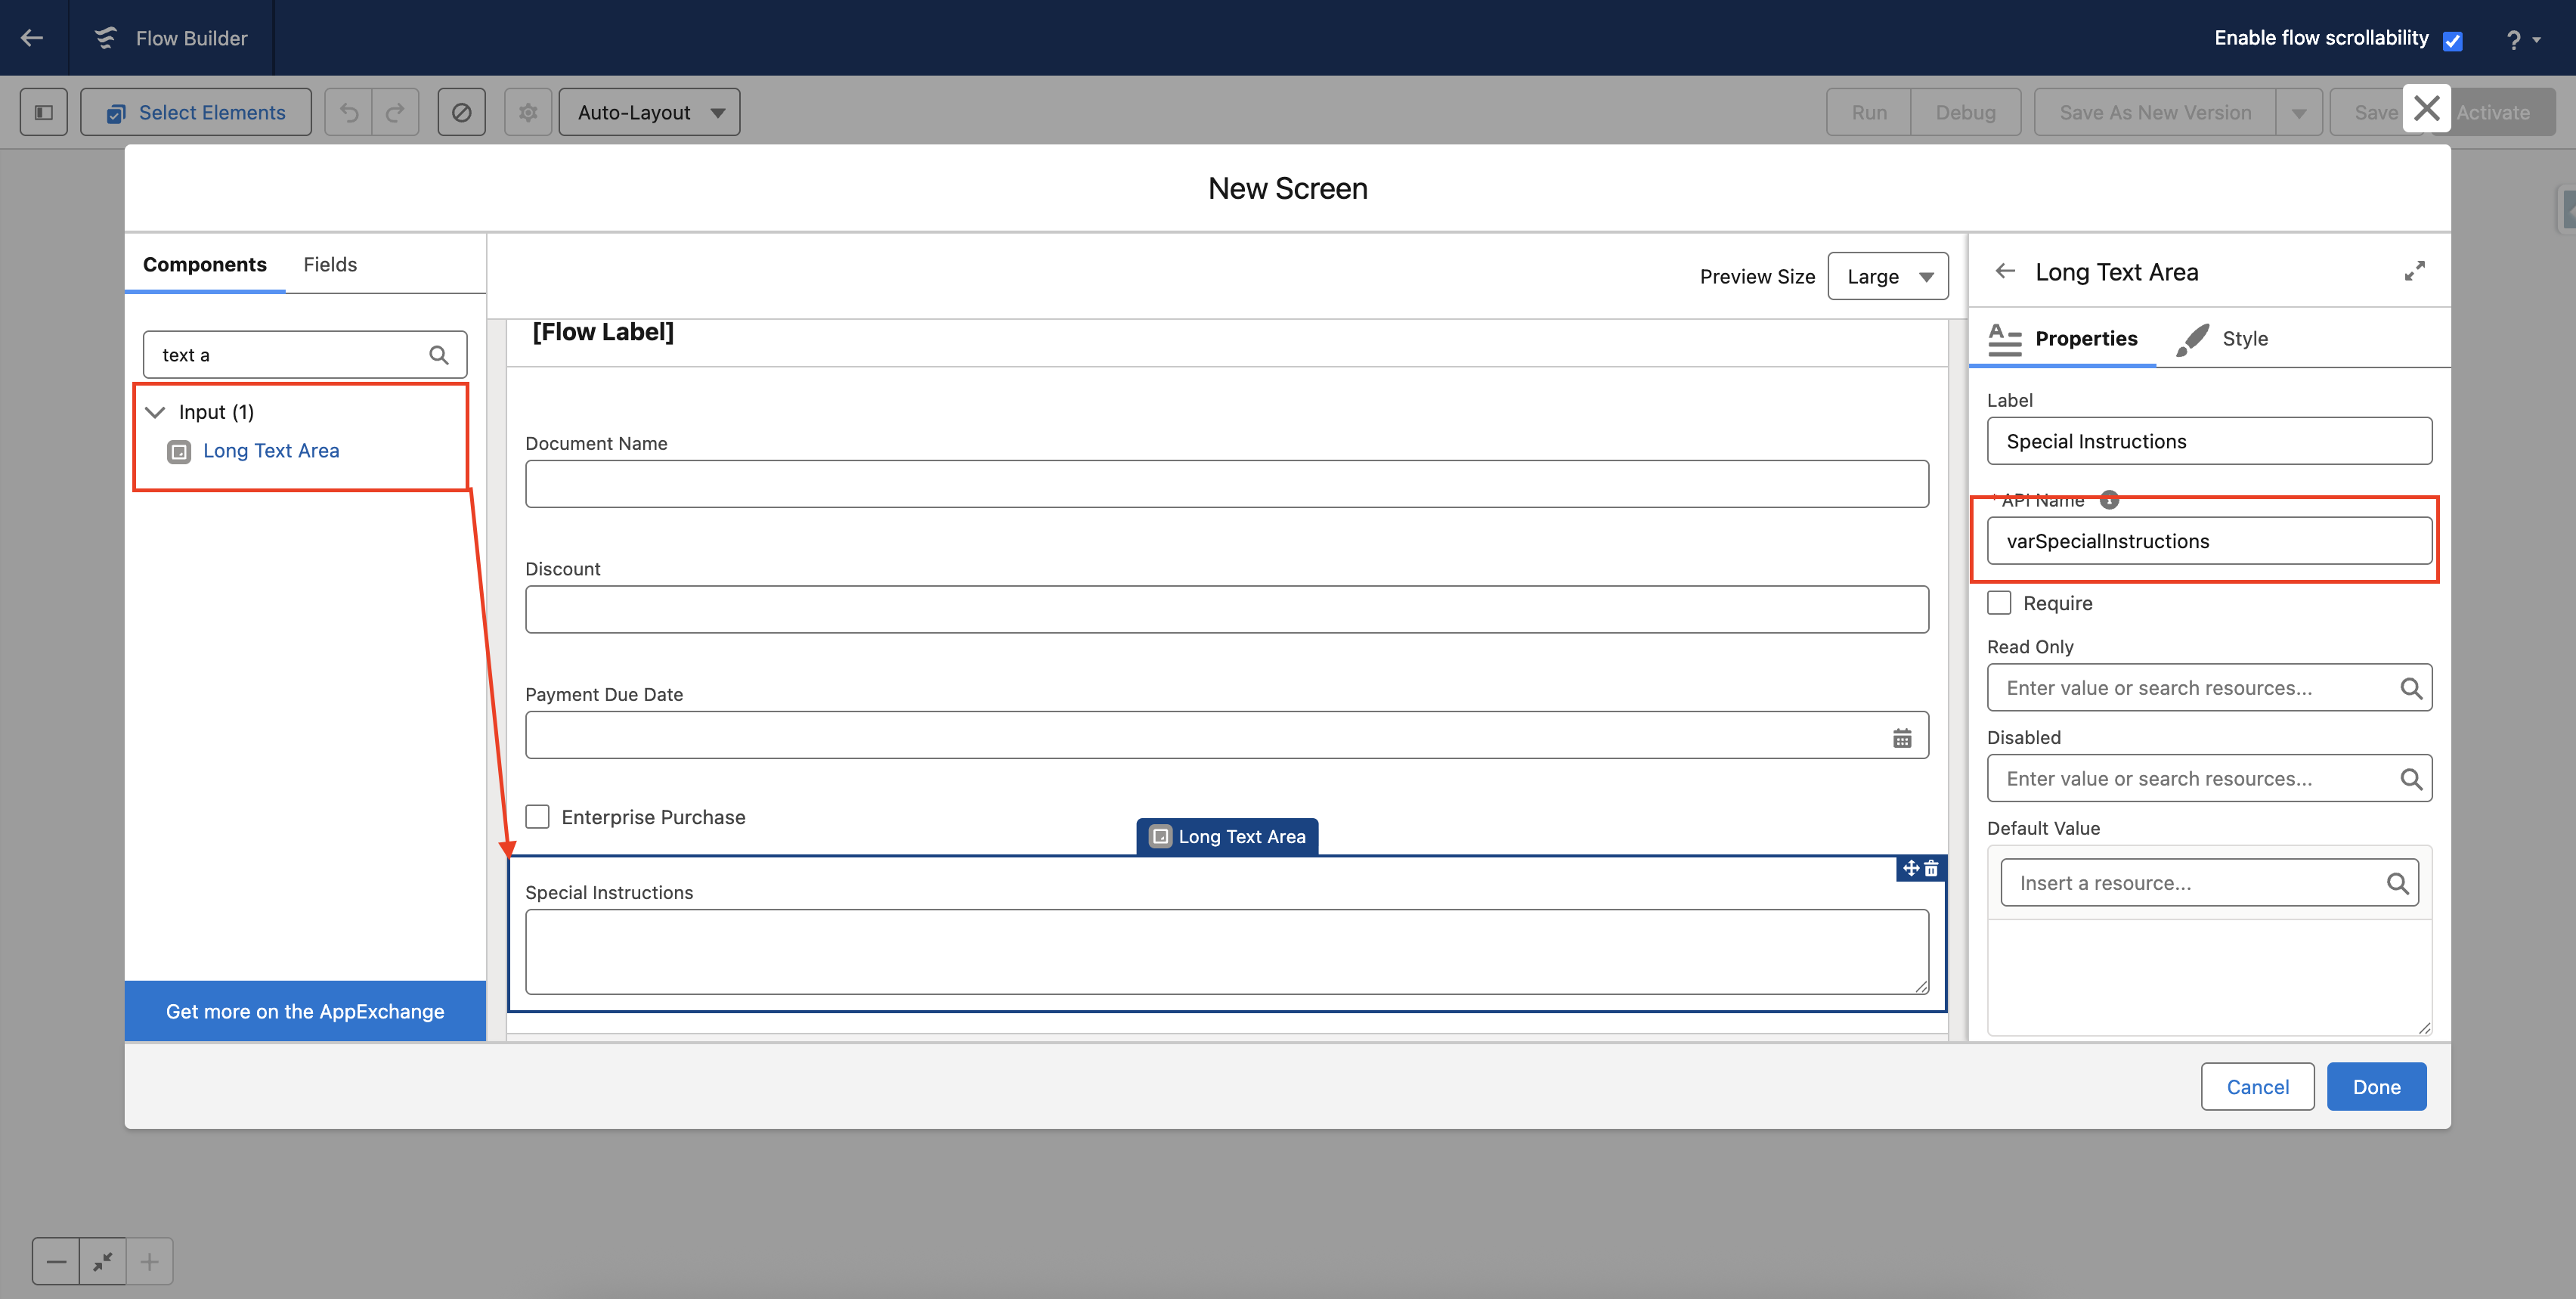
Add a 'Long Text Area' – Rich Text
Drag a Long Text Area component onto the screen and label it Special Instructions. Set the API Name as varSpecialInstructions. This variable will capture formatted text at runtime.
Rich Text Input Options
You can also use any custom screen component to capture rich text input, or pass values from any custom field with rich text format into the runtime variable. These values can then be printed in the generated document while retaining the formatting.
3 - Assign CloudFiles Variables
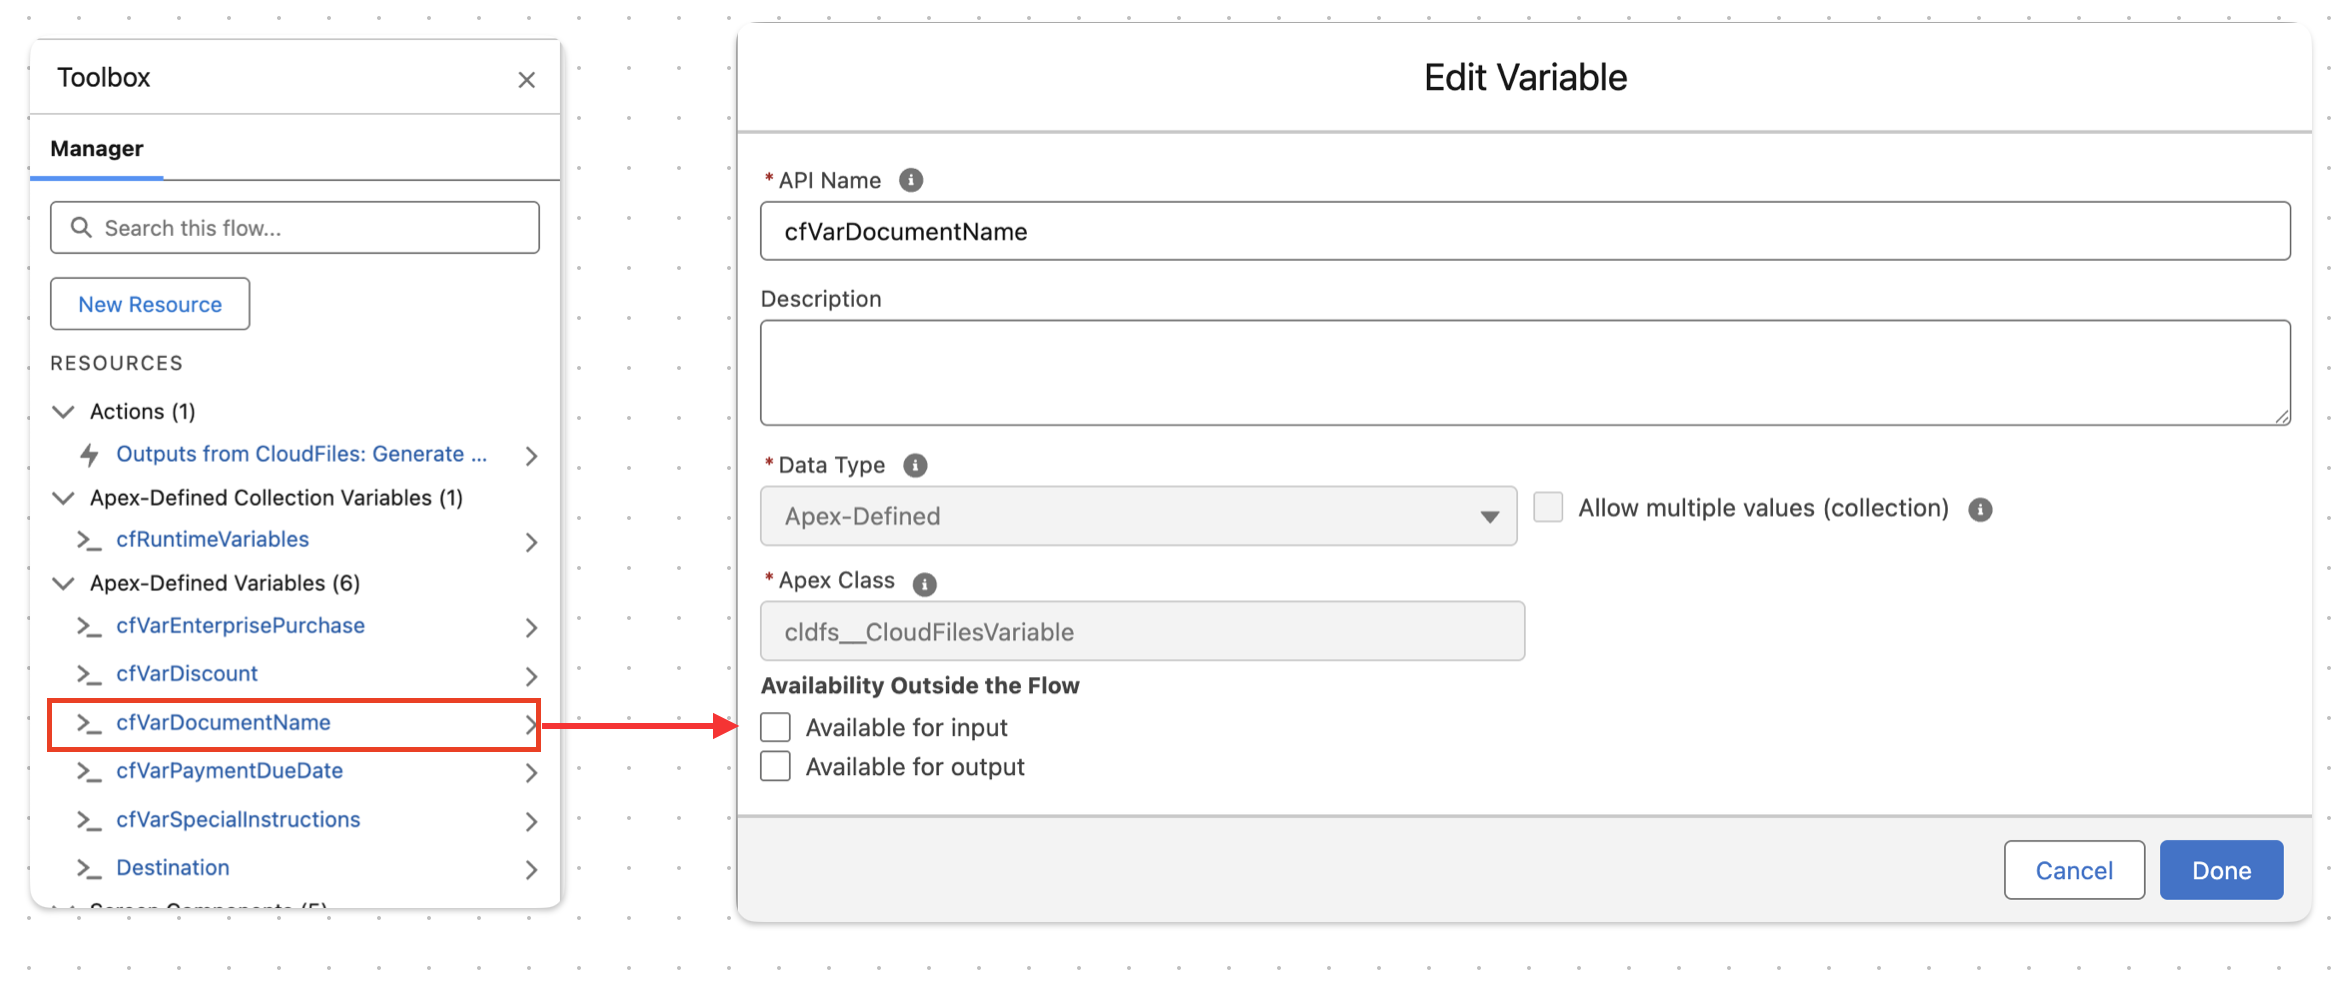
Create CloudFiles Variables
Create variables of data type Apex-Defined, and select the Apex class as 'cldfs_CloudFilesVariable' for each screen input.
We create these variables because the input fields captured in the Screen Flow (Document Name, Batch Number, Discount, etc.) need to be mapped to CloudFiles runtime variables. By assigning these inputs to Apex-defined variables, the values can be passed into the Generate Document (Sync) action.
Create one variable for each input field in your Screen Flow:
- cfVarDocumentName → for Document Name (String)
- cfVarBatchNumber → for Batch Number (Integer)
- cfVarDiscount → for Discount % (Double)
- cfVarPaymentDueDate → for Payment Due Date (Date)
- cfVarSpecialInstructions → for Special Instructions (Rich Text Area)
Assign Values to the CF Variables
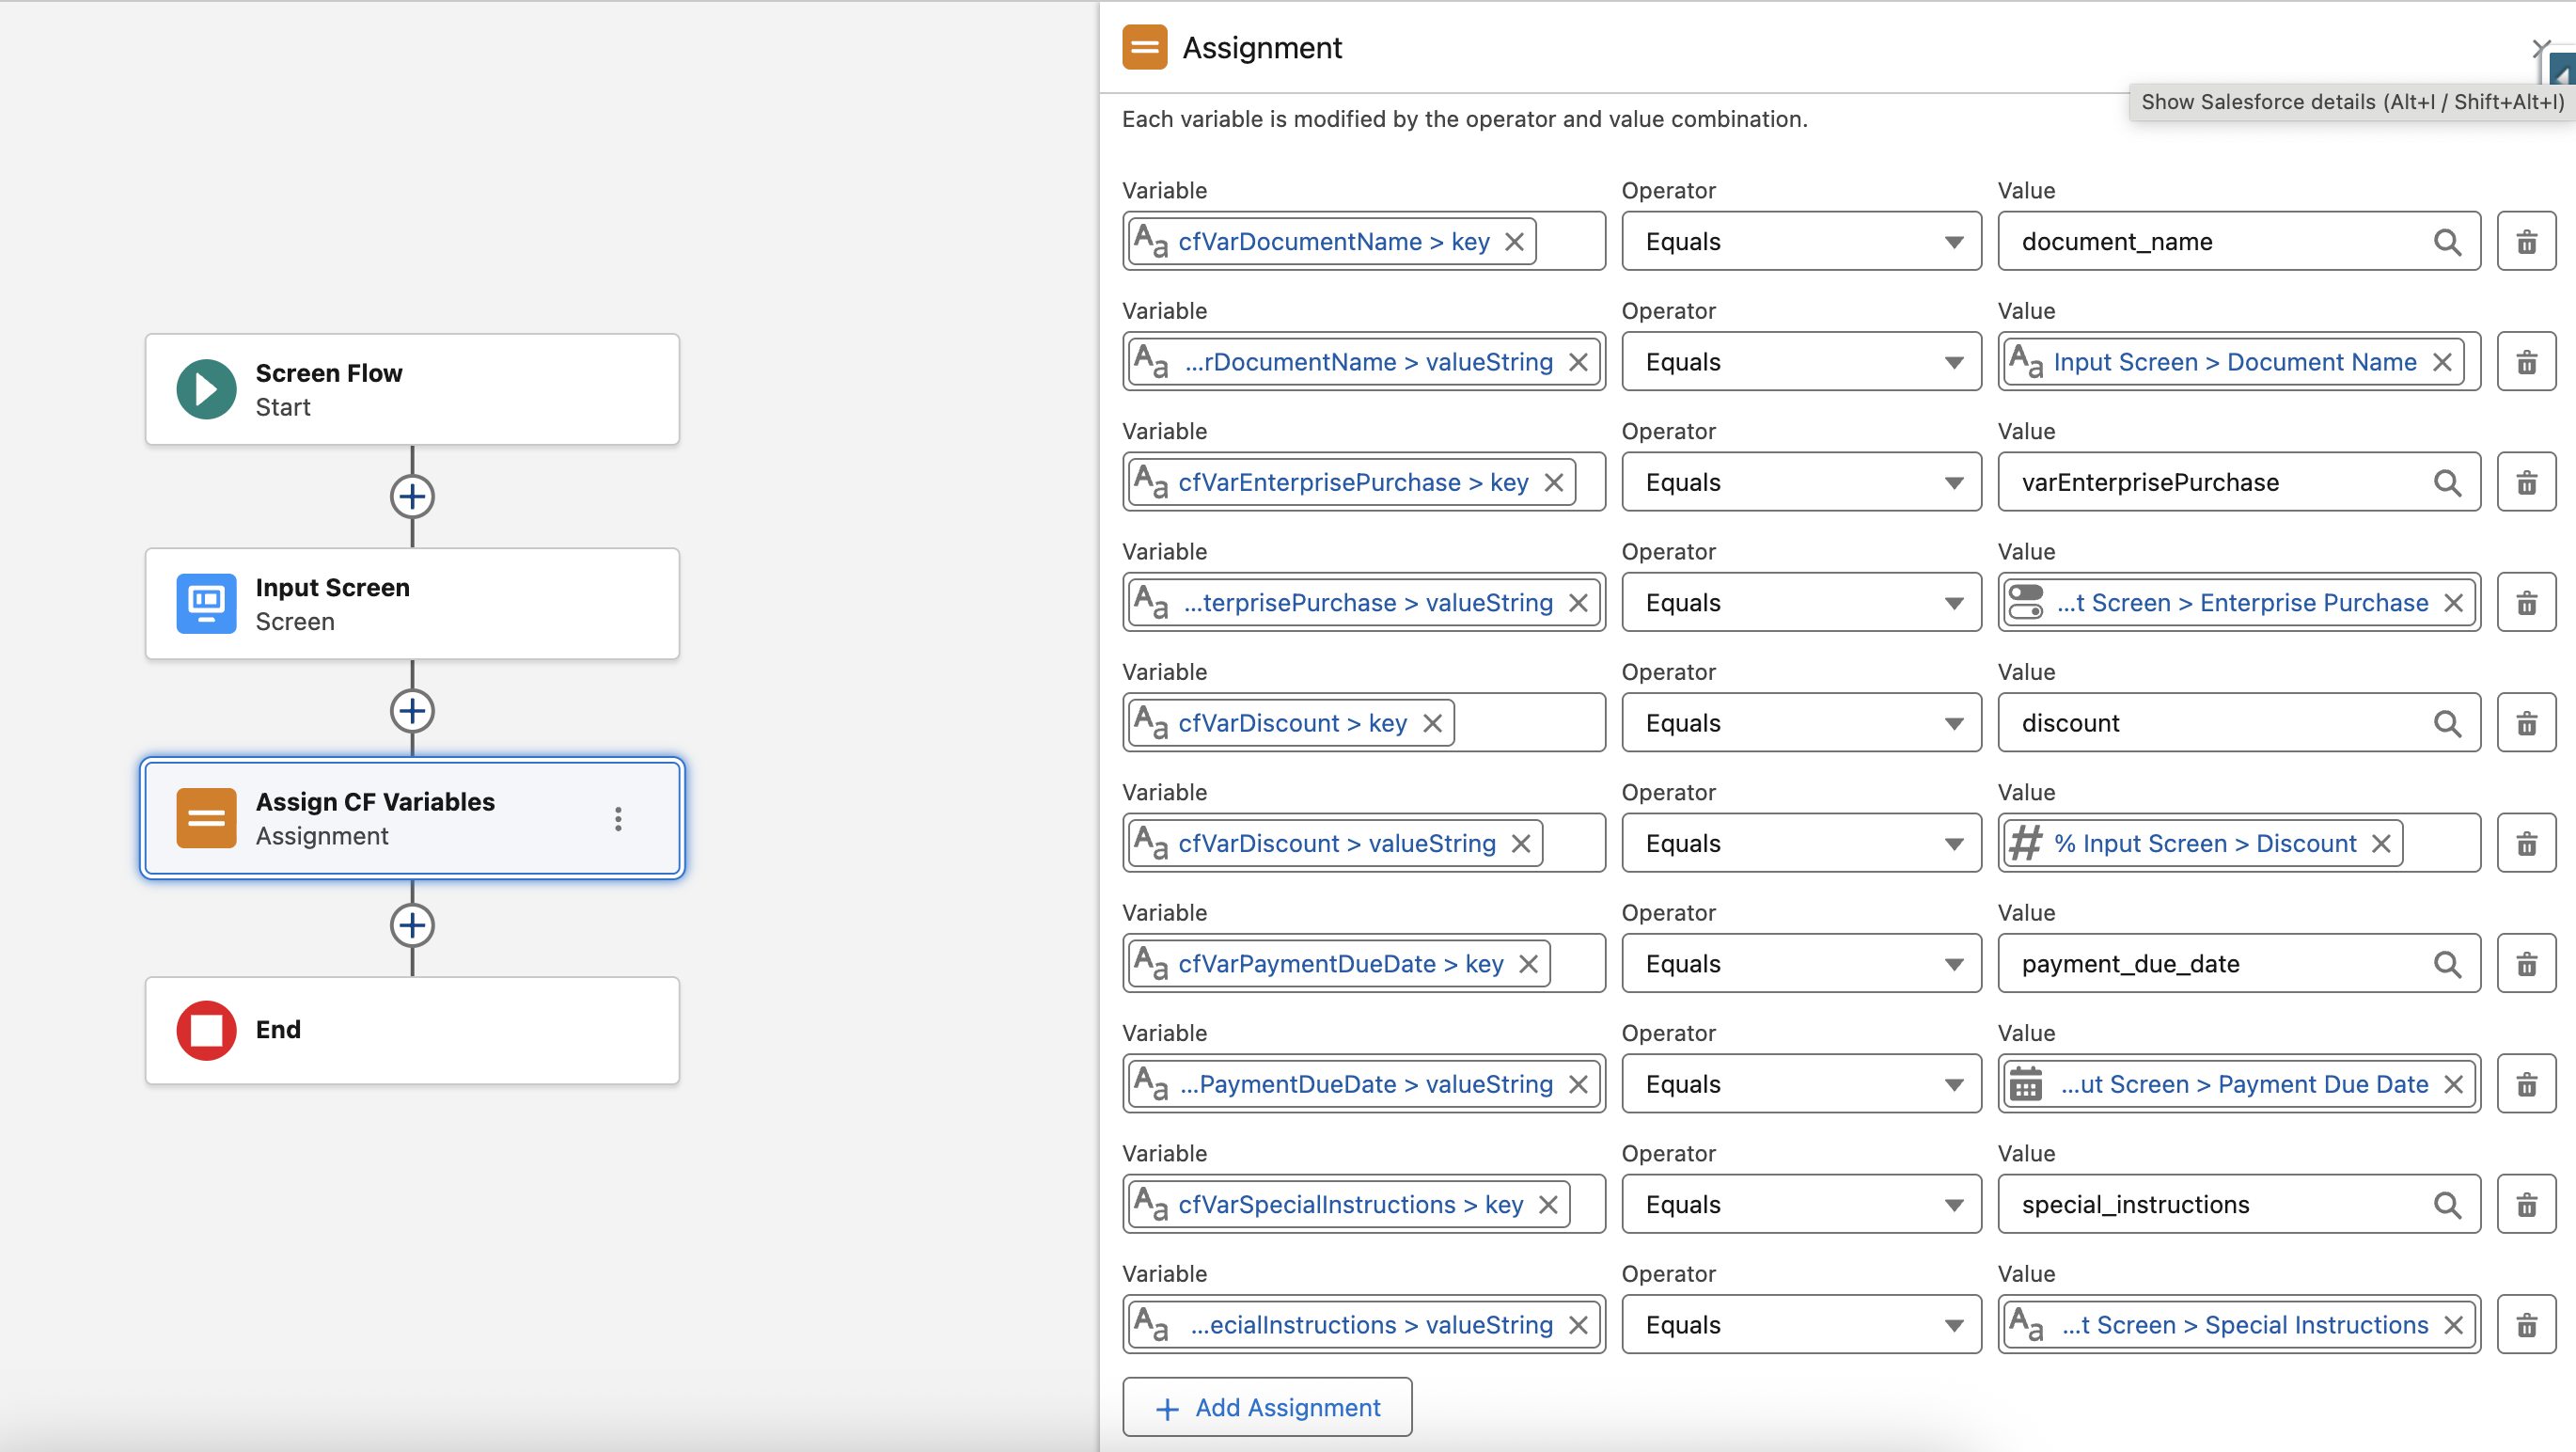
The CloudFiles variable has key and valueString as parameters, which must be assigned using the Assignment element in the flow.
- key is the API name of the Runtime Variable as defined in the CloudFiles template.
- valueString is the actual value you want to assign and pass.
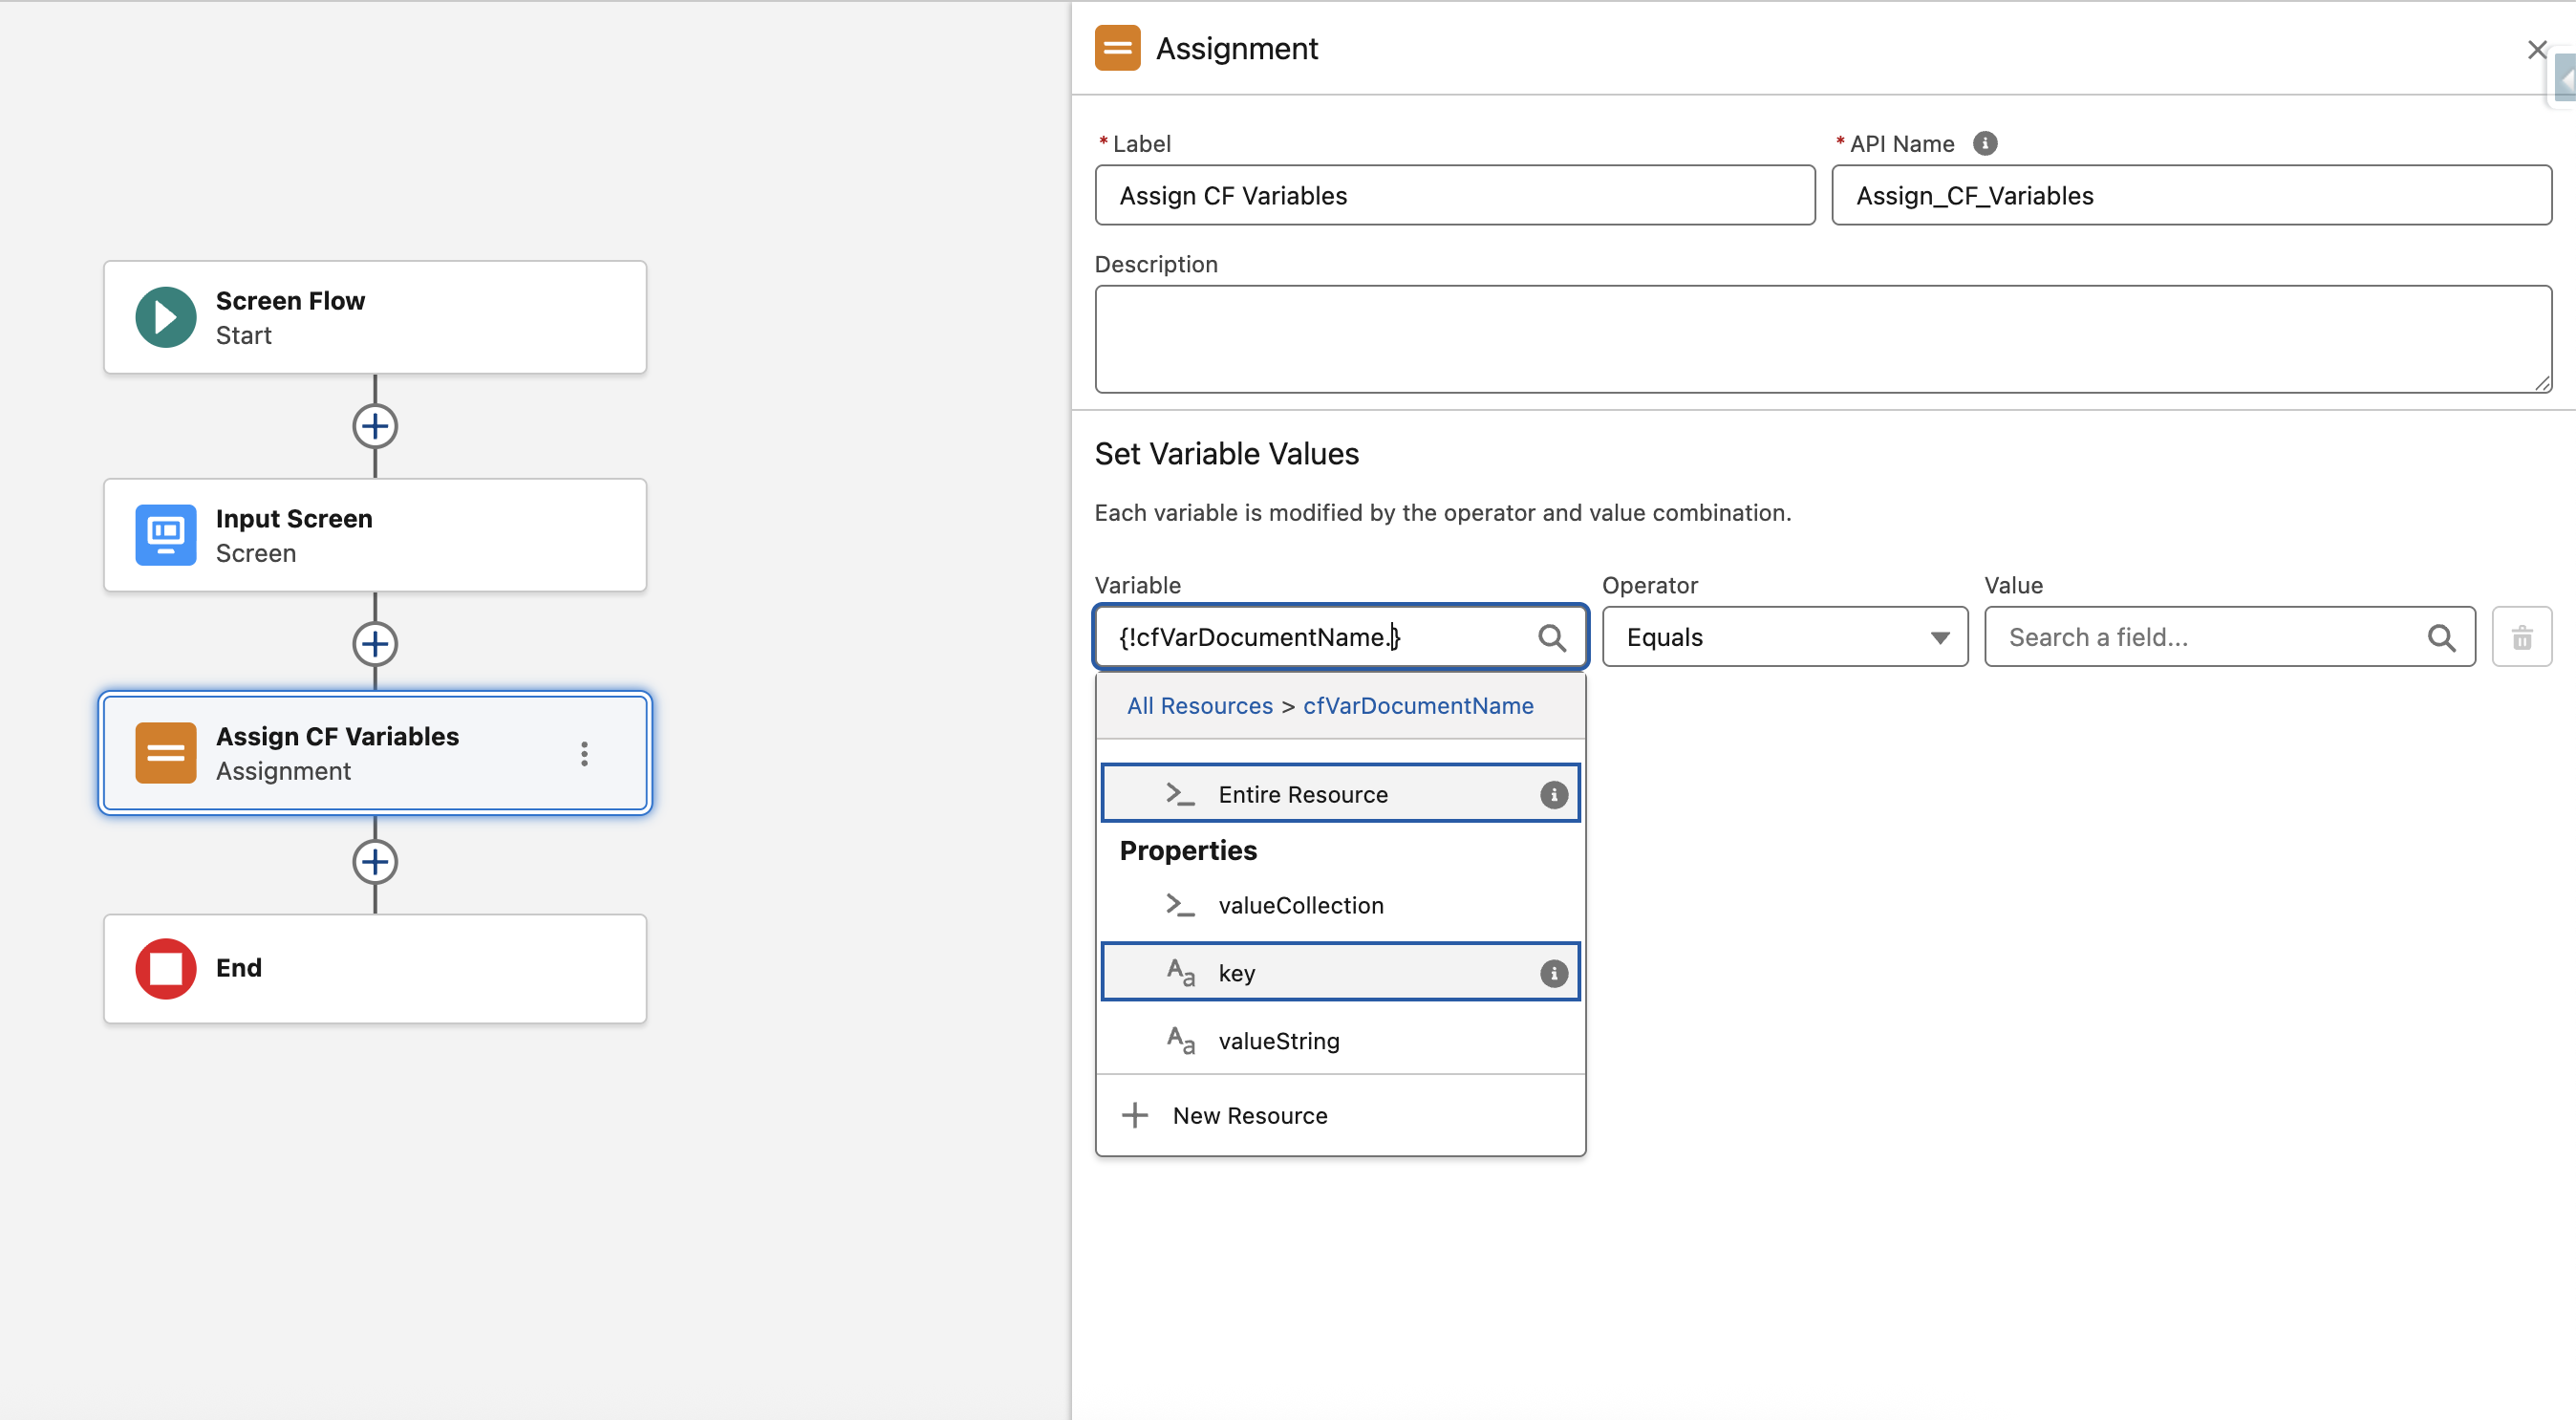
Add an Assignment element in your Flow for each input and map as follows:
- cfVarDocumentName.key → document_name
- cfVarDocumentName.valueString → {!varDocumentName}
- cfVarBatchNumber.key → enterprise_purchase
- cfVarBatchNumber.valueString → {!varEnterprisePurchase}
- cfVarDiscount.key → discount
- cfVarDiscount.valueString → {!varDiscount}
- cfVarPaymentDueDate.key → payment_due_date
- cfVarPaymentDueDate.valueString → {!varPaymentDueDate}
- cfVarSpecialInstructions.key → special_instructions
- cfVarSpecialInstructions.valueString → {!varSpecialInstructions}
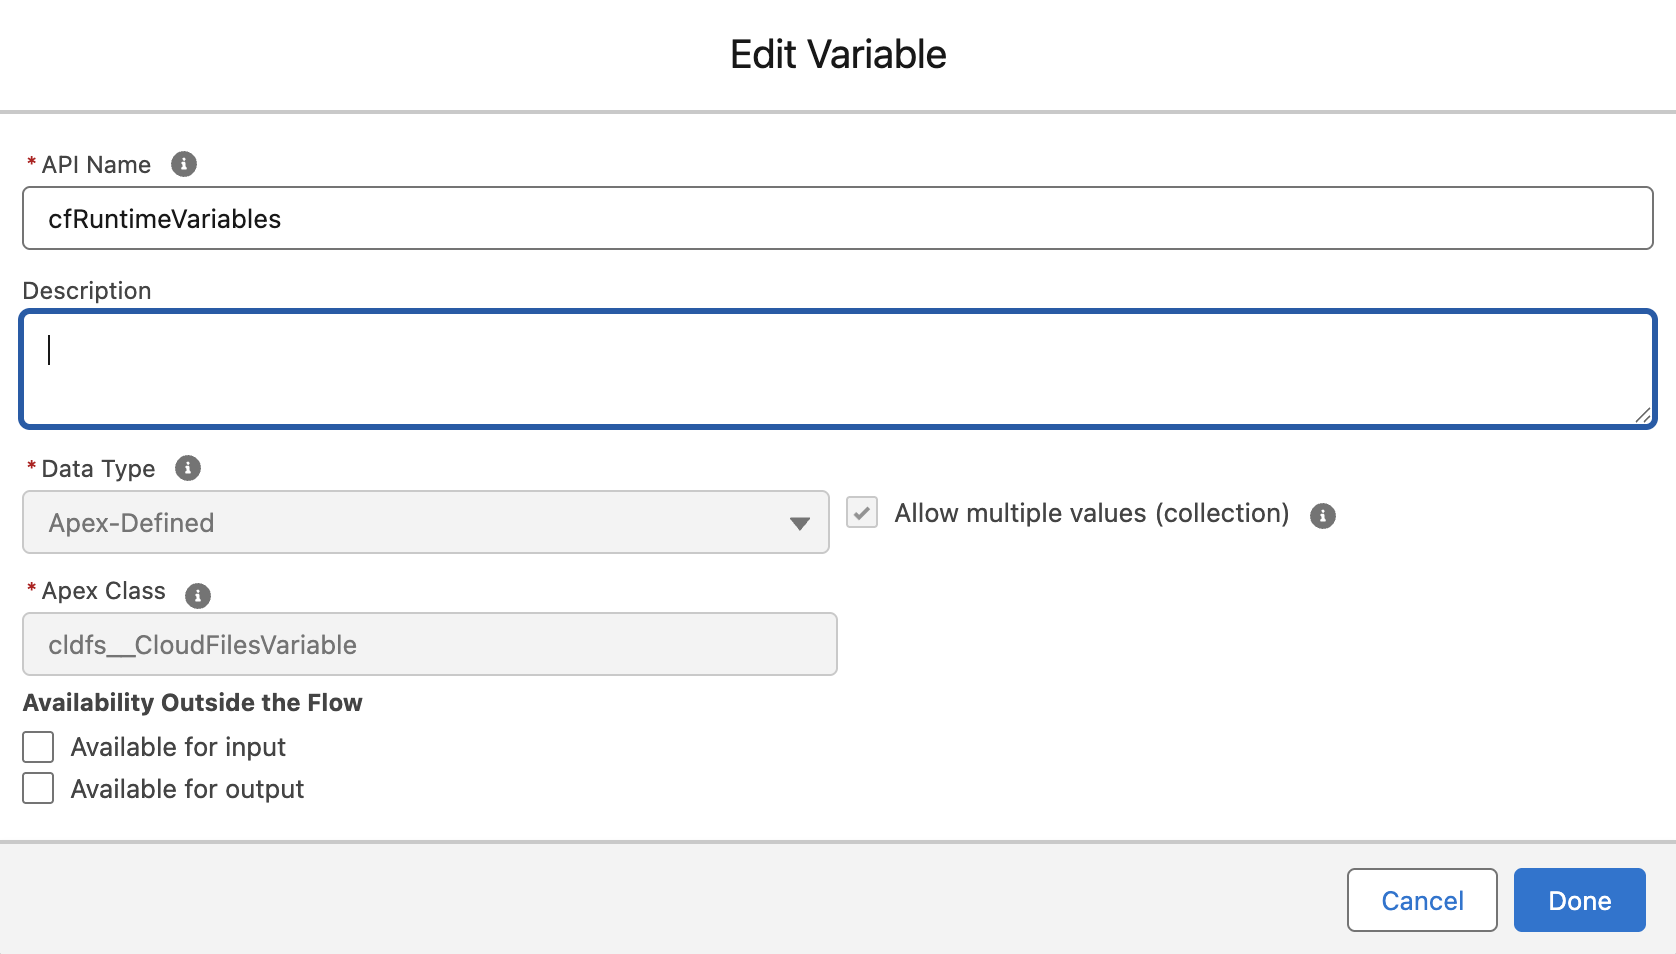
Create a collection variable of data type Apex-Defined, and select the Apex class as cldfs_CloudFilesVariable. This will be passed as input for Generate Document (Sync) action.
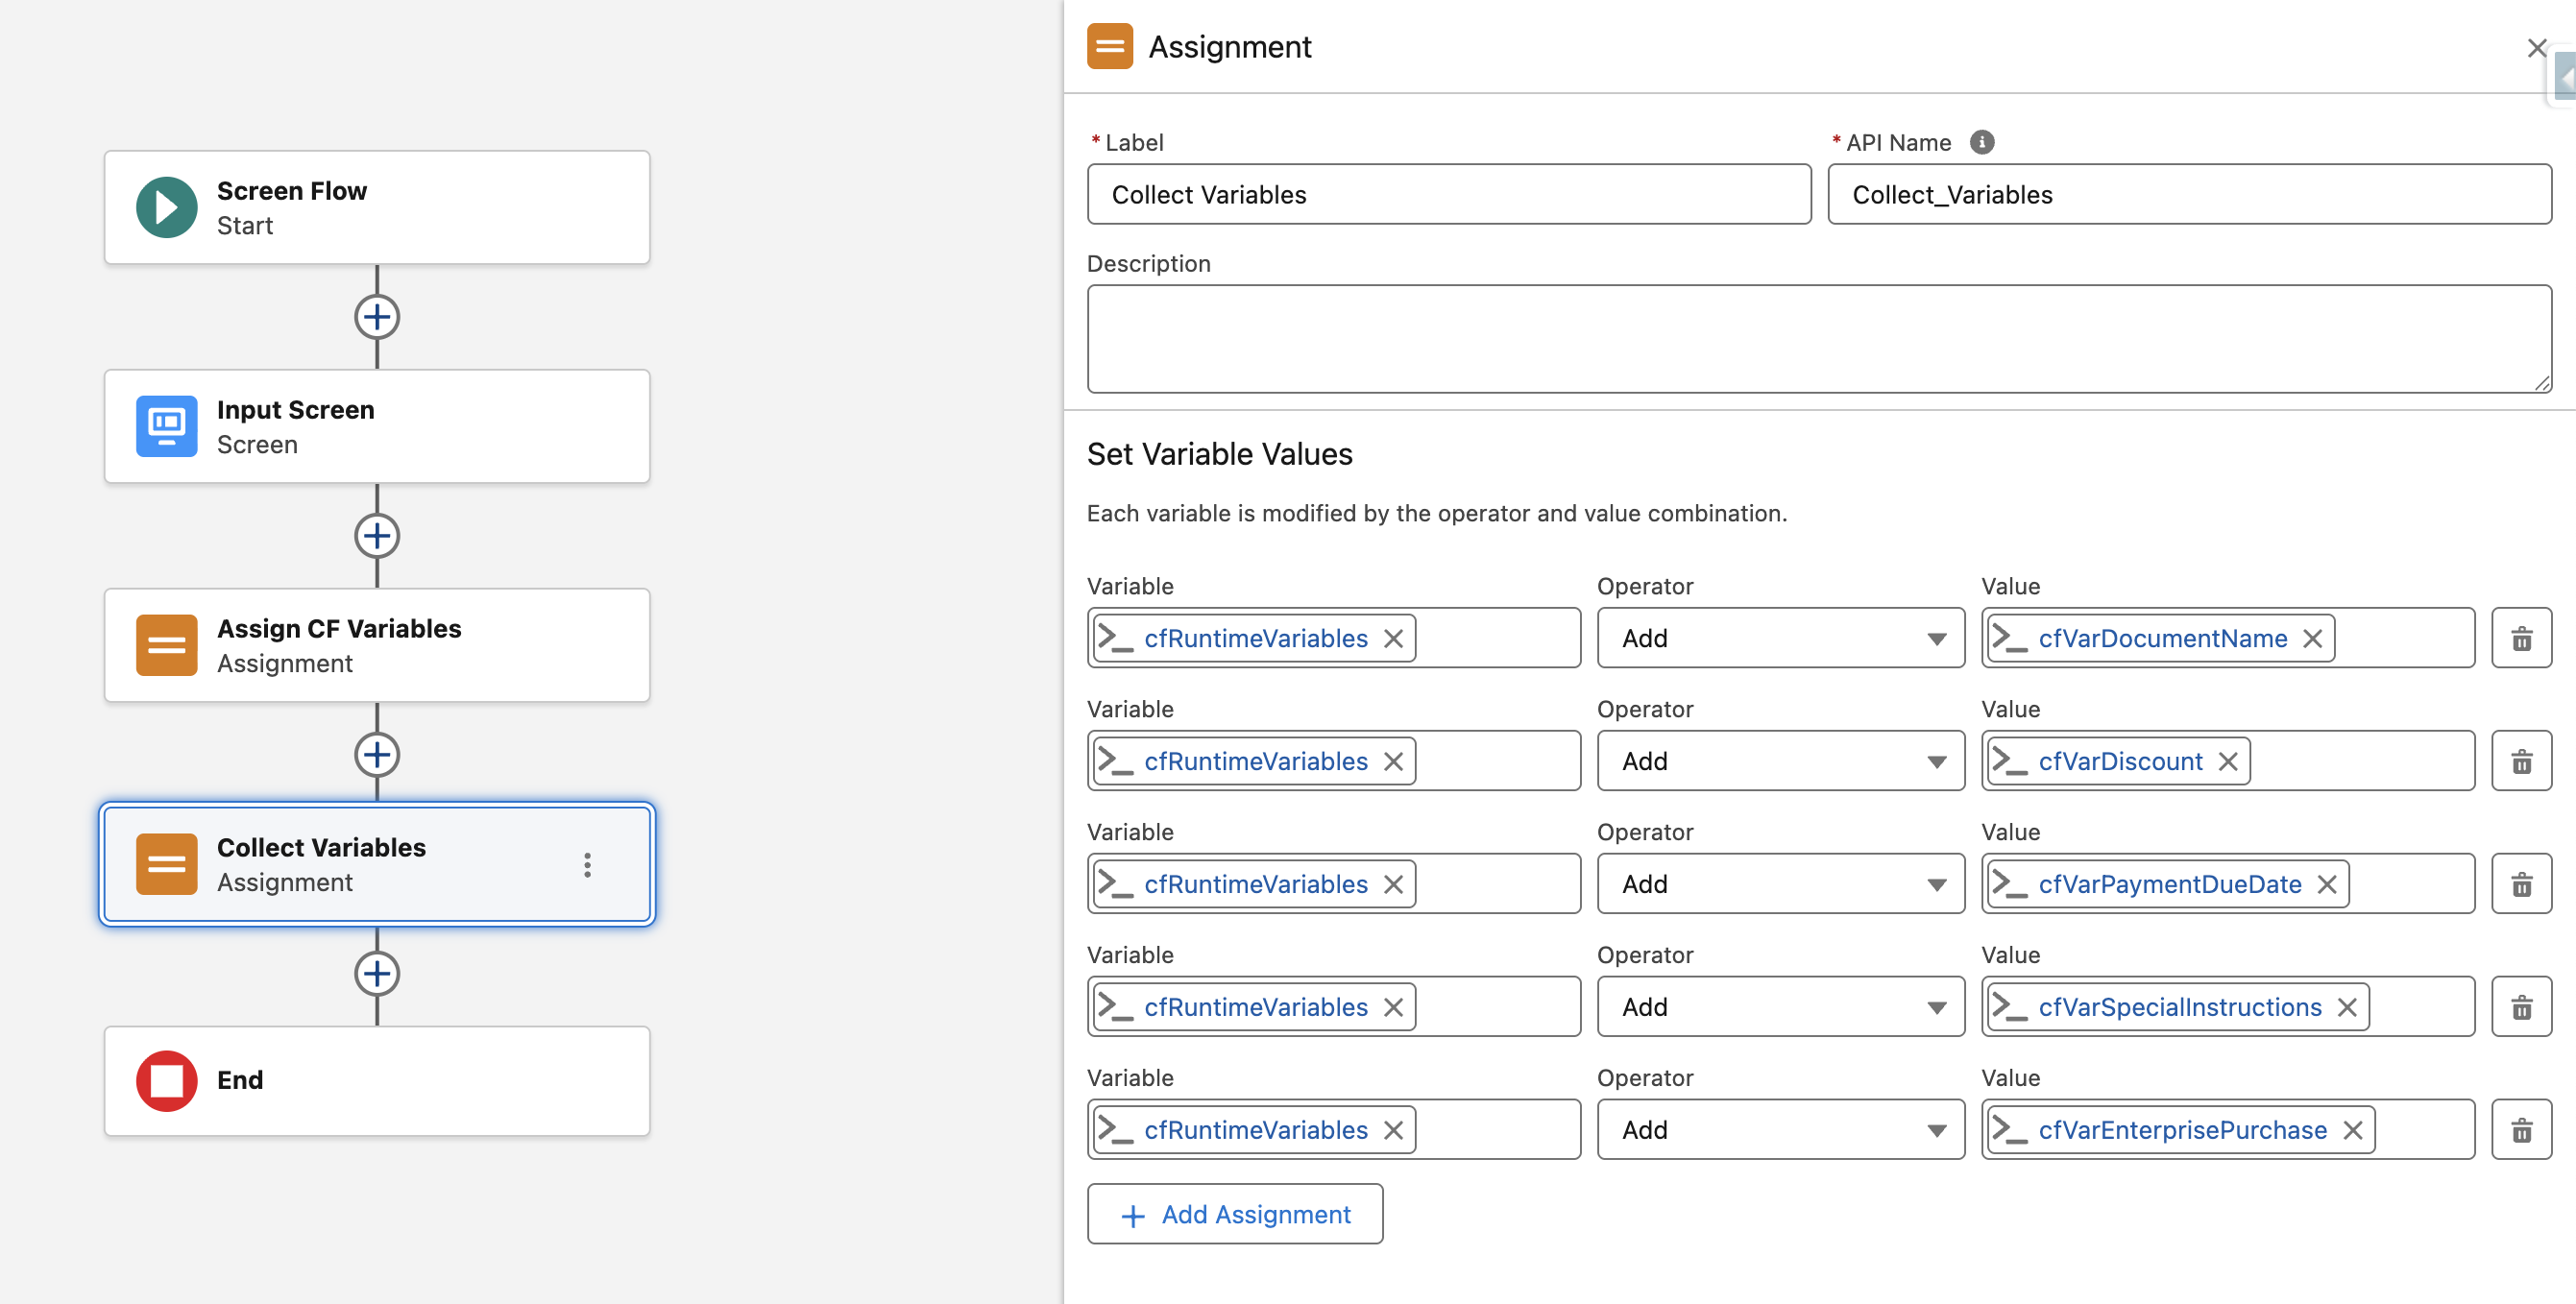
Add all the above variables into this collection.
4 - Add Destination
The Generate Document (Sync) flow action requires destination parameters if you want to attach the generated document to a specific Salesforce record or store it in external storage. Let's store the document in the Notes & Attachments section of the Order record. If you don’t define a destination, the generated document will be stored by default in the Salesforce Content Library.
Steps to Configure Destination:
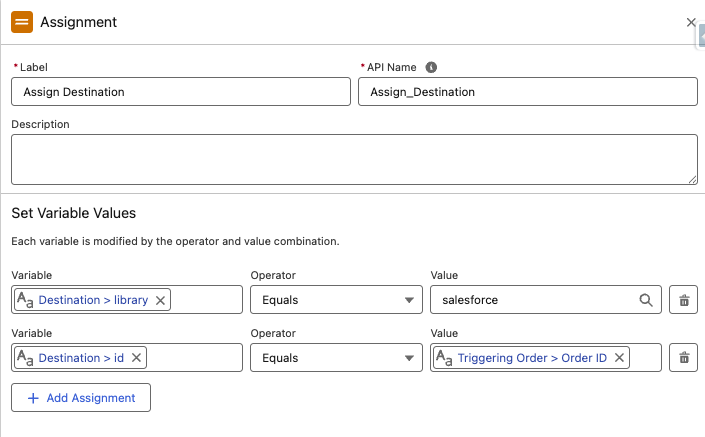
- Create an Apex-Defined Variable of Apex Class cldfs__Resource
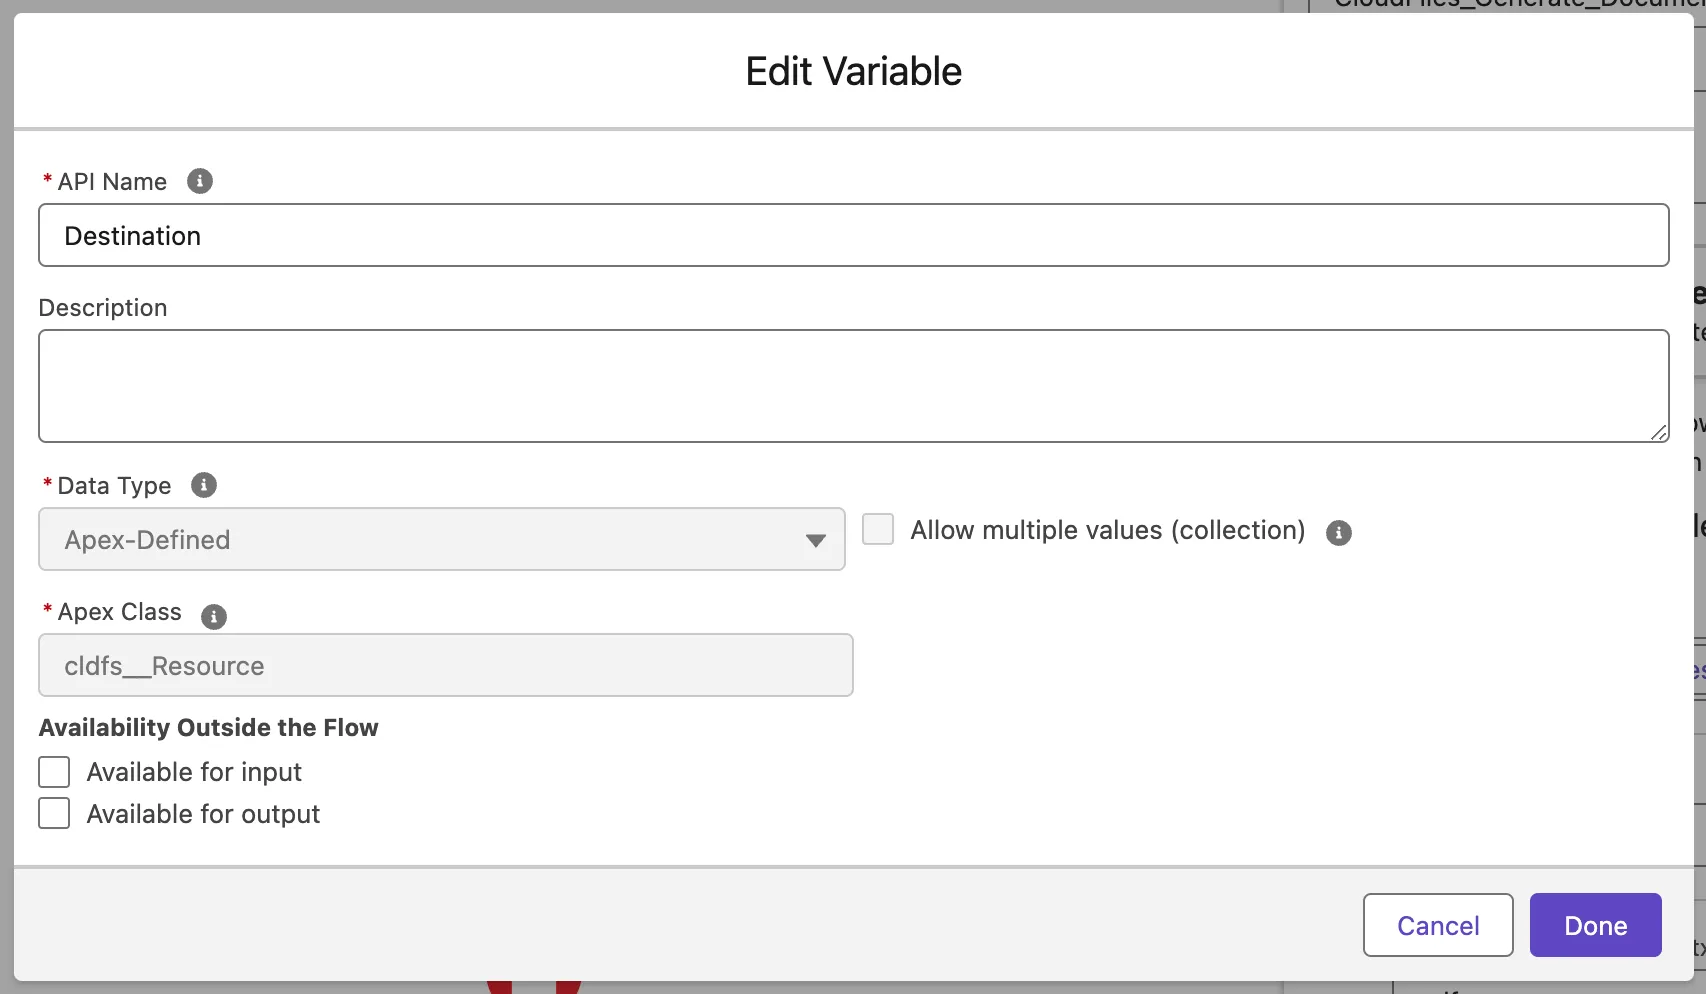
- To Save in Order's Notes & Attachments,
- Assign the following fields:
- Library: Set to salesforce.
- Id: Set to the Record Id of the Order record.
- Assign the following fields:
Save Documents to External Storage
To store documents in external storage such as SharePoint, Google Drive, etc., you need to configure the Library, Drive Id, and Folder Id. Refer to the Destination section in Generate Document (Sync) for more details.
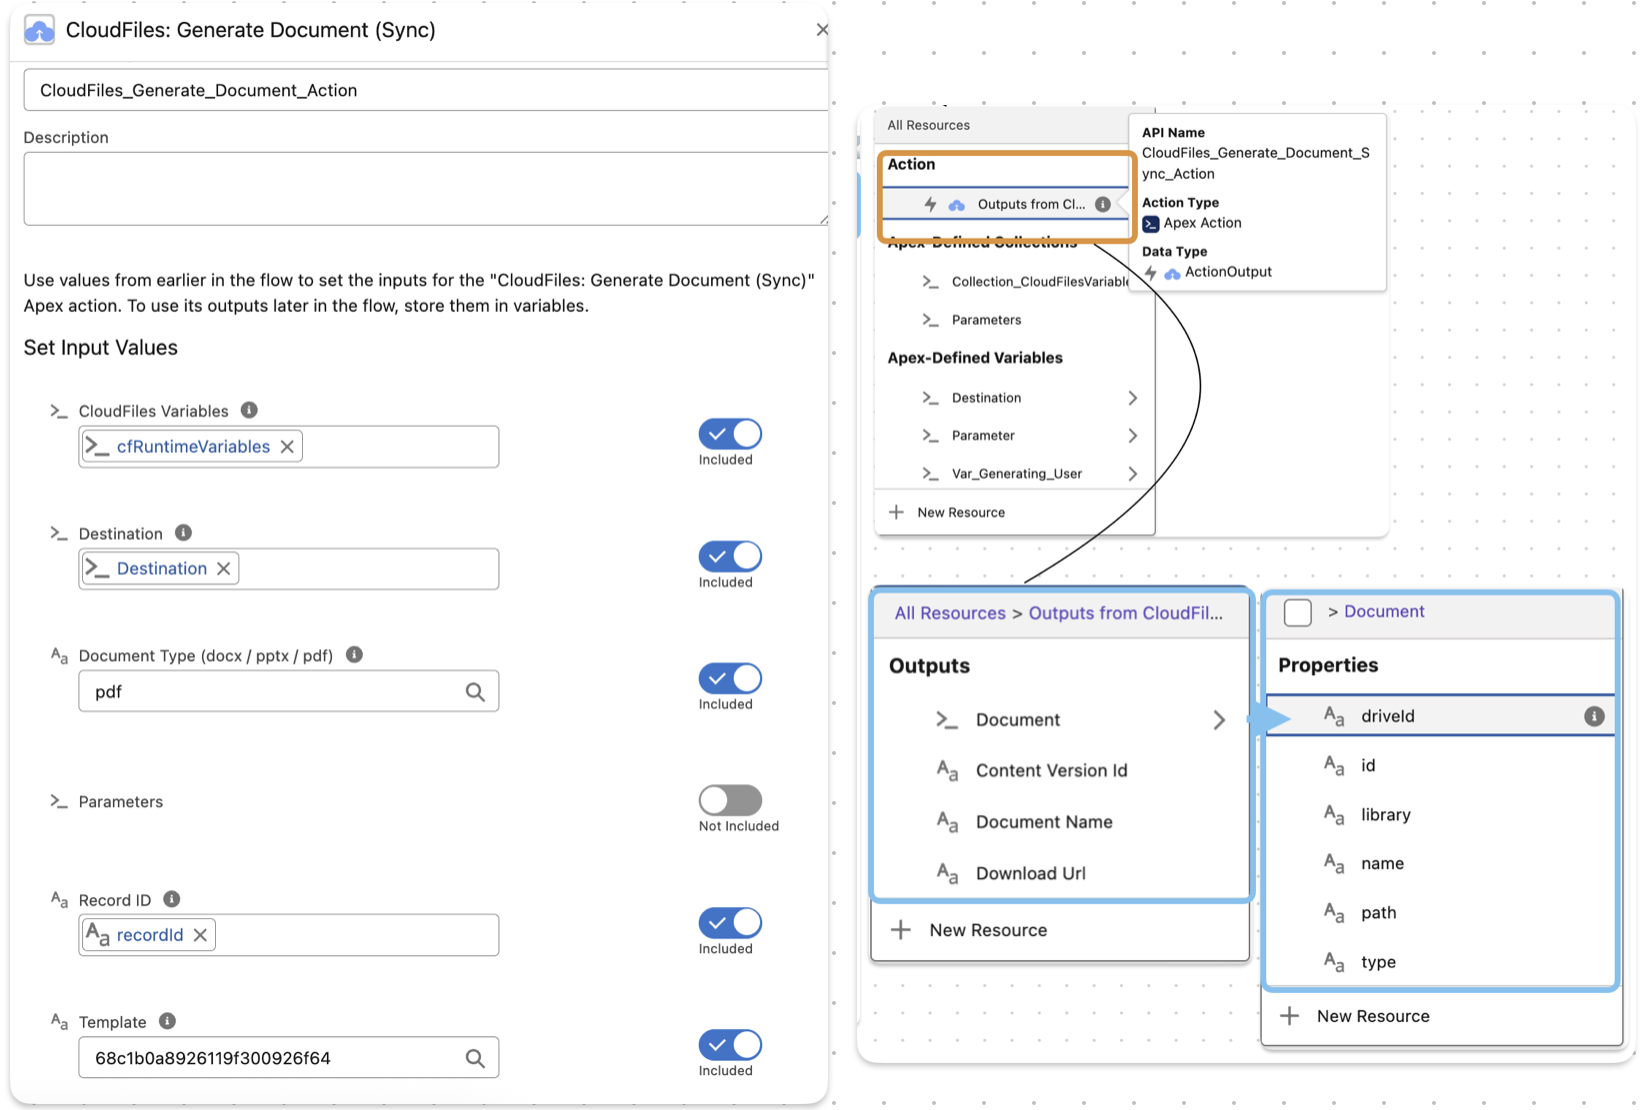
5 - Add the Generate Document Action
- In the flow, click + and select Action.
- Search for and choose CloudFiles: Generate Document (Sync).
- Fill in the following input parameters:
Destination
Provide the previously created Destination variable to specify where the generated file will be stored. You can store it either in a Salesforce record or in an external storage location (such as SharePoint or Google Drive). If left blank, the file will be saved to the Salesforce Content Library by default.
Document Type
Select the format for your output file, such as docx or pdf.
- Enter docx for finalized, non-editable documents.
- Enter pdf if the document will need further editing.
Record ID
Pass the {!recordId} from the triggered record. This tells the action which Salesforce record to use as the data source for generating the document.
Template ID
Enter the 24-digit CloudFiles Template ID of a published template. This ensures the correct template is used for document generation, so that the output is formatted and populated as intended.
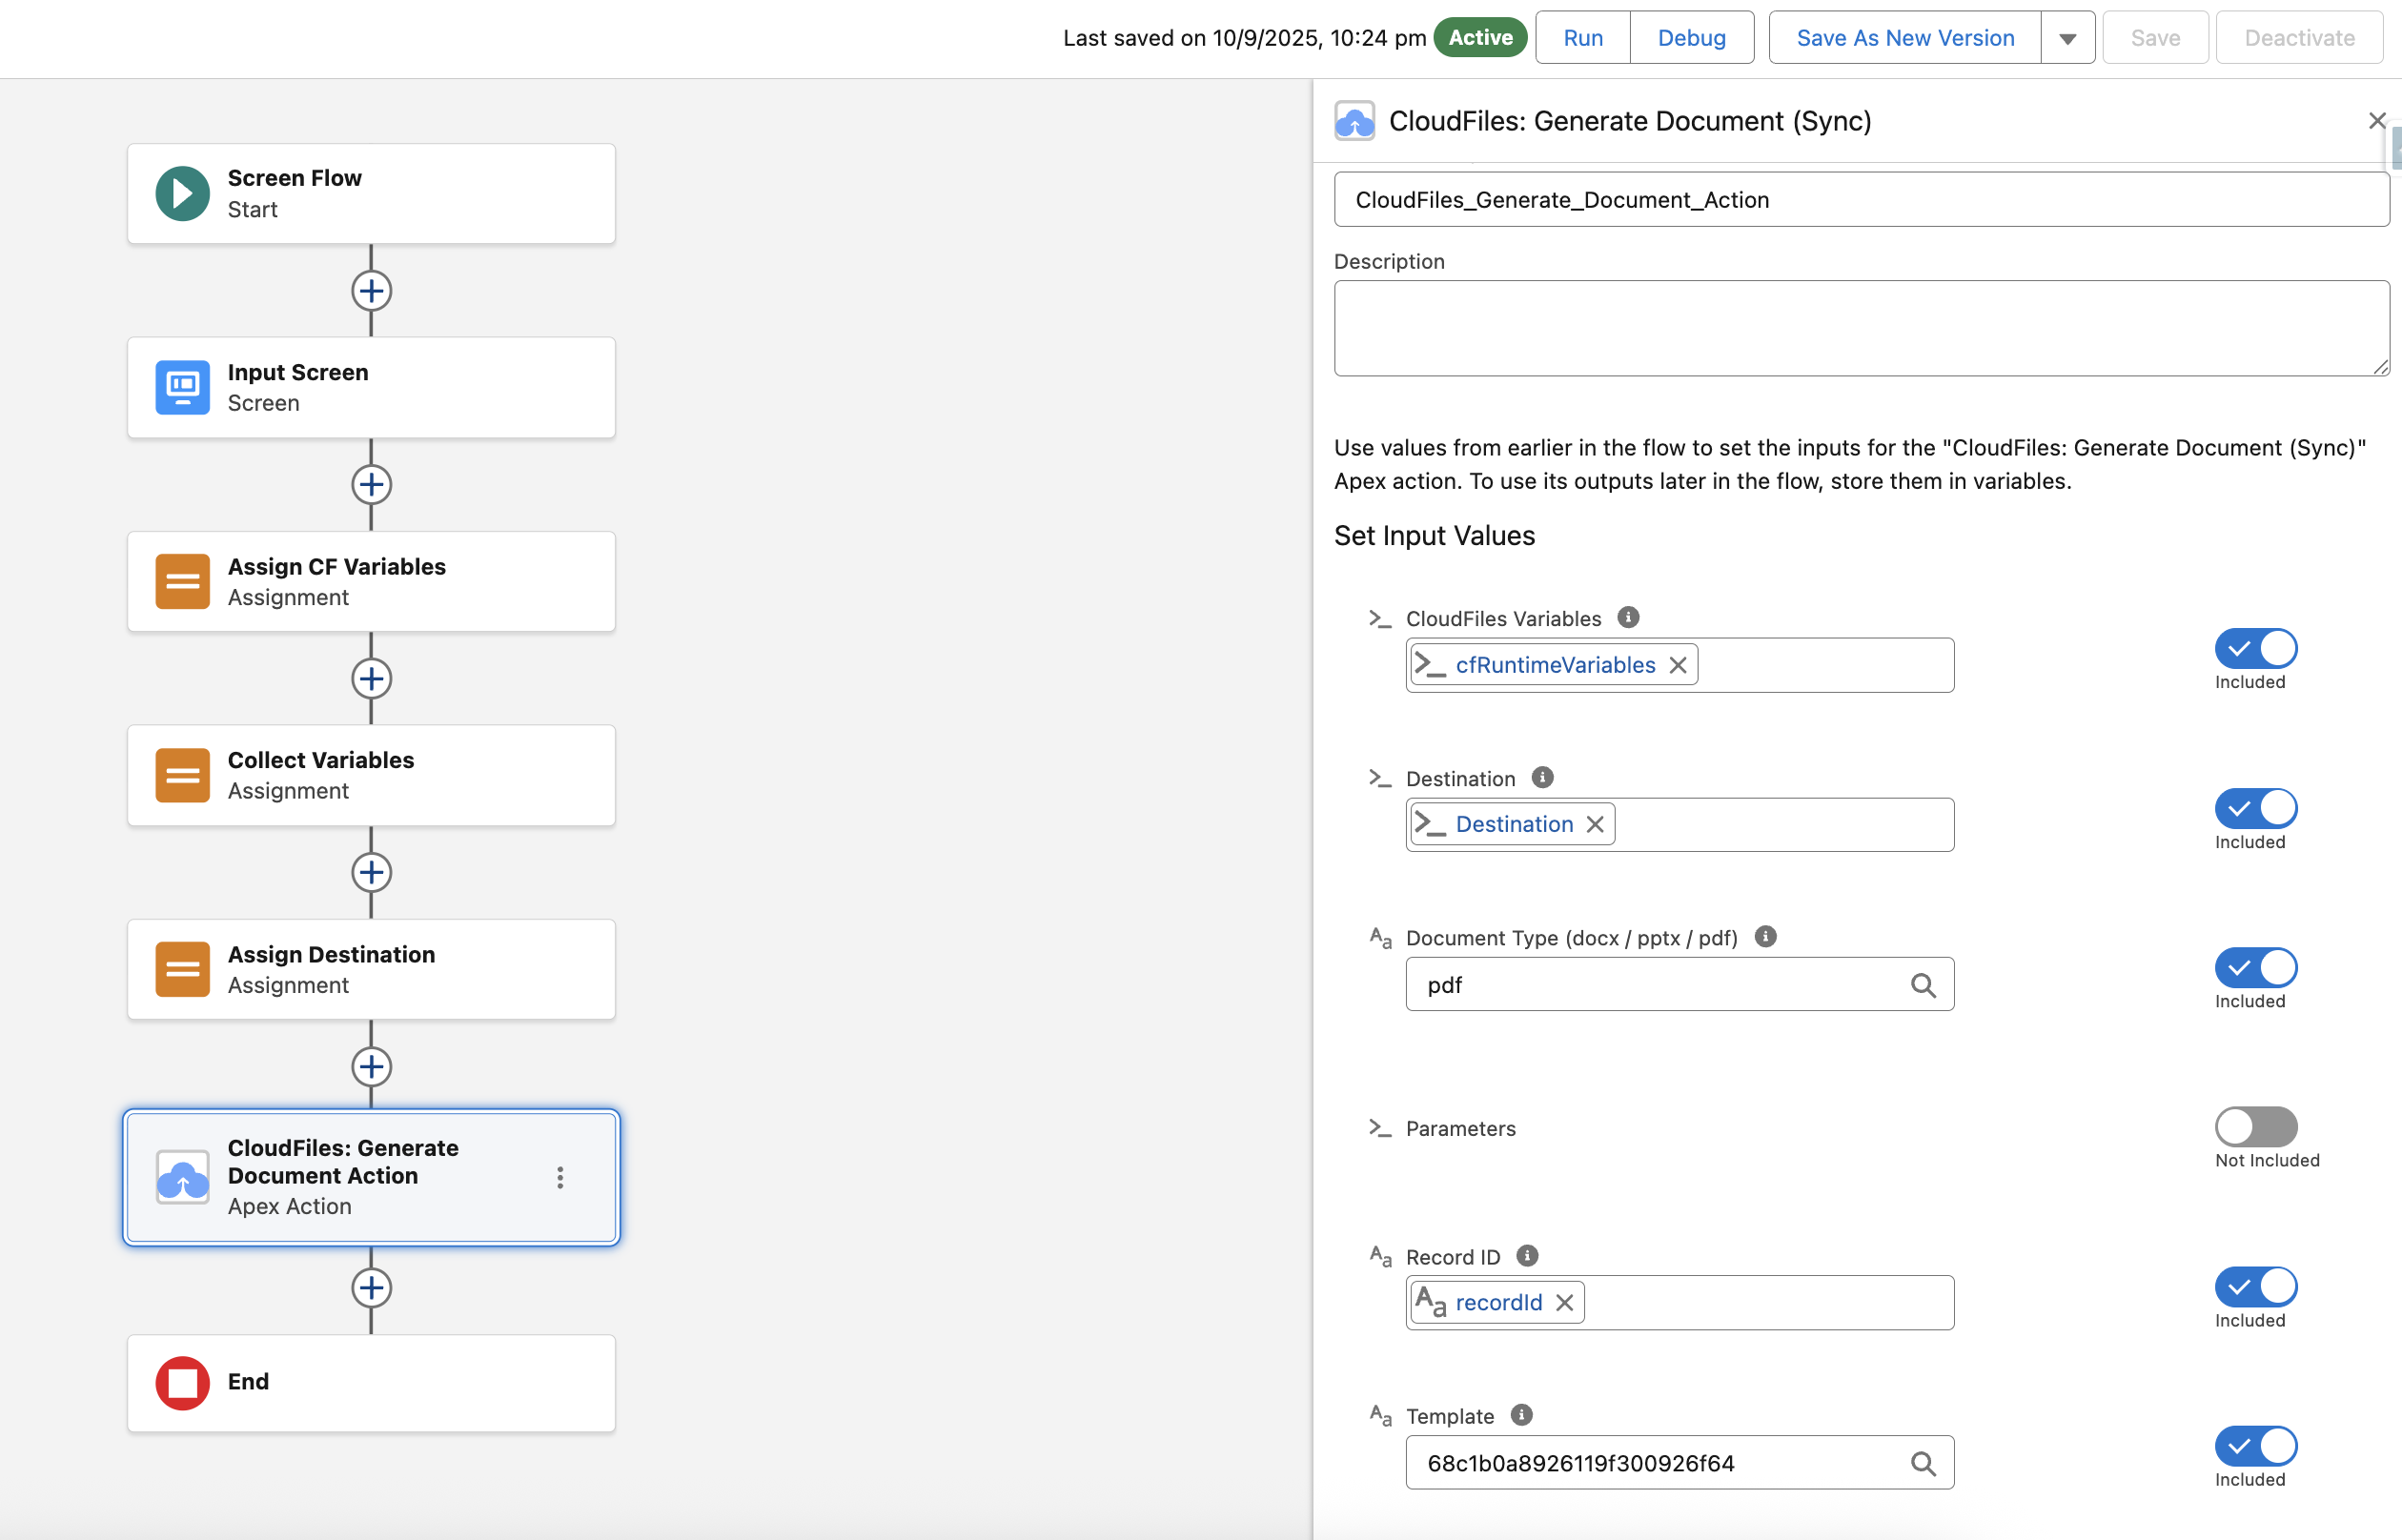
You can also use the Parameters input to configure additional settings for the document, such as password protection, locking, or printing permissions. To know more, refer to the Parameters section of Generate Document (Sync).
Test the setup
Save and activate the flow.
Add Flow to Record Page
To allow users to generate documents directly from a record page, add the flow component into the record page:
- Navigate to the Object Manager in Salesforce Setup.
- Select the Order object.
- Go to Lightning Record Pages → Edit the desired page.
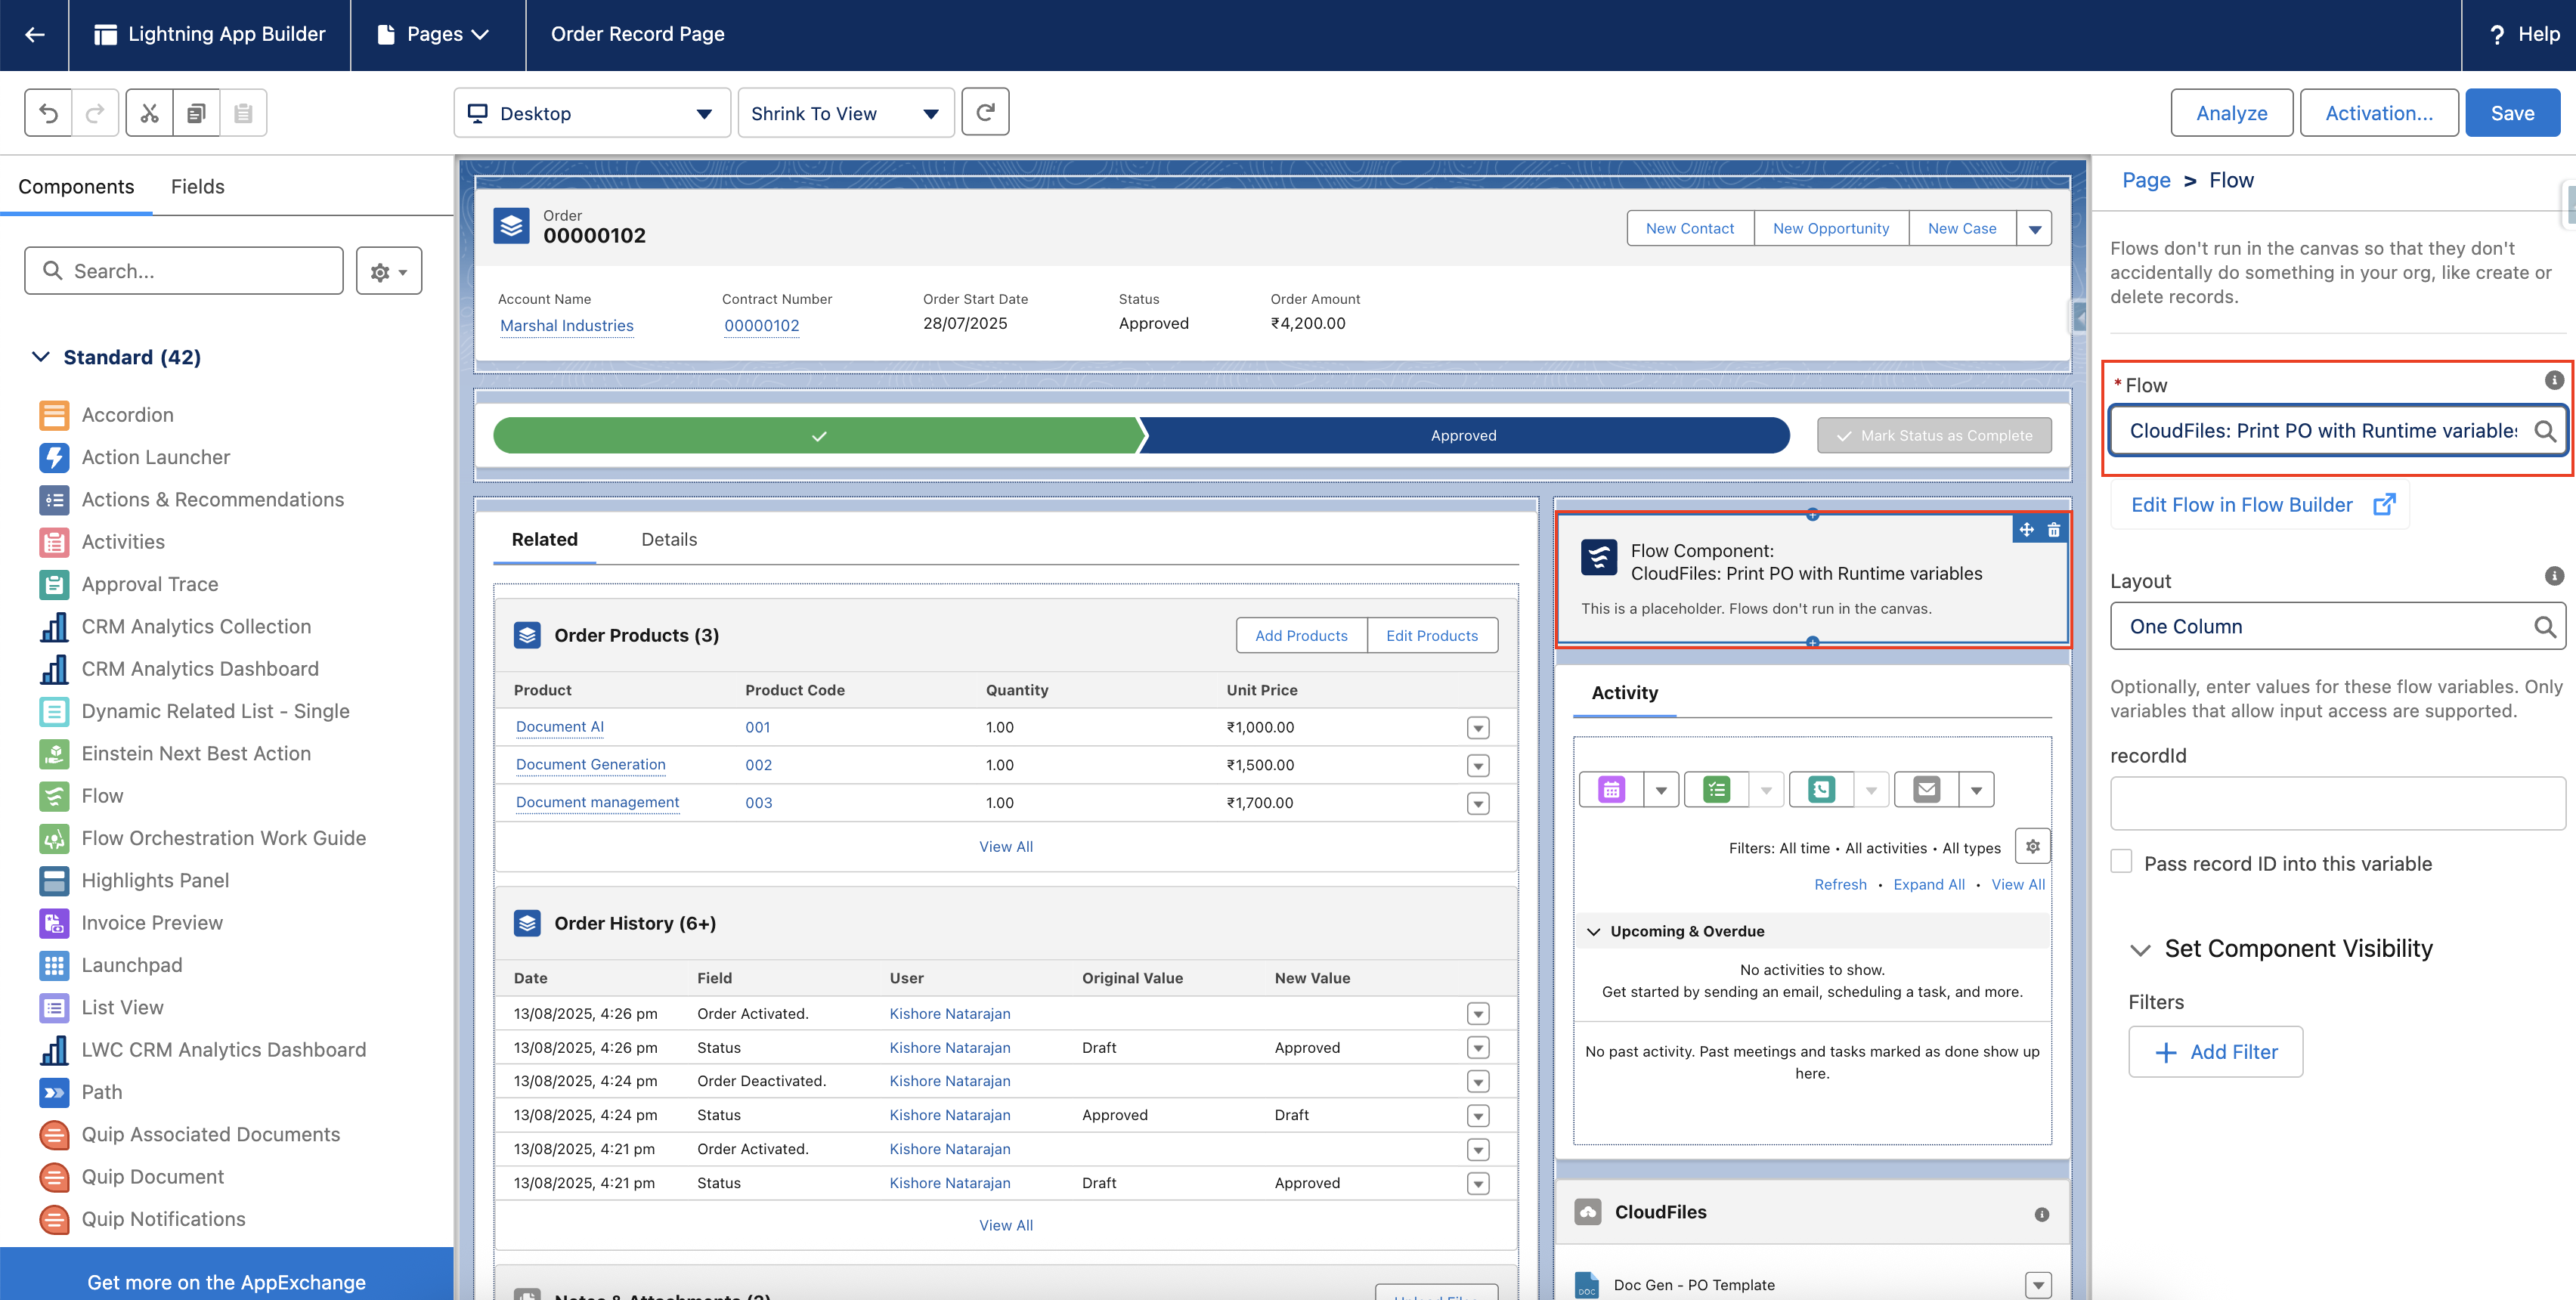
- Drag the Flow component onto the page layout.
- In the properties panel, select your newly activated flow.
- Save and Activate the page.
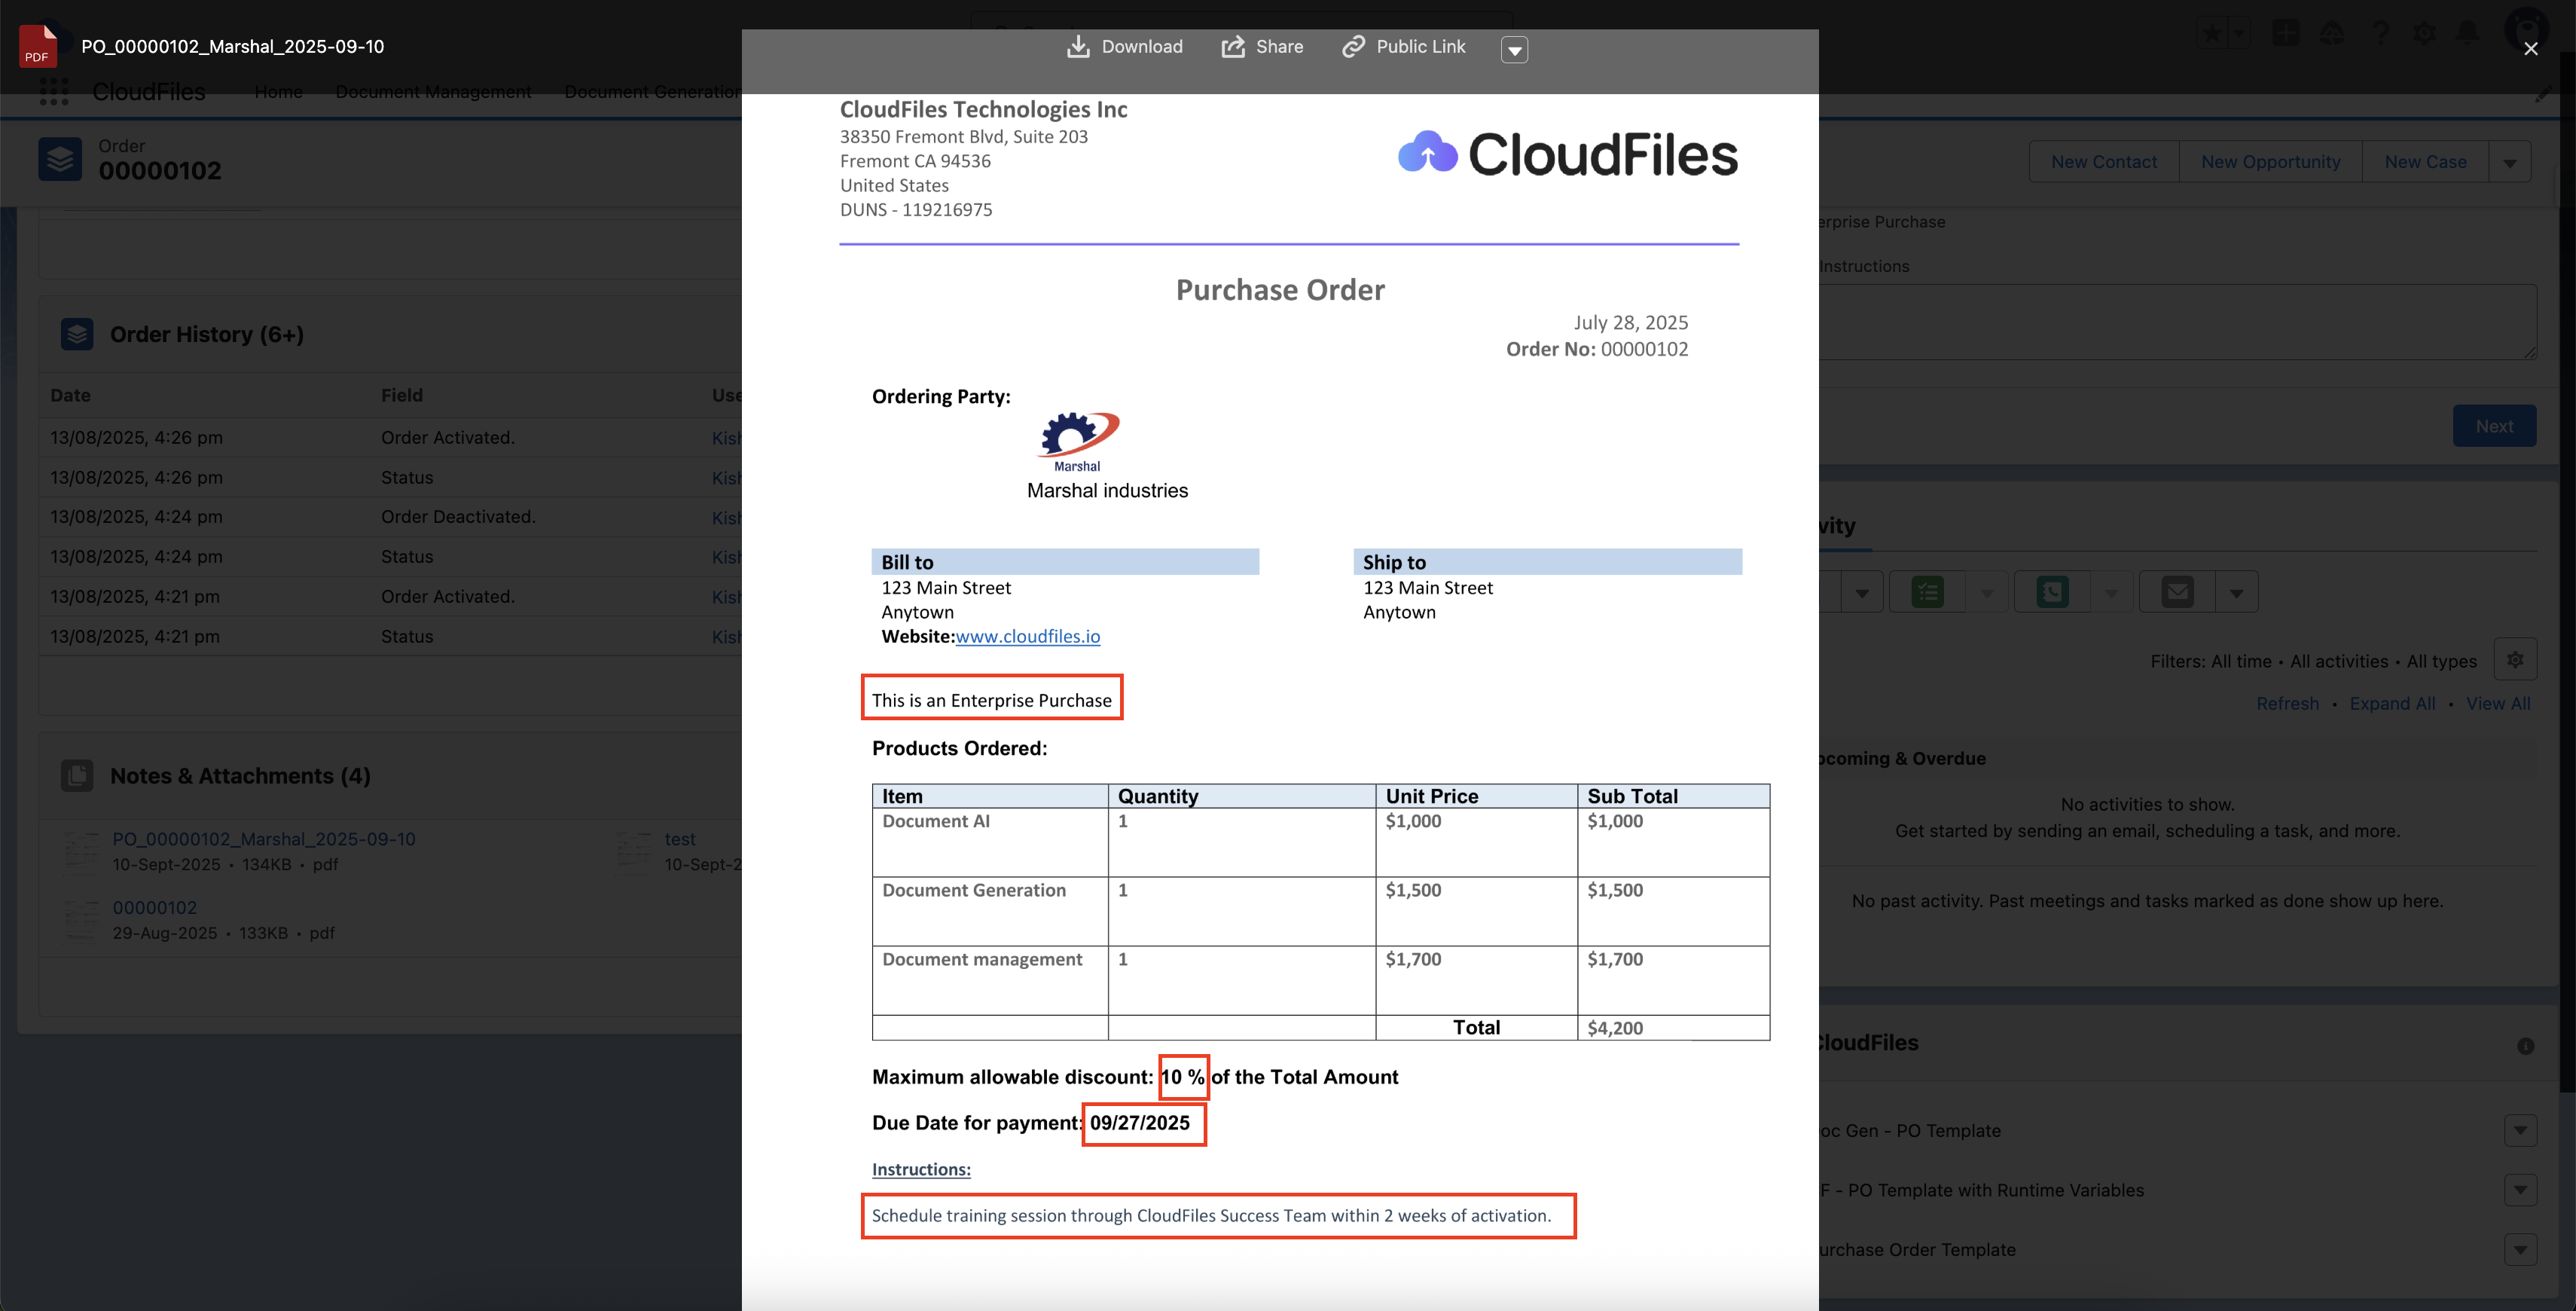
Users will now see a flow section on the record page to generate documents with instructions.
Once the flow is added to the Order record page, it will now display the screen with inputs for Document Name, Batch Number, Discount, Payment Due Date, Special Instructions.
- Enter the details
- Click 'Next'
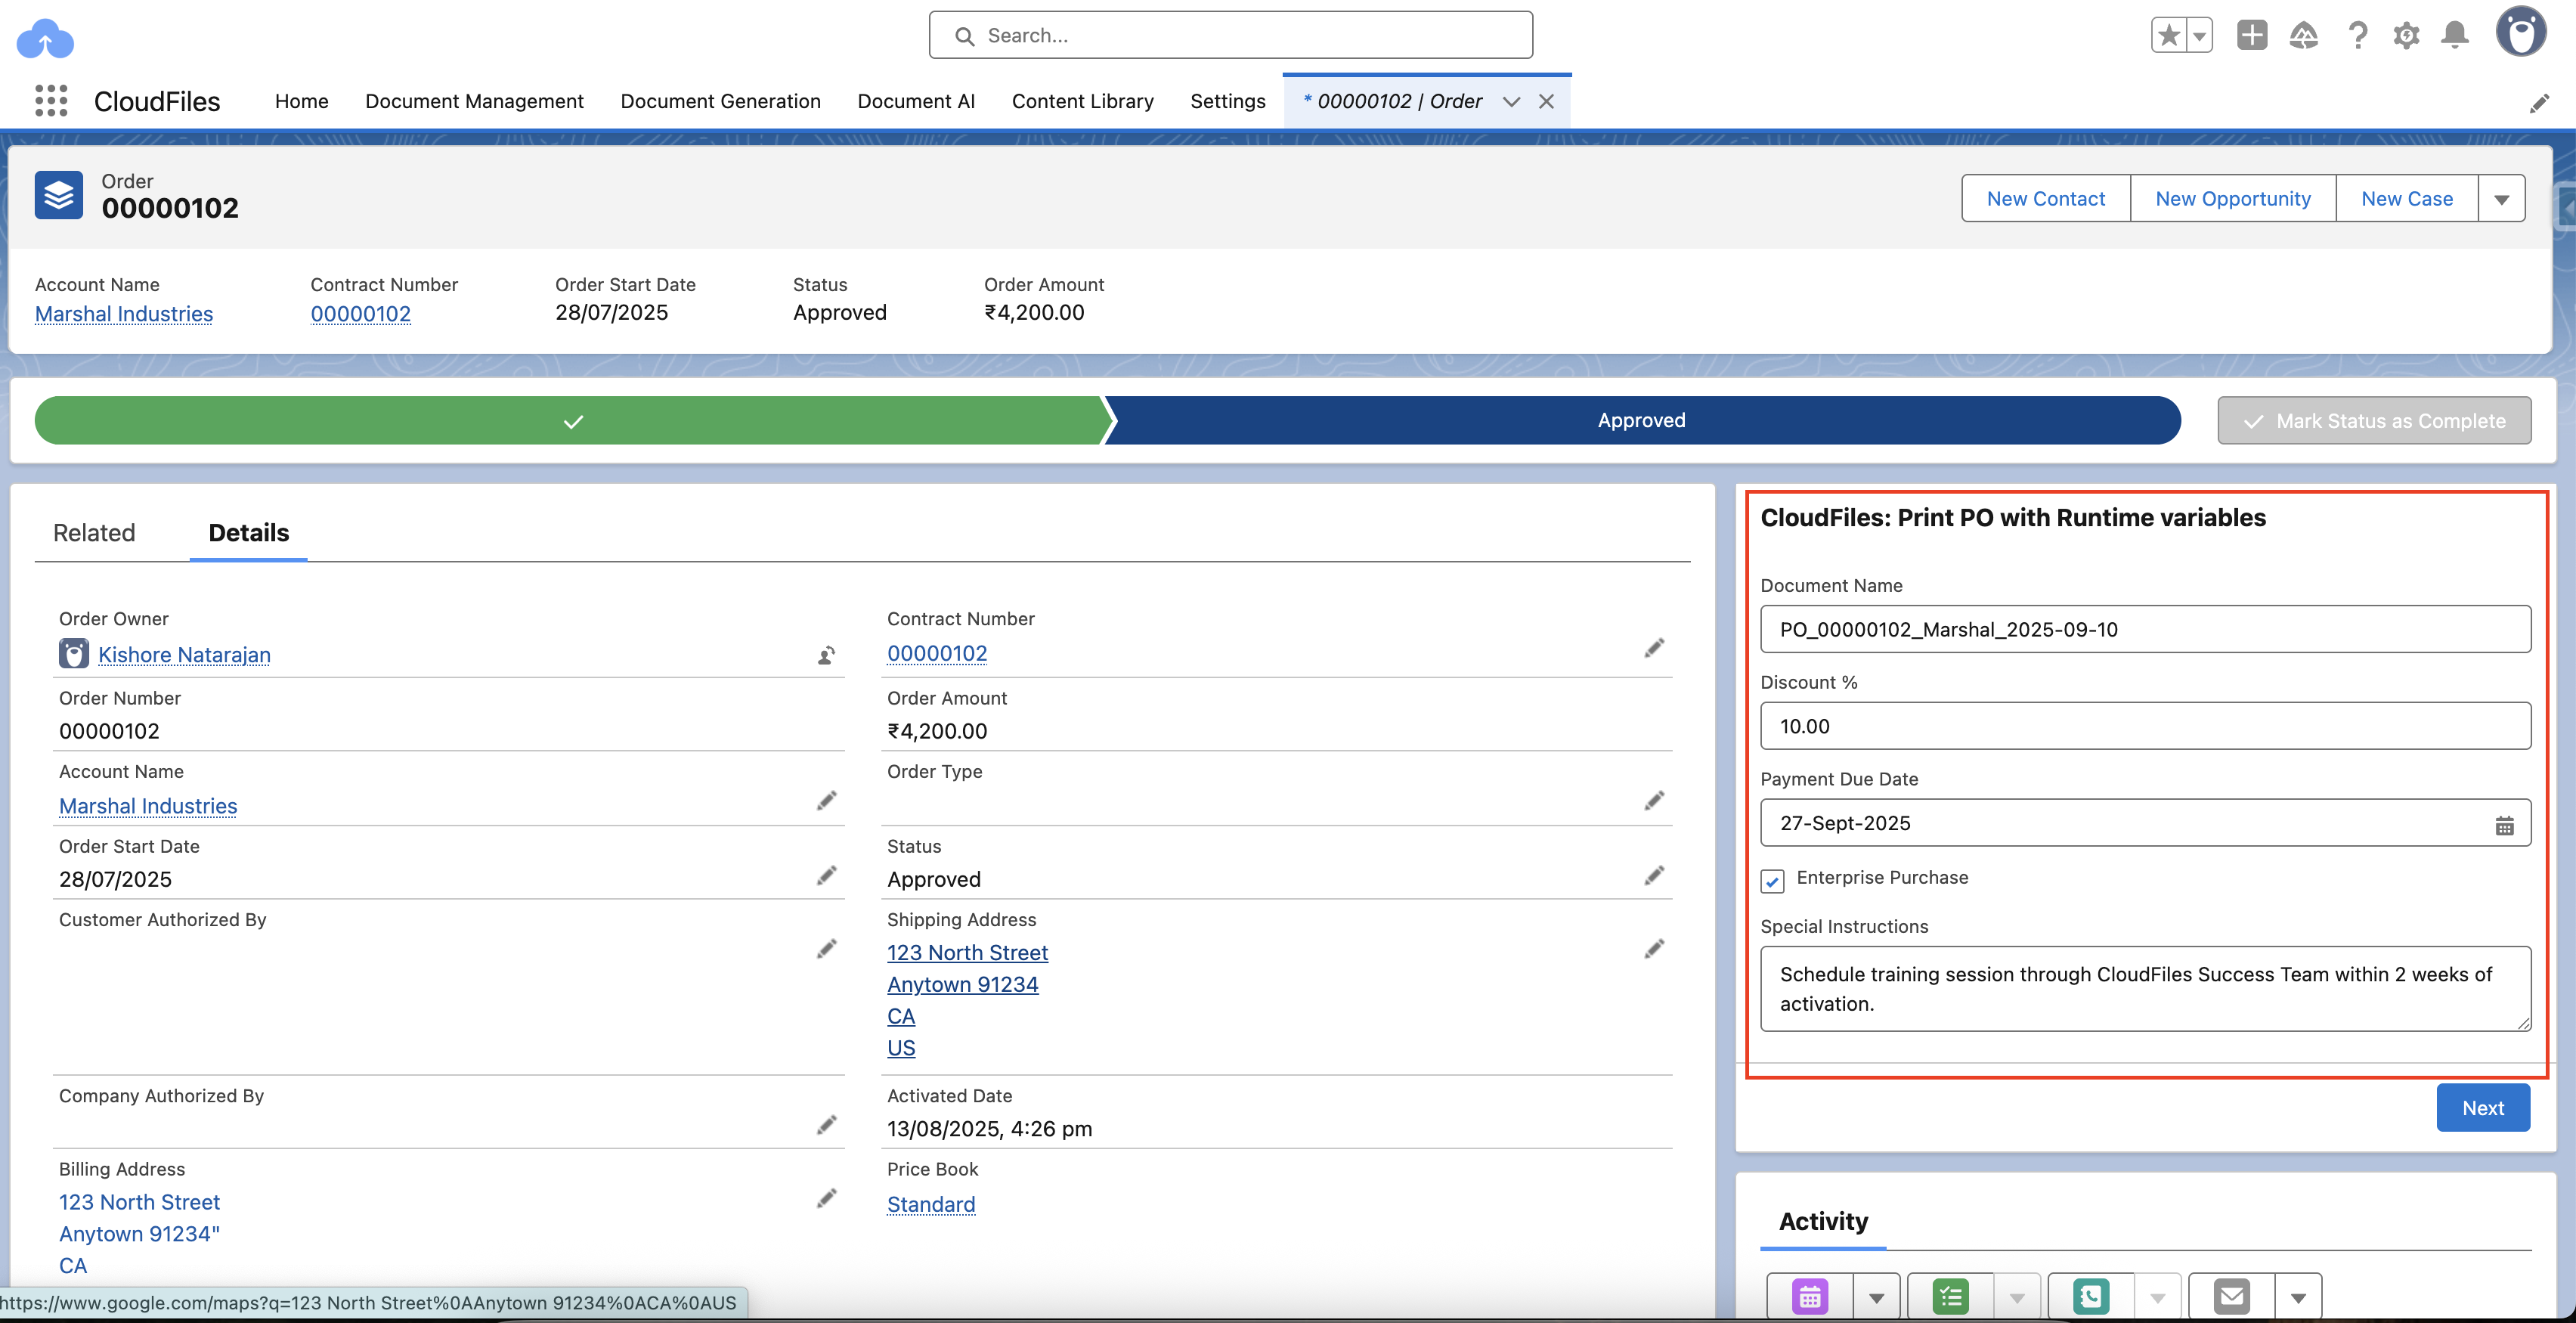
The generated document(s) will then be saved in the order's Notes & Attachments. It will display the runtime values entered by the user along with the standard Order details.
Output Parameters
The CloudFiles: Generate Document (Sync) action provides immediate outputs, accessible in the flow’s All Resources. It provides the following output parameters:
- Document – Id, driveId, library, name, path, type
- Content Version ID
- Document Name
- Download URL
- Preview URL
For more details on these parameters, refer to the Output Parameters section of Generate Document (Sync).